Grasshopper Python 102
Variables and Assignment
After the introduction in our latest post now is time to get our feet wet with a fundamental concept: variables.
What Is A Variable?
Variables are portions of memory that represent a certain entity and that have a name. We use variables to hold information in order to read, write, modify or process it. Variables would be equivalent to parameters in GH and they behave in a very similar way.
Variables in Python can belong to two families: value-type and reference-type. Value-type variables are used to represent basic information such as integer numbers, decimal numbers, strings of characters and boolean states. Reference-type variables are way more flexible and can be used to hold any type of data. In GH we will use value-type variables to basically store numbers and booleas and reference-type for surfaces, curves and points.
Declare and Assign Variables:
Declaring variables in Python is easey, just write the name of your variable and assign something to it. Python will figure out whether that variable will hold numbers, surfaces or carrots. You can change the assignment type anytime you want, although that might have unexpected results.
Here are some examples of variable declaration and assignment:
# Declare an variable and name it myVariable, assign a number
myVariable = 10
myVariable = 20.0
myVariable = "20"
myVariable = true

# Although is good practice to indicate the type in the identifier
# Declare a boolean
myBoolean = true
myOtherBoolean = false
myThirdBoolean = myBolean

# Declare some doubles
myDouble = 12.33;
myOtherDouble = 1.0;

# Strings come within quotes
myString = "Hello World!";

# By the way, lines starting with # are not processed and are called comments
You should keep this in mind when naming variables:
Outputting Values In Your Component
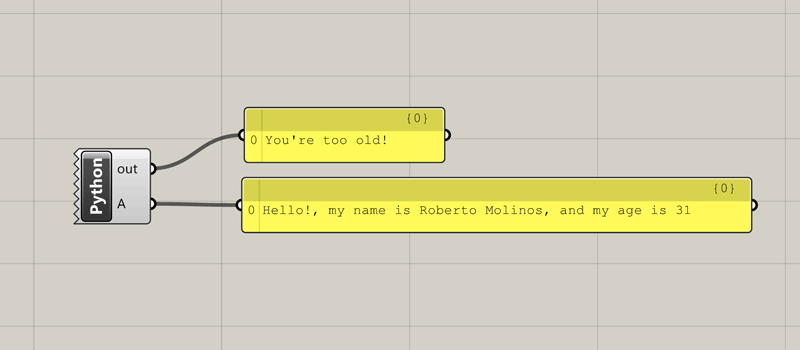
Let’s see a complete example of variable declaration, assignment and output.
- Create a new Custom Python Component by double-clicking on the canvas and look for Python…
- Remove every input parameter by clicking the (-) sign after zooming in the component.
- Double-click on the center of the component.
- This should be your code:
myAge = 31
myName = "Roberto"
mySurname = "Molinos"
mySentence = "Hello!, my name is " + myName + " " + mySurname + ", and my age is " + str(myAge)
A = mySentence

#This is a comment to show you how to use the out informer
print("You're too old!")
Keep in mind that you should only edit the region inside the curly brackets, as the rest is controlled by GH itself.
In the example above whe are doing the following:
- Line 1 declares a variable, by assigning 31 it will be treated as an integer.
- Line 2 and 3 declare two variables to store my name and surname as strings (“) and those are assigned.
- Line 4 declares a variable and directly assigns the concatenation of several other strings. Those not being a variable are created by typing within quotes and the parts are joined by using the (+) operator. myAge is converted to a string using the str() function.
- Finally, in line 5, the output value A gets a reference to mySentence.
- Line 6 is blank, which is OK.
- Line 7 is a comment as it starts with #.
- print() is a function to render a string through the out connector, and is very helpful for reflecting intermediate steps in our code.