
Editing ceiling sketch with Revit API
We show you how to do it using programming
In many projects we will have to model the finishes, which can be a laborious task depending on the complexity of the project.
Revit’s interface doesn’t have any tool that allows us to generate finishes automatically using the information of the rooms, however by programming we can easily make solutions to generate walls and floors, as we show with the node of the Modelical Dynamo Package Wall Finishes by room..
The problem is when we reach the ceilings, after reviewing the API documentation and looking for solutions on the web, we find ourselves with the following starting situation:
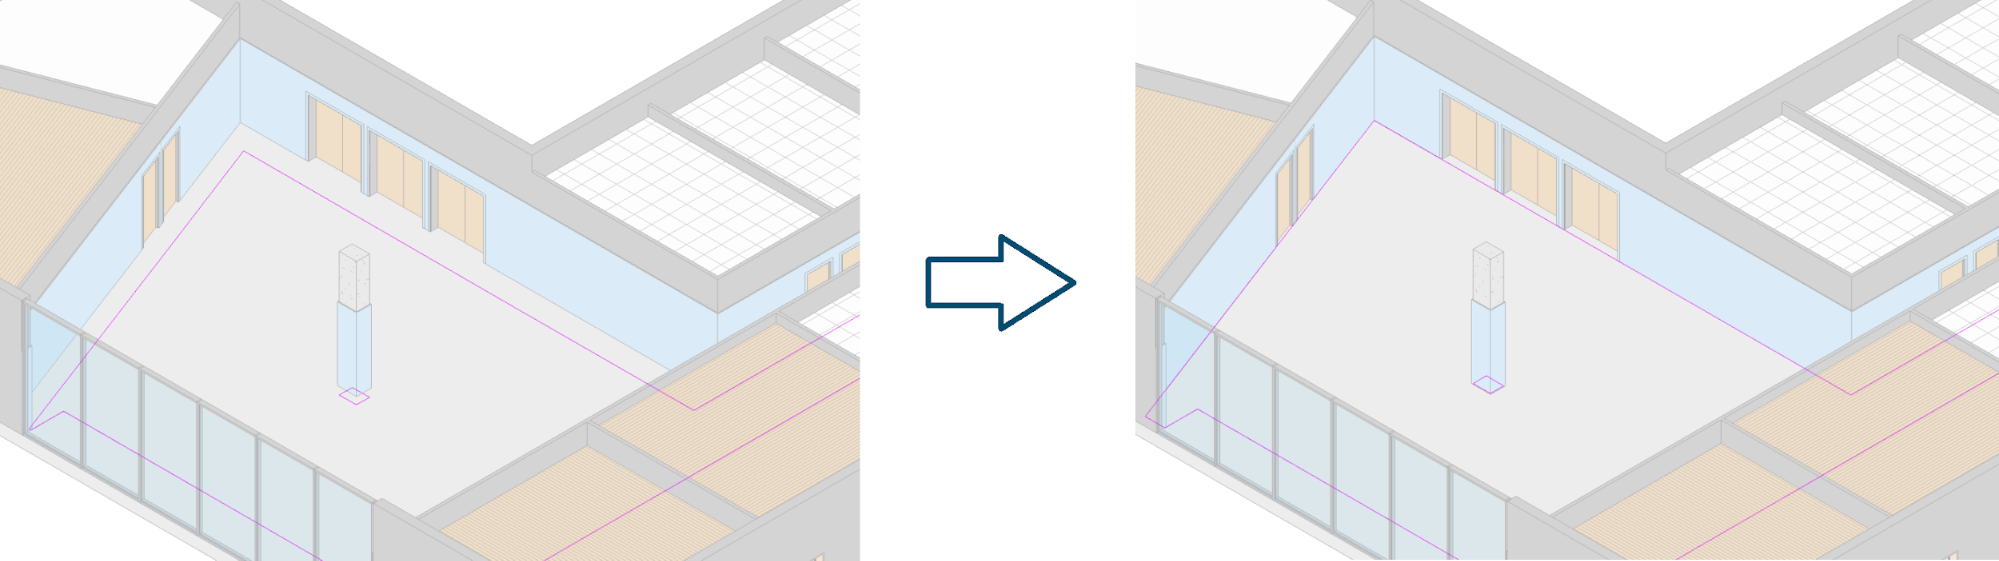
With this post we will teach the reader how to modify the perimeter of the ceilings, exploiting the perimeter of a room. We will use a small example as a basis for this exercise:
Let’s suppose that, after creating manually all the ceilings of our model, in the last project update there was a mismatch due to a change in the architecture.
Having thousands of ceilings, updating the profiles would be a tedious task, fortunately this task is also potentially automatable. We will start with one ceiling and its room.
Getting the perimeter of the room
The first thing we do is to get the room’s boundaries. To do this we can use the GetBoundarySegments method from the SpatialElement class.
This method returns a sublist of segment lists, being the first sublist the outer perimeter of the room and the following ones the inner loops.
Document currentDocument = ActiveUIDocument.Document;

ElementId roomId = new ElementId(207717);

Element room = currentDocument.GetElement(roomId);

//get room boundary
SpatialElementBoundaryOptions options =
    new SpatialElementBoundaryOptions();

options.SpatialElementBoundaryLocation =
    SpatialElementBoundaryLocation.Finish;

IList<Ilist<BoundarySegment>> roomBoundary =
    (room as SpatialElement).GetBoundarySegments(options);
We can see that in this example the room has been located using its id (we will do the same with the ceiling), this is because in this exercise we do not intend to identify which ceiling corresponds to which room, we leave that to the reader.
Getting the sketch of the ceiling
Now we must get the sketch of the ceiling that we want to edit. In the Revit API we can achieve this in the following way:
ElementId ceilingId = new ElementId(210549);

Element ceiling = currentDocument.GetElement(ceilingId);

//get ceiling sketch
ElementClassFilter filter =
    new ElementClassFilter(typeof(Sketch));

ElementId sketchId =
    ceiling.GetDependentElements(filter).First();

Sketch ceilingSketch =
    currentDocument.GetElement(sketchId) as Sketch;

CurveArrArray ceilingProfile = ceilingSketch.Profile;
This instance of the CurveArrArray class is an array that contains subarrays that store the ceiling sketch lines, separated by loops, equivalent to the result obtained previously for the room.
The problem is that the elements of this instance cannot be modified, Revit will launch an exception of the type “InvalidOperationException […] Collection is read-only” if we try it.
Getting the editable lines
While the Revit API does not allow us to directly modify the sketch, there is one thing we can do, get the lines that form the ceiling and modify them.
filter = new ElementClassFilter(typeof(CurveElement));

IEnumerable curves = ceiling.GetDependentElements(filter)
    .Select(id => currentDocument.GetElement(id));

IEnumerable modelLines = curves
    .Where(e => e is ModelLine).Cast();//target

if(curves.Count() != modelLines.Count())
     throw new Exception("The ceiling contains" +
	                     " non straight lines");
In this case we have obtained a list of the lines that form the ceiling, without the loop structure.
The question would be how to change the lines that make up the ceiling and not break it in the attempt. To do this we have to take into account two particular conditions:
This means that if the original ceiling had 7 edges on its outer perimeter, the new perimeter should have 7 or fewer edges. Also, the new ceiling may have the same or less number of inner loops and these inner loops may have the same or less edges than the original ones.
In this example there is another limitation that can be solved by the user: the ceiling and the room must be formed by straight lines.
At this point we can conclude that it may be interesting to preserve the structure of the ceiling sketch that we had achieved in the previous section, but using the model lines we have stored in the previous point. To do this we can do the following code:
IList<IList<ModelLine>> editableSketch =
    new List<IList<ModelLine>>();

foreach (CurveArray loop in ceilingProfile) {
     List<ModelLine> newLoop = new List<ModelLine>();

foreach (Curve edge in loop) {

          foreach (ModelLine modelLine in modelLines) {

               Curve currentLine = ((modelLine as ModelLine)
                 .Location as LocationCurve).Curve;

               if (currentLine.Intersect(edge)
                    == SetComparisonResult.Equal){

                    newLoop.Add(modelLine);
                    break;
               }

                editableSketch.Add(newLoop);
          }
     }
}
This code is running through all the lines of all the loops of the ceiling sketch (variable ceilingProfile) and looking for the same line in our list of model lines (variable modelLine). When the code finds the line, stores it in a new structure (variable editableSketch) that follows the structure of the sketch, but storing the editable lines.
Preventing errors
To avoid exceptions the code should check that the conditions mentioned in the previous section are satisfied, before editing the ceiling.
The following code is a simplification that:
//sort room boundary
IList<BoundarySegment> roomPerimeter = roomBoundary[0];

roomBoundary = roomBoundary.Skip(1)
   .OrderByDescending(s => s.Count()).ToList();

roomBoundary.Insert(0, roomPerimeter);

//sort ceiling boundary
IList<ModelLine> ceilingPerimeter = editableSketch[0];

editableSketch = editableSketch.Skip(1)
   .OrderByDescending(s => s.Count()).ToList();

editableSketch.Insert(0, ceilingPerimeter);

//compare the number of loops and edges
if(roomBoundary.Count() > editableSketch.Count()
  || Enumerable.Range(0, Math.Min(roomBoundary.Count(),
                                  editableSketch.Count()))
  .Any(i => roomBoundary[].Count()>editableSketch[].Count()))
{
     throw new Exception(
        "The ceiling's sketch cannot be "
		+ "adapted to the room's shape.");
}
Editing the ceiling
We already have the original sketch of the ceiling and the shape of the room, which is what we want to obtain.
Now we modify the ceiling lines to match those of the room, using the ModelLine class as seen in the following code:
using (Transaction t = new Transaction(currentDocument,
                                      "Edit ceiling sketch"))
{
   t.Start();

   for(int i = 0; i < editableSketch.Count(); i++)
   {
      IList<ModelLine> ceilingLoop = editableSketch[];

      if(i < roomBoundary.Count())
      {
         //edit the current loop
         IList<BoundarySegment> roomLoop = roomBoundary[];

         for(int j = 0; j < ceilingLoop.Count(); j++)
         {
            ModelLine currentEdge = ceilingLoop[];

            if(j < roomLoop.Count())
            {
               //edit the current edge
               BoundarySegment roomEdge = roomLoop[];

               Curve newEdge = roomEdge.GetCurve().Clone();

               if(!(newEdge is Line))
                  throw new Exception(
                     "The room contains non straight lines");

               (currentEdge.Location as LocationCurve).Curve =
			       newEdge;
            }
            else
            {
               //remove the current edge
               currentDocument.Delete(currentEdge.Id);
            }
         }
      }
      else
      {
         //remove the current loop
         foreach(ModelLine line in ceilingLoop)
         {
         currentDocument.Delete(line.Id);
         }
      }
   }

   t.Commit();
}
It is important to insist on the use of the Clone method of the Curve class, used to replicate the line of the room. If it were not cloned, the line that defines the perimeter of the room would be internally linked to the line that delimits the ceiling, leading to errors when the user makes modifications to these elements from the Revit interface.
As some readers will have already noticed, this code allows us to modify the sketch of more elements than the ceilings, however other categories do have their own methods to create and modify their geometry, we recommend consulting Revit API documentation to avoid falling into solutions that are more complex than necessary.
Conclusion
It may seem that this example has too many limitations, however it is the basis on which we were able to develop in Modelical an add-in like the one below:
References
We must thank Joe Ye for his post Change the boundary of floors/slabs, which was the key to achieving our goal.
Author: Adrián Sánz
It’s possible in Revit 2022 API, now.
Yes! But in the next 2-3 years not all project will be in 2022+ so this still remains useful. It took Autodesk 20 years to get ceiling sketches in the API 🙂