

Export to PDF
Revit Workflow
Export to PDF
Objectives
- Understand the customized settings before printing.
- Be able to solve any issue that comes up from printing.
Prerequisites
- User has basic skills in BIM modelling with Revit Software, and understands the language used.
- User has basic skills in PDF printing.
Description
This guideline explains the procedure of generating PDFs from Revit files. It explains how to deal with multiple views and sheets, explains the features, benefits and handicaps of different settings, and useful complementary tools.
Procedure
Print Setup
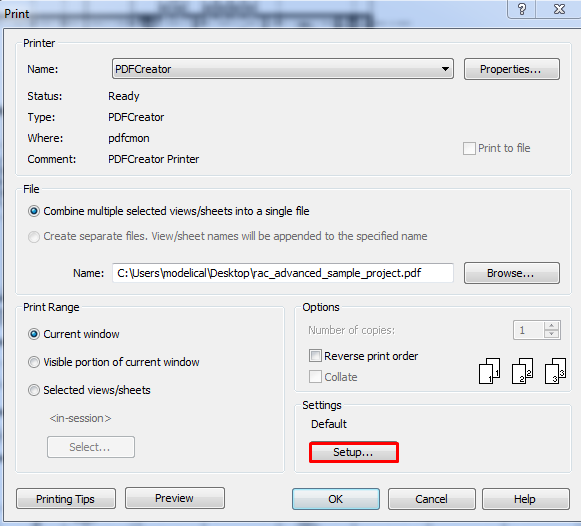
At the Print Setup menu we can define whether we want to generate several independent PDFs, or if we want to join all sheets into one unique PDF. We can also establish if we want to use raster or vector processing, and adjust the configuration of special objects as links, reference planes, or tags, among others.
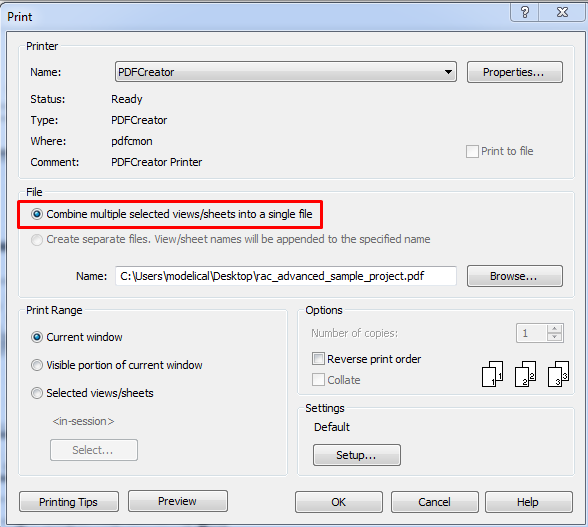
Combine Multiple Selected Views/Sheets into a Single File
At the File section we can select the option Combine multiple selected views/sheets into a single file, so we’ll generate a single PDF file that contains all of the selected views and sheets.
The specified filename will be the name of the single file containing multiple views/sheets.
Create separate files
At the File section we can select Create separate files.
If you are printing multiple views and sheets and you select Create separate files, you cannot cancel the print job once it starts.
If you are generating multiple PDF files, the specified filename is used as a prefix. It is appended with the names of the selected views and sheets.
PDF print settings
If you are using Revit to create separate PDF files for several views or sheets, the default settings of the PDF printer force you to provide a filename for each PDF file as it is created.
To avoid the need to provide individual file names for each PDF document, change your system’s default PDF settings.
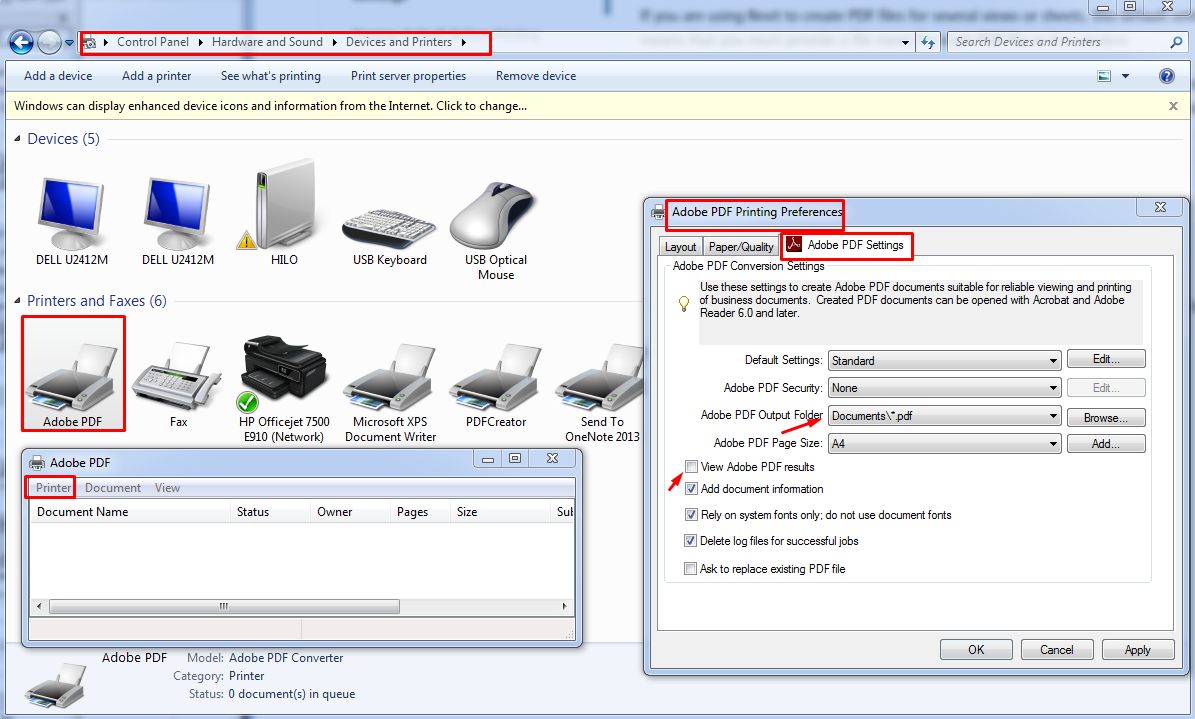
There are many printers for PDF (PDF Creator is the most common one), but f you are using Adobe PDF you have this option:
- On the Windows Control Panel, click Devices and Printers.
- In the Devices and Printers window, double-click Adobe PDF.
- Click Printer >Printing Preferences.
- At the Adobe PDF Settings tab, for Adobe PDF Output Folder, select Documents\*.pdf option or browse to select an specific folder.
- In any case, do not choose the option “Prompt for Adobe PDF Filename”.
- Clear View Adobe PDF results.
- Click OK.
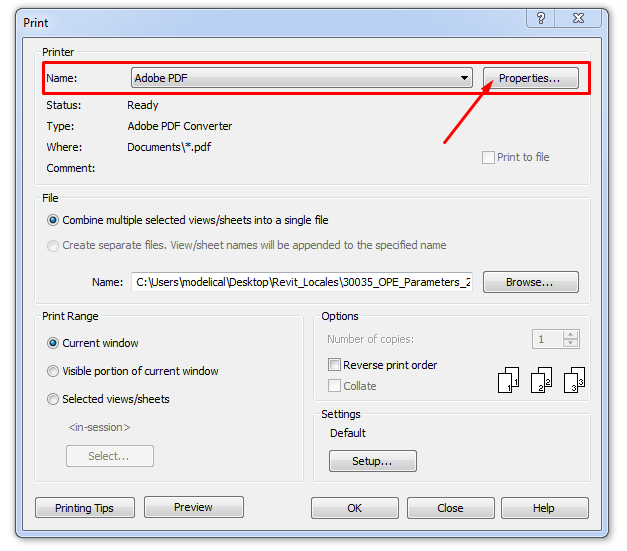
You can also access and change this options through the Print Menu in Revit, for any printer you might be using:
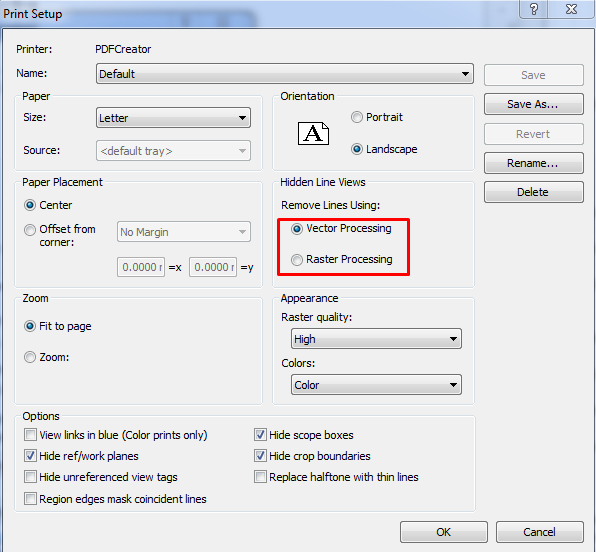
Vector Processing and raster Processing
It’s highly recommended to use vector processing whenever possible, as it keeps the vectorial nature of objects. Revit automatically uses vector processing, it only prints with raster processing if any of the following statements is true:
- The view uses shading, shadows, gradients, or sketchy lines.
- The view is rendered.
- The view contains an image.
- The view uses point clouds.
- The view contains a decal.
Raster processing printing time depend on the dimensions and the amount of graphics included in the view.
Vector processing
Vector processing time vary depending on the number of views processed and on view complexity. Vector processing typically produces much smaller print files than raster processing, and vector processing is usually faster.
Use vector processing whenever possible.
Raster processing
If you are printing a set of sheets and views and you have selected Vector Processing, Revit uses raster processing for individual views that meet any of the mentioned criteria.
You can use raster processing to improve the display of certain graphics when vector processing cannot process the view correctly due to its complexity.
Raster processing generally takes more time to complete than vector processing due to the rasterizing process, and it may also result in lower quality PDFs. You can improve their quality by adjusting the Raster Quality setting in the Print Setup dialog box. Using higher quality settings will result in longer print times and heavier files.
The quality when using raster processing may also be affected by the driver you are using. Verify that you are using the latest driver available for your device or when printing a file to ensure the best quality possible.
Print Settings Additional Options
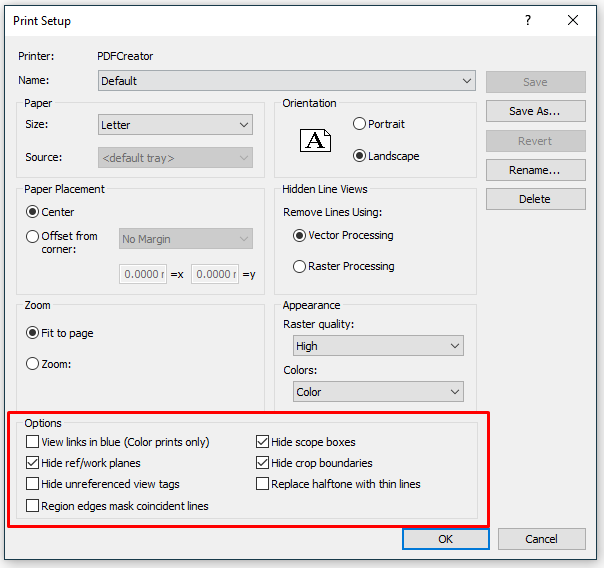
- View links in blue: View links are printed black by default, but it’s adjustable.
- Hide ref/work planes (Recommended): select this option if you do not want to print reference planes and work planes.
- Hide unreferenced view tags: select this option if you do not want to print view tags for section, elevation, and callout views that are not on sheets.
- Region edges mask coincident lines: select this option if you want the edges of masking regions and filled regions to cover lines with which they coincide (this option is available only if the Vector Processing option is enabled).
- Hide scope boxes: select this option if you do not want to print scope boxes (recommended).
- Hide crop boundaries: select this option if you do not want to print crop boundaries (recommended).
- Replace halftone with thin lines: if views display some elements in halftone, select this option to replace the halftone drawings with thin lines.
Print Oversized sheet
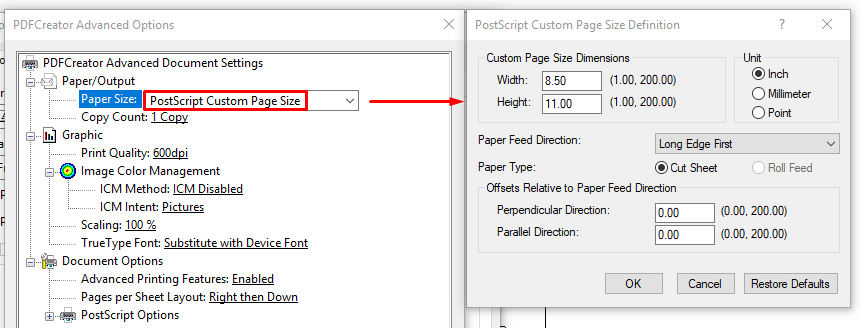
Go to Print/Layout/Advanced/PaperSize/Postscript custom page size:
Save print settings
You can save print settings in a project for later reuse:
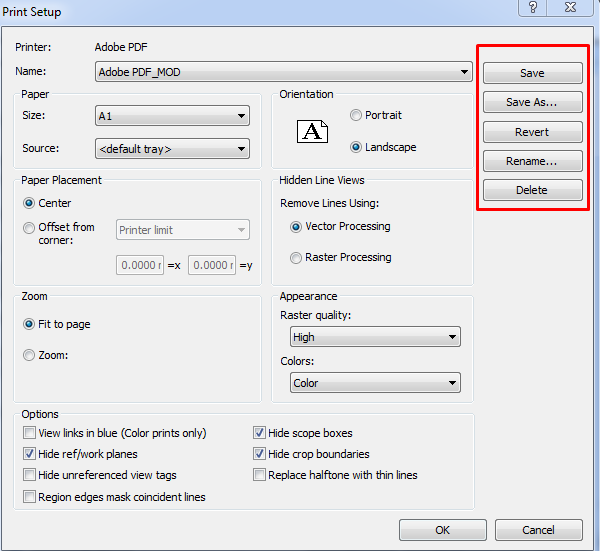
If you click OK before clicking Save, your changes are not saved to the selected print setting. The first time you click OK, however, you are prompted to save your changes to the modified print setting. If you click No, the changed settings are applied to the in-session print setting. Any future changes you make without saving are also applied to the in-session setting. These changes are lost when you exit the Revit session.
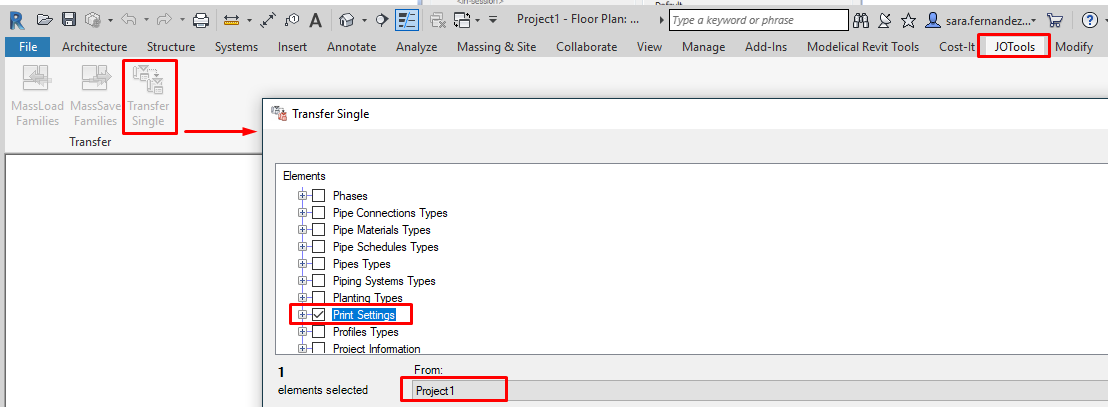
The print setups are saved with the project, so they can be used across multiple sessions.
You can transfer print setups to another project using Transfer Single:
Change sheets order
You have a set of sheets and would like to print them to PDF in an order different than showing in the project browser. Revit send sheets to be printed in alphabetical order. You can then take two different ways: by exporting sheets to DWF, and by post addressing their order with Adobe Acrobat Professional.
Export the sheets to DWF (See ExportToDWF guideline). Once you have exported them, open such DWFs with Design Review, at the top left, under the Thumbnail tab, drag and drop the sheets to match the order you wish to print:
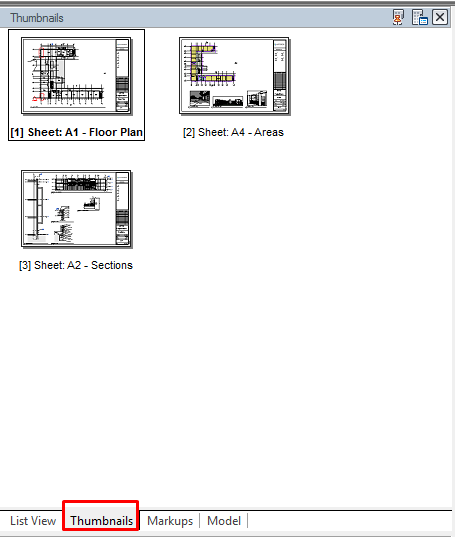
Then print the set to PDF.
Troubleshooting
Surface patterns are partially submerged: in the Print Setup dialog, under Hidden Line Views, select Vector Processing.
Imported images print differently from the on-screen display: ClickPrint (Print Setup), in the Print Setup dialog, under Hidden Line Views, select Raster Processing.
When using "black lines" to print you expect the result to show black lines but the solid color fills are printing in color. Possible solutions:
- This issue could be caused by elderly drivers.
- Updating the driver for the printer.
- Updating the video driver.
- Re-check the settings in Revit and in pdf printer.
If Raster Processing is selected to print a cropped view, some of the model elements may be missing from the printed output.
- This incident has been resolved in Autodesk Revit 2017 and more recent versions.
- In the views for which this could happen, the crop regions have a non-rectangular shape.
- Replace the non-rectangular crop region with a rectangular crop region and use masking regions to hide elements.
- If possible, print the view with vector processing.
Printing inconsistencies: using vector processing to plot complex views may result in display inconsistencies, such as lines that are missing or merged incorrectly, or shaded views that are plotted incorrectly, among other issues. You can often eliminate these issues by switching to raster processing when print from Revit.
Print views/sheets as separate files. This operation cannot be canceled: this message displays when you are printing multiple views and sheets to PDF as separate files. Once the print job begins, you cannot cancel it.
Only a portion of a print job comes out on a sheet:
- Several printers have limited on-board memory to process print data.
- When printing large format sheet sizes to plotters such as the HP DesignJet, change the plotter's settings so that the data is processed in the computer.
- To change the settings, click (Print). Select the correct printer, and click Properties. In the dialog, click the Advanced tab. Select the option to process the document in the computer, and click OK.
Improving performance
To improve performance and stability when printing views and sheets, do the following before you start a print job:
Make sure that you have installed the most recent version of the printer driver.
If shadows are not needed for the views to be printed, turn off shadows.
Unload all links that are not necessary for a particular view that is being printed. This strategy should reduce the memory resources required to open the file.
To increase the print speed of elevation views, section views, and perspective views, use the Far Clipping property for these views.
Vector printing is usually faster than raster printing. Use vector processing if possible. See About Vector Processing and Raster Processing.
If you are working on a workshared file and you find printing issues, ask the users who needs to print, and detach their local copies to work locally. This strategy conserves network resources and reduces communications between local files and central files.
Do not open other applications while printing.
If the print job is of substantial size, the status bar displays a Cancel button.
3D PDF
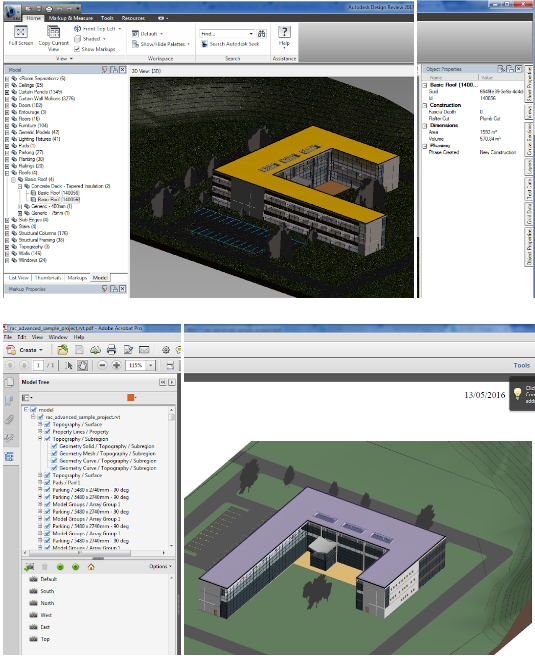
Check out the guide Converting Revit to 3D PDF. It allows to make 3D PDF files that are much smaller than the original Revit model. These files are very useful because they can be viewed with the free Adobe Reader.
Differences between 3D DWF and 3D PDF
3D PDF is much larger than DWG.
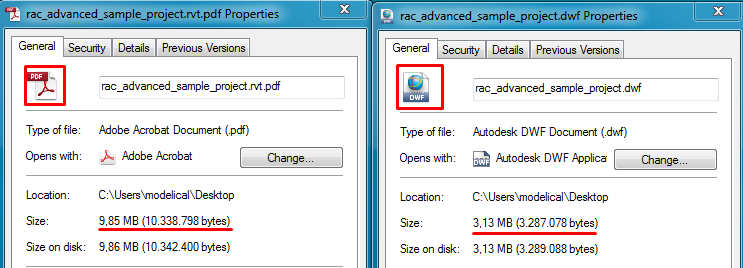
Both are built around self-contained files that support multiple pages, printing, and password protection. Both offer a free product for viewing and printing files.
Export to DWF is easier but stakeholders are more used to PDF formats.
In DWF files you can make transparent some revit elements, create markups and import them back in the revit file.
Available Add Ins
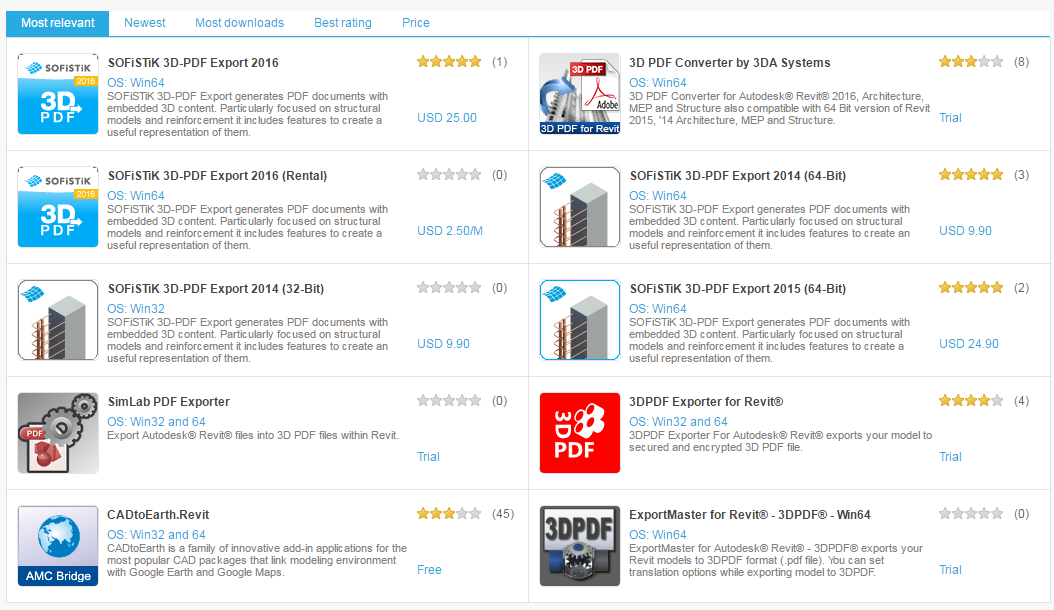
- 3D PDF Converter for Revit is an add-in from 3DA Systems
- SOFiStIK 3D PDF Export
- From RVT to IFC, then PDF (free): Adobe Acrobat Pro Extended
Tips&Tricks
You can also export construction documents to DWF. DWF files are smaller in size than PDF files, and they can be easily shared for online review.
Batch Print provides an easy way to print a large number of drawings (views and sheets) from a Revit model unattended. Batch Print is available to Autodesk Subscription customers. After preparing the default printer and the project, use Batch Print to send any number of drawings to the printer and to control the order in which they print. When you start the print job, Batch Print manages the printing of the drawings, requiring no further interaction from you. If desired, you can monitor the progress of the print job using a status dialog. When the current default printer is a virtual printer, such as Adobe PDF or Autodesk DWF Writer, Batch Print either will not print or will only print one page only. Batch Print is currently not designed to handle virtual printers.
Use Print Preview to see a draft version of the current view or sheet before printing it. If the print job is of substantial size, the status bar displays a Cancel button. The file size necessary to trigger this option depends on system speed and amount of memory.
When printing from Revit to PDF, the resulting PDF files are unusually large when using non-rectangular crop regions, leading to slower prints and larger PDF files.
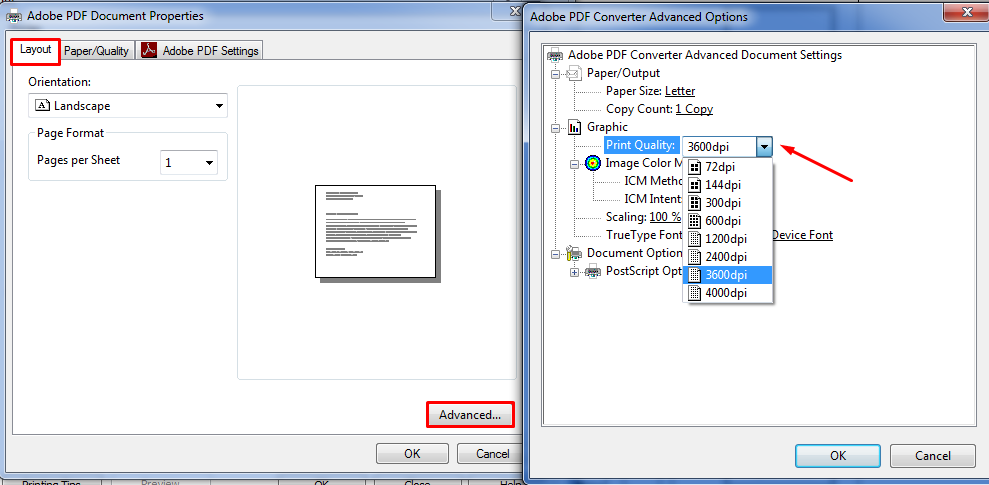
- Reduce the resolution specified in the PDF Printer properties (600DPI or lower).
- Use a PDF printer that handles non-rectangular crop regions correctly. For example, Nitro Reader is a free PDF printer that generates appropriately sized PDF files from Revit files.
- Replace the non-rectangular crop regions with rectangular crop regions. You can also use masking regions to achieve the non-rectangular crop shape.
Conclusion
Printing is a usual task that everybody is used to, but sometimes it could change to a tricky issue. The main goal of this guideline is to solve some of the most common issues related to printing, and provide some tips about the installed drivers.
Somewhere else on your site there is a workflow presented that concerns the opening of a dgn file from AECOsim. If you have AECOsim installed or any Microstation vertical, you also have access to the app’s own pdf driver which also allows the creation of 3D pdfs.