Modelling Facades (II)
Visibility and deliverables
This guideline is created as an extension of the previous post “Modeling of Facade Elements”. It details the visibility of façade elements, which have already been created, and how best they can be transformed into project deliverables.
1 Visibility
1.1 General considerations
The way Revit is able to display an element, enables you to modify this element in several ways, some having priority over others. In addition to the aforementioned, there is a hierarchy in place, which needs to be followed. For this reason, it is important to configure the visibility settings in any one view, thus enabling you to control it better.
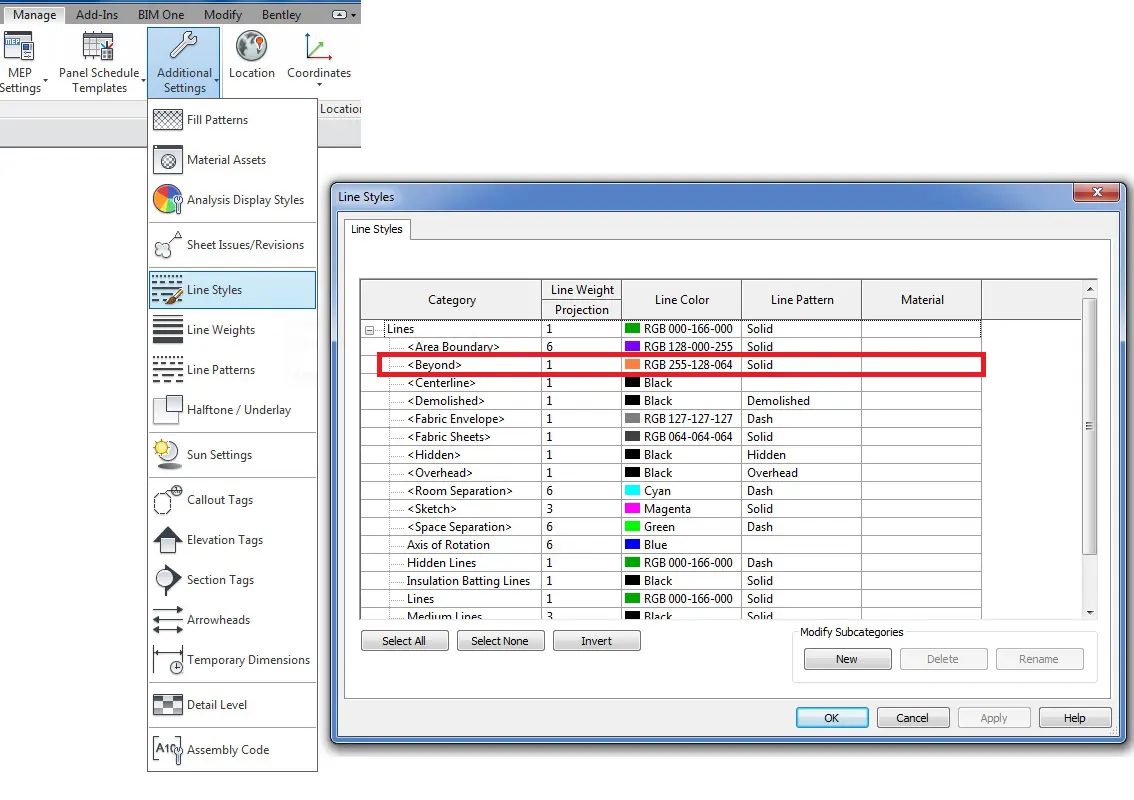
The visibility hierarchy is set out in order of priority is:
- Line Work: Within this view: key “LW” and select the lines you wish to change and the linestyle you wish to apply.
- Override Graphics in View > By Element
- View Filters
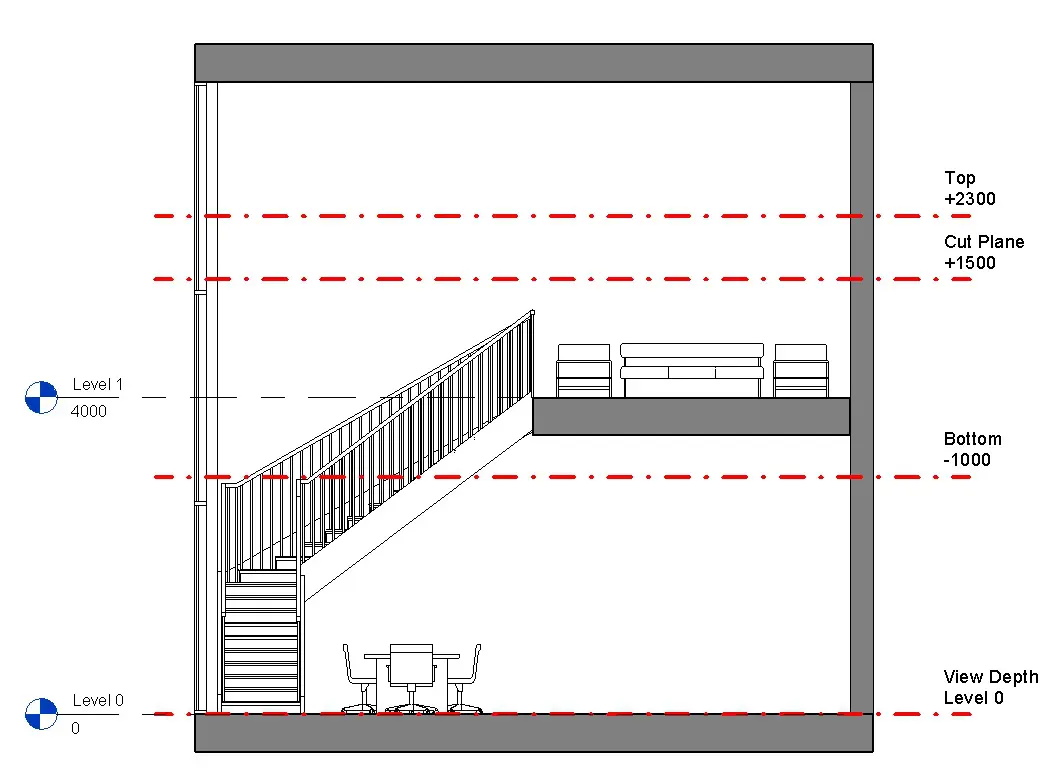
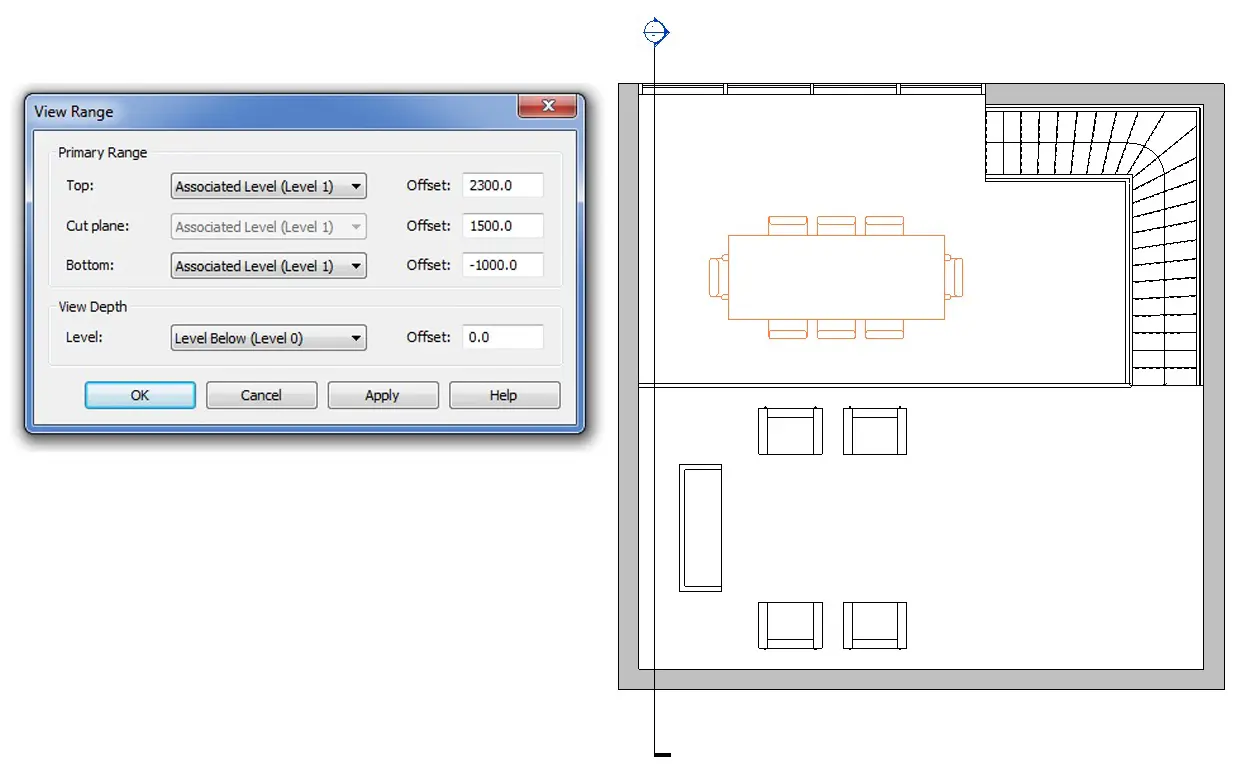
- View Depth – “Beyond” line style: When one element is placed betwen the Bottom Plane and the View Depth Plane, the element´s lines will be shown as the “Beyond” line style configuration.
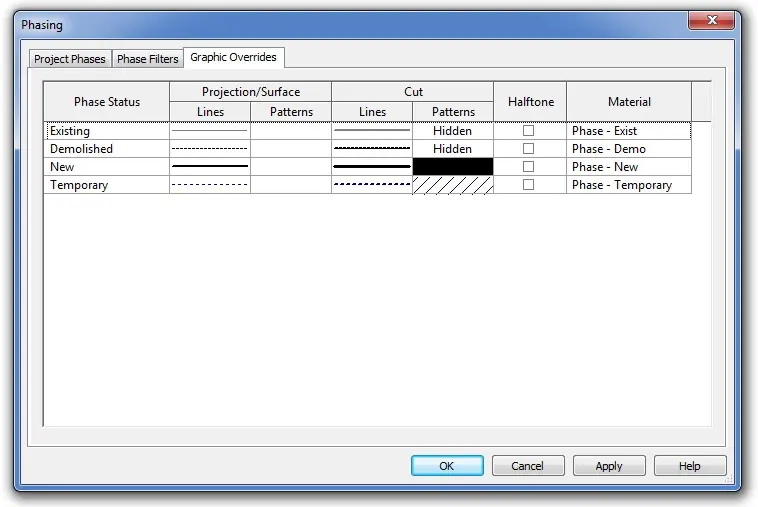
- Phasing Graphic Overrides: This changes the display settings of the elements, depending on the phase in which each element has been modeled.
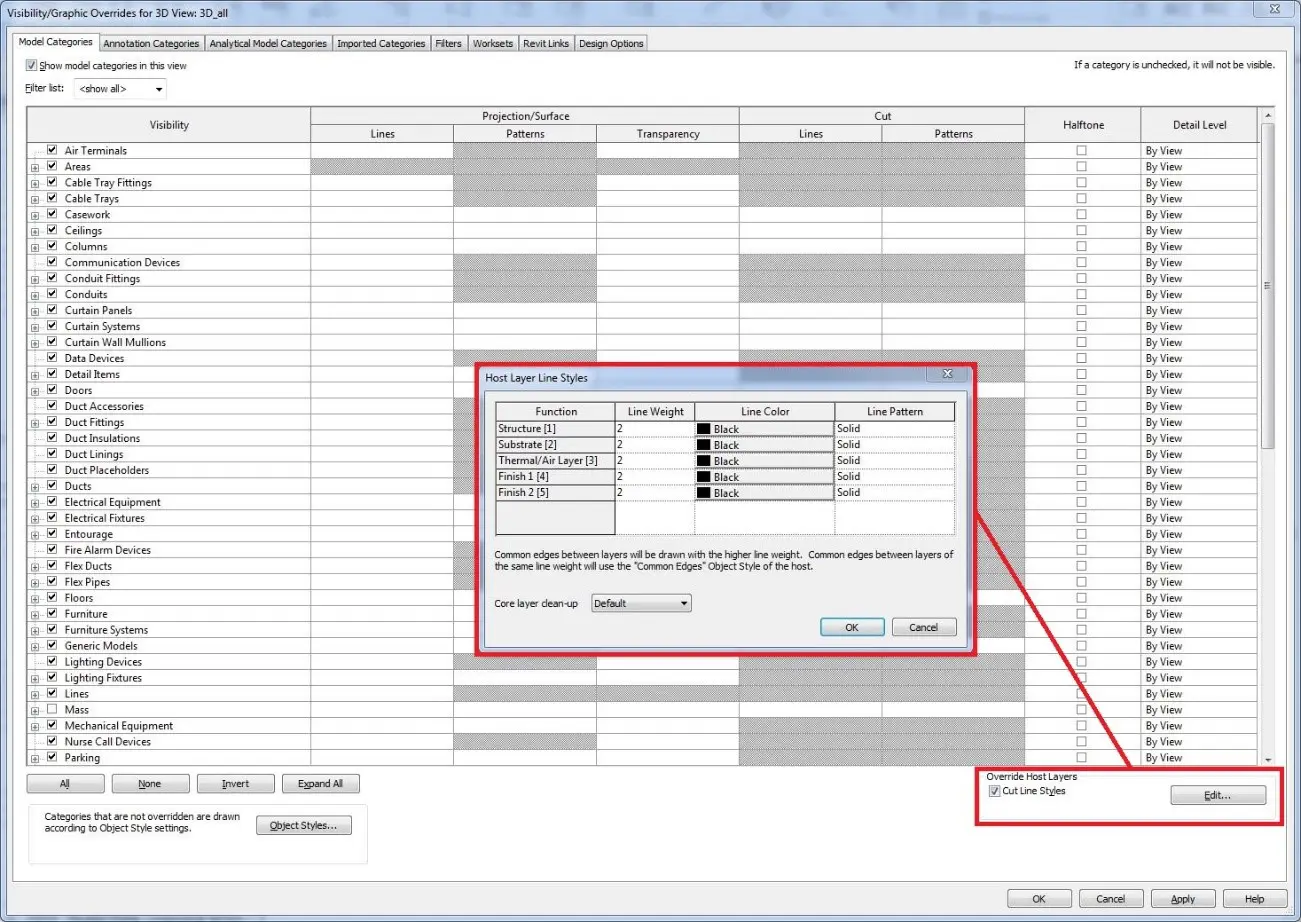
- Visibility / Graphic Overrides > Override Host Layers > Cut Line Styles

- Visibility / Graphic Overrides: General settings of the visibility of a view.
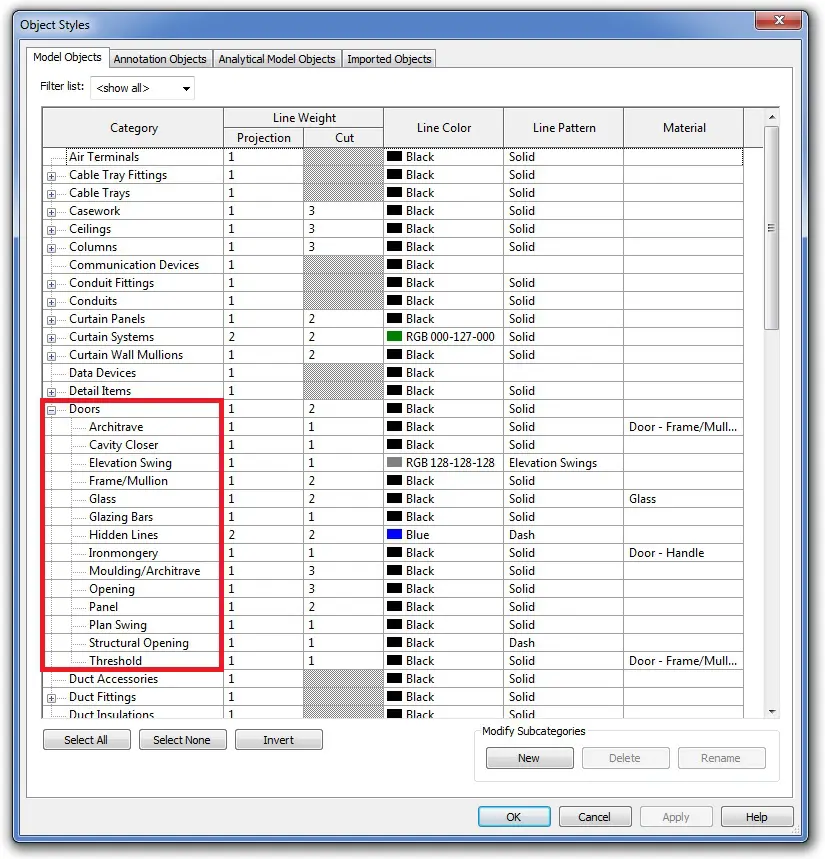
- Project Object Styles
Bearing in mind the hierarchy, the best way to adjust these parameters is by selecting the last method in the list, and, if required you can scroll up to the other “methods” should you need to carry out further adjustments. In this way, the parameters of many elements can be adjusted at the same time, resulting in a faster and easier approach when making subsequent changes.
Firstly we should adjust the object styles. We will find them going to Manage > Settings > Object Styles. From this section we can modify the visibility of the elements modeled in all the views of the project. We are changing the way Revit shows the elements by default. If we make a good adjustment of this parameters, we will not have to make much modifications in the views. A good practice would be take the adjustments we make in this section, and save it into a project template.

There are different subcategories of lines in each category. This is something to keep in mind when we create families and we set different subcategories of lines. We will not see the lines in the project as we see them in the family, the family will show its lines as is configured in the object styles of the project.
Subsequently, we can use the visibility/graphic overrides in view, usually through view templates to make the adjustment of the parameters faster and easier.
Finally, but less recommended, adjustments can be made with annotations or changes to the elements per view, that will only affect the visibility of this element in one view. This resource should be always the last to use since it creates modifications difficult to detect for subsequent adjustments.
1.2 Visibility from the project template
Project templates provide a initial environment for new projects. They are very useful to mantain standars betwen projects. This topic is long enough for a complete post, or several posts, but in this case we will focus in all the aspects relating to the visibility, both of the elements modeled and annotations.
When creating a project template we should consider the following aspects and decide which ones we include:
- Annotations:
A project template should include the annotation families we plan to use in the project, already edited by ourselves.
Going to Annotate > Tag > Loaded Tags and Symbols we can check the tags and symbols we have already loaded to the project by category, and we can add more.

View tags, (callout, section and elevation tags) are system families and are composed of nested annotation families. We can change them from Manage > Additional Settings.
We can load other annotation elements such as grid heads or level heads, or any other annotation we frequently use. We can create new ones from New > Family > Annotations.
Annotations also include text and dimensions. They are system families, and we can edit their type properties or we can create new types.
- Titleblocks
- Viewports in sheets
- Views, schedules, sheets
We can create views we know we will use in the project, and leave them in the template already configured. This way we will not have to create them later in every project. We can also create schedules with the parameters we normally use for our measurements, or sheets with titleblocks included.
- Filters
- Placeholder links
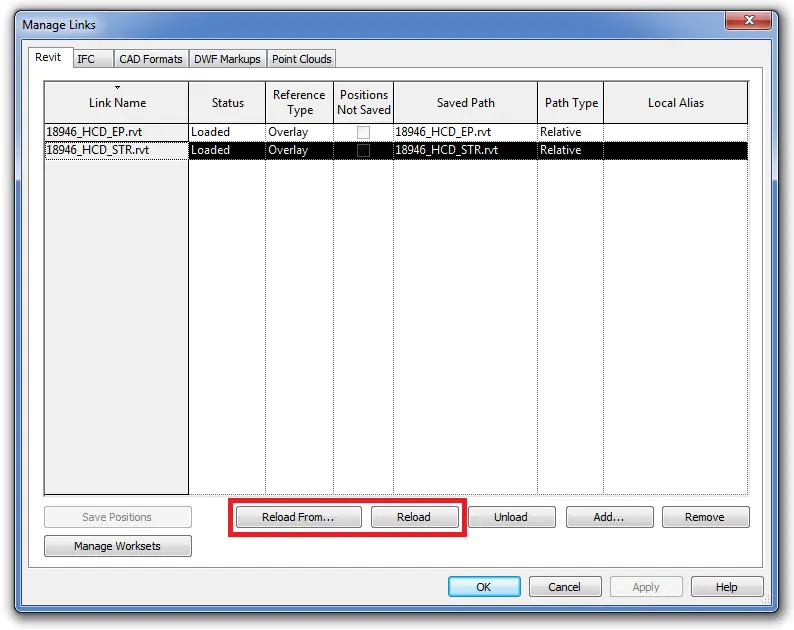
We can use this resource when we work with linked models from other partners. We will create some empty models that we know we will later use (structure model, MEP model…) and then we link them in our template. After that we can adjust the visibility parameters for those links, what we want to show from them and how we want to see it. Once in the project, we have to replace those links from the template for the real ones of the project. We will do it going to “Manage links” and using “Reload from”. This way we will keep the visibility adjustments of the template.
Esto es útil cuando sabemos que vamos a trabajar con modelos vinculados de otros colaboradores. Crearemos en un principio una serie de modelos en blanco que pensamos que utilizaremos (estructura, arquitectura, instalaciones…) y los vinculamos en la plantilla de proyecto. Establecemos los parámetros de visibilidad que queremos para cada archivo vínculado, qué queremos mostrar y cómo lo queremos ver. Una vez en el proyecto, sustituimos cada link de la plantilla por los reales del proyecto, mediante el método “Reload from” en la pantalla “Manage links” y permanecerán los parámetros de visibilidad establecidos.
- View templates
- Materials and patterns
- Line styles: Manage > Additional Settings > Line Styles
- Object styles / line weights: Manage > Additional Settings > Line Weights
1.3 View templates
View templates are a Revit element that allows us to adjust the visibility of several views at the same time. We can control them from View > View Templates > Manage View Templates.
If we want a view template applied in a great number of views, is better not to include some parameters. It is not a good practice duplicate templates for views that only differ in terms of visibility in the scale or in the view range. Is better not to include this fields and then adjust it in the views. This way we will have a great number of views with their visibility controlled by one template, and if we want to modify it we only have to do it once, in one template, instead of reviewing those adjustments in several templates. We will avoid having a lot of templates used in few views each one. If we want to know in how many views a template is applied we have to go to View > View Templates > Manage View Templates, and then selecting one template we can see it.

The best way of working with view templates is modifying the visibility of one view by categories, and when we think is ok, we can create a template that will keep the modified parameters of this view we are working on. We can create this template from View > View Templates > Create Template from Current View.
1.3.1 Filters
Sometimes when we are modeling, the number of filters created grows, and that can become an issue to manage them. We propose a way of naming those filters to make them easier to find.
Cuando el modelo empieza a tener una gran cantidad de filtros, empieza a ser difícil saber si el filtro que queremos usar está creado o no. Para ello proponemos una nomenclatura:
The name of the filter is based in three parts:
Example:
- 1_Doors_FR
- 0_Sections_STR
- The first part, indicates if we will act on the element showed in the name or not.
- 1 shows that we are acting on the element described in the name, in this case doors Fire Resistant. Here, the rule is positive: “Doors that are Fire Resistant”.
- 0 would indicate that we are acting on elements that do not comply with the rule. Here, the rule is negative: “Sections no STR”
- Second part shows the category on which the filter is acting. We recommend using a filter by category, it is more useful later for recognising it.
- Third part indicates the property of the elements we want to filter.
1.3.2 Links
When we are in a view modifying the visibility/graphic overrides, we can go to the “Revit Links” tab to change the visibility of the models linked. From there we can hide completely or show the link, we can assign the halftone or underlay mode, or we can make more specific adjustments in their visibility using the display settings. We can modify some aspects of the halftone and underlay modes from Manage > Additional Settings > Halftone/Underlay.
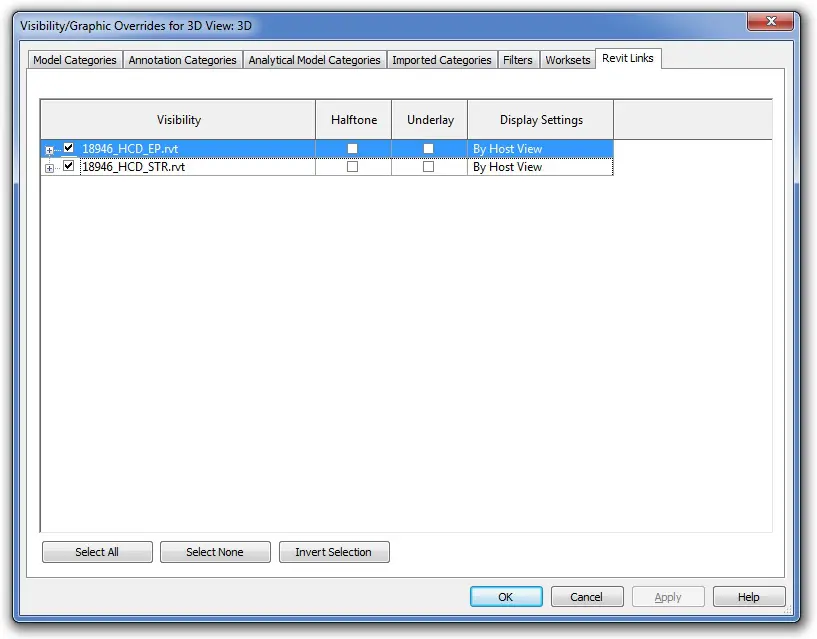
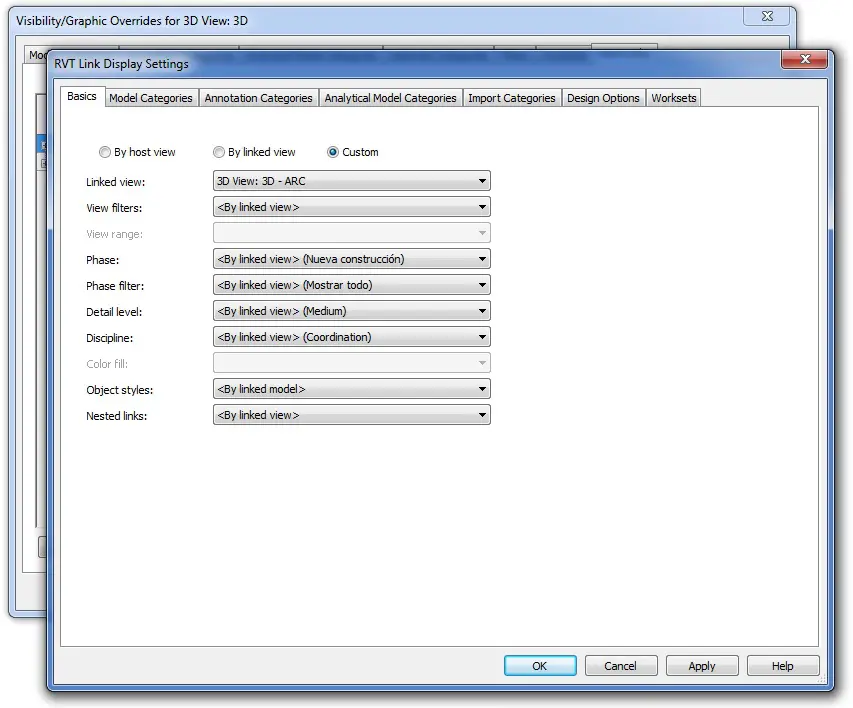
Links are assigned by default the configuration “By Host View”. This means that all the adjustments we make to the categories of the model will affect the same way the categories of the linked model. If we press there, a new window will appear that will show as a similar appearance than the visibility/graphic overrides of the view. Here we can change the visibility parameters of the linked model in this view or in this group of views if we are using a template. In the top of each tab, will appear three options, that will allow us to configure those parameters “By host view”, “By linked view”, or “Custom”. If we set “By linked view”, Revit will let us choose a view of the linked model, and will apply the visibility settings applied in that view in the view we are working on. If we choose “Custome” we will be able to change the visibility of the elements of the link, by categories and worksets, but without filters.
Filters applied to the model, will affect also the elements of the linked models. If we want to filter an specific element of a link, Revit will not suggest us the information of that element, but we can write it and it will work the same way.
Visibility adjustments of links will remain when we replace them, but we have to do it using “Reload” or “Reload from” in “Manage links” window.
2 Deliverables: Sheets
2.1 Prepare views for sheets
Sheets are a normal way of giving the information that the model contains. To take the model to sheets we will drag views to the sheets. But one view cannot appear in several sheets, so we will have to duplicate views. When duplicating views we have to think in the visibility of each one, and then assign them view templates.
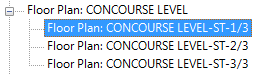
Sometimes happen that one floor does not fit in one sheet in the scale we want, and so, we have to split it into smaller parts and take them to sheets. To do that we can use scope boxes. We create them from View > Scope Box. This element allows us to create regions that then will easily become the crop region of lots of views by selecting it in the view properties.
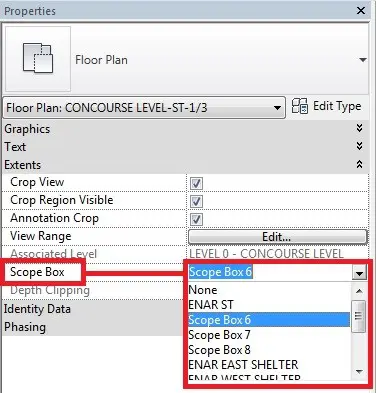
When we have one view that we have to split into smaller regions, the best way is duplicating this view as dependant. This way we assure that the duplicated views will have the same visibility configuration as the original one, and the adjustments we make in the original one will apply in the duplicated views. The duplicated views will appear linked to the original one in the project browser. Then we only have to apply to each view the correspondant scope box in the view properties.
2.2 Detailed views
When we increase the level of detail in views, sometimes is neccesary to add some draw and detail items to complete the model. Revit offers two options to do that: callouts and drafting views. Callouts are views that contains the model where we can add some details to it. Drafting views are views non related with the model where we can draw details using 2D detailing tools.
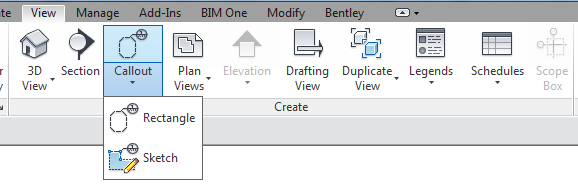
Callouts are a model view that can appear referred in other views as a callout or a section. This type of view usually presents a part of the model in a bigger scale than the main view it comes from. We can create a callout from a plan view, from an elevation and from a section and then we can add detail with the model as reference. We can create them from View > Create > Callout.
Once done the callout, we can go to the view (right click > go to view) and there we can add annotations, detail items and 2D tools to complete the model. We have to be careful with these type of views, because they show the model, so if the model change, it will be shown in the callout, but the 2D elements will remain in the same place they were. When we drag this view to a sheet, the callout tag will show the number of the sheet is placed in the views where this detail is referred. If we want to change what the callout tag shows we can modify the tag family from the project browser, and then change it in the callout type from Manage > Additional Settings > Callout Tags.
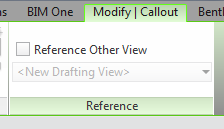
When we create a callout, we can refer to an existing view. This tool allows us to refer the same detail from different views. The same occurs when we create a section, it allows us to refer to other view and it draws a section in this view but does not create a new one, just refers to the selected one.
Along a project, sometimes is neccesary create details in a view that is not related with the model, and then we create a drafting view. These views do not show the model, and in them we use 2D tools: detail lines, regions, detail items, dimensions or text; or we can import a dwg file. Drafting views can be created from View > Drafting View, then we will name it and will set the scale.
If we want to import details from CAD, we will go to Insert > Import CAD. We must check that the scale of the view and the scale of the CAD is the same. In the import window we can modify some aspects, paying attention to the option “Current view only”, that should be marked.

2.3 Annotations
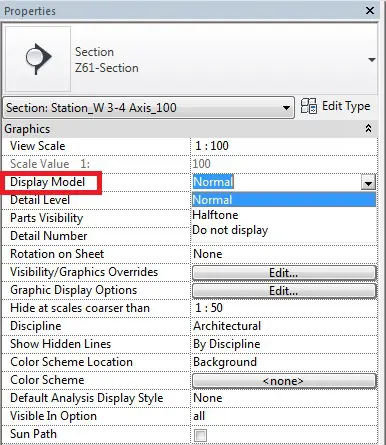
A good procedure to control the annotations that are placed in one view, is by changing the option “Display Model” option of the view that we can find in the view properties. If we change it to the options “Halftone” or “Do not display”, Revit will apply those options to the model and will leave the annotations the same as they were, so we will easily see where they are.
In case we need to place some annotations in several views, we can create a group with all of them. Then we can copy the group and paste with the option “Aligned to Selected Views”, or we can go to Annotate > Detail Group > Place Detail Group, in the view.
2.4 Sheet list
A sheet list will help us to manage all the information related with sheets. We can export this information to Excel from R > Export > Reports > Schedule, when we are placed in the schedule. It will create a .txt file that then we can drag to an excel file.
If some sheets are not created in Revit, we can add them to the list as a placeholder to keep the complete list of sheets. In the sheet list (View > Schedule > Sheet List) we can insert rows that will have the information of the sheets created in other softwares by Modify Schedule/Quantities > Insert Data Row. Then we can easily filter the sheets that are in Revit from the ones that are not from the menu Modify Schedule/Quantities > Filter Placeholder Sheets.
2.5 Placing views in sheets
Each view can be placed just in one sheet, that is why it will be neccesary duplicate them and assign templates to them depending on what we want them to show. Schedules and legends are an exception because they can appear in as much sheets as neccesary, but they will appear always the same way, with the same visibility.
One sheet can contain lots of views, that can be overlapped.
If we want to edit the shape of the crop region of the view, we have to make it visible, then select it, and then press “Edit Crop”. If we have annotation crop active, it will remain with rectangular shape surrounding the new crop region of the view.
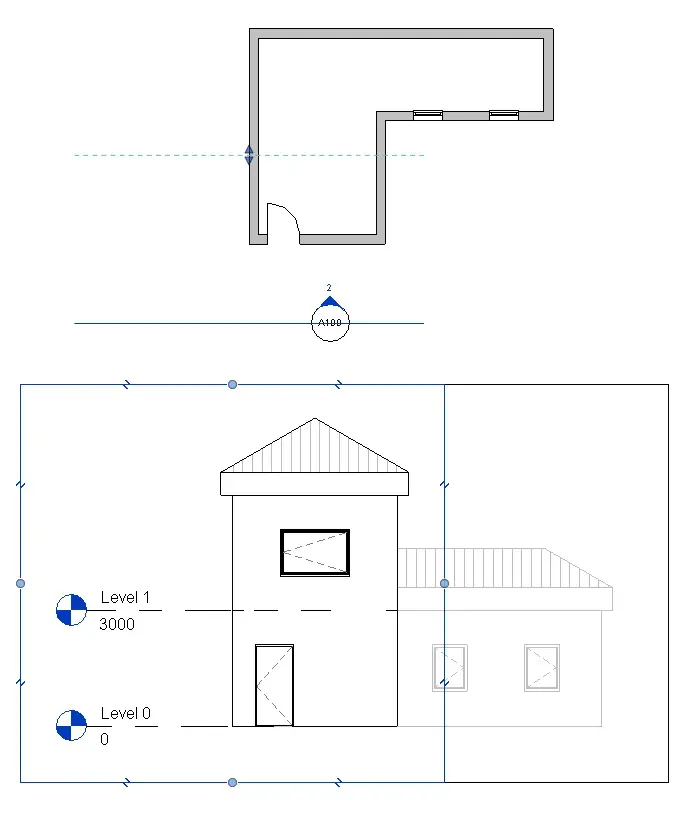
When we overlap views in one sheet, it is very important the order of placing them in the sheet. The first view placed in the view will be in the background, and the last placed will be in the foreground, hiding the others.
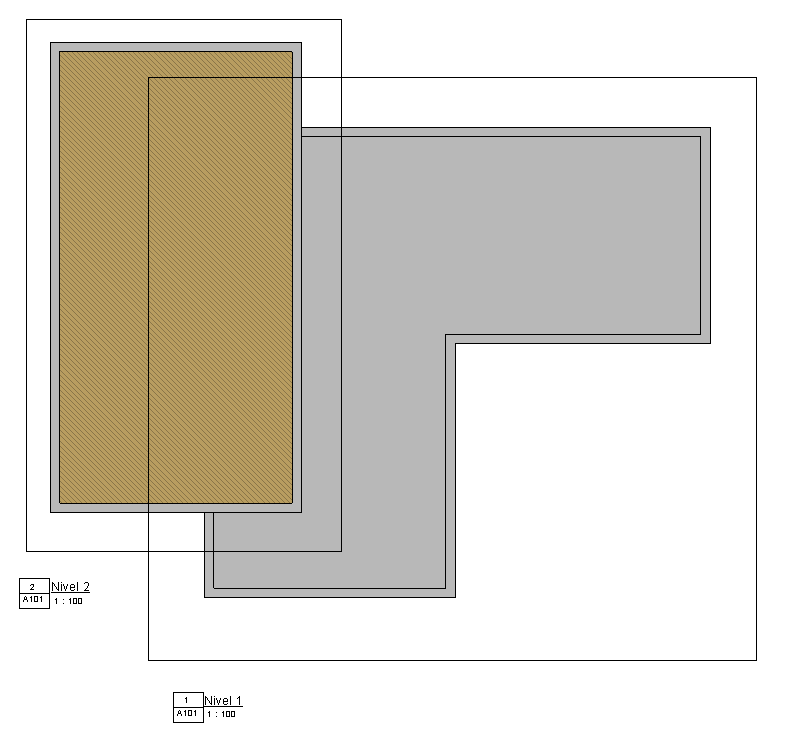
View 2 (brown) over view 1
If the view placed in the foreground has a crop region with no rectangular shape, a white space will appear surrounding its shape, hiding the views are under it. This is a strange situation because is just a problem of graphics on screen, but it disappears when we export or when we print the sheet. We can check it in the preview of the sheet, and there the view will appear cropped in the foreground without any strange white rectangle hiding other views.
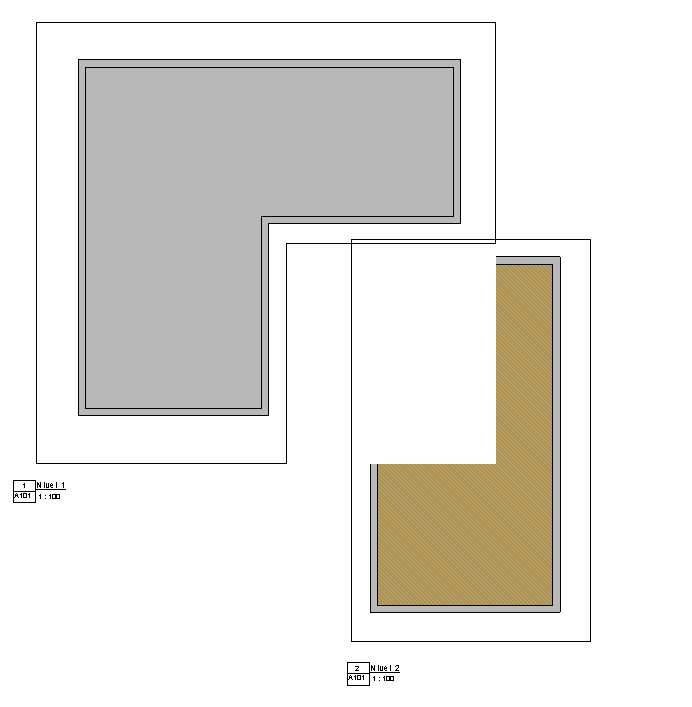
View 1 cropped hides view 2 with a white rectangle, but it happens just on screen, it dissappears when we export or print.
A good way of having different ways of displaying the model in the same sheet is playing with overlapping of several views with different view templates and adjust their range (“View range” in plan views and “Far clip offset” in elevations and sections). For example, we can place an elevation with greys in the background and then place the same view with a low level of “Far clip offset” and other visibility. This way, we can mark the elements that are nearer in the view placed in the foreground, and the elements that are far will appear grey, showing some distance. We can adjust the “Far clip offset” in the view properties of the view, or placed in a plan view and selecting the section we can drag the limits of the view. The “View Range” can only be changed in the view properties of the plan view.