
Architectural Walls
Operation in Revit
Architectural walls
File: OPE_ArchitecturalWalls

Objectives
- Be able to create a new wall, understanding all its properties.
Assumptions
- Datums must be created before starting this guideline (levels, grids, reference planes).
Description
- Walls are a system family, what means that they are created and modified only inside the project.
- You cannot create new wall families. Either way, you can make as many types as you need inside the existent system families:
- Basic walls (most used).
- Curtain walls.
- Stacked walls.
Procedure
Create desired wall type
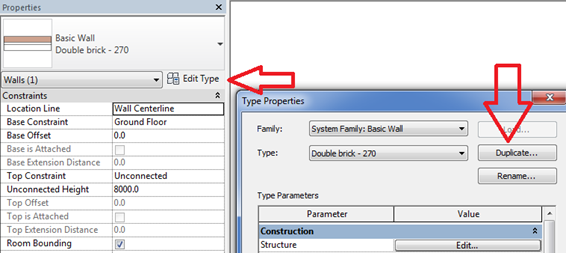
Whenever we want to create a new wall, we will have to start by duplicating an existing one. This is made by clicking on "Edit type" under the wall selector in the properties panel and later in "Duplicate".
To learn more about the composition of the walls, refer to the guideline:
Wall modelling
In Revit, unlike other CAD programs, it is much more practical to build walls in an approximate position and then end up placing them precisely thanks to the tools designed for this function, such as temporary dimensions and the alignment tool.
In the vertical plane, walls are placed from Base Constraint (a level) to a Top Constraint (same Base Constraint or other). There are also two Base / Top Offset parameters to adjust the height. Base and Top Constraint must be consistent with the position of the wall. (An error is displayed if the Top Constraint is below the Base Constraint, as it has incoherent measures).
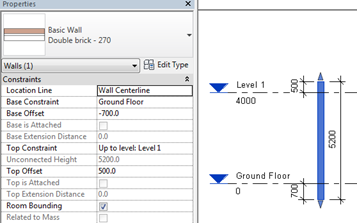
It’s a bad practice to use the offset property or the "Edit Profile" tool for actions that could be achieved by properly editing "Constrain Base" or "Top Constrain" levels.
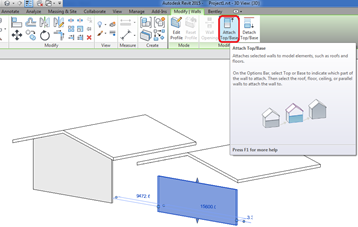
Sometimes walls should reach a sloping roof for instance... In these cases, what is indicated is to "attach" the wall element to the element which must reach (it can be a Reference Plane).
Properties
Type properties
Construction
- Structure (seen previously).
- Wrapping at Inserts: choice of the behavior of the layers that make up the wall when they reach gaps caused by insertions (families of doors and windows) on the wall itself.
- Wrapping at Ends: choice of the behavior of the layers that make up the wall when the end of the wall remain free, without joining other wall.
- Function: It offers several possibilities, it can serve as a method of schedule classification. If you are going to use your model for energy analysis it must be checked more closely because it affects their behavior in the analysis.
Graphics
You can choose wall shading configuration for those views where the wall is seen sectioned and the view level of detail is set to Coarse:
- Coarse Scale Fill Pattern: if nothing is chosen, there will be no pattern.
- Coarse Scale Fill Color: pattern color.
Materials and Finishes
Structural Material: if none of the layers of the wall has enabled the option to "Structural Material" this box is inactive. It should be the default state in an architectural wall.
Analytical Properties
- Heat Transfer Coefficient (U). It is automatically filled if in the wall structure is chosen some material with this data set.
- Thermal Resistance (R). It is automatically filled if in the wall structure is chosen some material with this data set.
- Thermal mass. It is automatically filled if in the wall structure is chosen some material with this data set.
- Absorptance
- Roughness
Identity Data
Under Identity Data section you can assign the keynote for the wall or the Assembly code.
Instance properties
Constraints
- Location line. Must match the wall boundary that shouldn’t change its location although the structure or thickness thereof is changed. For example, a wall centered on an structural axis must have the location line in the middle of its core. If the wall is located aligned with the edge of a slab, the location line should be coincident with the outer side face of the slab. To know more about the Location line, refer to the guideline: OPE_WallLayersAndLocationLine.
- Base Constraint.
- Base Offset.
- Top Constraint.
- Top Offset.
- Room Bounding. It indicates whether indeed it is intended that the wall is room bounding.
Structural
- Structural: If this option is not selected the rest of the structural options are disabled. In views whose discipline is set to "Structural" only appear the walls with this option selected.
Identity Data
- Image: an image can be attached.
- Comments: comments can be added for further explanations or classification.
Phases
As in the rest of model elements in Revit, you can decide the phase when an element has been created and when it has been demolished.
Level of detail
The walls are represented by default differently depending on the level of detail applied to the view.

Wall scheduling
It’s convenient to create a wall schedule for controlling them. With alphanumeric data you can quickly control their correct placement and characteristics. All changes made in the table will be reflected in the model and vice versa.
Naming convention
It is important to follow an order to name the different types of walls we create. Usually there will be a preset naming convention that you must follow, for instance:
Project_Company_Discipline_Category_Code or material_Description_Dimension
EJ: AKS_MOD_ARC_WA_WPT-01_Paint cladding_5mm
A correct nomenclature is very important since types are organized ALPHABETICALLY, and therefore we are interested in each material, such as paintings (WPT), to appear together.
Tips&Tricks
- The walls of an entire Level can be copied using Copy and then Paste Aligned to Selected Levels. You can copy to several Levels at once.
- To select multiple chained walls: preselect one and before clicking on it, press the Tab key.
- To avoid double counting is desirable that the walls that are going to be used in the project are preloaded into the project template and prevent that two people think the same wall with different materials or compositions.
Bottom-line
Walls are a main component in architecture, so it is really important to control them properly and to know all its properties.
Associated Files
- OPE_ArchitecturalWallsExercise.pdf
- OPE_ArchitecturalWalls.rvt
Completo tu informacion, gracias.