
Navisworks Clash Detection
Clash Detection for 3D Coordination
Navisworks Clash Detection
Objectives
- To comprehend clash detection tool for 3D coordination in Navisworks.
Prerequisites
- User can navigate Revit files.
- User has basic skills in BIM modelling with Revit Software, and understand the language used.
- User has knowledge about construction and planning.
- User has basic skills in Navisworks. If not, read before Navisworks guideline.
Description
Navisworks basic ideas:
- Is an Autodesk software that enables the analysis, simulation and communication of design and constructability.
- It allows shared viewing and review of models of different disciplines (Revit, Inventor, Rhinoceros, Solidworks, Sketchup, Allplan, Robot, CYPE, ...).
Main Naviswork uses:
- Clash Detection: Interferences detection and management. It allows us to anticipate, prevent and resolve problems in the virtual model before construction begins, to reduce costs and minimize changes and delays.
- Planning: 4D simulation. Navisworks Manage combines spatial coordination with construction planning, allowing the simulation and analysis of it, and also you can manage the changes that occur during the construction progress.
Navisworks products:
- Autodesk Navisworks® Freedom is a free professional version so it is even easier to get and use. This version only opens and combines NWD extension files (also 3D DWF). It allows the visualization of the objects hierarchy and their properties, however, you can not edit those objects.
- Autodesk Navisworks® Simulate: this product allows you to combine and display multiple models simultaneously from different disciplines. You can view the objects hierarchy and their properties and also edit them. It allows the use of "Timeliner" tool for construction planning, but not the use of "Interference Detection and Management" tool.
- Autodesk Navisworks® Manage: this is the complete Autodesk product, all the tools are available.
Extensions:
- NWC (cache files)
They contain the Revit extracted geometry and we are going to have as many as the number of Revit files we want to export.
Those files must be exported to the same folder where its origin file is located, with its same name, and be overwritten when it is exported again. In this way, when you refresh the NWF file last cache version will be automatically reloaded.
- NWF (federated files)
Those kind of files are containers for several cache files. The way of reviewing several files together (ARC, MEP, STR) is making a new NWF file and append (link) many NWC files to it. If the location of the NWC file change, they must be reloaded.
- NWD
Is the kind of file you use for delivering purposes, because it integrates all NWC files as imported elements, capturing the geometry and forgetting the relation with the NWC file. It saves all generated views, annotations and comments. It’s considered as a full file and it can be opened in the Freedom viewer.
Procedure - Clash detective tool
1 Step by step
- Prepare the file. Hide unnecessary elements.
- Hide all 2D elements
- Check the coordinates.
- Create Sets.
- Create tests.
- Look for clashes
- Check the collision list
- Review and Solve.
- Report
2 Create Sets
- Open Clash Detective panel, Selection Tree and Sets.
- Sets are “folders” that contain a selection set based on what we want to analyze. For example COL (columns) FRA (structural framing) or FON (foundations).
- The best way to create them is using the tool Find items. If the model changes and is exported again, the sets created thereby are updated while if we created them selecting items manually, they are not going to be added to the selection although they share the same properties.
3 Create Test
- Make a new test with an enough descriptive name.
- Review rules for clash ignoring.
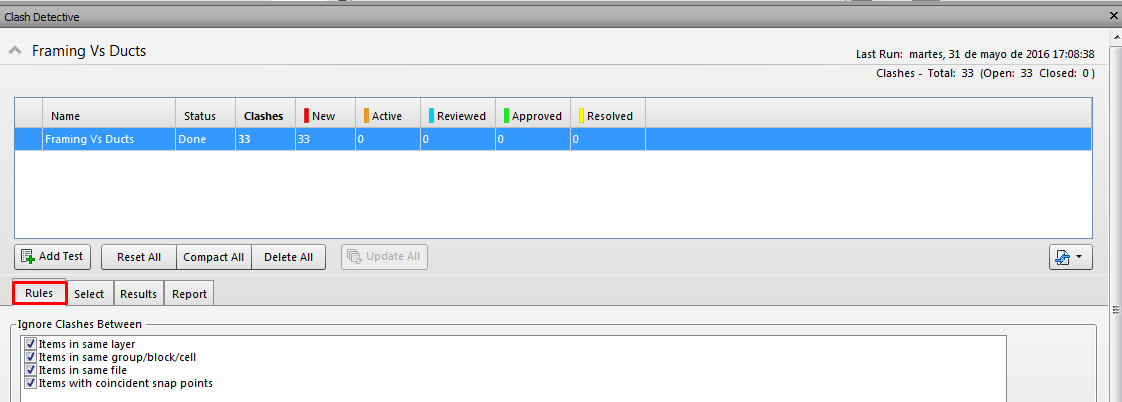
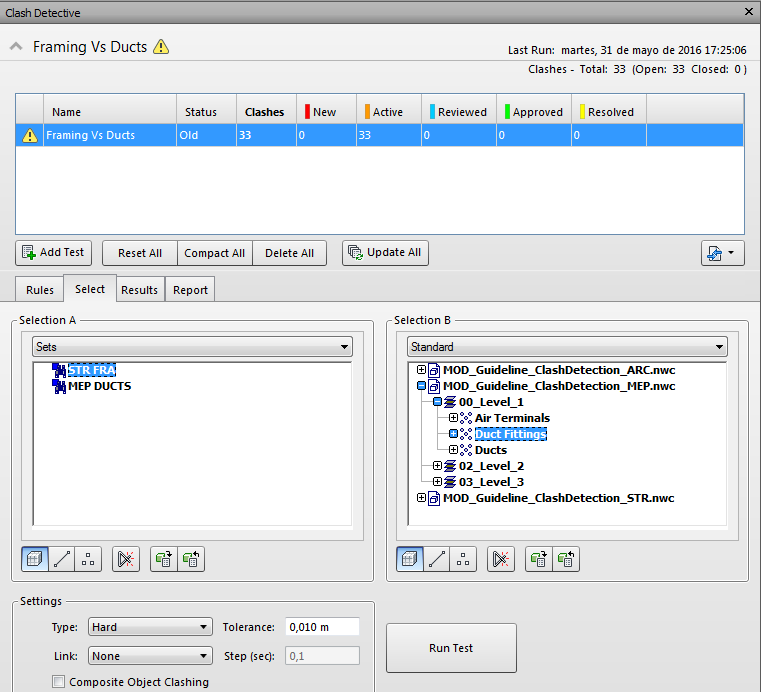
- In the Select section, choose which are the elements you want to test. In this case, you can choose previously created sets, a whole model with all its elements or manually select the elements. It’s recommended to use sets to control the selection of elements.
- On the Select section you can modify:
- Type: Hard if you want to test penetrations. Clearance if you want to ensure space for elements.
- Tolerance will dismiss overlaps smaller than the number (HARD) or larger than it (CLEARANCE)
- Keep Composite Object Clashing unchecked to avoid testing complex objects against themselves (i.e. nested families and sub-components within components).
- Click in RUN TEST
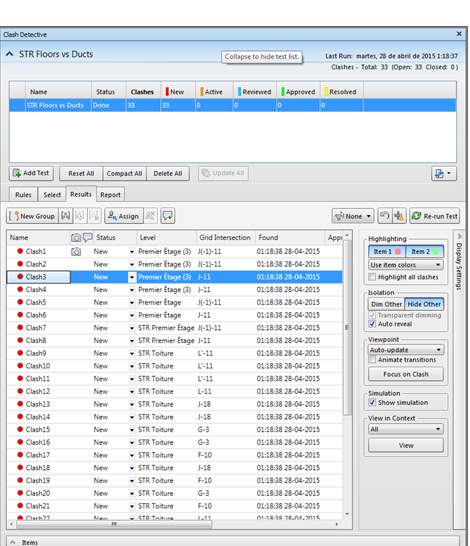
4 Check the collision list
- Pick in the RESULTS tab.
- New clashes will appear in red.
- You can click on any clash:
- Hide Other will isolate your selection
- Dim Other will make it easier to read
- Auto Reveal will hide any occluding elements
- You can assign or comment clashes
- Use the NONE / EXCLUSIVE / INCLUSIVE filter to show only clashes within selected elements
- You can group clashes and make them appear as just one item in the report
5 Review and Solve
In the properties palette we can know the ID of the element that clashes, and fix it in the Revit file.
Once solved all the interferences in the Revit file you have to export it again, with the same name and in the same folder, overwriting the previous one. Doing it, when you reload the cache on the NWF, resolved clashes will appear in yellow in the Resolved section. If new collisions emerge, they are classified in red as New.
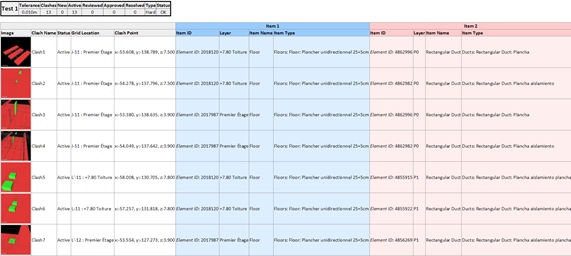
6 Report
In the report tab appears several properties of the elements that can be exported within the report.

- You can export the current test or all of them.
- You can export in different formats.

Tips&Tricks
- You can use Navisworks for model reviewing of several file formats. It can import natively from most of the CAD formats.
- You can work with other BIM platforms by using IFC files.
- If you have some knowledge in Dynamo, you can run tests and link the results directly into Revit using DynaWorks.
Conclusion
Clash detection is one of the tools in which more easily we will see the cost savings impact during construction time.
I just have some quick questions: are all of the detected clashes relevant and hard clashes? and if not, is there any possibility to distinguish which one is the real clash? and who and how could so this process?
Thank you!
Hello Fatima. In every single clash detection there are always false positives and you can classify them as “Reviewed” manually. Also you can filter your sets more accurately in order to attack only relevant elements. Once we finish this discrimination job we can export only those considered as active in our report. That’s my advice, hope it helps.
Regards