
Solutions for Document Management
Control of deliverables
Introduction
In the exciting world of AEC projects, we are constantly faced with the challenge of managing a large amount of documentation. Imagine having to deal with a flood of reports, files and records from both our team and external partners involved in a project. It is a challenge!
However, it is essential to be clear about whether we are delivering exactly what was originally planned, both in terms of quantity and quality of documents. We need to assess whether we are in line with the project objectives and if all relevant information is present in our documentation. With the sheer amount of information we handle, managing these documents manually can be tedious. But there is no need to worry! At Modelical, we have come up with an innovative solution to make this task easier.
We have developed automated processes that allow us to perform thorough checks and efficiently manage all our documentation. These processes not only help us to avoid errors and omissions, but also save us significant time and effort.
That said, recognising the need to standardize and document this process, we have decided to share our experience with you. That is why we have created this guide. Here you will find our best practices for managing documentation in delivery projects, presented in a clear and concise way. We offer you a proven working methodology that you can replicate and apply to any project you undertake. We are convinced that this guide will become an invaluable tool for improving the efficiency and effectiveness of documentation management, no matter where you work!
Google Sheets or Excel
This guide was originally conceived for internal use, but due to its great usefulness and potential impact, we have decided to share it with the world. We want everyone to benefit from our modest contribution to the field of document management related to BIM. It is important to mention that we make specific reference to the use of Google Sheets, as it is the tool we use at Modelical and on which we have based our examples. However, we want to make it clear that all the techniques and processes explained here can also be applied in Excel. The only difference lies in the need to adapt the scripts and functions to Excel instead of Google Sheets. So, you have the power to decide which is your preferred technological ally!
Why Google Sheets
Google Sheets is a collaborative tool that allows simultaneous editing by multiple users in real-time, unlike Excel, which is only truly collaborative on Office365. This avoids the loss of traceability and versions when sharing files, making it a highly recommended option for more efficient and organized teamwork.
Method
We have developed a series of steps that will guide us through the entire project, from its inception to the final stages of exporting the documentation to other formats. These steps allow us to effectively address the structuring and management of documentation at each stage of the project.
- Standard project documentation: We take the standard list of project sheets as a starting point. This list serves as a basis in case we do not know where to start.
- Sheets list: With the collaboration of engineers, architects or other team members, we shape the sheets list.
- Creating sheets in Revit: We generate the sheets in RVT from the GSheet (or Excel). However, it is important to note that if we received a predefined list of sheets, it is very likely that it does not coincide exactly with ours, although there may be common patterns between them. In this case, it will be necessary to make adaptations to the script in Dynamo so that it adjusts to the specific structure and format of the list received.
- Checking: Checking that the model matches the sheets list. It is common for the design team to make modifications to the sheet list, such as adding, deleting or modifying some of them. For this reason, it is crucial to establish a solid link between the two documents. However, we must keep in mind that the sheet list will be the main reference document, as it is the one that is accessible to the design team and, on many occasions, it is considered an independent deliverable by itself.
- Modification of the Revit sheets: When we identify discrepancies between the Revit sheets and those in the sheets list, we take necessary steps to correct them and ensure they match. These discrepancies can be the result of manual errors in Revit, intentional changes to the sheets list, or the addition of a new project phase that requires the modification of certain sheet parameters, such as Sheet Issue Date and Current Revision Date.
- Export check: In many cases, it is necessary to export sheets to other formats, such as PDF or DWG, for later use or distribution. It is crucial to perform an additional check to ensure that these exported files match our list of sheets. This check allows us to guarantee the consistency and accuracy of all project information in different formats.

1- Standard project documentation
Using a template gives us the advantage of having an initial reference that allows us to have an approximate idea of the size of the project we have been contracted to undertake. This makes it easier for us to consult in the event of numerous additional deliverables, allowing us to estimate more accurately the workload required.

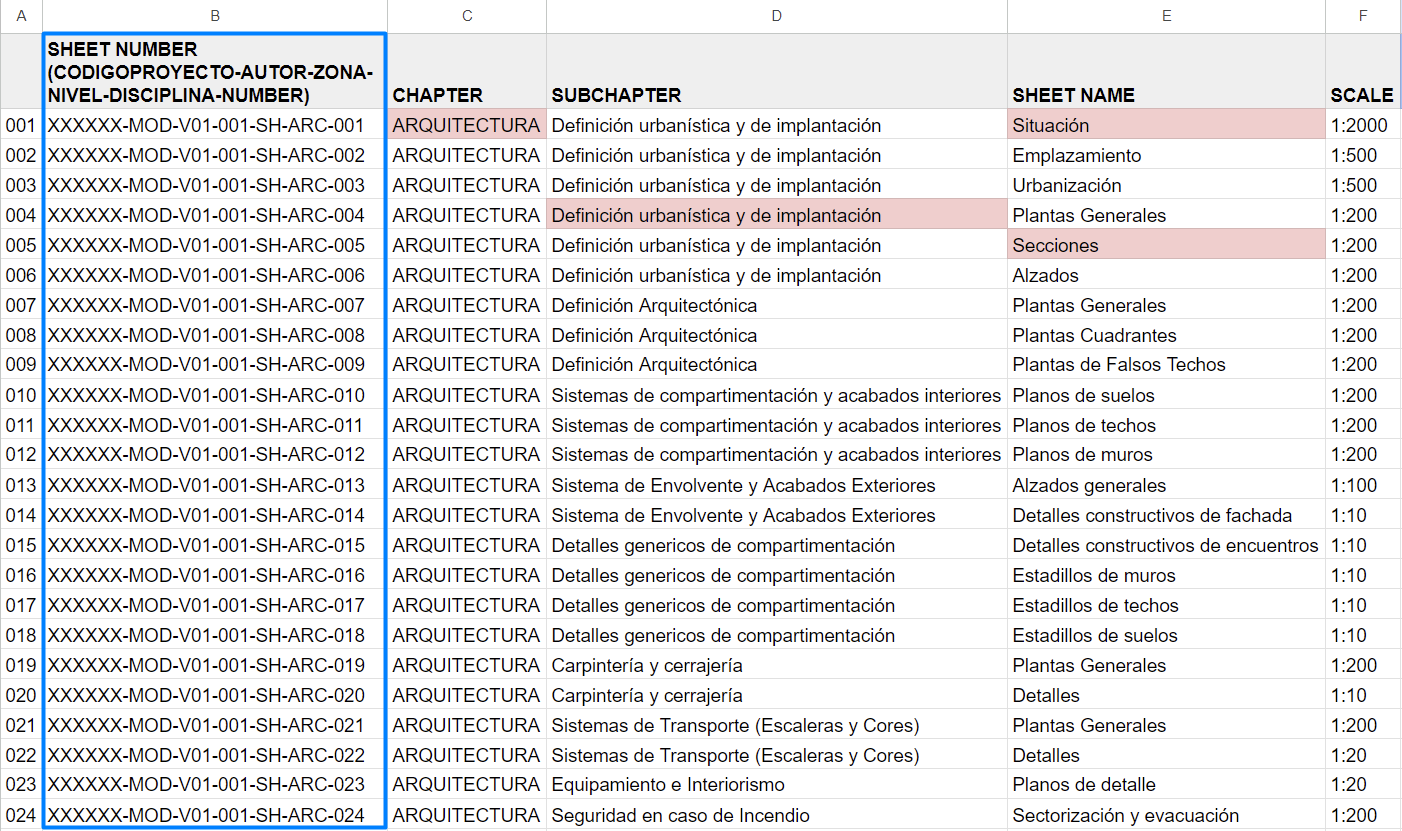
*Example of a basic documentation template
To achieve this, we conducted an exhaustive analysis of sheets content in a building project, focusing on the disciplines of architecture, structures and MEP. In order to carry out this analysis, we have consulted various sources, such as official architects' and engineers' associations, as well as specialized training websites.
For every sheet, we have defined the following information:
- Sheet code: We have used a nomenclature in accordance with ISO 19650, following the guidelines set out in our specific guide.
- Chapter: A specific chapter has been assigned to each discipline (ARC for architecture, STR for structures and MEP for installations), which facilitates the organization within the package of each discipline.
- Subchapter: Within each disciplinary package, a more detailed organizational structure has been established, which allows for a better classification and location of the drawings.
- Sheet name: A descriptive name has been assigned to each sheet, which helps to quickly identify its content and function.
- Scale: We have provided the most commonly used scales for mid-level projects, taking into account that they may vary according to specific needs. However, we have focused on the most commonly used scales.
- Delivery dates: Delivery dates have been set for different stages of the project, such as Concept Design, Technical Design and Construction Stage. This allows for a correct planning and monitoring of the process over time.
It is important to note that this template is basic and it is likely that more sheets will be added as the project develops, depending on the particular circumstances of the project. However, these sheets mentioned are the minimum that should generally be provided at each stage of the project.
Furthermore, it is important to mention that this list does not include specific civil engineering sheets, as it focuses on the disciplines of architecture, structure and MEP.
2- Sheets list
In collaboration with the design team, we will complete the list of drawings for each of the disciplines required for the project. The list of deliverables is a very important document in any project, and often constitutes a deliverable in itself.
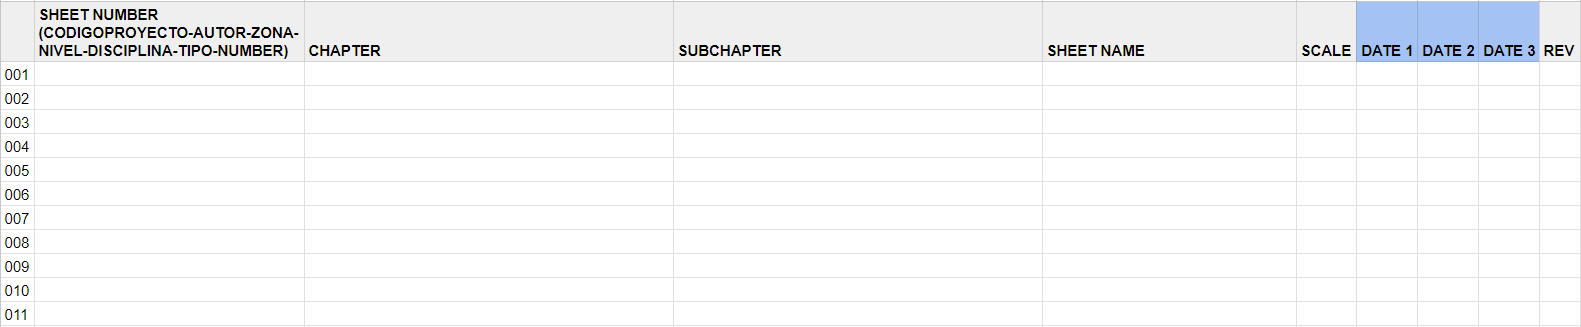
The following image presents some of the columns typically required in the list of sheets. However, each project is unique and will require customized modifications based on the specific needs of the project and the client requirements.

The information contained in the sheets list corresponds to the columns of the table. Each column of the table represents a different parameter in Revit:
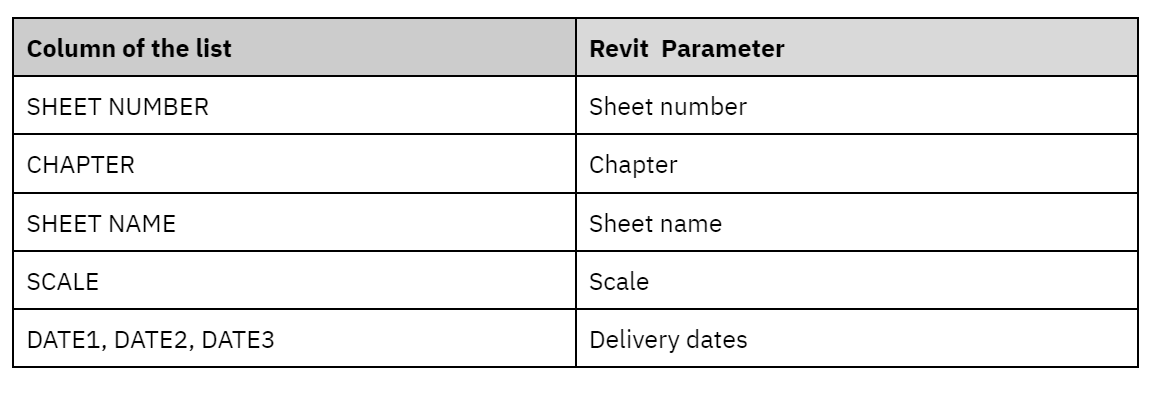
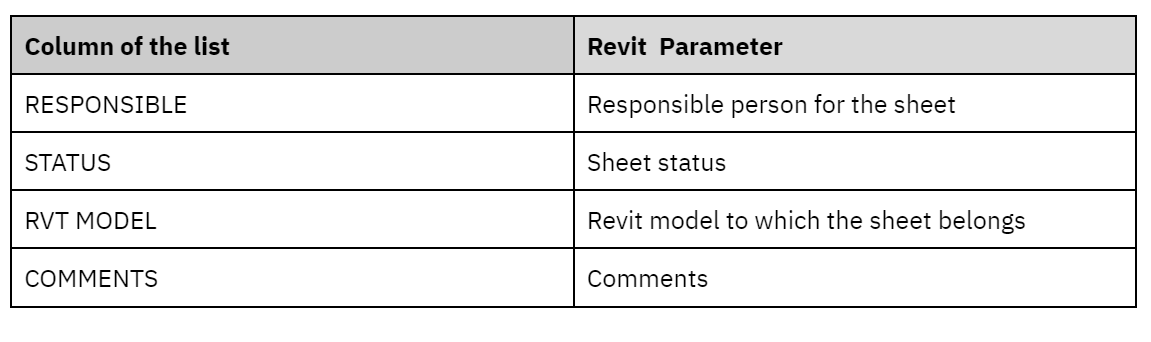
These columns mentioned above will be present in most projects, as they represent fundamental information for managing the sheets. Additionally, besides these main columns, it is common to include auxiliary ones that assist in document management and provide additional information:
3- Creation of sheets in Revit
Using a script, we will generate the sheets directly in Revit from our Google Sheet (or Excel) file. It should be noted that depending on how we have structured the list of sheets and our script we will be able to do more or less things:
- The first level would be just generating the sheets
- Generate sheets and views
- Generate sheets, views and insert them into the corresponding sheets
- Additionally, enter specific parameters in the title block.
Link to download the sheets creation Script.
The idea is to read the information from the GSheet, process it. Then generate the sheets containing all the parameters that correspond to the columns of the GSheet.
4- Checking
Within our spreadsheet, we have created an additional tab called "Checking". The purpose of this tab is to compare the information present in Revit with our list of sheets.
As a large number of people are involved in a project, it is quite common for changes to occur in both the list of sheets and the model sheets. In order to ensure the consistency of the project and to avoid possible discrepancies, we have added this check tab.
The check tab allows us to carry out an exhaustive and precise analysis of the information contained in Revit and in our list of sheets. Through this comparison, we can identify any differences or deviations between both sets of data and take the necessary actions to correct them.
The process consists of exporting the information from the sheets in Revit and then entering the extracted data in the check tab of our spreadsheet:
Link to download the Checking Script.
The script exports the Revit sheet data to match the organization of our spreadsheet for comparison purposes. Later we will use the "conditional formatting" function to automatically identify discrepancies between the list of sheets (GSheet/Excel) and the sheets in Revit:
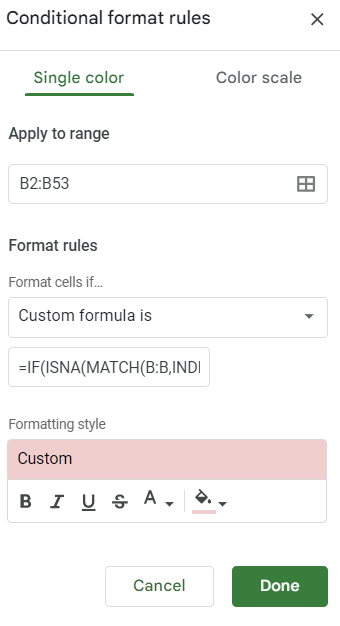
This conditional format rule will also be applied to the sheet list tab, in order to highlight possible errors between the two lists.
5- Modification of Revit sheets:
Once we have identified and resolved the discrepancies found in the previous step, it is crucial to proceed with updating the sheets in Revit. It is essential to maintain consistency and coherence between all the files in the project.
We do this by means of a script similar to the one used to create the sheets, except that in this case we don't have to create anything, just update the information.
Link to download the Sheet Update Script.
Repeat and Repeat
This interaction of steps 4 and 5 will be repeated as many times as necessary throughout the project.
6- Export check
Finally, it is important to verify exports to other file formats, such as PDF or DWG. If the sheets in Revit match the information recorded in the spreadsheet, we can expect that the PDF or DWG files generated will also be consistent. However, it is common to find projects where certain documents are not exported directly from the model.
With this checking system, we can ensure the consistency of the project even in those documents that are not managed by us, we can use this tool to verify that the information contained in the exported files matches the list of sheets.
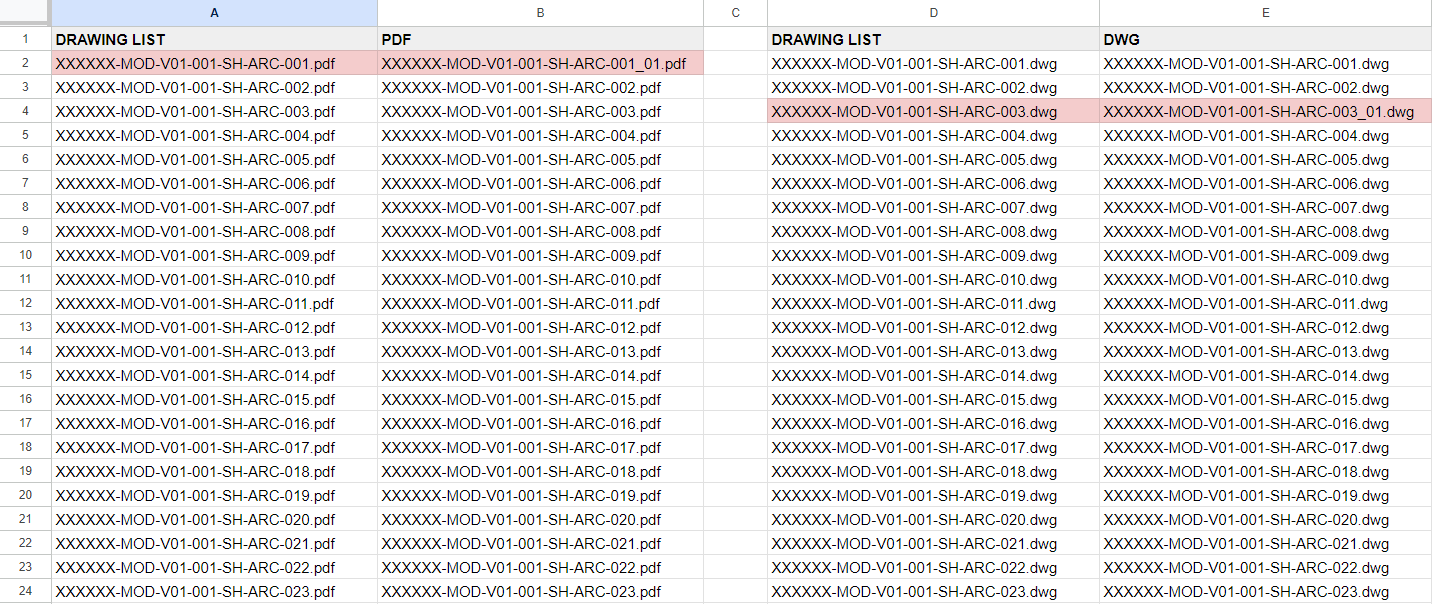
For this check, we will have another tab in our spreadsheet, very similar to the one in step 4. However, in this case, the information will not come from Revit, but from PDF or DWG files.
In the same way by using conditional formatting, we will check the discrepancies with the list of sheets.

This export in Modelical is done by means of a .bat file, which is just a file that when executed in a folder will create a .txt with the name of all the files that are in that folder.
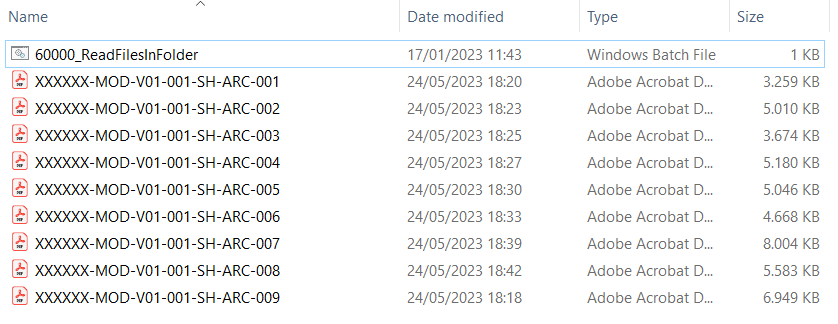
When the .bat is executed, a .txt file containing the name of the files will appear.
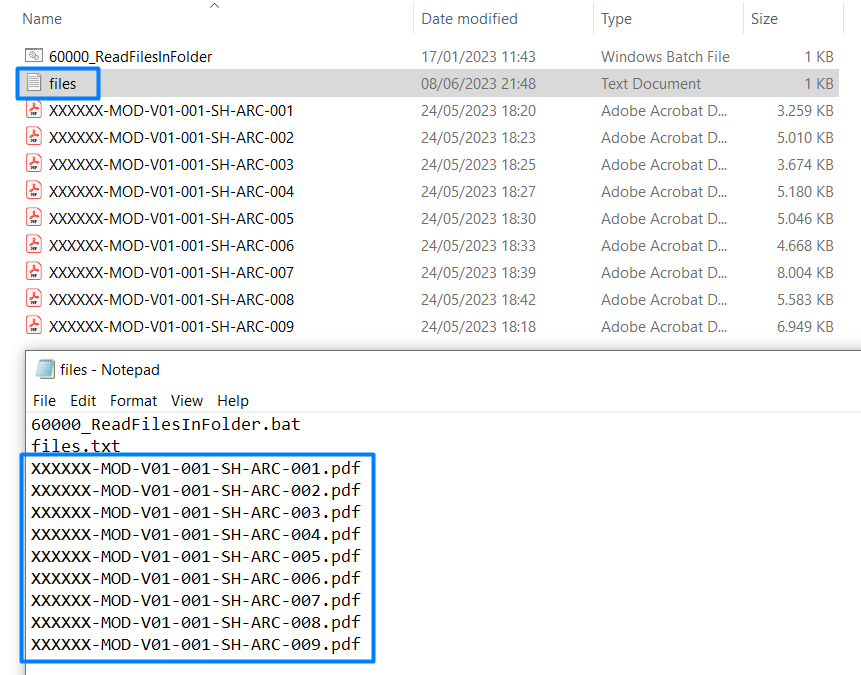
To generate this little program we only have to write this in Notepad++ and export it as .bat
dir /b > files.txt
Once the information has been exported to .txt, this list of files is copied to the GSheet check tab. Using the previously configured "conditional formatting", inconsistencies between the list of sheets and the list of files will be highlighted.
7- Organisation of the documents by folders
Additionally, we can also organize the PDF or DWG files by folders. This is also done by means of another .bat file. In this case:
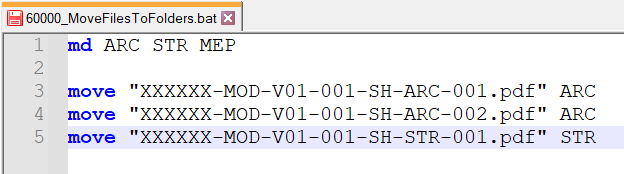
The md command is used to create the following folders: ARC, STR and MEP. On the other hand, through the move command, each of the files will be moved to the corresponding folder.
It is recommended to set up this .bat file through the same spreadsheet, concatenating:
Command + "File name" + Folder name (as shown in the image above).