
Revit Key Schedules
Operation in Revit
Revit Key Schedules
Notes
This guideline has been prepared taking into account the current functionalities in Revit 2023.
In this guideline we will talk about “Key Schedule” or “Schedule Key” as the same tool.
Objective
- Understand how to use Schedule Keys to quickly populate all the parameters referring to Rooms, Spaces and any other categories of key attributes.
- Understand how to use Schedule Keys applied to the Architecture Revit Discipline
- Understand how to use Schedule Keys applied to MEP calculation data.
Prerequisites
- The user has a basic knowledge of BIM Modelling with Revit software and an understanding of the terminologies.
- The user is capable of creating Revit schedules and is aware of the utility of Revit parameters.
Introduction
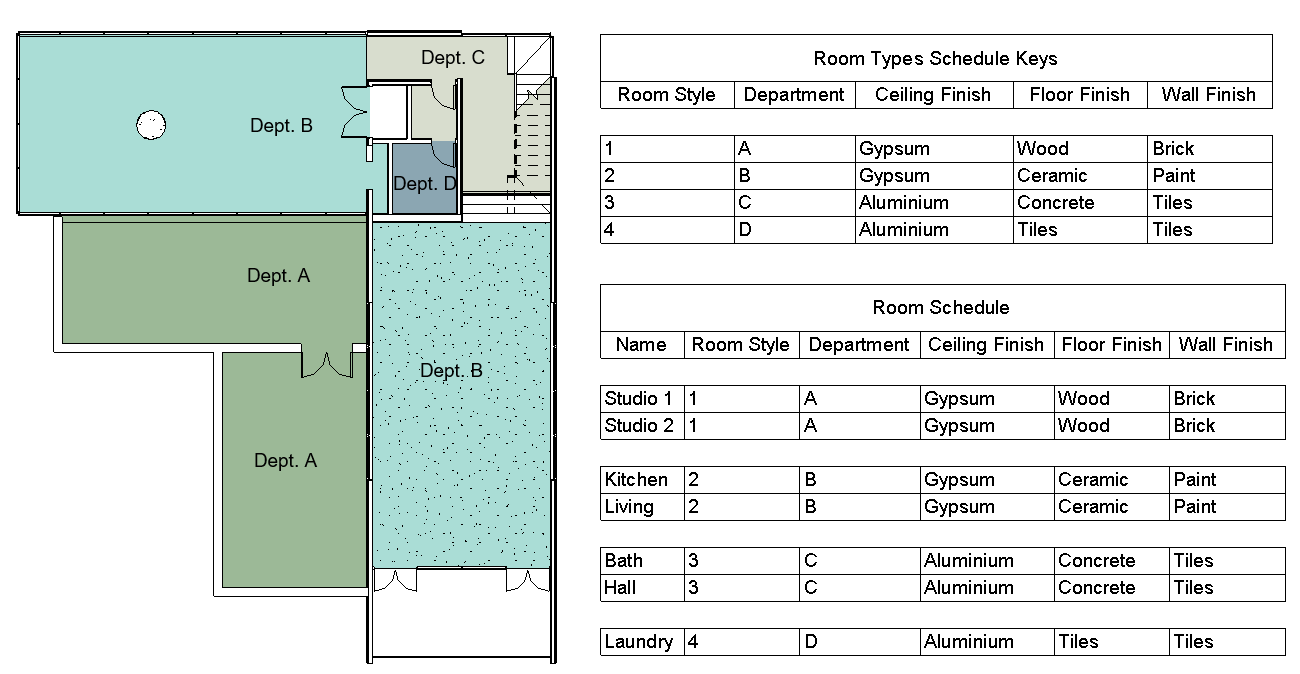
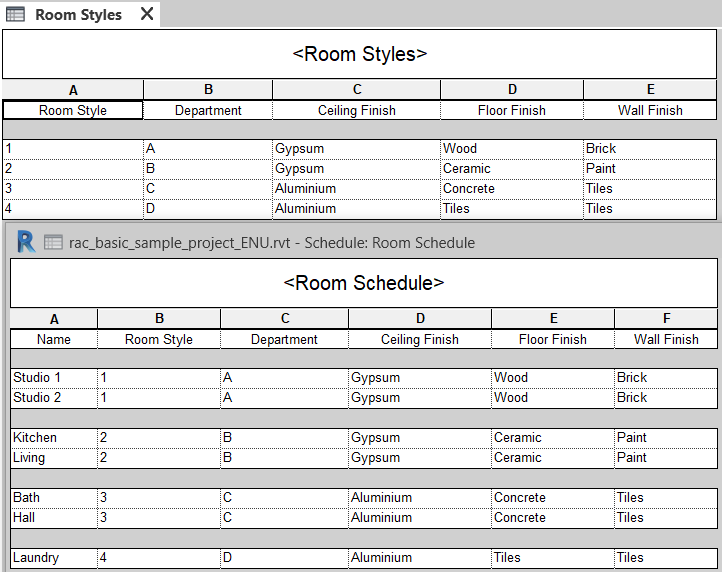
A Revit model contains thousands of elements, each one of them containing different associated parameters. Key Schedules allow us to manage all that data; However, sometimes we have multiple elements which share several characteristics between them. For example, in a Revit room schedule, all rooms might share finishes according to styles. It would take us a long time to edit all the Rooms parameter information if we did it one by one. To make this task easier, Revit includes a special tool called “Schedule Keys”
Using this tool we can set a key Parameter that allows us to fill out automatically other parameters contained within the element; keep focus on the previous example, if we complete the key parameters called “Room style”, we could fill out automatically other parameters such as ceiling, wall and floor finishes for the same room, saving us time at the moment to fill out or modify all data within a Revit Schedule.
What is a Revit Schedule key
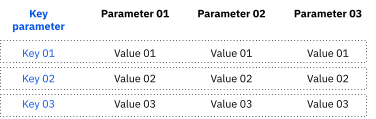
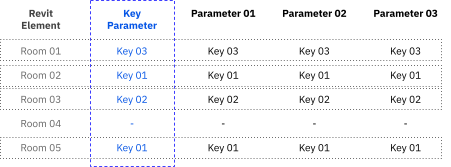
A Schedule Key is a Revit tool that works such as a sub-schedule which is directly connected to the regular Revit Schedules associated with each category, allowing us to package all the information. Starting from here we define some keys, which contain a series of values associated with each of these keys. At the moment that we assign the key to a Revit element, all the associated values to that key will be updated automatically within their corresponding parameters.
Dictionary concept
A Schedule Key works such as a dictionary. This concept is very important in programming because it is very useful at the moment for managing databases.
A dictionary is characterized by being composed of a series of key-value pairs, in which each key is unique and exclusive. This means that if I define a key, as the value of a key parameter, I can assign to that key a whole series of values, such as the values of all the parameters I want, which would always be linked to that key.
How a Schedule Keys works
A Schedule Key Table allows us to apply a certain amount of data or characteristics of objects, spaces and certain categories using the key parameter fields; these work such as instance parameters of an object and maintain a direct relationship with other parameters of the selected category.
This means that when a key parameter of an element is filled out, the other parameters associated to that key will be populated automatically within the same element according to the data that the key schedule contains.
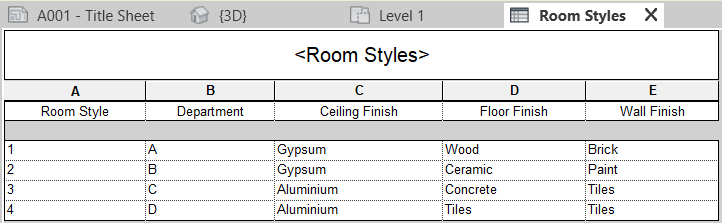
For example, A Room Schedule Key can be created to define which floor, wall or ceiling finishes will have that room type. We will have to create as many keys as the finished combination the project has, and then apply the key that we need to the different rooms.
At the very first moment that we created a Schedule key, this will be empty, the user will be adding as many key values as he needs.
How to use a Schedule Keys
Schedule Keys can be used to associate information that we’ve previously defined in a certain elements Category Key. The most common uses are:
- Apply Finishings to a room, door finishes or any other category of material finishings. When these parameters are not available as system parameters, it is necessary to add them as project parameters with the desired characteristics.
- Associate spaces to ventilation calculation data requirement or any other facility calculation data to be able to compare, for example, the required airflow with the actual airflow delivered.
- Add to a Revit category any information related to his manufacturer, for example, Type of window’s glazing, color or even the heat transfer coefficient all of this information related to the Revit window category.
- Uses related to minimum surface requirements in rooms, areas or parking spaces, could be useful to check if those requirements have been met. This could appear within the properties and be used for analysis and calculations.
Schedule Keys configuration and creation
1. Create a Revit Schedule Key table
Go to “View” Tab > “Create” menu > drop-down “Schedule” tool > “Schedules/Quantities”.
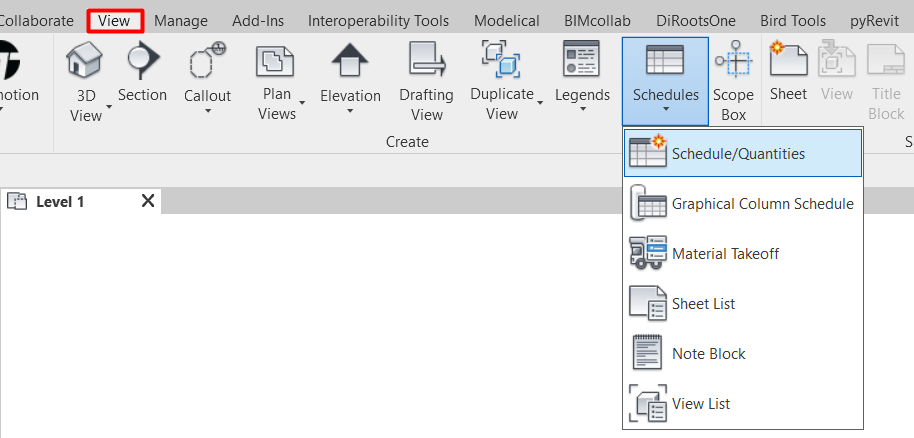
It will show a menu where we can select which Revit category we want to schedule. The Schedule’s name or if it’s a “Schedule Building Components” or a “Schedule Keys”. As a starting point we’ll select the second option to begin setting our Keys. We can create Schedules Keys for almost every Revit category.
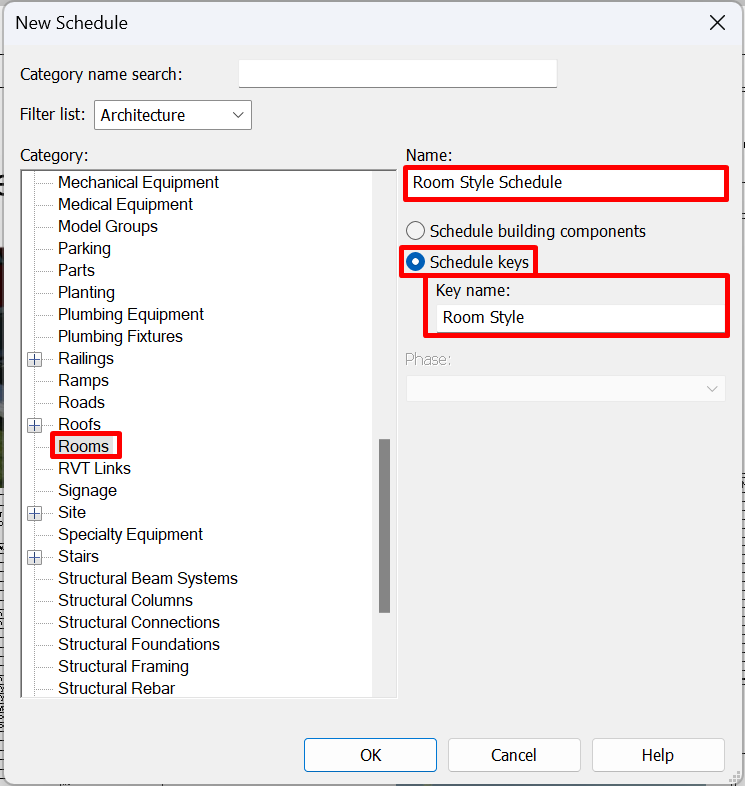
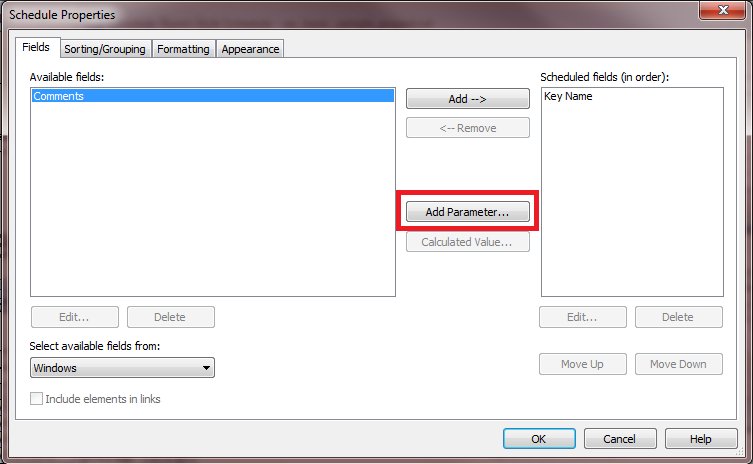
The next step is to define the fields that will be shown in our schedule key
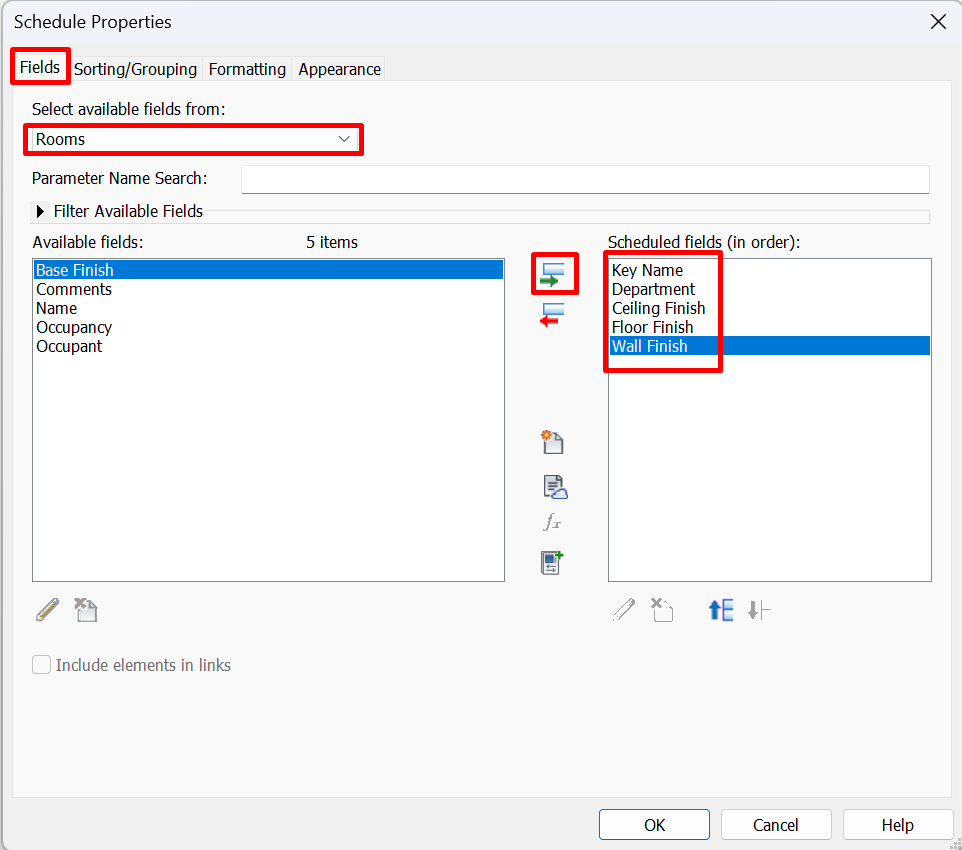
Within a schedule Key in addition to the “Key name” the following fields could be added:
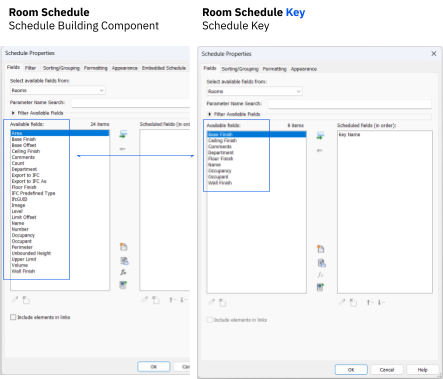
- Instance Parameters (read parameters guideline) within systema families. Not all the parameters will be available, as this will depend on the chosen category:
- Categories that don't allow any systema parameter:
- Grids
- Levels
- Paths Caminos de recorrido
- Analytic spaces
- Analytic surfaces
- Categories that allows to include several system parameter within a schedule key:
- Spaces
- Rooms
- Areas
- Doors
- Electrical equipments
- Plumbing fixture
- The rest of categories have the system parameter called “Comments” which can be included within the schedule key
In the image below it can be seen the difference between the available system parameters that can be included within a “Schedule key” or a “Schedule Building component”, as appropriate.
- Custom parameters (Shared parameters) can always be used if they are Instance parameters.
- Other parameters (always as instance parameters) to be use within Schedule Keys are:
- Information project parameters
- Parameters from services (located in the cloud)
- Parameters with calculated values
On the other hand, we will not be able to use calculated parameters or included elements coming from linked models or files.
Once we have chosen all the fields to be included in the schedule key, it’s time to create the key rows with their associated values. We need to add as many rows as key types we want to create.
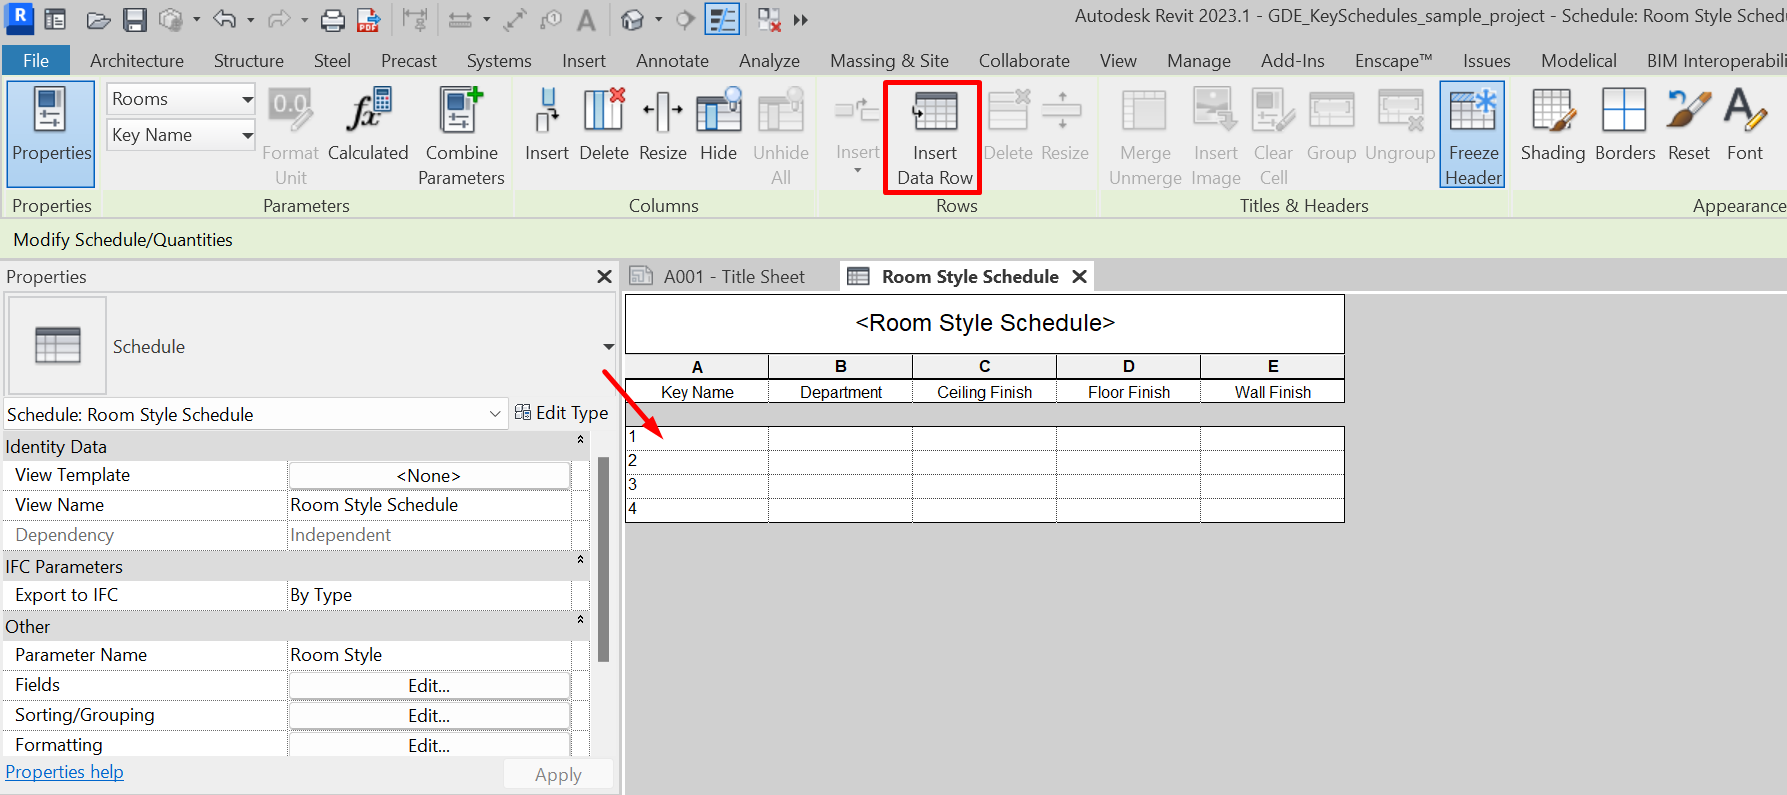
At last, complete the appropriate information for each key value.
Going back to the room finishes schedule example, we must define for each key associated with the ”Department” type, the ceiling, floor and wall finishes that each “Room style” will have.
The key parameter name that will be used to select which key is the one to be assign to an element, could be customized into the setting of the schedule key, located in the “Property Bar” under the property set called “Other” > “Parameter Name”
In the next example, we have modified the name of the parameter to “Room Finishes” which needs to be set as “Key parameter”
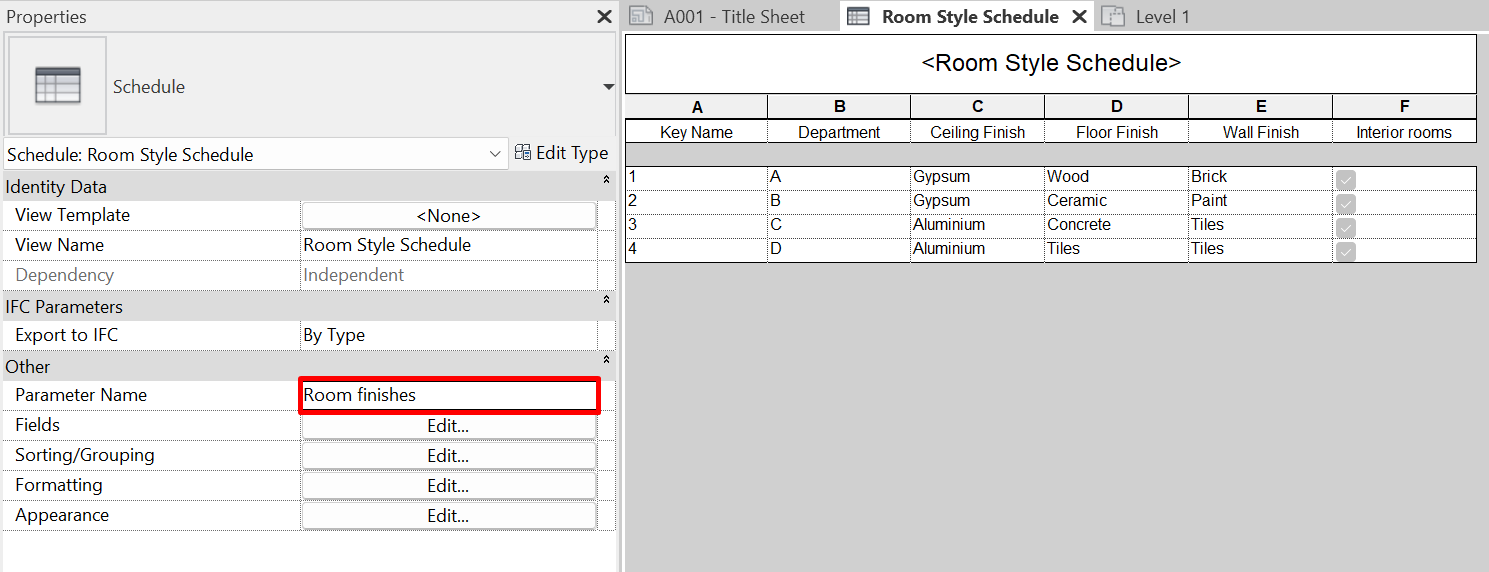
We can see how when creating the Key Table, the key parameter is automatically created as an instance parameter of the selected category, in this case, Rooms.
2. Apply a Schedule key tables
The definition of a Key or Style Table can be added in the following manner:
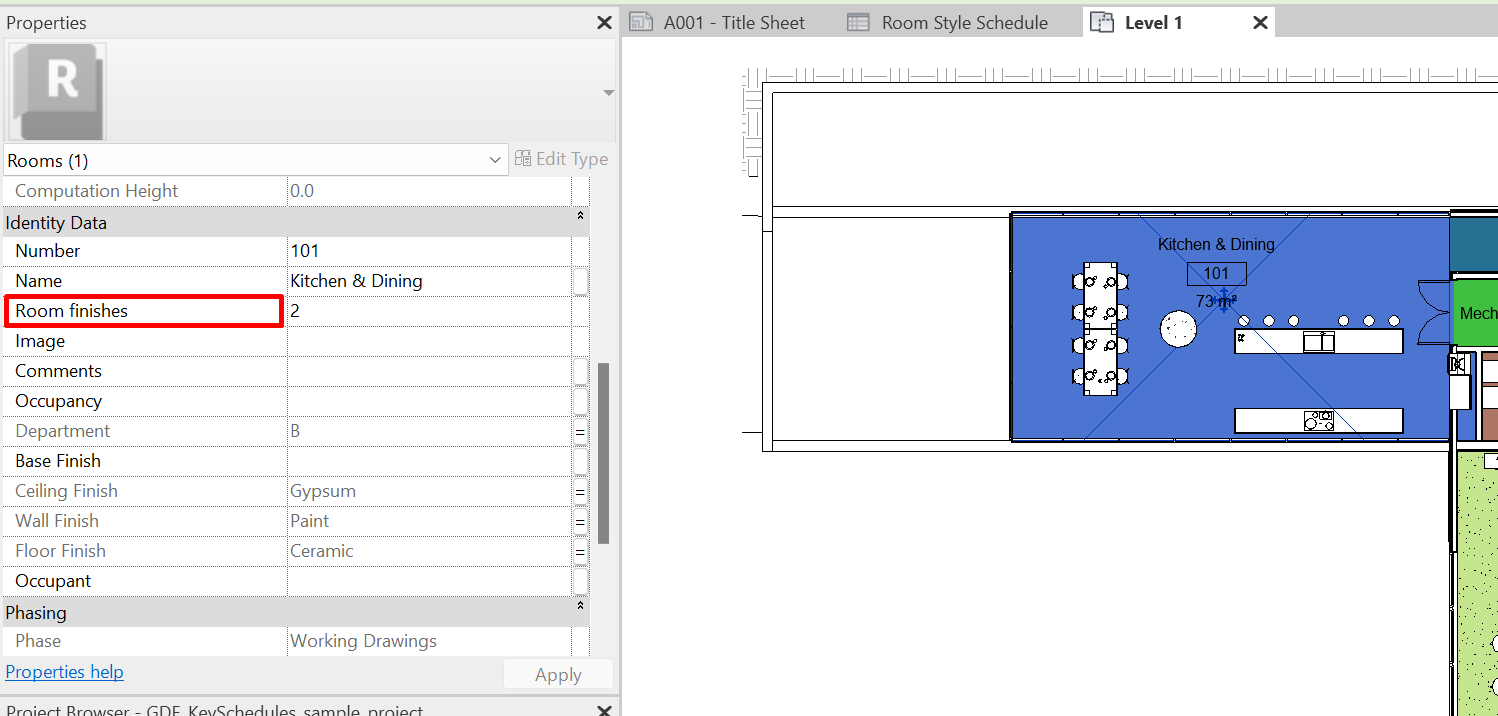
- Selecting each element and applying a key parameter value; “Room Style” (for example) within its properties:
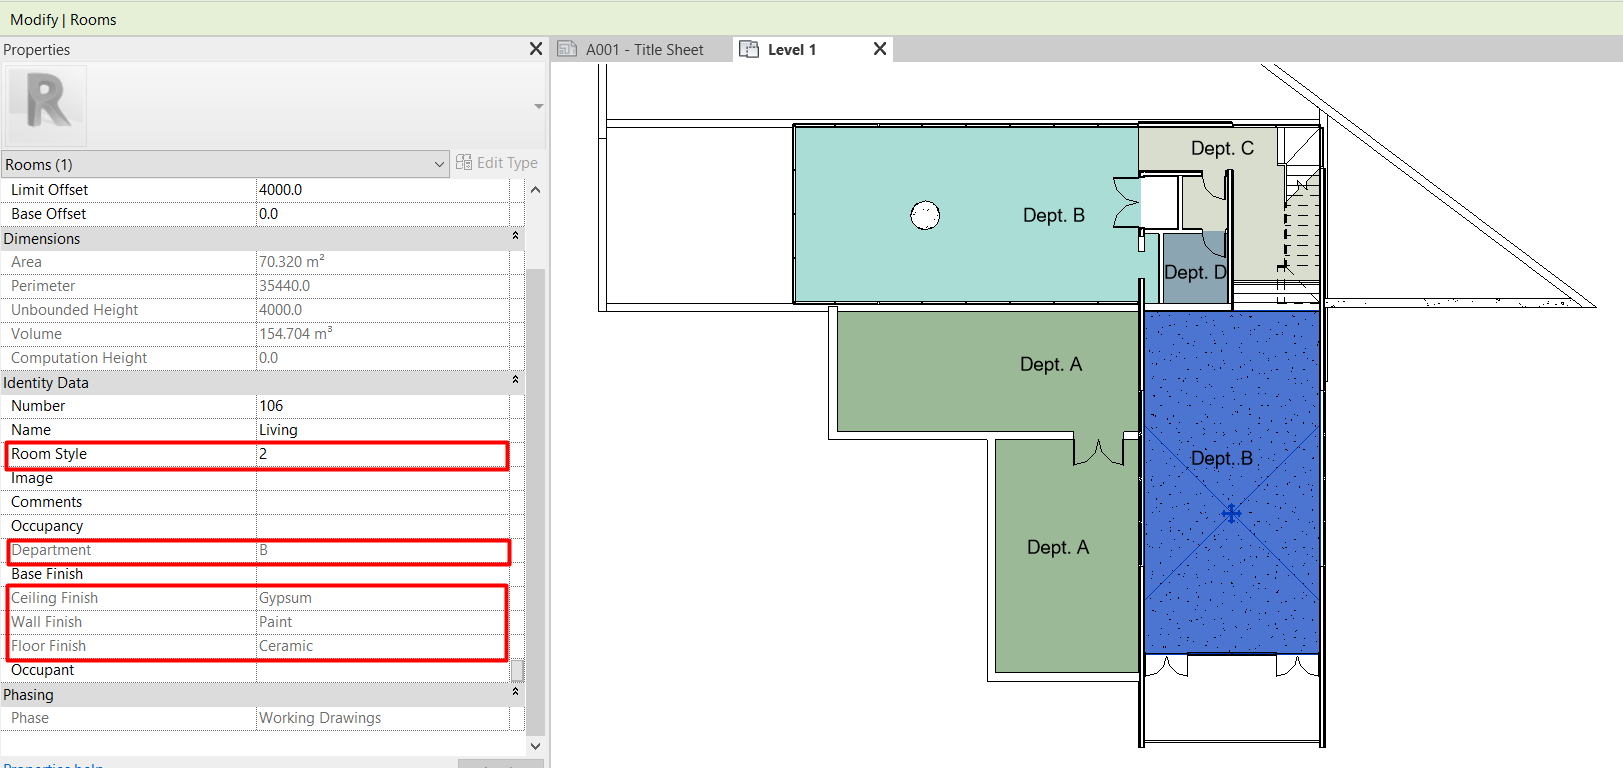
- Creating a schedule key where we assign a key parameter value (Room Style) and filling out the rest of the parameters automatically.
This option is recommended if we have lots of elements in the model, thus we’ll save time and it helps us check if all the model elements are properly configured.
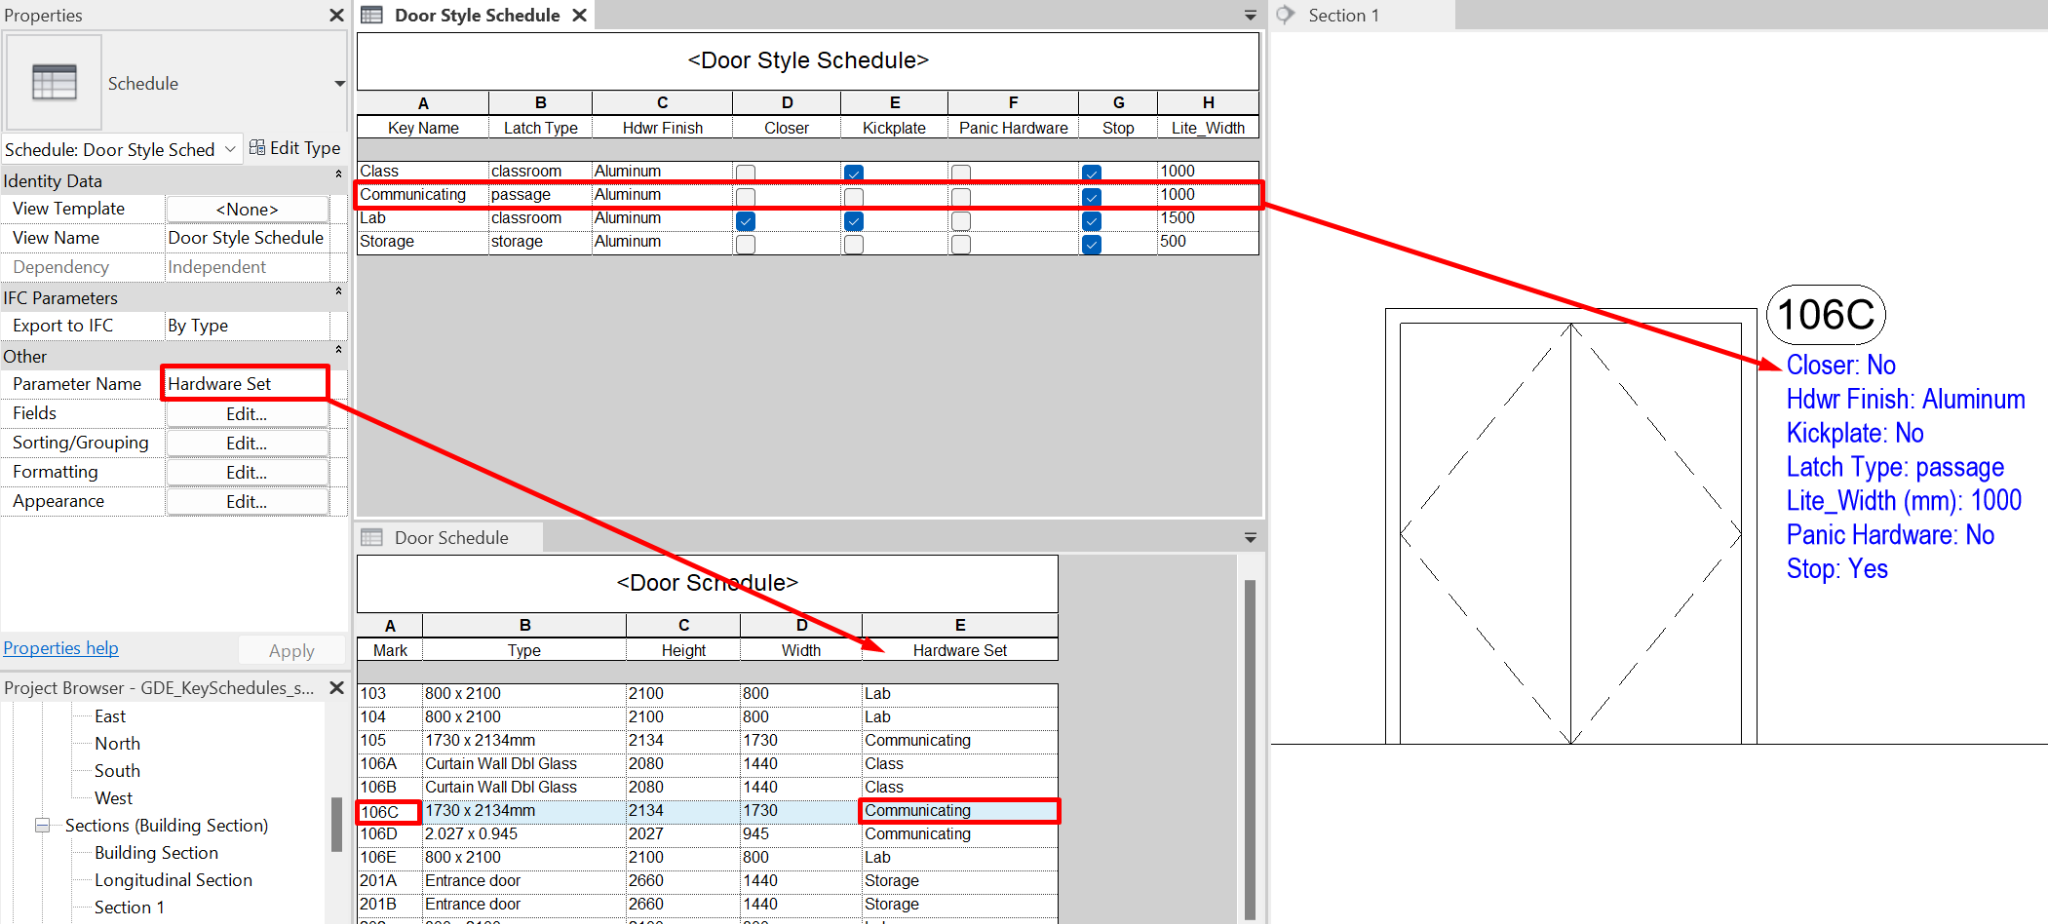
Tagging Key Parameters
Schedule Key tables can help control data and fill out multiple values within elements. Tagging those elements can be configured to show all those parameters filled.
Family tags can gather the system parameters by category that are filled out within the Schedule Keys. But if we need to tag new parameters, those shall be shared parameters that we must include into the families tags.
The only parameter that cannot be tagged is the “Parameter Name”, which is used to select the style or key to be assigned to an element, and is normally called “Category Style” and appears within each element’s properties.
An useful example could be a carpenter quality sheet. If we want to describe all the doors, such as latches, locks systems, anti-panic fittings or security system, those could be recorded considering their types needs within a schedule key, assigning them to each type of door through a door schedule, and in the carpenter quality sheet, tag the door with the information needed.
Samples of how to use a schedule key
Next we’ll see some useful examples about the use of schedule keys. Certainly, this kind of schedule has lots of potential uses and depends on the user to take advantage of all their potential.
Filling out Parking information requirements related to Surface range areas
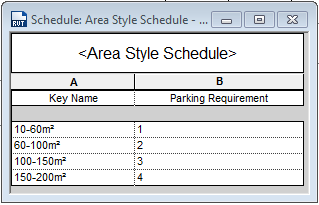
This can be helpful when working on large-scale buildings with a wide quantity of apartments with certain surface areas pre-defined. Using a schedule key in these cases we’ll allow us to check in an easier way if we’re meeting the parking ratios per apartment established by the legislation.
- First, we must create an Area schedule key defining how many parking spaces are needed according to the apartment’s surface.
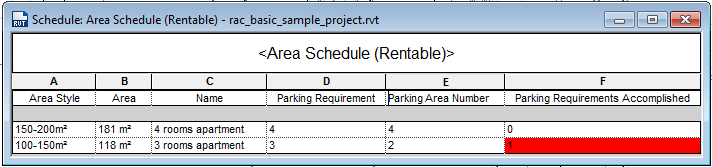
- The next step is to apply the “Area Style” corresponding to its total surface area. We can compare this parameter against the real number of parking spaces and then create a calculated value: “Parking Requirements Accomplished”. This calculated value will be the difference between the “Parking requirements” and the real parking spaces in the project (Parking Area Number). An easier way to detect if we’re meeting the legal requirements we could, is to apply a conditional formatting with highlights in red color if we’re out of the accepted parking spaces number by the legislation:
Manufacturer's information within windows category
Suppose that we have a windows catalog with some information that we want to include in the windows families. We could add it manually or use programming to automate the project. Let’s see how easy it can be to complete this information using the schedule key. When a schedule key is initially created, only the parameter Comments is visible as an available field:
As we mentioned before, this is not a problem; we just need to add new parameters to the project.
In this case we want to add the next five parameters (Setting appropriately the discipline, Parameter type and group (Property set) for each parameters added):
Name | Discipline | Parameter Type | Group (Property Set) |
Window Glazing type | Common | Text | Materials and Finishes |
Window Color | Common | Text | Materials and Finishes |
Heat Transfer coefficient | Energy | Heat Transfer coefficient | Energy Analysis |
Unit Cost | Common | Number | Construction |
Frame Material | Common | Material | Materials and Finishes |
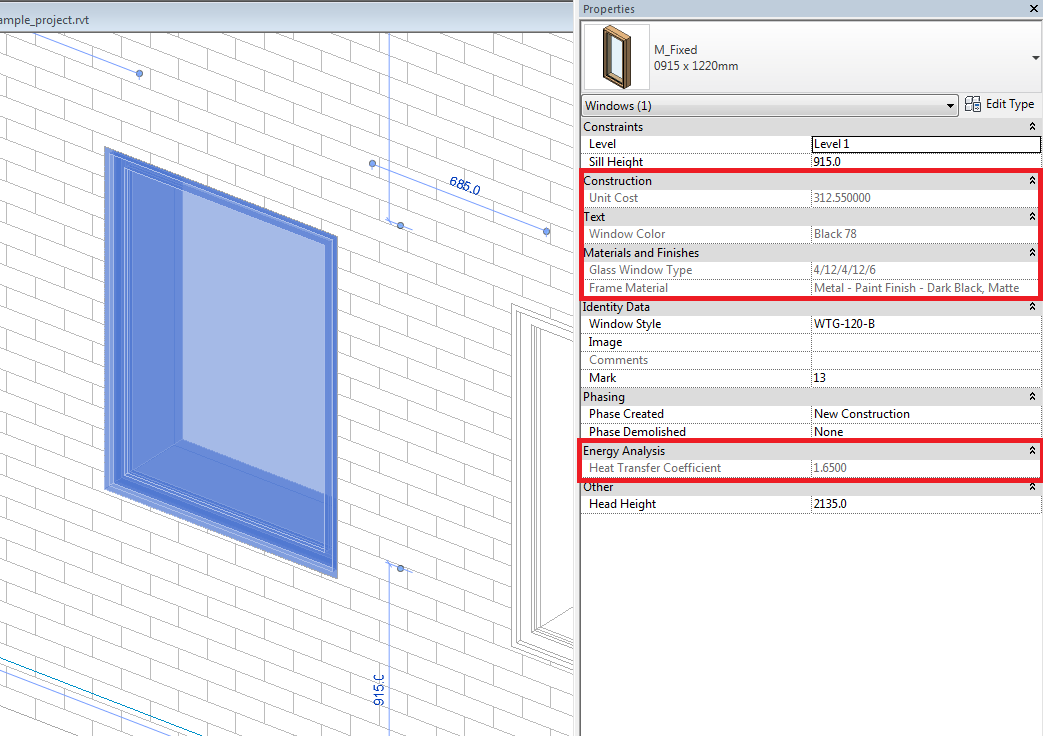
We then need to complete this information for each Key, which in this case is related to the window type. When we complete the information for the Material Type parameter, Revit will automatically show the Material browser window so we could choose the proper material.
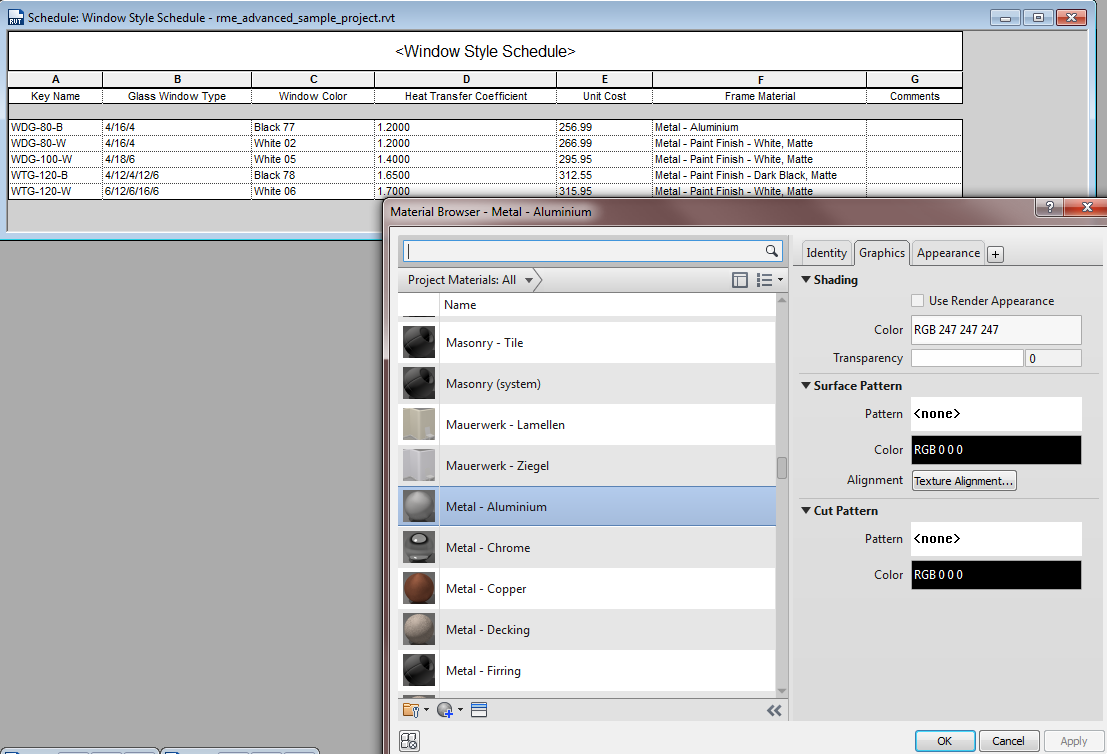
As we have explained before, we just need to create a windows schedule (Schedule building component) to apply the corresponding key to each window, thus having the whole information filled within the windows properties:
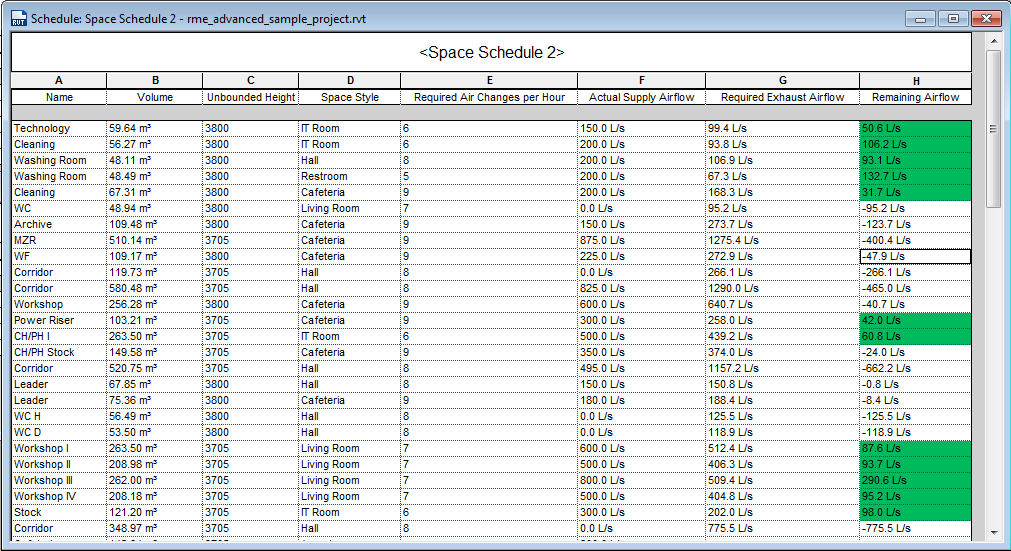
Space required ACH to calculate the required renewal airflow/exhaust air area required to meet a given exhaust airflow rate
Schedules Key are used frequently to define MEP spaces information and do calculations.
Let's see the case where we must define space airflow per hour using a schedule key. If we’re working on a large project with hundreds of spaces, we could define some key spaces according to the airflows per hour that we need:
- Create a “Room” Schedule Key where we will use a parameter to set the number of airflows needed by space type; create as many space types as needed.
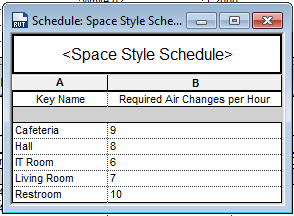
- Then, apply the Space Type to all the project spaces using a space schedule (building schedule component) and create a new calculated parameter which multiplies the Volume space by the number of airflows needed. Using this method we can compare if we’re supplying enough air to the space.
Conclusion
BIM models are big databases that can be managed and visualized in a clear and organized way using Revit Schedules. The problem that often arises is the large number of parameters that we must keep configured for each element in a context of constant changes. Thanks to the Schedule, we can package this information making some parameters dependent on others and applying 'styles' to our Revit elements. This approach saves time and allows us to control the information we generate in our models.
The use of Schedule Key tables can be extended in a multitude of fields from the verification of regulations in projects to the configuration of product catalogs. It is therefore convenient to have clear notions of the potential of these tables and the figure of the BIM Manager is necessary to facilitate the most efficient data management possible.
On the other hand, like the rest of the tables, they must continue to improve their development until they can be edited as real calculation tables (Excel or Google Sheets).
Tips & Tricks
- Elements within groups cannot change their key parameters from outside the group. We must open the group to be able to edit each of them.
- Once a system parameter is used in a certain Schedule Key category, it cannot be used in any other key table of the same category.
- Creating an appropriate Schedule Key can be very useful not only to populate parameter information, but also to help the automatic modeling of some elements through the use of applications such as Dynamo.
- Unlike a schedule (schedule building component), in the editing properties of the Schedule Key we do not have the Filter section; this forces all the rows that we have created in the table to appear. On the other hand, we still have the sections: Fields, Grouping/Classification, Format and Appearance.
- When we apply a key to an element in the properties, the fields are filled with the characteristics that we have previously defined in a Schedule Key. But we must take into account that if we want to remove the key from the element (by selecting "none") the parameters will remain filled according to the last characteristics applied. The difference is that these parameters will no longer be locked, and can be modified manually.