
Keynotes
Operation in Revit
Keynotes
Objectives
- Understand the uses of the type parameter “Keynote” inside the model.
- Be able to manage a "Keynote" parameter file in Revit.
- Be able to add in sheets a legend scheduling "Keynote" codes used.
Prerequisites
- User have basic skills in BIM modelling with Revit Software, and understand the language used.
- User understands the data structure in models (category > family > type > instance).
- There is a need for classifying model elements according to a classification system, internal or external.
Description
In Revit there are several tools for classifying elements. Some of them are out of the box, as the Omniclass classification, the Assembly code or the “Keynotes”, and it is also possible to use a new project parameter for this kind of task. This document will focus on the "Keynote" tool.
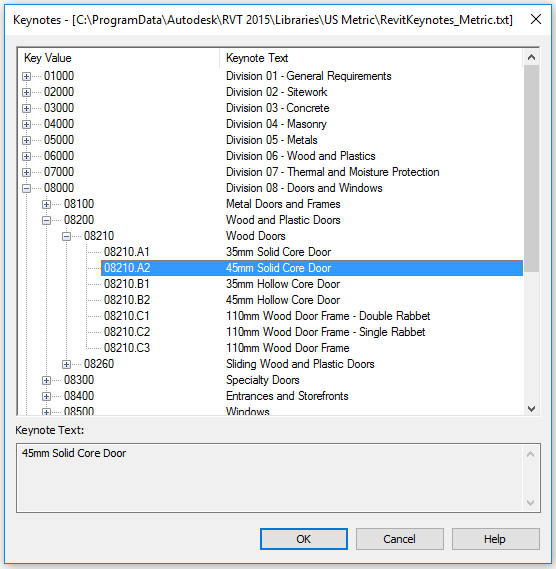
A "Keynote" parameter is available for all model elements (including detail components) and materials. The "Keynote" parameter value is derived from a separate text file that contains a list of “Keynotes”.
“Keynotes” assigned in a project are linked to their source "Keynote" table (file). When the "Keynote" table is changed, “Keynotes” in the project will only reflect the changes when the project is closed and reopened.
The default keynoting data provided in Revit is based on the 1995 Construction Specification Institute (CSI) Master format system, which uses 16 divisions to organize construction process and materials.
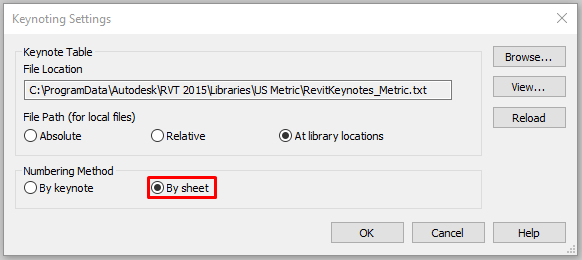
Each organisation can use its own “Keynote” file by going to Annotate > Keynote > Keynote Settings and browsing for it.
In the very same menu can be set Numbering Method. It will be described in more detail in the following sections.
Procedure
1. Adding Keynote data
As explained before, "Keynote" parameter is available for all system and loadable model and detail items (not filled regions or annotations) and for materials. To assign it to a family, open its Type properties panel and click on the icon as the image below:
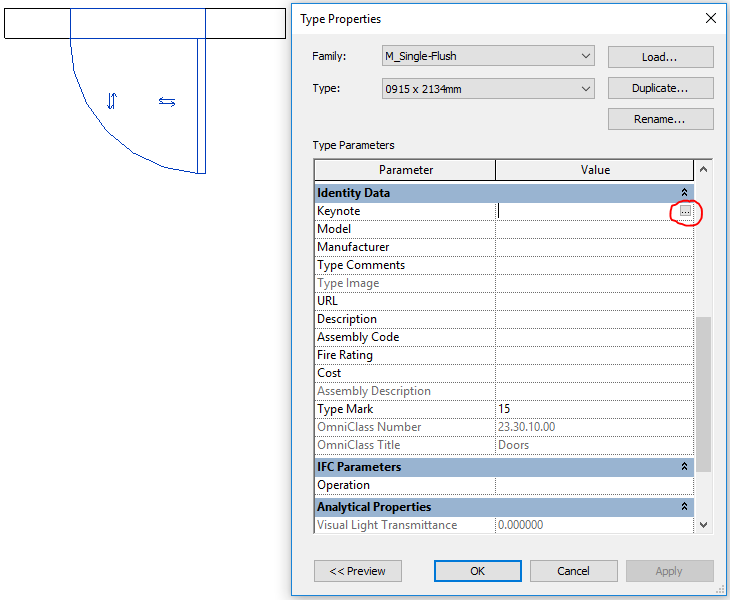
This action will open the "Keynote" file and the corresponding code can then be assigned to the element type.
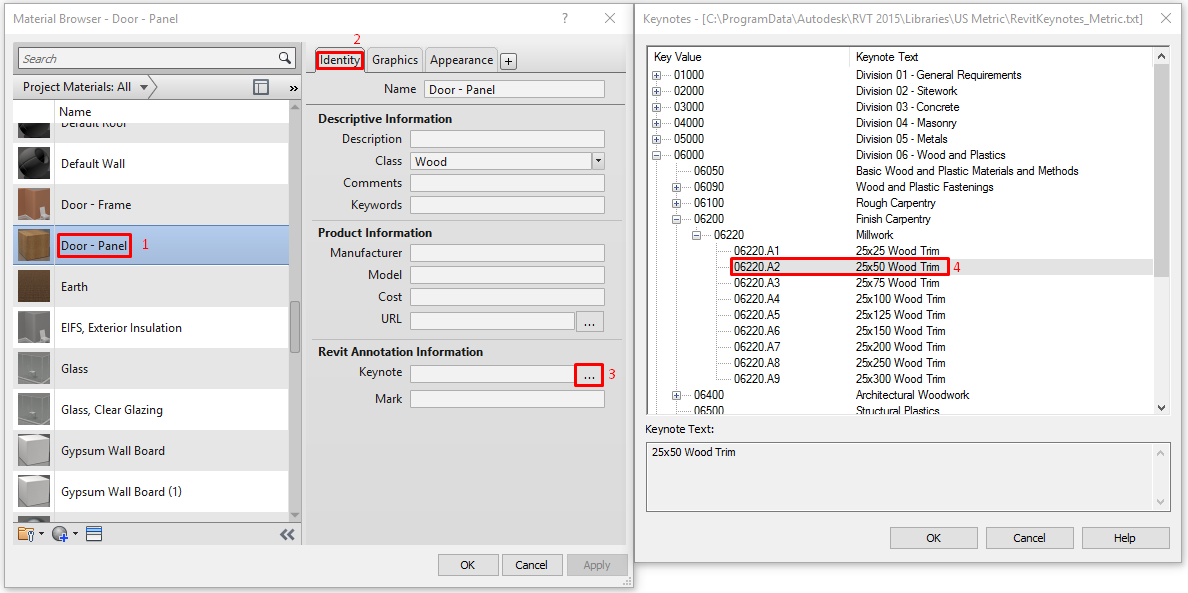
For the materials, the workflow is pretty similar.
Go to Manage > Materials, look for the material to be modified and find the "Keynote" parameter under the Indentity data.
2. Tagging Keynotes
Next step in the "Keynote" workflow is tagging the element with the related information.
This can be done by clicking on Annotation > Keynote > Element Keynote or Annotation > Keynote > Material Keynote.

User "Keynote". This option provides a way to use commonly used notes or phrases to address documentation issues. These additional user notes must be added to the provided "Keynote" text files or included in one that the user or the organisation creates.
This option is only accessible when you click in an element with the tool Annotation > Keynote > User Keynote selected. And only affects the active view, it doesn’t modify any actual element property. This feature should be used carefully.
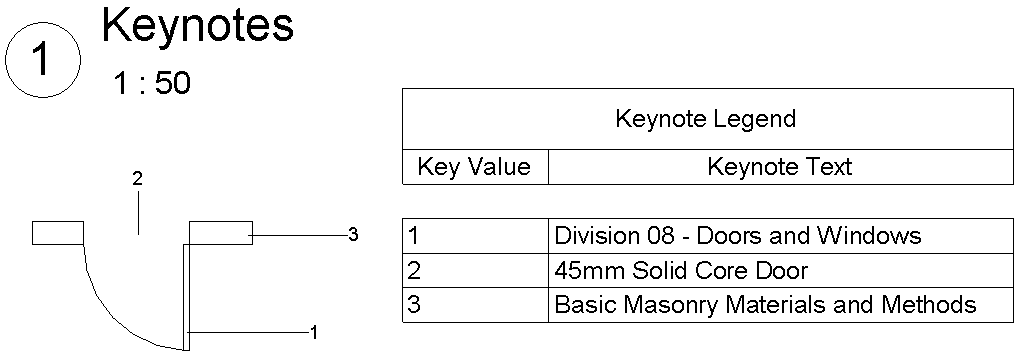
3. Keynote legends
When placing a view in a sheet, it may be necessary to add as well a legend explaining the codes of the "Keynotes". Do it by clicking on View > Create > Legend > Keynote legend.
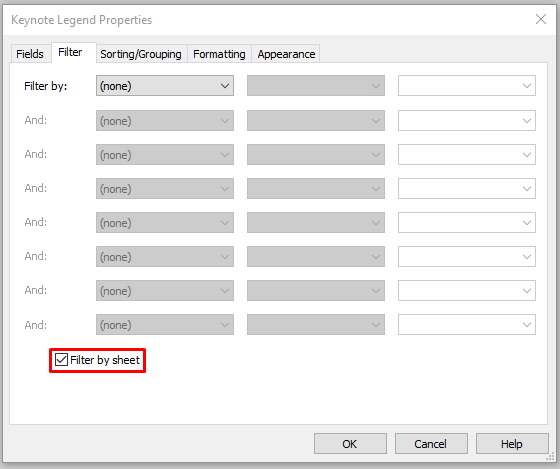
This legend is a schedule that can be placed on sheets as any other schedule. And as any other schedule has the Fields, Filters, Sorting and Grouping, Format and Aspect tabs to correctly configure it.
Filters in the “Keynote” schedule allow to see in the table only the items visible in the current sheet. This can be done by choosing the option Filter by sheet in the legend properties.
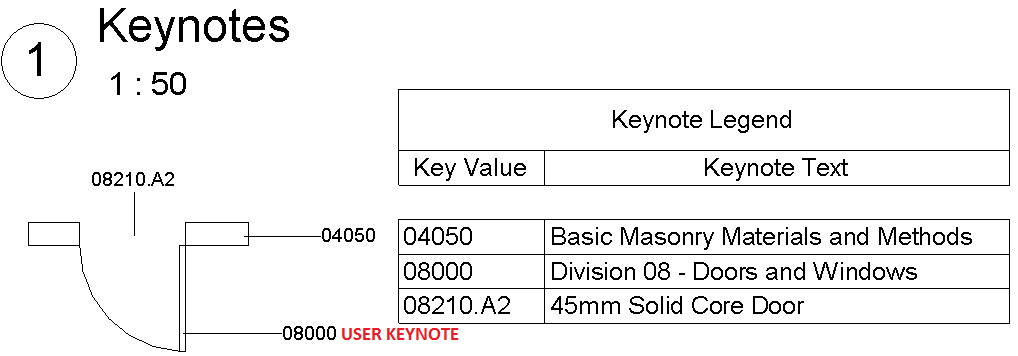
The last option for the “Keynotes” is the ability of working with the codes in the "Keynote" file or changing them by a sorted list (of correlative numbers) independent for each view, starting in number 1.
To do so, change the Numbering Method in Annotate > Keynote Settings to “By sheet”.
Tips&Tricks
- “Keynotes” are defined in a tab-delimited text file. Use Microsoft® Excel or a similar spreadsheet application to manage the data, then export it to a tab-delimited file format.
- Changes made to the "Keynote" table are not available in the current project session of Revit. Changes are only available when the project is closed and reopened.
- "Keynote" files for a standalone installation reside in the Revit library, which is located by default in %ALLUSERSPROFILE%\Autodesk\<product name and release>\Libraries\<locale and language>
Bottom-line
"Keynotes” are a great tool for classifying and describing elements in a project. The joint use with legends will permit to standardize the projects. Depending on the country, use the National Standard to follow, as the NBS in UK for instance, or use a custom file of the organisation.