
Navisworks Files
File types and Revit Model Conversion
Navisworks Files
Objectives
To understand what Navisworks is and how to convert Revit files.
Prerequisites
- User can navigate Revit files.
- User has basic skills in BIM modelling with Revit Software, and understand the language used.
Description
What Navisworks is?
It is an Autodesk software that enables the analysis, simulation and communication of design and constructability.
It allows shared viewing and review of models of different disciplines (Revit, Inventor, Rhinoceros, Solidworks, Sketchup, Allplan, Robot, CYPE, ...).
Main uses
Clash Detection: Interferences detection and management. It allows us to anticipate, prevent and resolve problems in the virtual model before construction begins, to reduce costs and minimize changes and delays. See ClashDetection guideline.
Planning: 4D simulation. Navisworks Manage combines spatial coordination with construction planning, allowing the simulation and analysis of it, and also you can manage the changes that occur during the construction progress. See 4DPlanning guideline.
Navisworks products
Navisworks is offered in three versions:
Autodesk Navisworks Freedom
Is the free-of-charge viewer version and only allows opening one NWD, 3D DWF or Recap file at the same time. It allows navigating the model, accessing saved viewpoints and comments and making measures, also playing an existing 4D simulation. However, edition is restricted and the model cannot be modified at all.
Autodesk Navisworks Simulate
This product allows you to combine and display multiple models simultaneously. You can view the objects hierarchy and their properties and also edit them. It allows the use of the timeliner tool for construction planning, but not the use of the clash detective tool.
Autodesk Navisworks Manage
Is the complete solution, all tools are available.
File types
Navisworks is capable of directly opening dozens of different CAD file formats but internally it always works with the same three:
NWC
Also called cache files. Contain geometry and properties for a converted model.
Cache files are the main piece of information in the Navisworks workflow: other CAD formats are read by Navisworks translators and a corresponding cache file is then created. If the source CAD file changes, a new conversion is triggered. Cache files are usually stored with their corresponding native files but this is not mandatory.
Cache files are not designed to be modified after created, on purpose. Metadata regarding 4D planning, assemblies, viewpoints, issues, etc, is contained in NWF and NWD files.
NWF
Also called federated files. NWF files are used to aggregate other cache or delivery files together with the necessary information to store clash detection, issue management and 4D planning operations, among others.
The normal Navisworks workflow involves creating a NWF file and appending many NWC files into it, then applying Navisworks features. The NWF does not store the geometry and element data, instead, NWC remain as links that can be updated as the project or design evolves.
NWD
Used for delivery purposes, because it integrates other cache and delivery files as imported elements, capturing the geometry and removing the link with the source NWC file. It stores all generated views, annotations and comments. It’s considered as a full file and is the only that can be opened in the Freedom viewer.
Procedure
Converting Revit Models to Navisworks
Revit to Navisworks conversion can be done in two ways, either exporting from Revit, which will create and save a NWC file from your Revit Model, or by opening the Revit file with Navisworks, which will also create and save the NWC in the same location as the Revit file, and then will add it to the NWF model.
In any case, it is imperative to prepare the model before conversion to Navisworks. This mustn't entail a lot of “extra” work, as the use of Navisworks shall be clear early on in the project, and the modelling procedures should enable it.
Preparing the model for conversion
If 4D planning is a BIM use to be completed in Navis, model elements must be subdivided in relation to the construction planning tasks.
”Parts” tool in Revit can be of help to segment an element in smaller pieces. For instance, you can model a retaining wall in Revit for all its length, but for construction purposes and planning, it must be broken down in smaller pieces that can be assigned, for example, to different days or construction periods.
Ensure that the coordinates of the model are correct. Navisworks allows the assembly of several models, to do so is imperative that the shared coordinates are properly set. Relocating models once loaded in Navisworks is possible but not a great idea.
Prepare a dedicated view for model export and name according to your BIM plan. If the view name contains the string “navis” then the translator can use it as the default Naviswork view and you can save a lot of time as Navis can locate the view for you automatically and there is no need to make the export manually from Revit.
Model export is made from a view: the translator converts only what appears in that view. Categories that are not relevant to the use of the model in Navis should not be exported. We also recommend you hide the links in the Navis view as those should be exported independently and assembled later.
Make sure the right level of detail is chosen.
Conversion settings
Creating the NWC from Revit
With the Naviswork installation, a new plugin will show up in your tools ribbon. Go to Add-ins > External Tools > Navisworks. A new window will show up asking for the destination folder of the file. In the bottom part of this window, you can access to Navisworks settings.
We recommend the following settings.
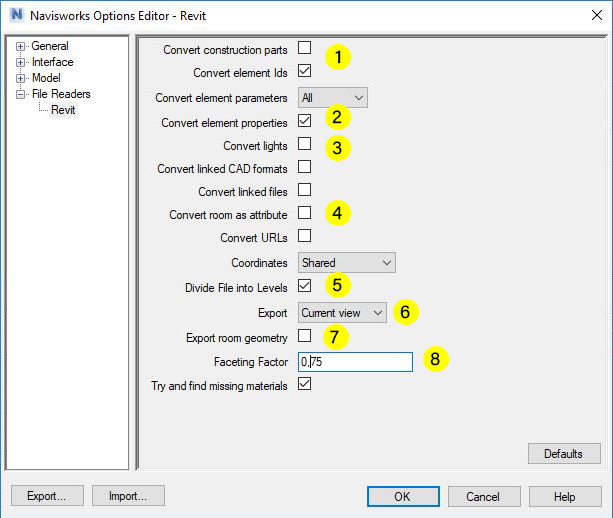
- Convert construction parts to export the parts instead of the original element.
- Convert element properties should most of the times be checked unless you’re not interested in accessing the parameters of each object in Navisworks.
- Convert linked files should, most of the times, be unchecked, as we recommend exporting each link separately and assembling them in Navisworks.
- Convert room as attribute to include the room properties in doors, windows, fixtures and other items.
- Divide file into levels will assign objects to levels, most of the time in the right way but sometimes we might encounter elements assigned to the wrong level (roofs, staircases, beams) or hard to assign to one unique level (multi-level walls).
- Export from Revit will make the most sense from the Current View so make sure you’re in a 3D views with the information and level of detail you want.
- Export room geometry will create solids with properties for each room. Must have Export Entire Project in order to work.
- Faceting factor tells how many triangles we want, being 1 the default value. Keep the faceting as low as possible for your purposes.
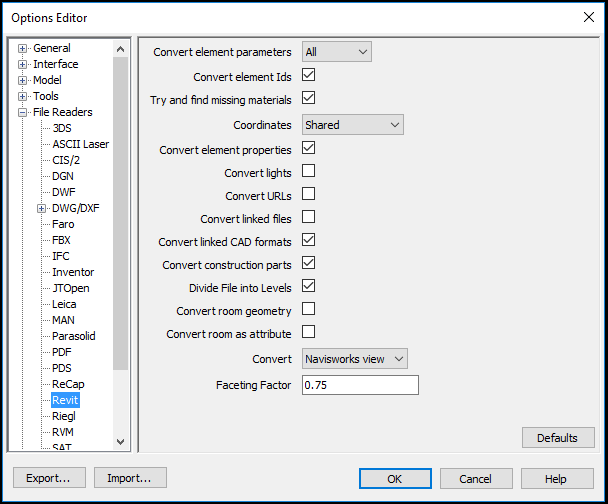
Creating the NWC by opening the Revit file directly in Navisworks
Go to Navisworks Menu and click on options. In File Readers section find Revit. You will have the same options as exporting from Revit but, in this case, you can choose the view to convert to be the one with the string “Navis” in its name or the first 3D view.
Resulting NWC file
If the file has been created from Revit it will be an "independent" file, and will be saved in a location set by the user.
If the file has been created from Navisworks, the file remains linked to the Revit file. When opened, Navisworks checks whether the Revit model is newer than the NWC, and if so, it will be regenerated.
Tips&Tricks
- You can use Navisworks for model reviewing of several file formats. It can import natively from most of the CAD formats.
- You can work with other BIM platforms by using IFC files.
Conclusion
Navisworks is the Autodesk tool for offline model reviewing. It includes tools for Clash detection and 3D model coordination and also the Timeliner tool, for construction planning. An extra application that is not very commonly used is for Quantity take off.
Could you please expound on the points:
2.Convert element properties should most of the times be checked.
3.Convert linked files should, most of the times, be unchecked
They are, at least in Navisworks 2018, by default opposite. Convert element properties is by default unchecked and Convert linked files checked.
Thanks.
Hello Miguel, we’ve extended our guideline but let me answer your queries:
You’ll want to export all Revit attributes as they are a key feature to help you search and filter items in Navisworks, which is quite important for creating clash detection sets.
You may not want convert linked files as you will most likely prefer to export then individually, with the right settings. This is the case for large projects.
Hope this helps.
Good afternoon,
I want know how export files of naviswork 2016 at autocad or invenor.
thanks, very much
Please me help !
Hi Julio César, morituri te salutant! (sorry for the joke)
You can export to FBX from Navisworks and import this file into Inventor or AutoCAD. Hope it helps.
Regards
Hola,
Necesito abrir un archivo 3d que está hecho con el SolidWorks.
¿En que formato debería guardarlo para poder abrirlo desde Navisworks?
Si eso es posible, claro.
Gracias!
Sandra, en principio con Navisworks puedes abrir archivos de solidworks directamente. Si no tienes éxito siempre puedes usar STEP / IGES como formatos alternativos.