
Bills of Quantities : Revit to Cost-it and Presto.
Generating Bills of Quantities from Revit 2023 to Presto using Cost-it
Revit bill of quantities. Cost-It and Presto

Version
This guide is based on the functionalities of Revit version 2023, Cost-It and Presto.
Objectives
- Customise the information in a model to make it useful for exporting it in a bill of quantities.
- Identify each Revit element in the cost estimate and vice versa.
- Assign, modify and/or transfer the values of project parameters, types and elements between model and cost estimate in both directions.
- Assign colours to model elements according to the chapter, work unit or quantification line to which they belong.
- Structure and generate a new cost estimate with chapters, line items and quantification lines from any model.
- Export quantities from a Revit model and add them to an existing cost estimate.
- Merge cost estimates or transfer chapters, line items or quantification lines between them.
Prerequisites
- It is not necessary to know how to model in Revit to use Cost-It, but understanding the general structure of the program and the properties of families and types is required.
- The user must have basic knowledge of Presto.
- To have installed the Cost-It add-in for Revit. It can be downloaded from the official RIB Spain website at www.rib-software.es, from the client area (there is only a Spanish version).
- As Presto has only a Spanish version, all the software’s tools will be named in Spanish in this guide.
- All Cost-It options can be used using Revit in Viewer mode, except those that introduce changes in the model and saving is pretended.
Introduction
Cost-It is a Presto plug-in for Revit that exports quantities to Presto from a BIM model.
Before starting, the quantification criteria must be defined, e.g what is going to be measured and how, and therefore, how the elements will be modelled. By default, Cost-It exports the quantification of elements using the most appropriate criteria for each category, however this configuration can be modified and adapted to the needs of our project.

When a cost estimate from Revit is exported, each element will be linked to a quantification line in Presto and this relationship will work in both directions. This will allow us, among other tasks, to select elements in the model from the estimate or locate elements in Presto from the model. Colouring and entering values from the cost estimate into the elements of the model will also be possible.
This guide provides instructions on preparing the model to accurately export quantities based on specific requirements, linking quantification codes with elements, and selecting appropriate export options according to the project's needs.
How to Classify the Information?
The function of Cost-It is to generate a “work” or Presto file with the information from the Revit model, and organise it within the structure of a cost estimate. First of all, it is important to understand how this information will be organised.
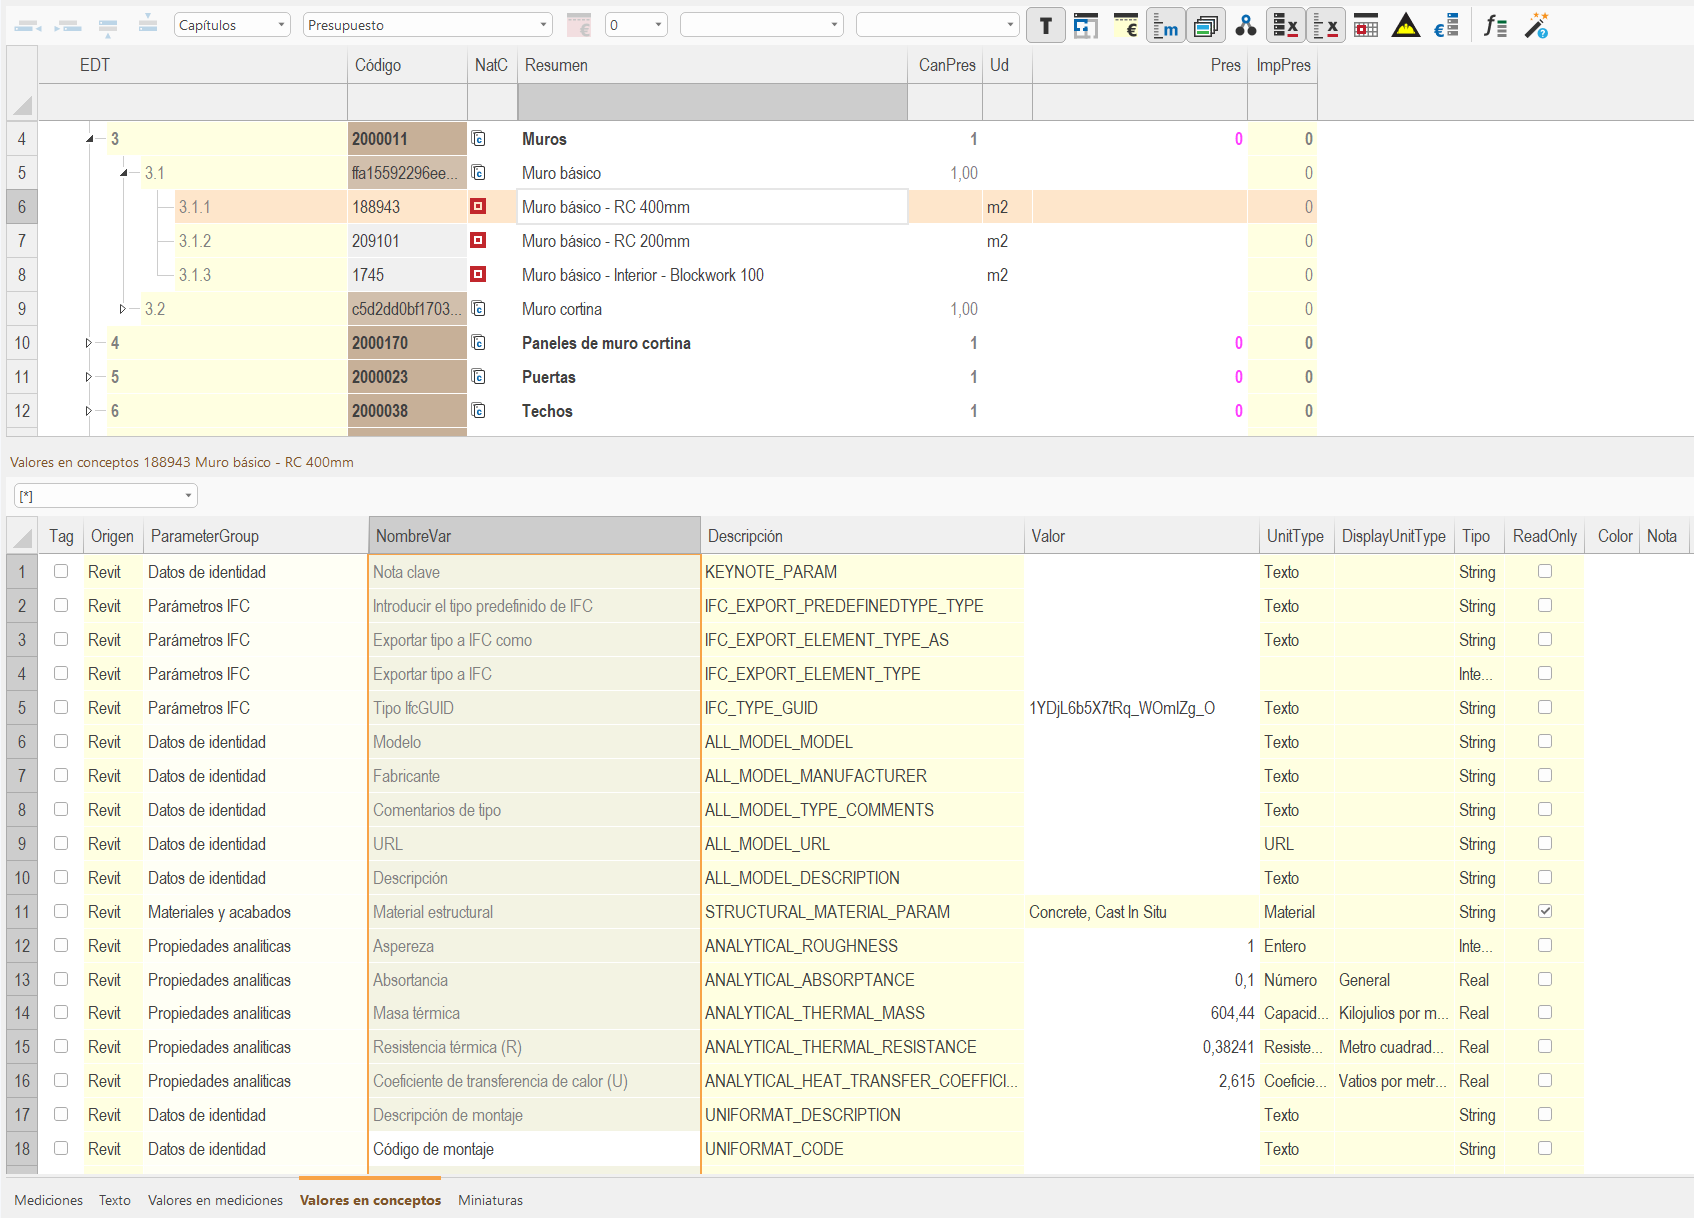
When exporting a cost estimate from Revit to Presto, the categories will generate chapters, families, sub-chapters (optional export from Cost-It), types (work units) and each item will be a quantification line in our cost estimate. In addition, each type or element parameter will be exported as a variable in Presto.
REVIT | PRESTO |
Categories | Capítulos (Chapters) |
Families | Subcapítulos (Subchapters) (Optional) |
Types | Unidades de obra (Work units) |
Elements | Líneas de medición (Quantification lines) |
Levels | Espacios (Spaces) |
Phases | Fases (Phases) |
Parameters | Variables (Variables) |
Values | Valores (Values) |
Cost-It Tools
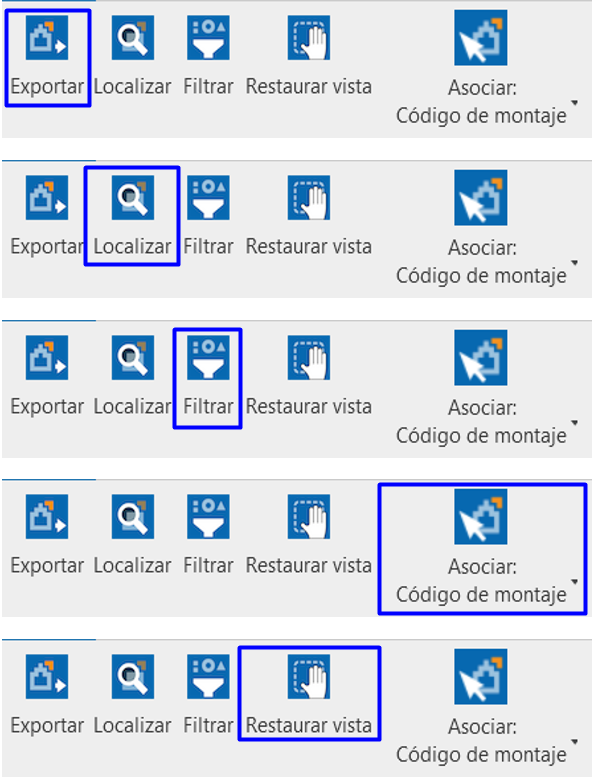
Cost-It can be found in the top bar of Revit as another tab, just like any other plug-in. When the tab is clicked on, it is observed that it is composed of five tools.
- Exportar (to Export)
- Localizar (to Locate)
- Filtrar (to Filter)
- Restaurar Vista (to Restore View)
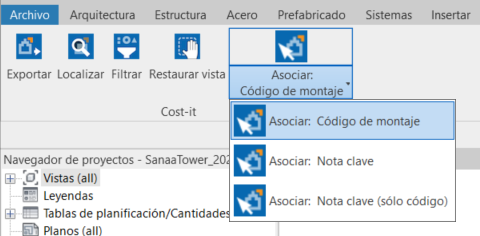
- Asociar (to Link): Assembly code, Keynote or Keynote (code only)
Tools. Export

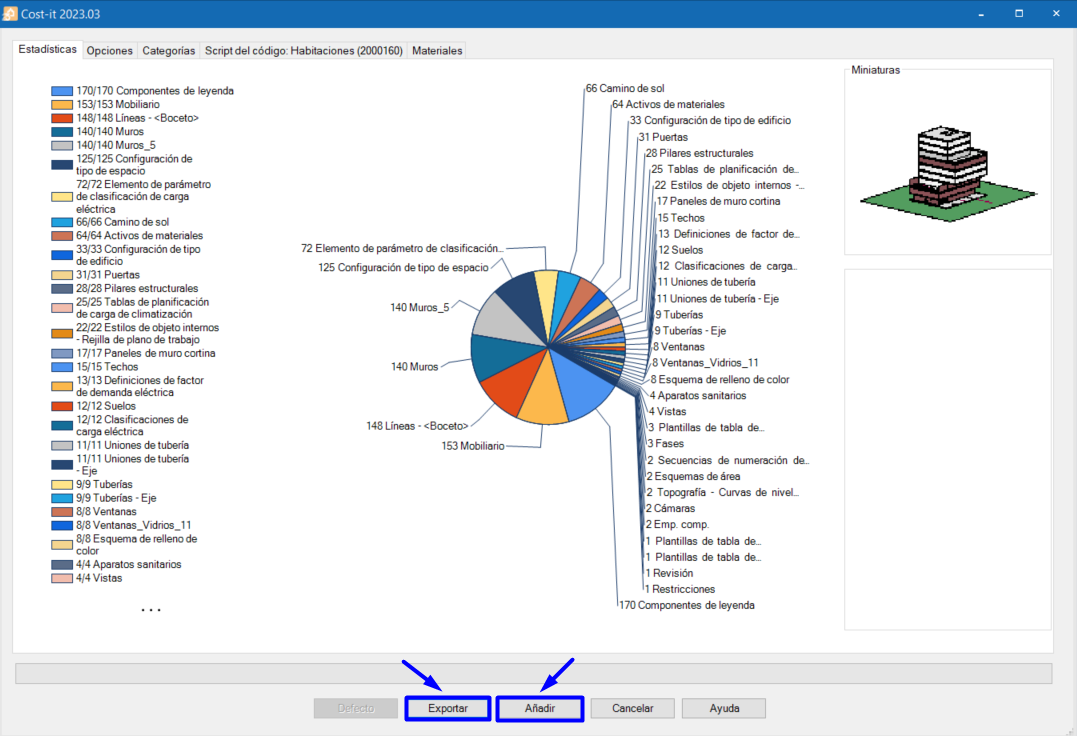
From this window the export will be customised, and the process will be started using the “Exportar” (Export) (to a new cost estimate) or “Añadir” (Add) (to an existing one) buttons in the lower menu.
These options are explained later, in the section “Configuración de la exportación” (Export settings).
Tools. Locate

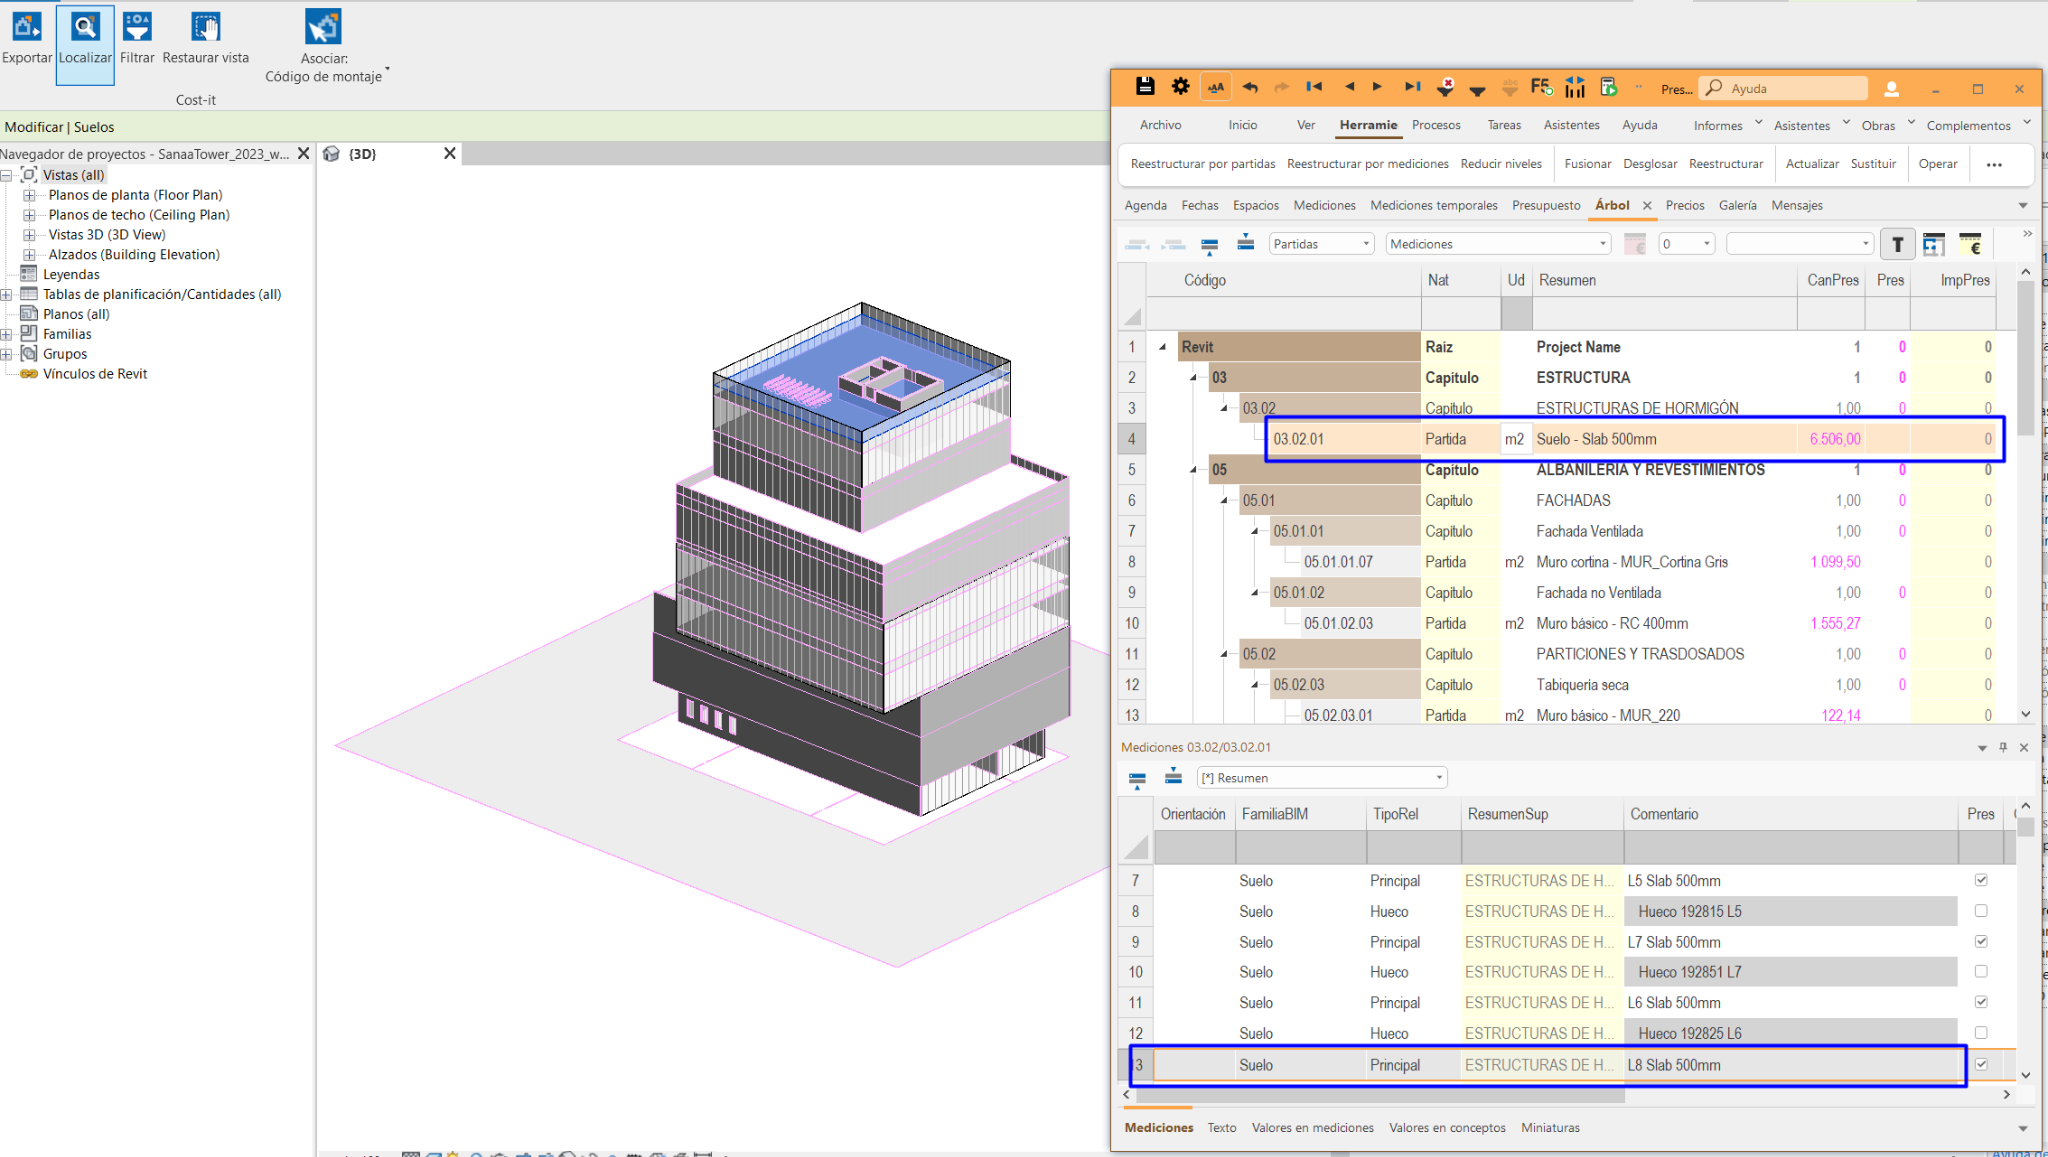
With the budget opened, if an element in the model is selected and press “Localizar” (Locate), it will indicate in Presto to which quantification line it corresponds to.
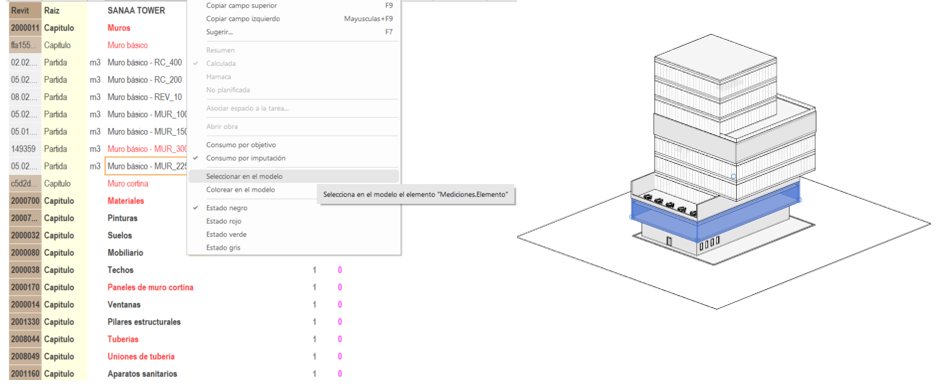
Elements can also be located the other way around, i.e. from the cost estimate in the model. If the line of the work unit is clicked with the right button and "Seleccionar en modelo" (Select in the model) is clicked on, all the elements of that work unit will be selected.
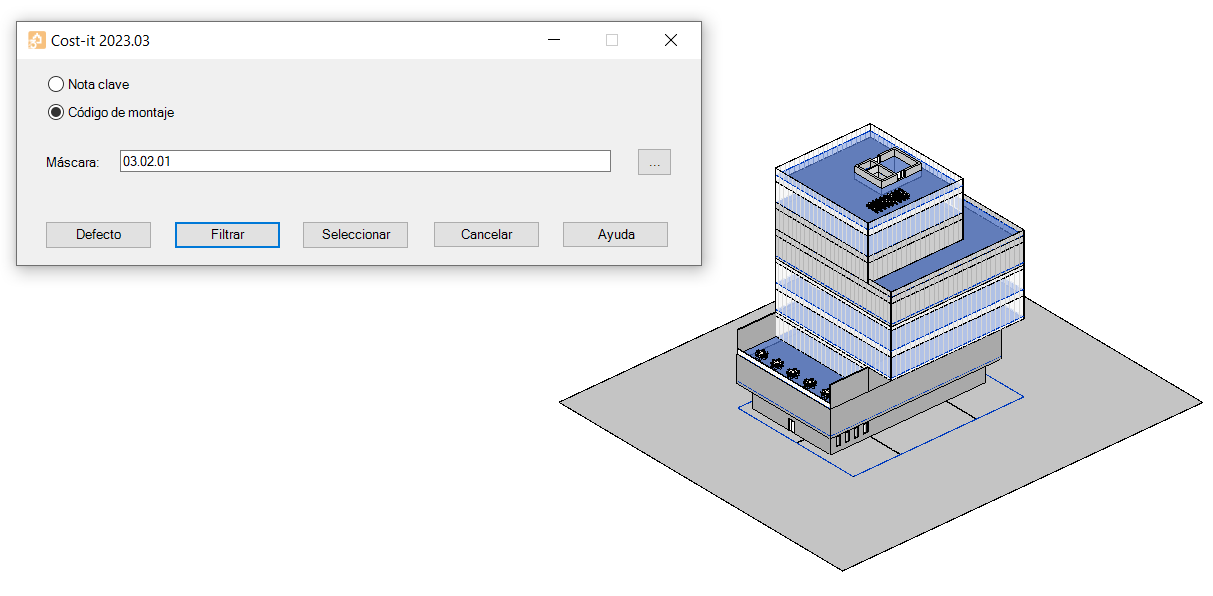
Tools. Filter
With the “Filtrar” (Filter) option, the elements can be selected by their “Código de montaje” (Assembly Code) or “Nota clave” (Keynote). Elements that have no code can also be identified by leaving the “Máscara” (Mask) field empty.
Tools. Restore View

Restores the initial display of elements in Revit, for example after hiding elements for the export or after colouring them from Presto. This will be explained later.
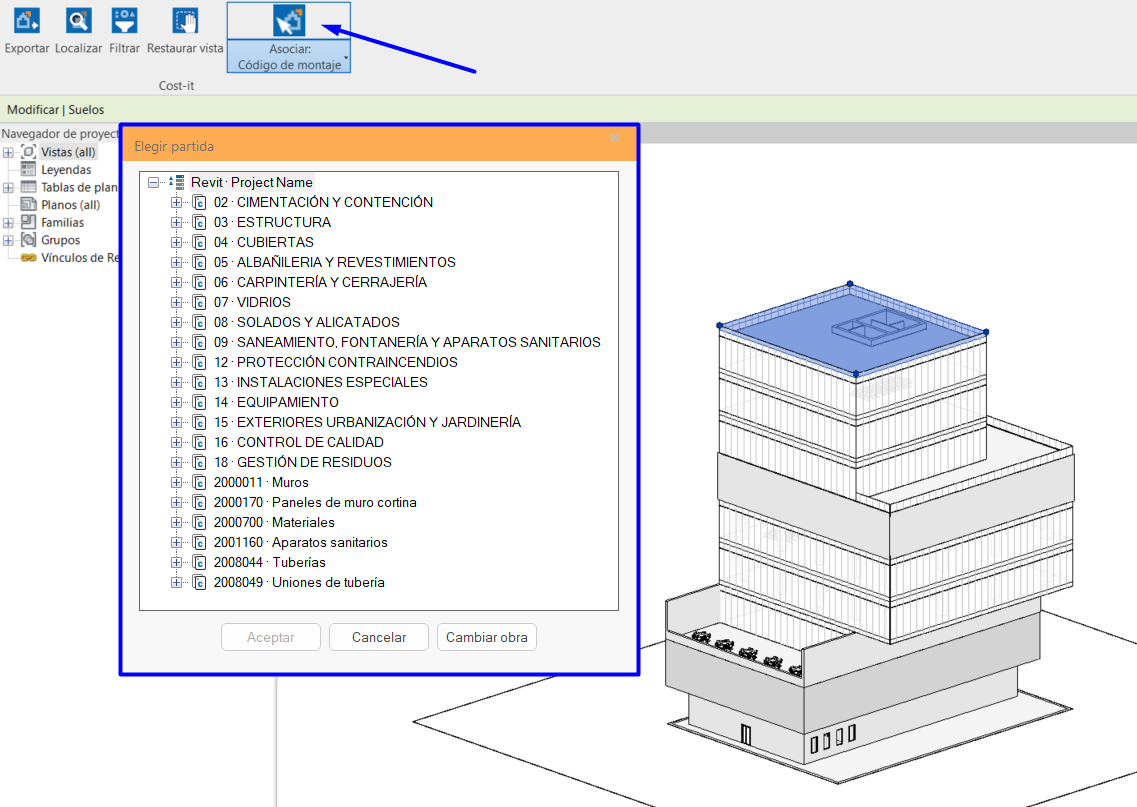
Tools. Associate: Assembly Code, Keynote or Keynote (code only)
With this tool, the work unit can be selected directly from a Presto cost estimate and assigned to an element.
Depending on whether materials to be codified are "Nota clave" (Keynote) or types of elements "Código de montaje" (Assembly Code), one option or the other will be chosen. For “Asociar: Nota clave (sólo código)” (Associate: Keynote (code only)), no text description will be assigned in the quantification line.

Coding Elements
To export quantities from a BIM model, the model must first be codified. A code corresponding to a work unit or item needs to be assigned to each element. Before starting, it's crucial to determine which elements will be codified and how (whether by type, item, or material) based on the work units required.
It is recommended to use the Assembly Code parameter(Código de montaje in Cost-it) to codify by type and for materials, in the Keynote parameter (Nota clave in Cost-it).
Cost-It allows for coding by user-created parameters, both by issue and by type. Therefore, these parameters can also be used to codify the elements of our model.
Base template for Coding Elements
Before starting to associate Revit elements to work units, it is convenient to have a previous cost estimate or a template with a defined coding.
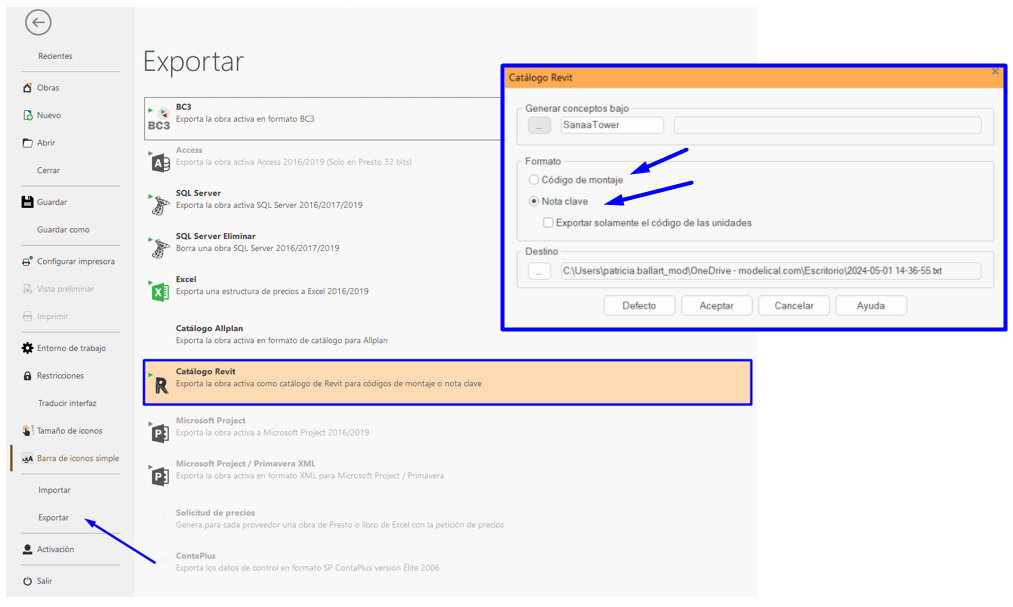
The necessary classifications for coding can be generated from Presto in the “Código de montaje” (Assembly Code) and “Nota clave” (Keynote) parameters. To do this, go to Archivo> Exportar> Catálogo Revit (File> Export> Revit Catalog) and choose the “Código de montaje” (Assembly Code) or “Nota clave” (Keynote) format.
Coding methods
There are several ways to associate the work units codes with the elements of our model:
- From the model (they are only coded in that project) or from the library of families used in the project that have been previously coded (the families will be loaded already coded in any model).
- From Cost-It, with the “Asociar: Código de montaje” (Associate: Assembly Code), “Nota clave” (Keynote) or “Nota clave (sólo código)” (Keynote (code only)) tool. Its use will depend on what is going to be codified: elements or materials.
- From Presto, from the cost estimate. Later it can be transmitted to the model by updating parameters or variables.
Associate codes from the model
In general, the elements will be coded by type (“Código de montaje” (Assembly Code)) or by material (“Nota clave” (Keynote)). However, sometimes it may be the case that elements will need to be codified by item because they belong to different line items. This occurs, for instance, with pipes that have different diameters and therefore have different work unit codes.
To codify the elements, it can be done by entering the code manually or from the previously loaded classification of “Código de montaje” (Assembly Code) or “Nota clave” (Keynote) (see Guideline Keynote and Assembly code).
Associate codes from Cost-It
From the Cost-It “Asociar” (Associate) tool, elements from the model can be coded. This way is more limited as it only allows us to associate work units through “Código de montaje” (Assembly code) or “Nota Clave” (Keynote). To codify in a custom parameter or an issue parameter is not possible. This could be customised from the “Exportar” (Export) tool that will be commented down below.
Associate codes from Presto
From Presto, coding can be done by type ("Código de montaje" (Assembly Code)), by instance (instance parameter), and by material ("Nota clave" (Keynote)). If codification using a custom user parameter is desired, it must be created beforehand in our model.
To do this, navigate to the "Valores" (Values) | VARIABLES schema. Right-click on the header and select the option "Insertar la variable en conceptos" (Insert variable in concepts), then locate the parameter "Código de montaje" (Assembly Code) in the "Variable" column.
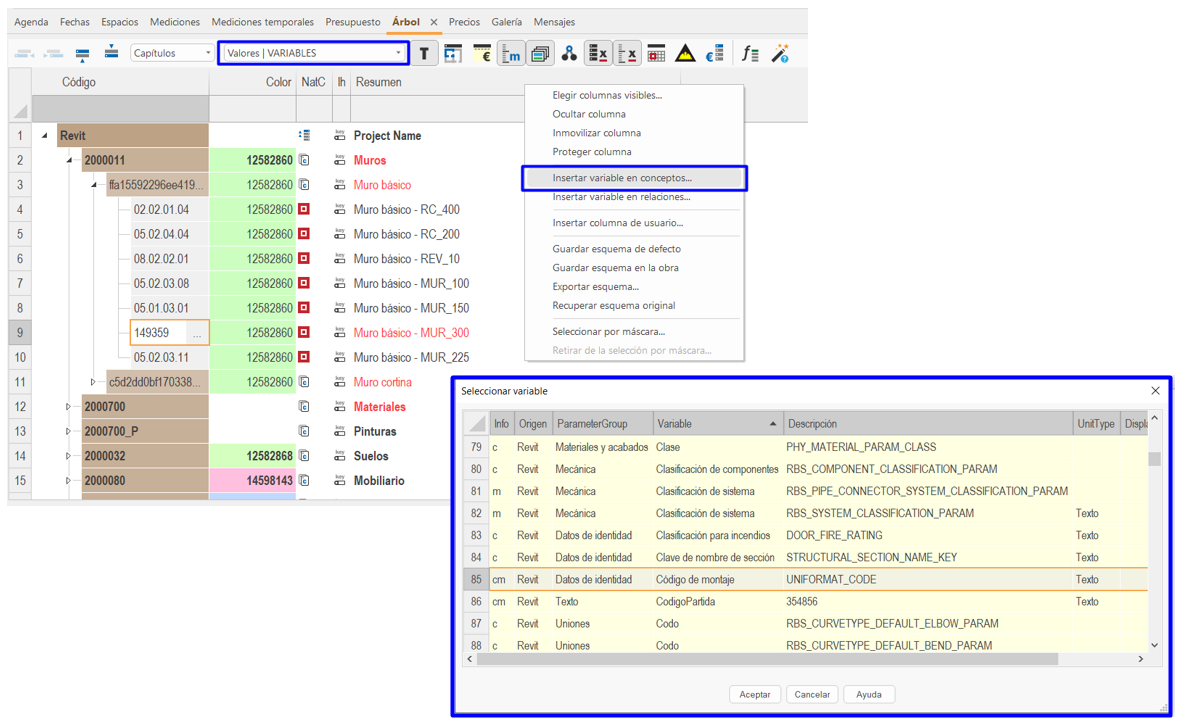
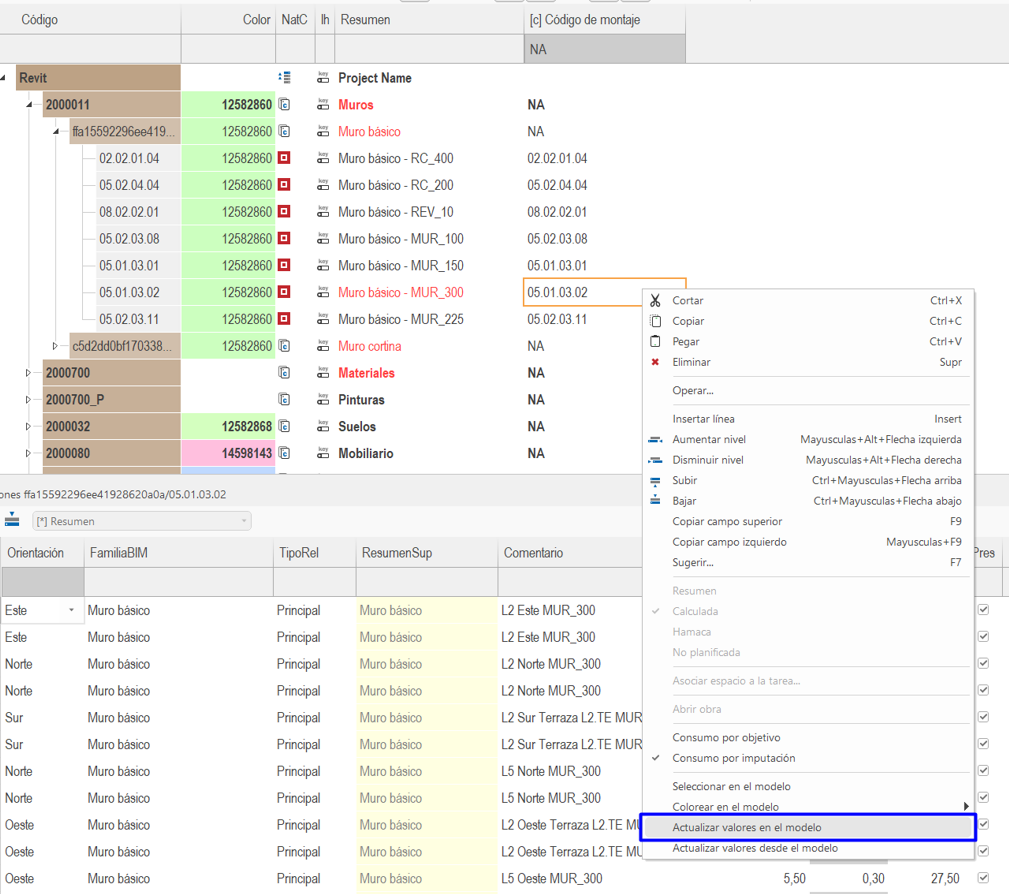
The "Código" (Code) and "Código de montaje" (Assembly Code) fields need to be filled with the item code. Right-click on and select "Actualizar valores en el modelo" (Update values in the model) to code the elements according to the cost estimate.
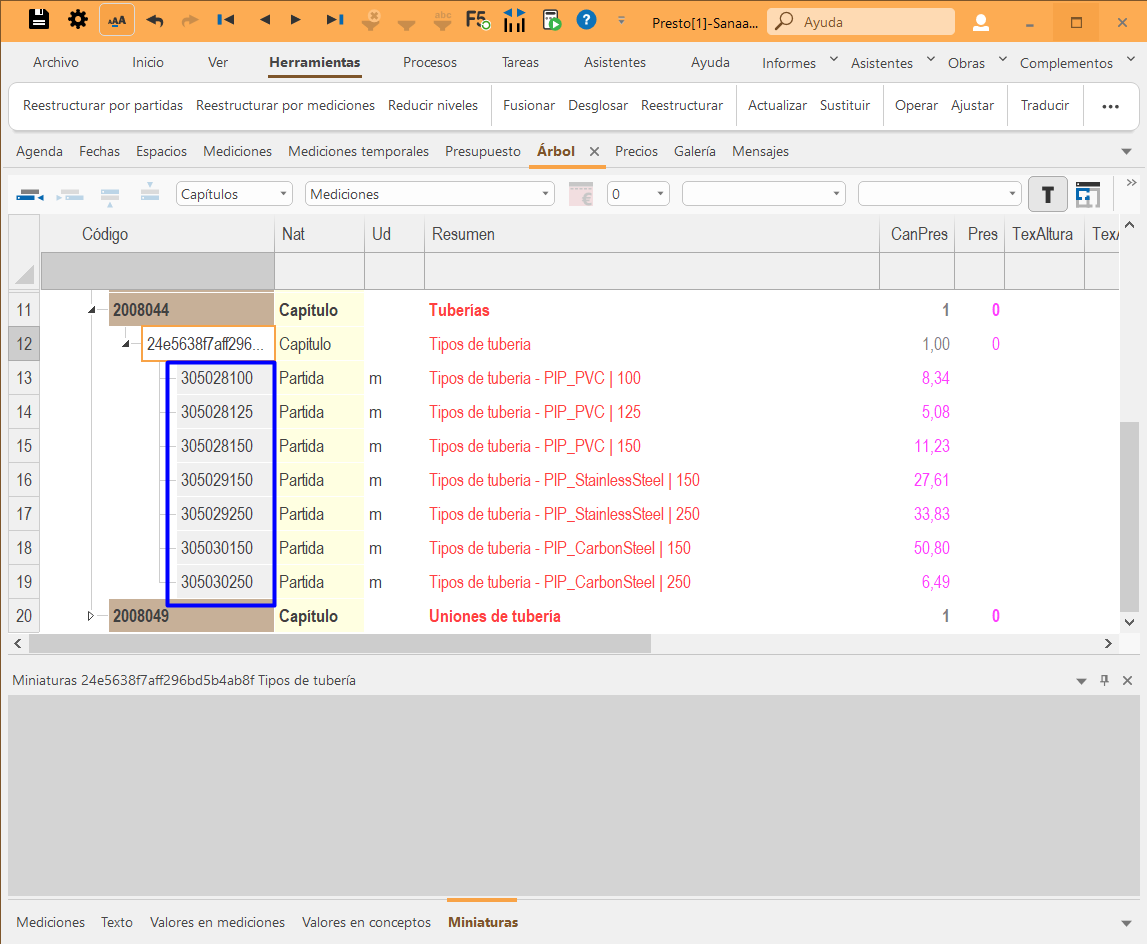
To codify by instance from Presto, select the chapter or subchapter of the cost estimate and from Herramientas>Desglosar (Tools>itemise). In this case, instances are discriminated by the diameter parameter

Once the diameters are sorted by breakdown, the correct instance codes can be populated for the different types.
Export to Presto with Cost-It
Selection of Exported elements
If there are selected elements, only these elements will be exported and if any is selected, all the elements of the model will be exported, regardless of whether they appear as visible or hidden in the work view. It is convenient to generate a specific view with the content to be exported and select everything visible in it. Also, the elements can be selected from a schedule previously filtered to contain the elements to be exported.
Export options
Within the “Exportar” (Export) tool dialog box, there are two options for exporting the cost estimate:
- Exportar (To export). This option creates a work, a Presto file with a new cost estimate.
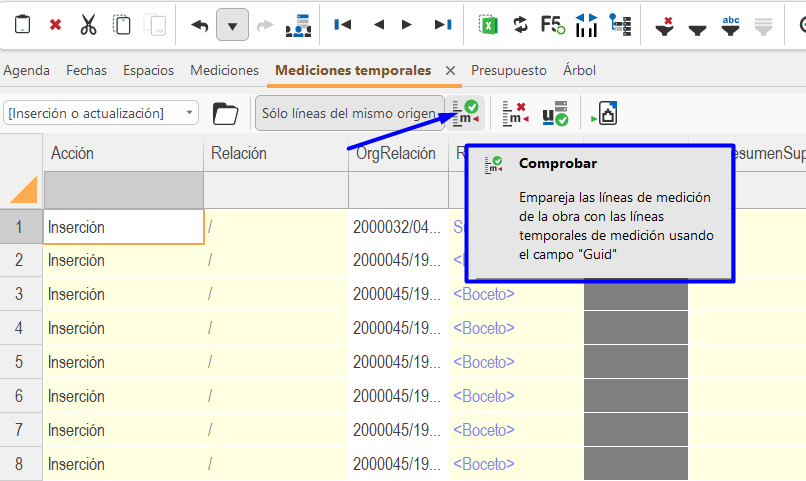
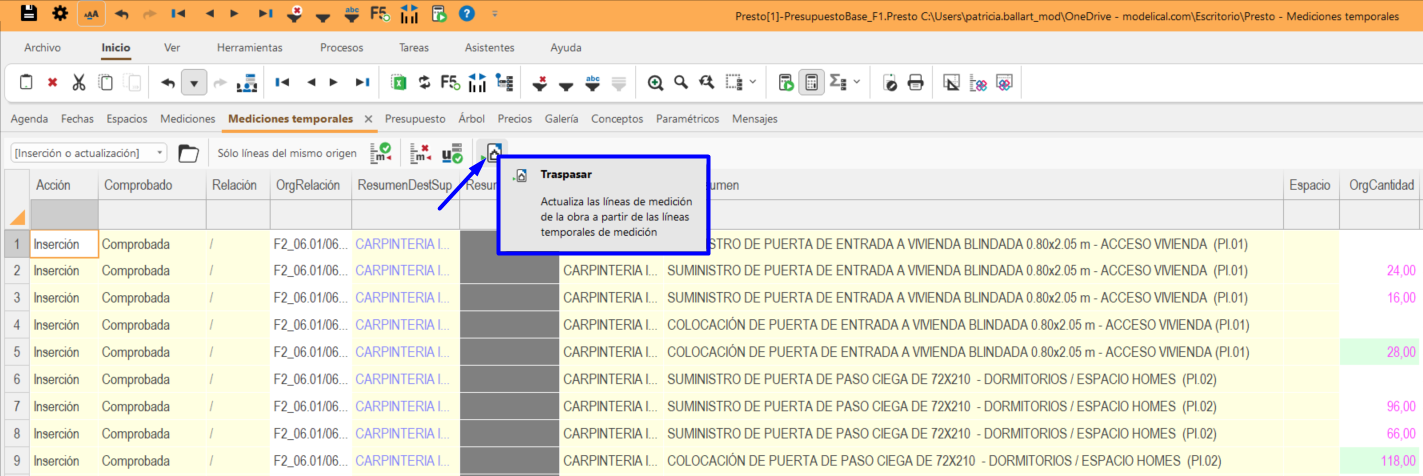
- Añadir (To add). If this option is selected, the quantification lines will be added to an existing work or file as temporary quantities, which will have to be transfered to the final cost estimate.
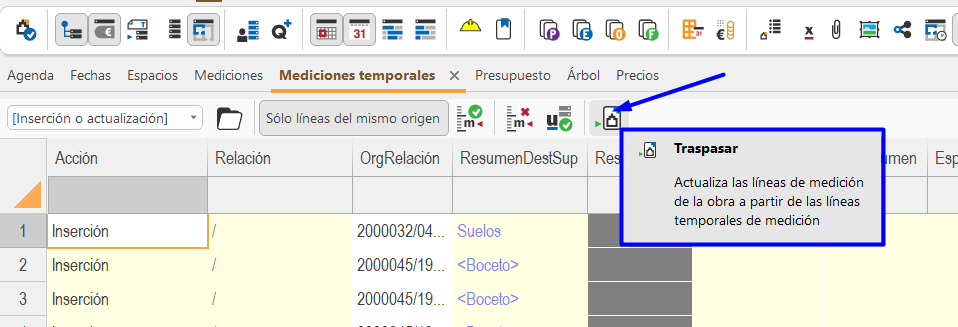
First, the cost estimate must be opened and the new quantification lines will be added under “Mediciones temporales” (Temporary quantities). Then click on “Comprobar” (Check) to match the new and existing lines. Finally click on “Traspasar” (Transfer) to incorporate them definitively.
Export settings
From the following windows the customization and selection of the information to be exported to the cost estimate will be necessary. Certain options will allow us to speed up the process.
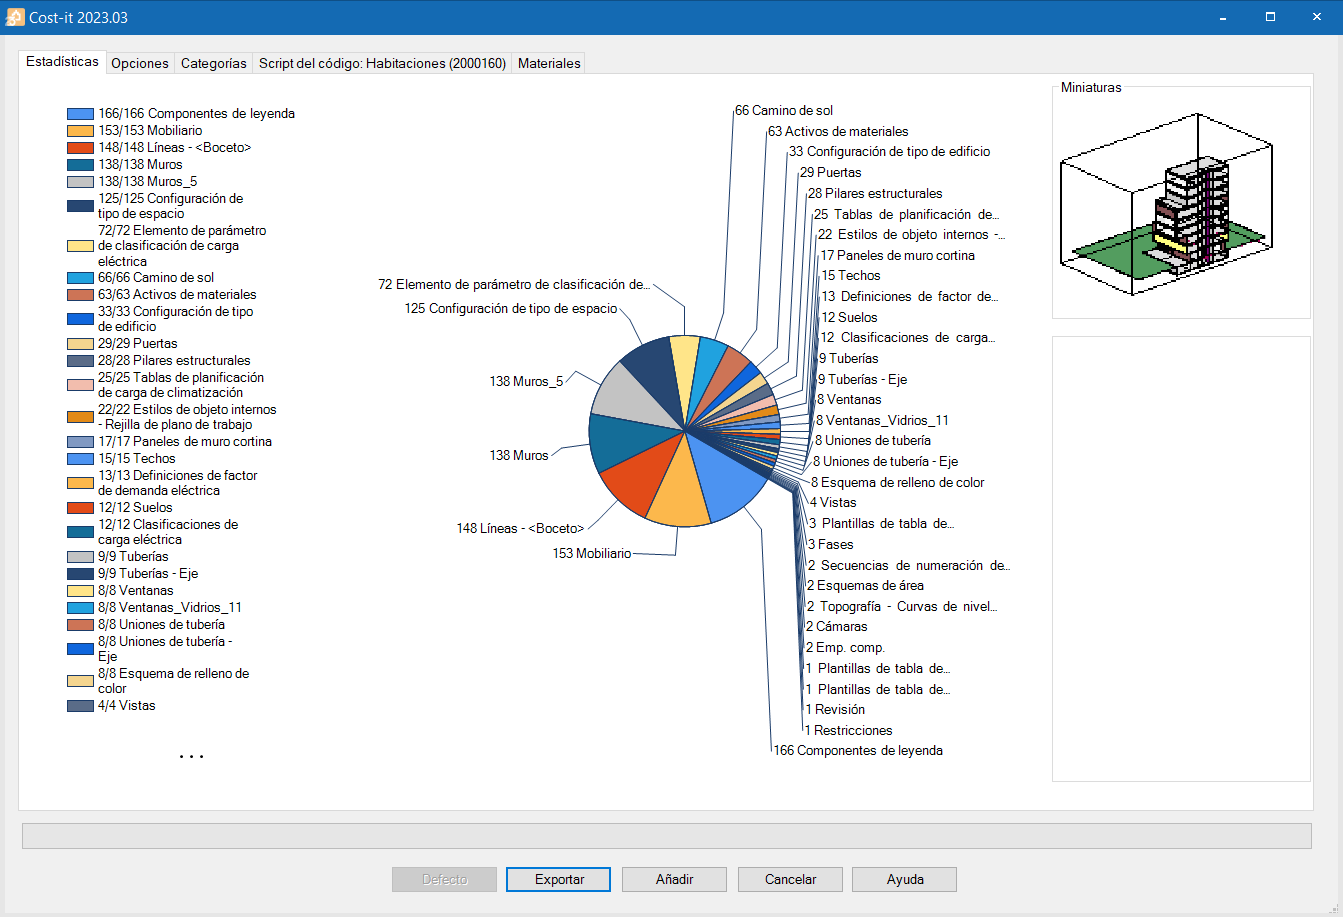
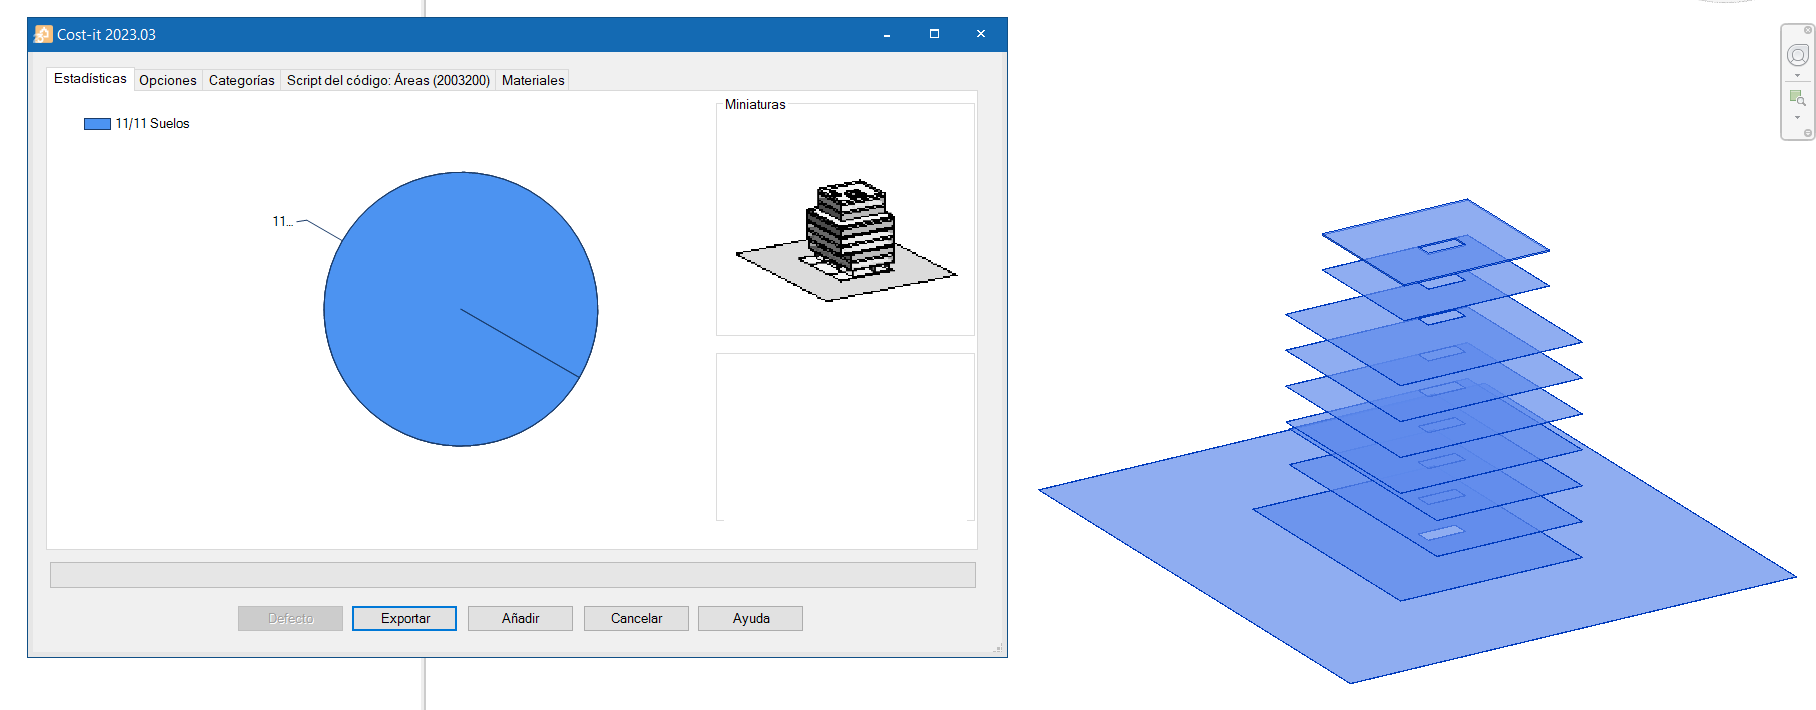
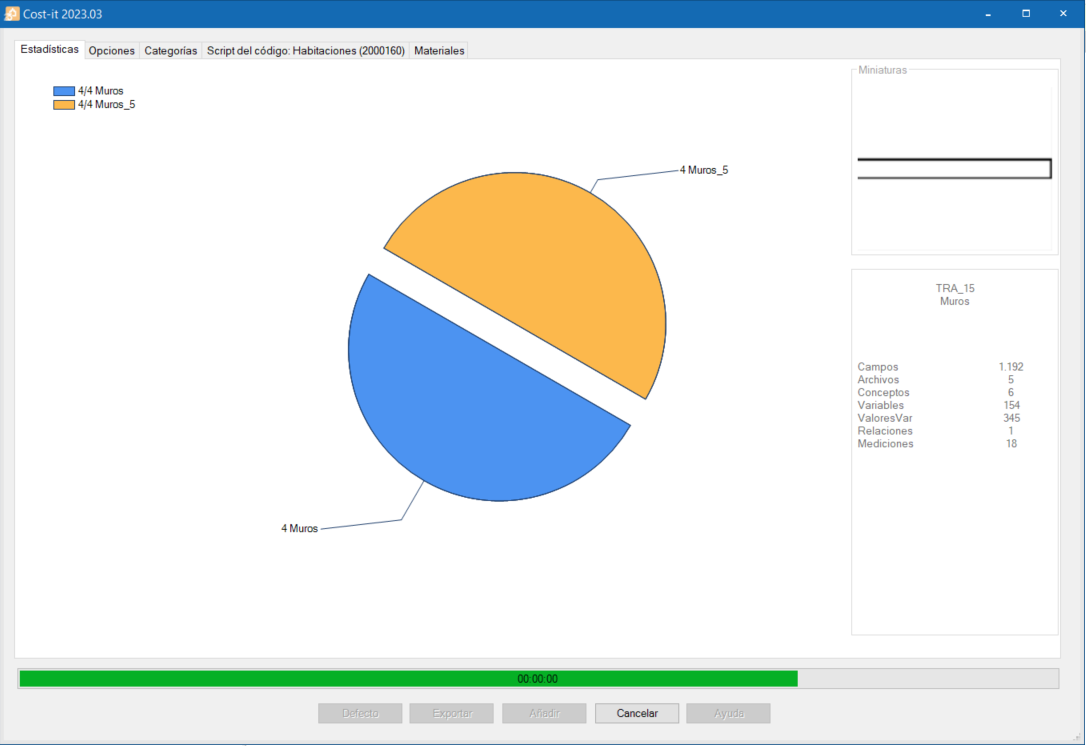
Statistics
This window allows you to check the elements to be exported and shows the progress during the export.
Options
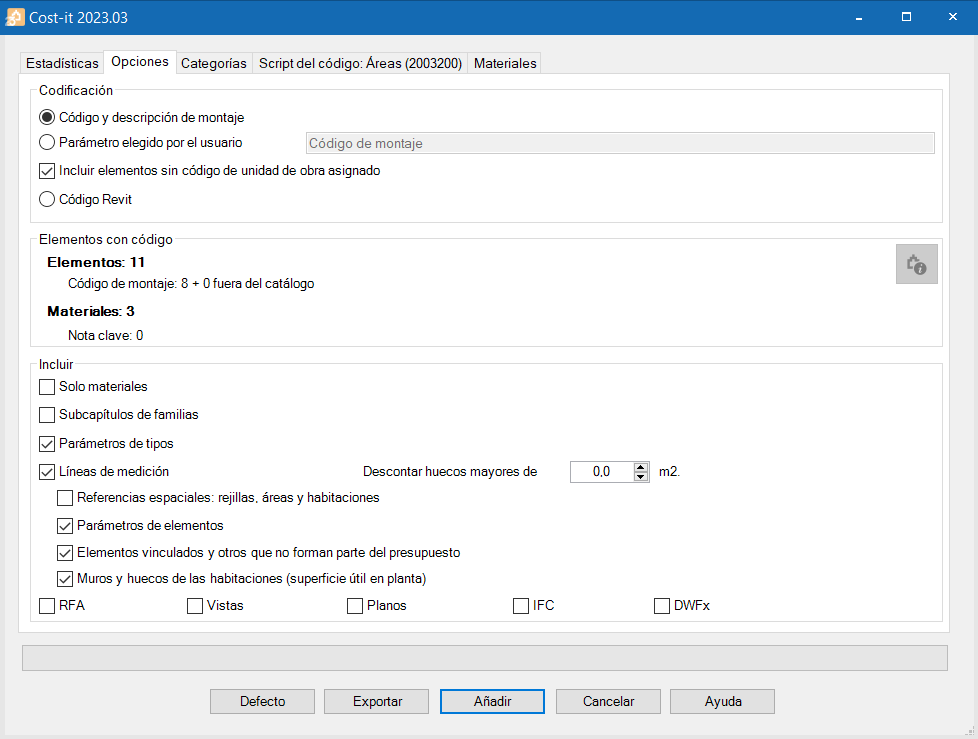
Coding
This option allows you to define the parameter that will be used as a reference to export the coding associated to the work unit.

It can be customised to read the item code from the “Código de montaje” (Assembly Code) parameter, from the custom user parameter or if the “Código Revit” (Revit code) is chosen (Category Revit code for chapters, and the type code for line items). For materials, the “Nota clave” (Keynote) parameter will be taken by default.
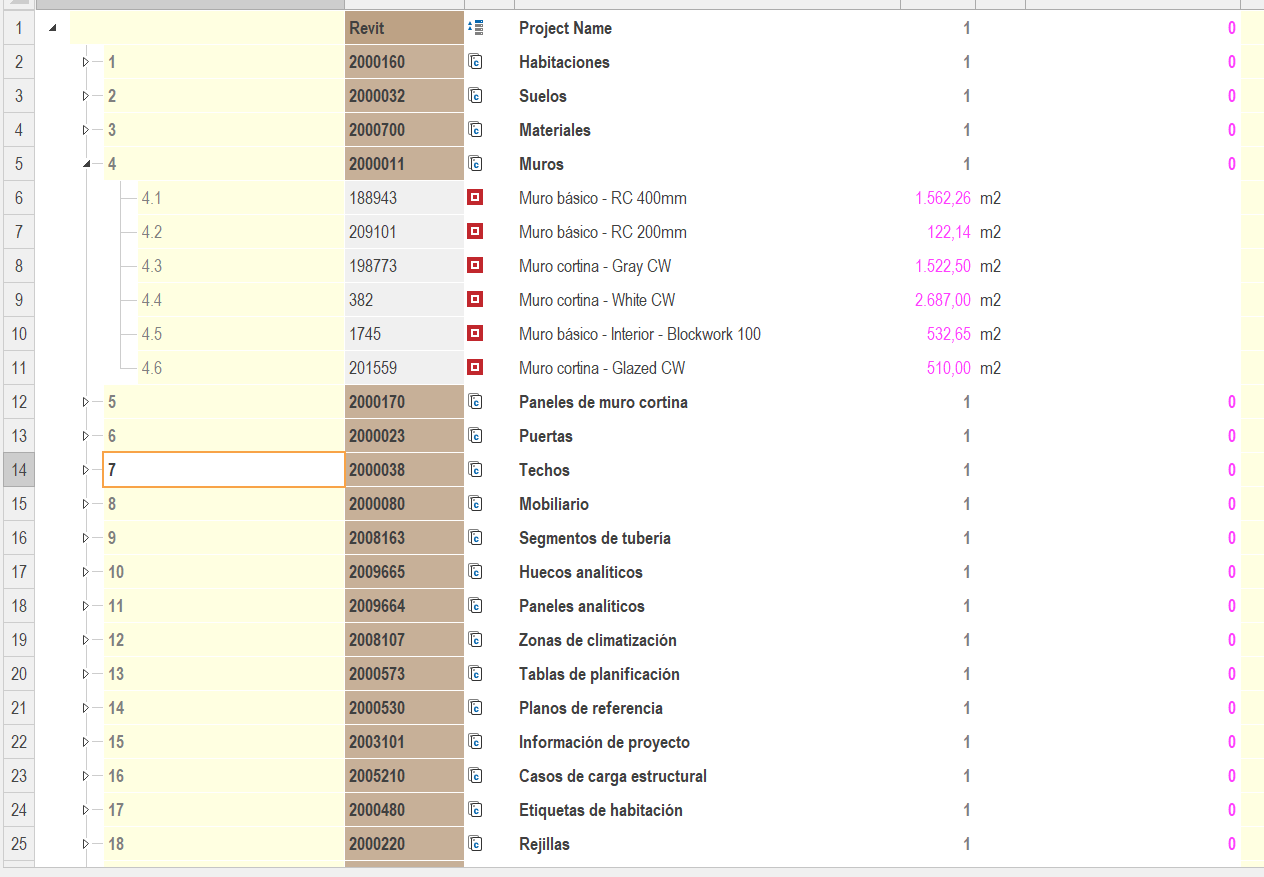
Exportación con Código Revit
The export by item must be customised from the Categories window in the “Discriminador” (Discriminator) field. In the corresponding category, the instance parameter used in the model is specified. If there are more than one, they must be written separated with the character “|”.
The option “Incluir elementos sin código de unidad de obra asignado” (Include elements without assigned work unit code) exports all elements even if they have no assigned code. In this case the chapter will appear in red and the category ID code will be assigned to it.
Elements with code

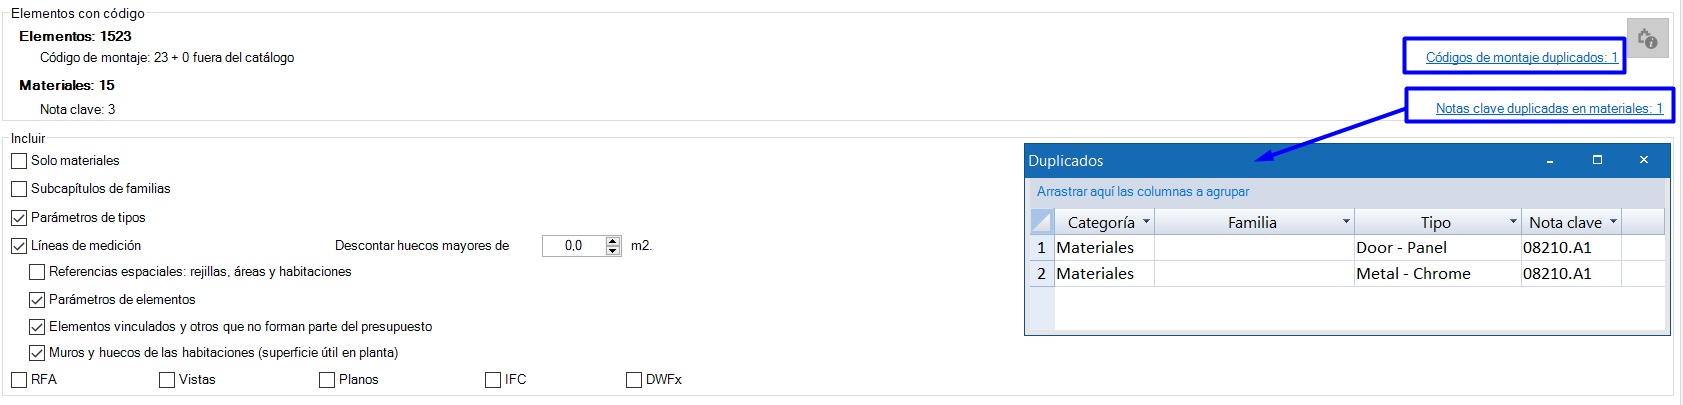
Depending on the selected parameter as the element type code container, by clicking on the Presto logo, Cost-It will perform a calculation and give us the following data:
- The number of coded types
- The number of types that share the same code and therefore will go to the same item. By clicking on the link you get the complete list.
- Under “Materiales” (Materials), the number and duplicates for the “Nota clave” (Keynote) parameter are indicated.
Include
The following options limit the information that is exported to speed up the process.
- Solo materiales (Materials only). Exports only the materials of the elements.
- Subcapítulos de familias (Subchapters of families). Creates an intermediate level between categories and types.
- Parámetros de tipos (Type parameters). Revit parameters from the “Identity data” group of types are always exported, but this option allows to include in the export the rest of the parameters.
- Líneas de medición (Quantification lines). Exports the quantification lines of the elements and obtains quantities.
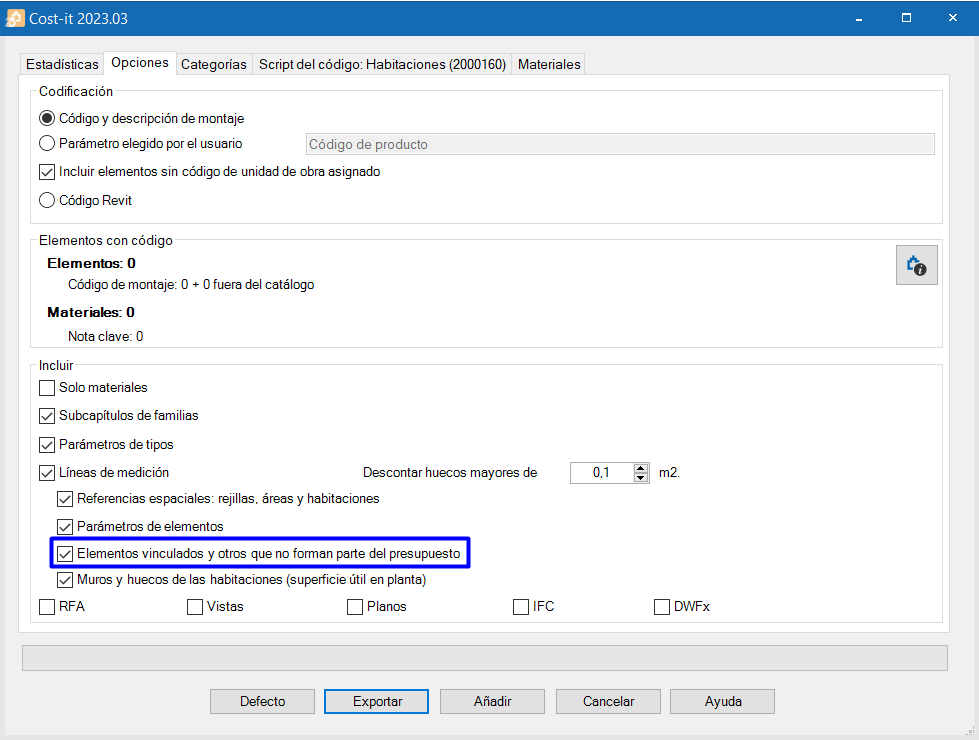
- Descontar huecos mayores de (Discounted gaps greater than). In the quantification by default, all wall, floor and roof openings are discounted. By selecting “Elementos vinculados y otros que no forman parte del presupuesto” (Linked elements and others that are not part of the cost estimate), the quantification lines of the elements that generate the voids will be exported.
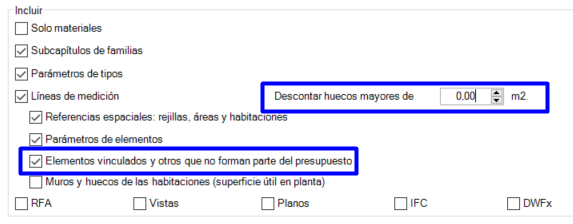
- Referencias espaciales: rejillas, áreas y habitaciones (Spatial references: grids, areas and rooms) They identify where an element is located based on an area, room or grid.
- Parámetros de elementos (Element parameters). Exports the parameters of each element, associated to its quantification line.
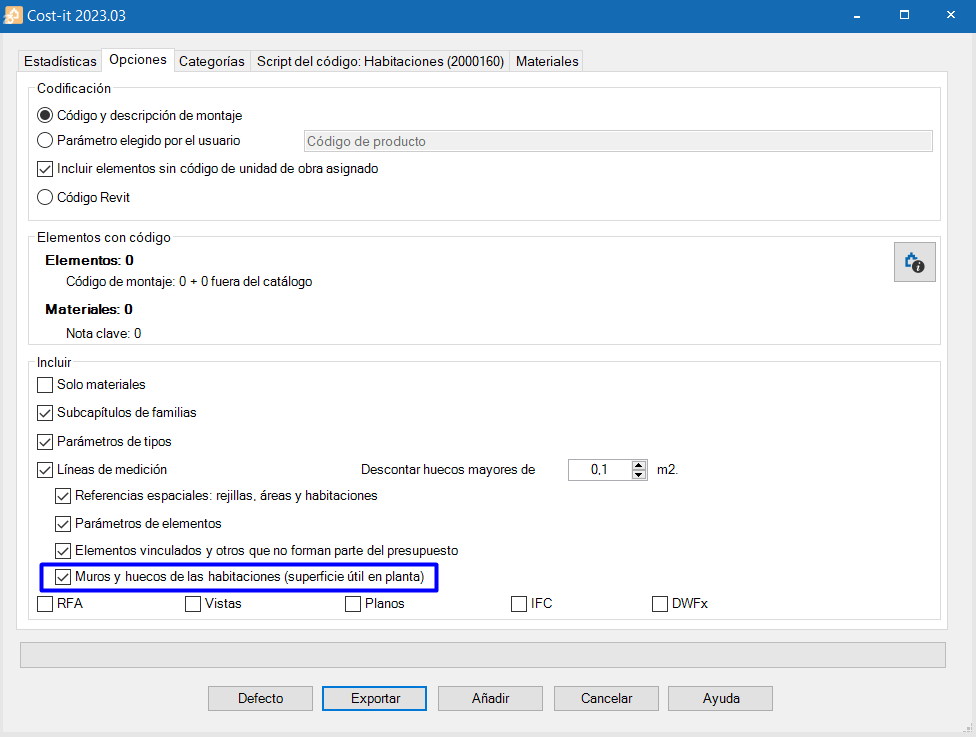
- Elementos vinculados y otros que no forman parte del presupuesto (Linked elements and other elements that are not part of the cost estimate). Adds after the quantification lines of some elements other informative lines, which do not contribute quantities to the cost estimate. For example, the elements that generate holes in walls.
- Muros y huecos de las habitaciones (superficie útil en planta) (Walls and openings in the rooms (floor area)). Includes the floor area of walls and openings in the room quantities.
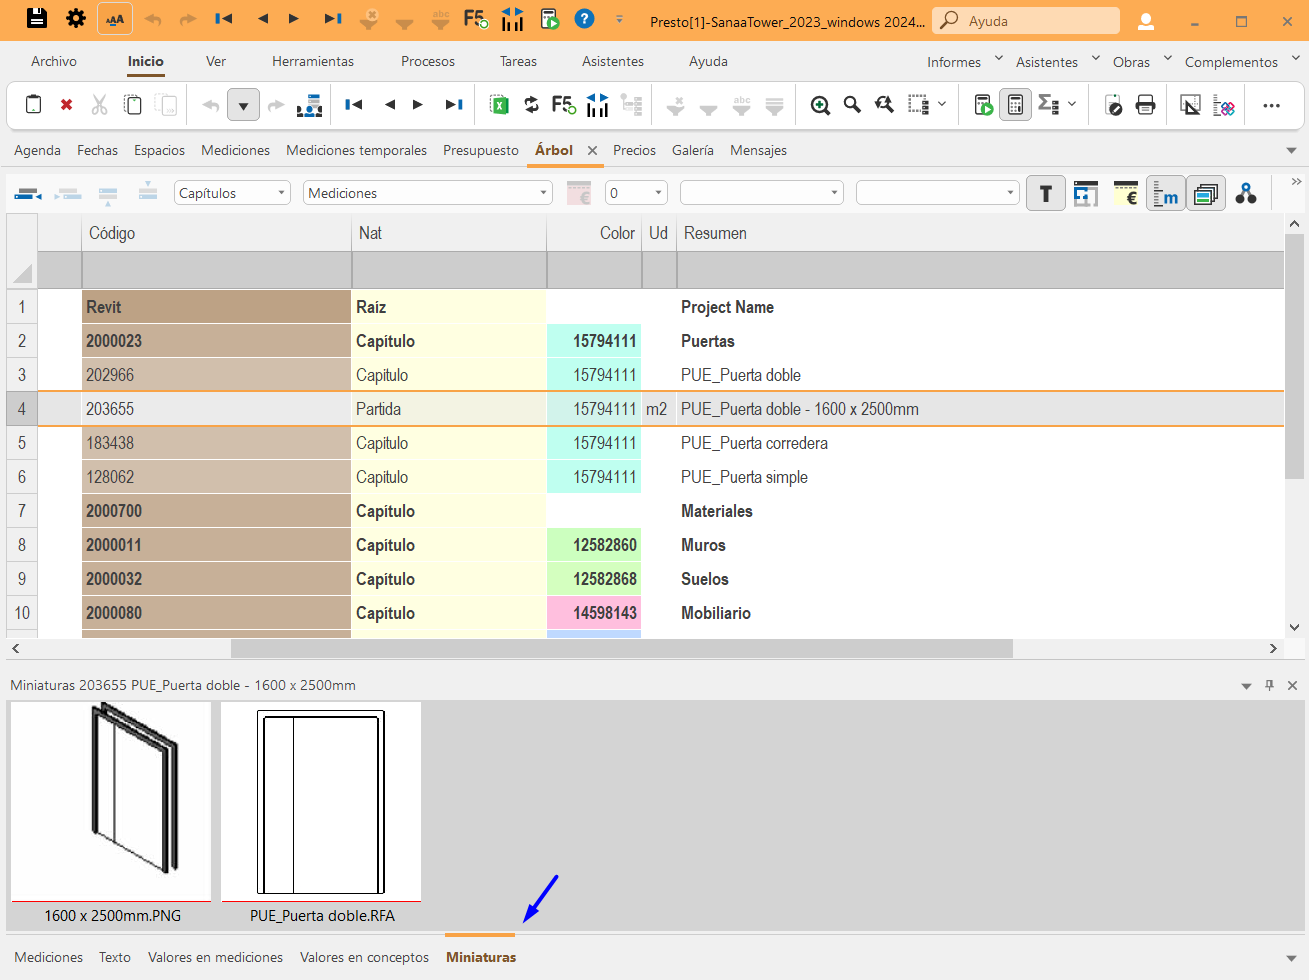
- Documentación gráfica (Graphic documentation). The image associated in Revit to each type is exported as a thumbnail of the concept. For materials, the image used to choose the colour and texture is exported.
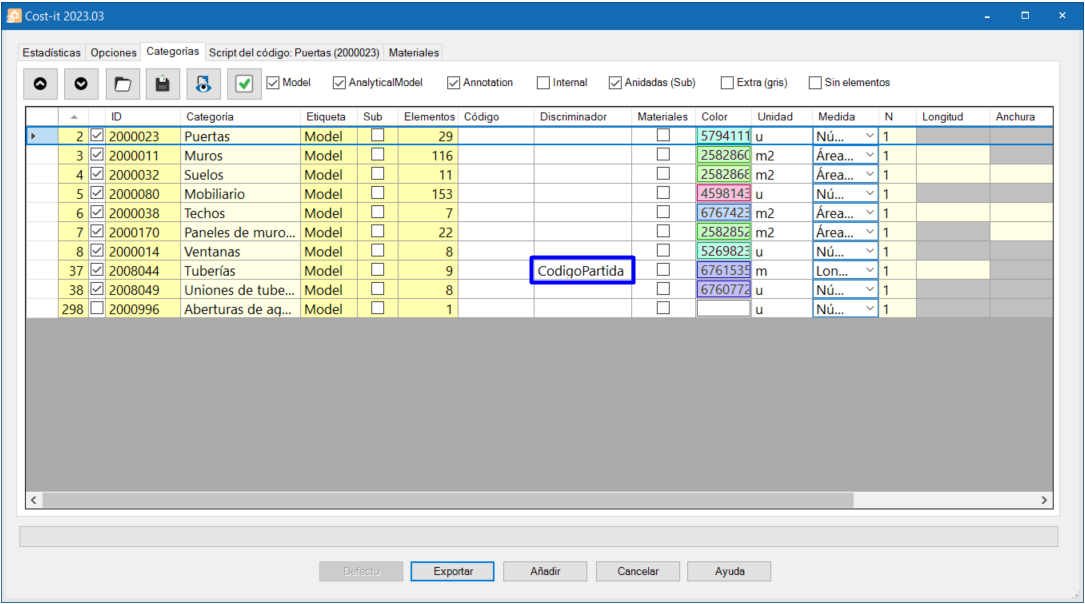
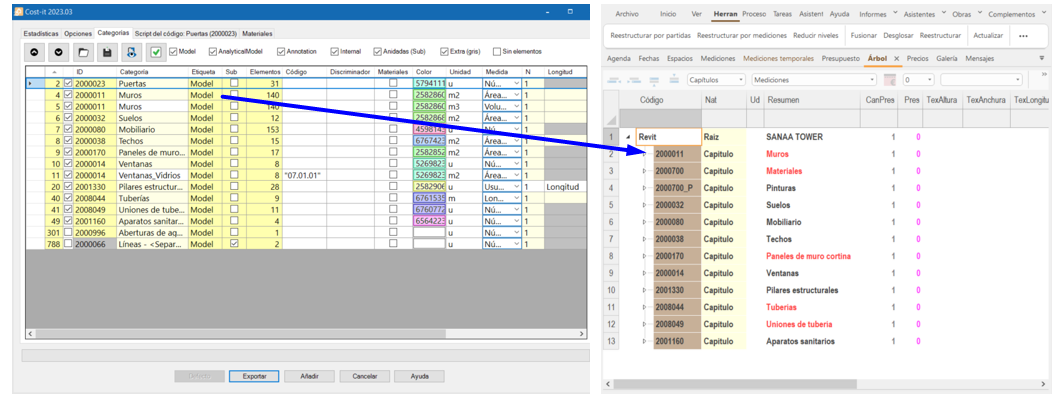
Categories
From this window, the export of the elements of each Revit category can be customised.
The export options can be saved (Categorías>Icono de Guardar>Seleccionar ruta de guardado (Categories>Save icon>Select save path)) and loaded (Categorías>Icono de Carpeta>Seleccionar ruta de archivo para cargar (Categories>Folder icon>Select file path to load)) as XML format files. The default configuration can be recovered with the file Defecto.CostItLayout, from the Presto installation folder, or can be deleted the Cost-It configuration files.
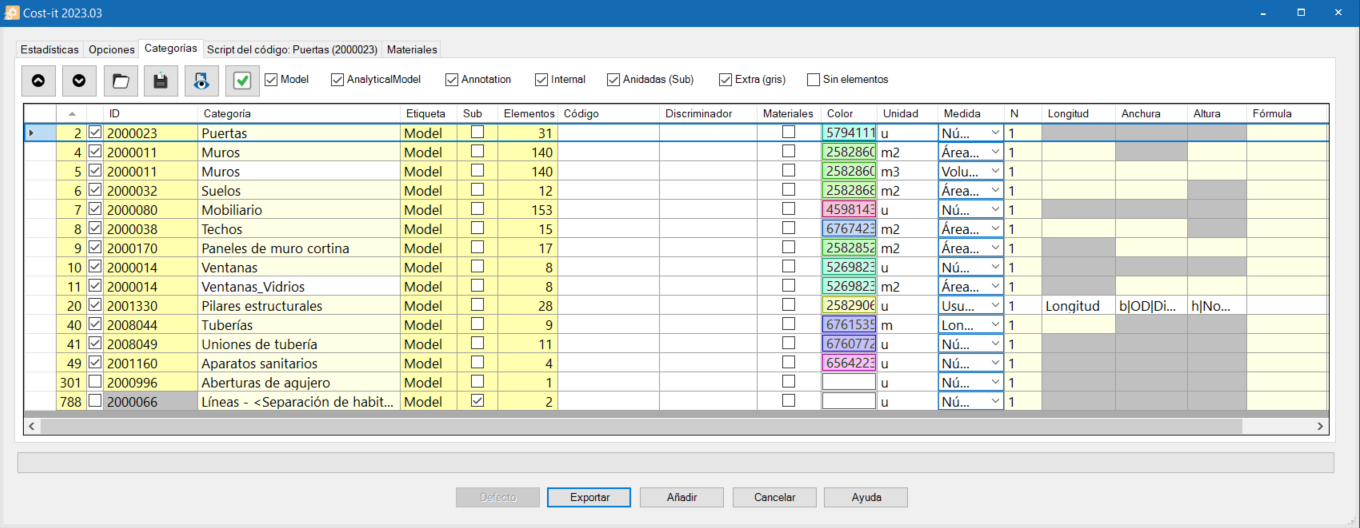
Table columns
- Order. The first column determines the order of the generated chapters.
- Tag. This tag excludes or adds categories to the export. By default, categories that generate a lot of information are excluded.
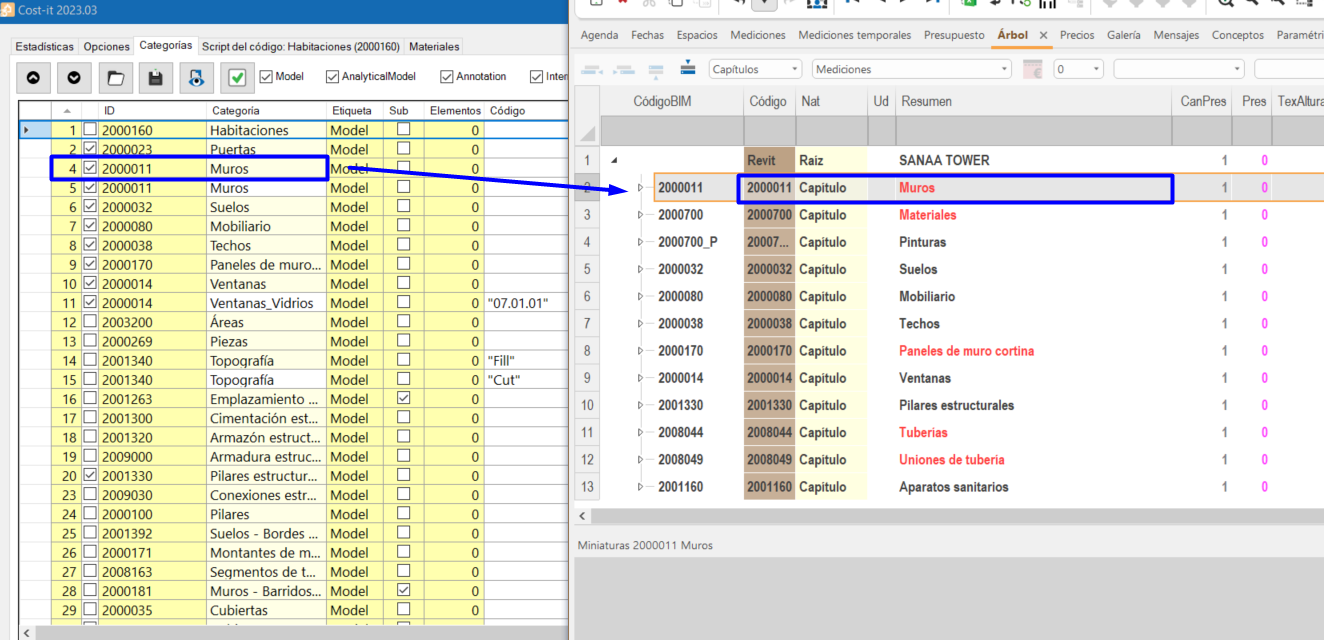
- ID. Identifier of the category in Revit. In Presto, it will appear in the “Código” (Code) column for chapters and in “CategoríaBIM” (CategoryBIM) for all line items. In the extra categories, the field will be greyed out.
- Categoría (Category). The category name is transferred to the “Resumen” (Summary) field of the chapters in Presto.
- Etiqueta (Label). The category label is moved to the “Resumen2” (Summary2) field of chapters in Presto.
- Sub. Categories labelled as “Sub”.
- Elementos (Elements). Shows the number of elements of the category contained in the model.
- Código (Code). The code of the work unit assigned to the category can be customised. If no code is specified, the one chosen in the options window is assumed by default.
- Discriminador (Discriminator). In this field the coding by instances can be splitted indicating the parameter to discriminate.
- Materiales (Materials). Separates by the materials or layers that are part of the category types.
- Colour. A colour is applied to each category except those that are not usually quantified. By duplicating a category, the colour will be applied to each work uni instead of to the chapters.
Category labels
Each Revit category is included in a label according to its characteristics. This way can be filtered and make them visible in our table and select or deselect them depending on what is to be exported.
The categories that are usually quantified are included in “Model”. The “Anidadas (Sub)” (Nested (Sub)) are those that are contained within other categories, such as panels in curtain walls. “Internal” and “Extra” have no specific definitions. The “Sin elementos” (No elements) option allows to display only the categories that have elements in the active model.
Export settings
By clicking on the right button on the line of a category you have the option to:
- Duplicar (Duplicate) a category to assign more than one work unit or a different quantification criteria. This is usually used to generate more than one quantification line from a single model element. Categories can be duplicated unlimited and will be displayed with a white background. In addition, a specific identifier is created in the “GuidAux” field of the quantification lines to differentiate its elements from the elements of the main category. They can be differentiated by assigning each one an identifying category name and its corresponding code
- Eliminar (Delete) only duplicate categories.
- Filtrar por script (Filter by script), apply, in the display right window, the category script filters, if any.

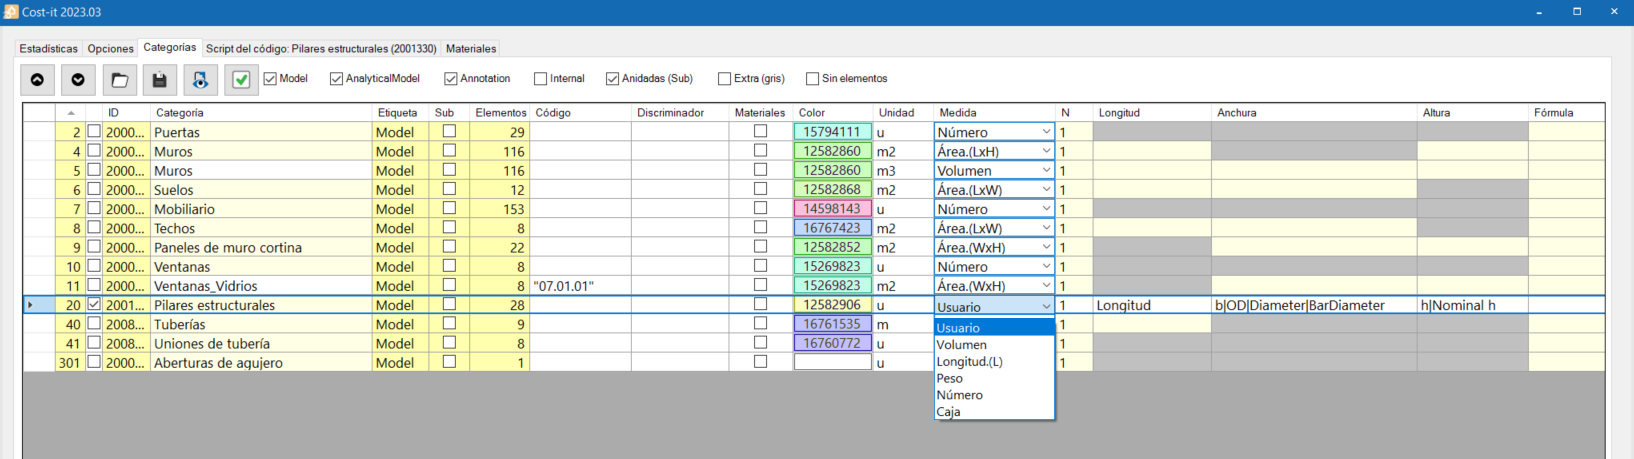
Quantification criteria
By default, the most common quantification criteria is used to quantify each category without the need to enter rules or further data (Walls will be quantified per m², railings per ml, etc.). However, the “Usuario” (User) quantification criterion can also be activated and customised according to the needs. If several parameters are entered, separated by the “|” character, Cost-It will choose the first one that has a value for each item in the category.
Code script
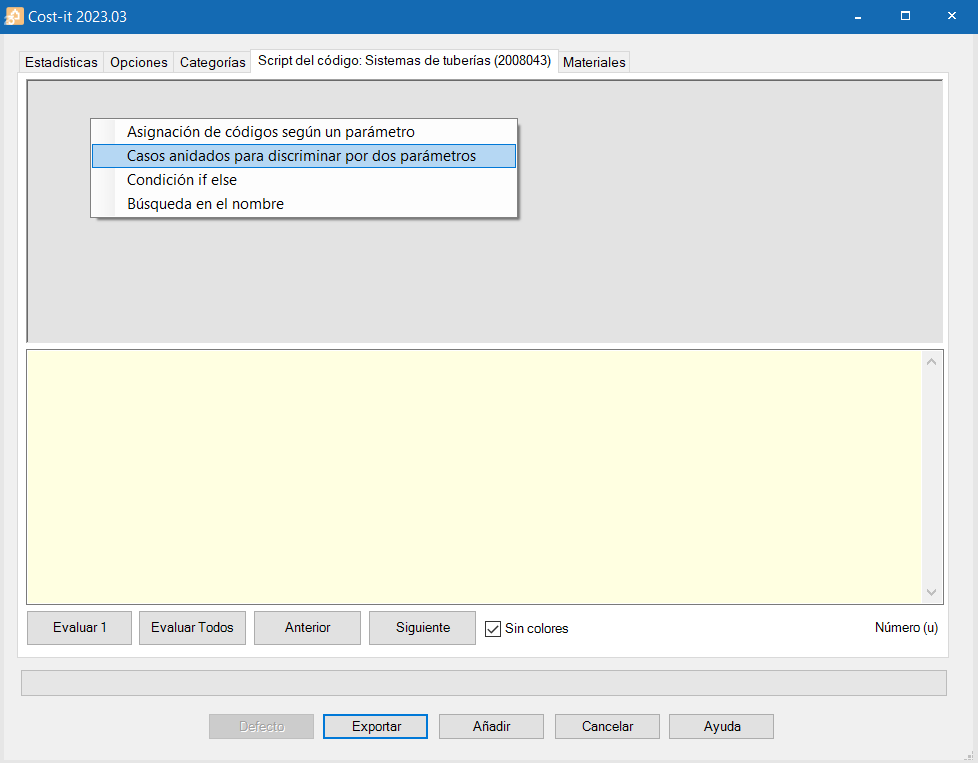
From the “Script del código” (Code Script) window, codes can be assigned with more flexibility to different types and instances by means of an expression or program written in JavaScript. The rules for associating work units codes can be saved in the configuration sheet and reused in the same or in a different model.
By clicking inside the grey box with the right mouse button, the context menu appears. This menu provides us with examples of the most common possibilities, where only generic values have to be substituted.
Materiales
From now on, the materials export can be customised, code them, choose the quantification criteria and check the main quantities. To obtain the materials and their quantities, click on “Calcular número y cantidades de los materiales” (Calculate number and material quantities).
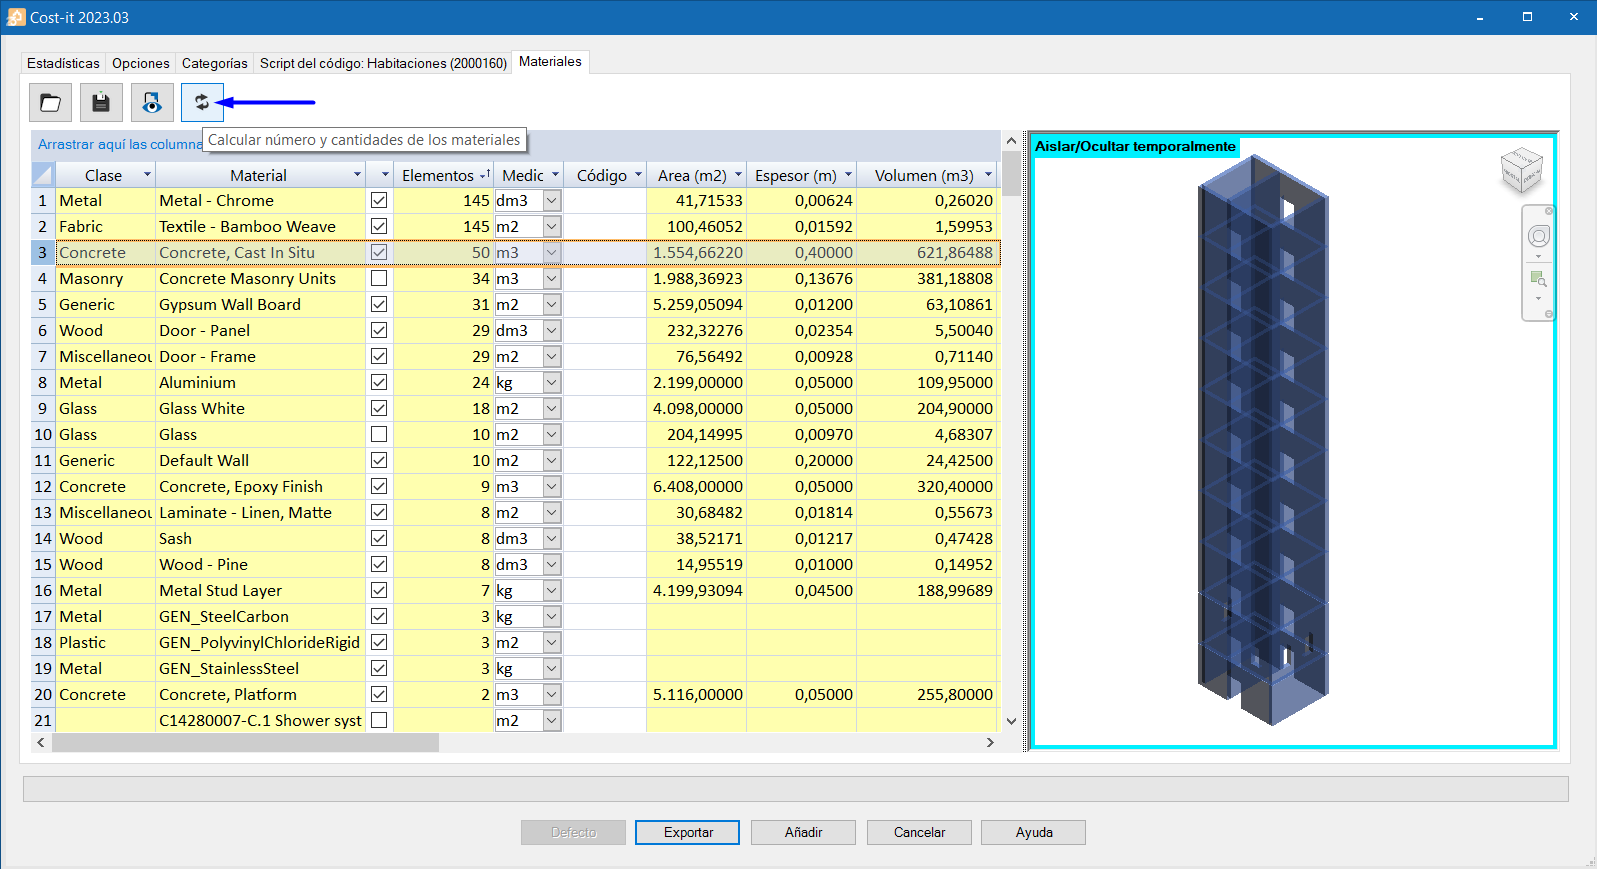
If the material quantities are not going to be used, it is advisable to deselect all of them, in order to speed up the export. To do this, click on the top left box that selects all lines and then uncheck the “Exportable” tick. It is advisable to review this tab whenever an export is performed. If materials are exported by mistake, this line can be removed from the cost estimate in Presto.
Export of Special quantities
Quantification of materials
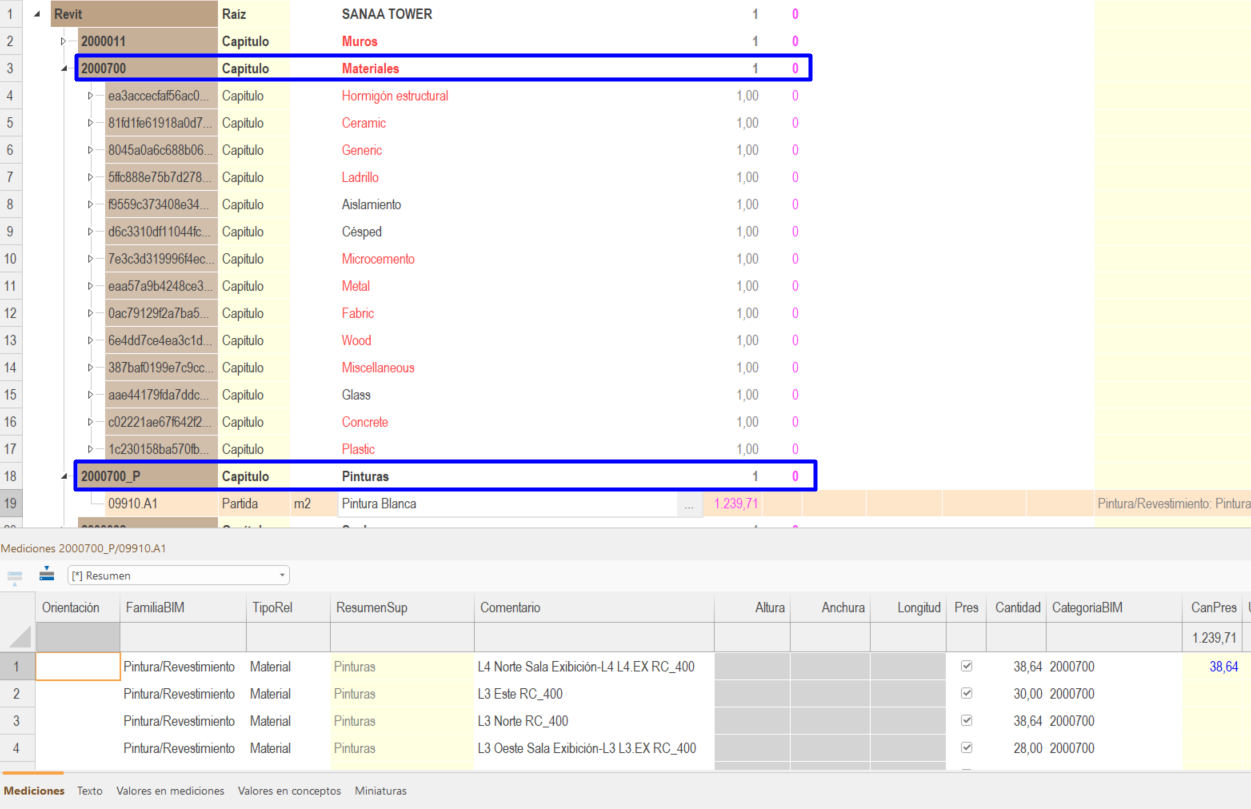
It could be assumed that each layer of an element is equivalent to a material and each material generates a work unit or item. Materials are grouped in sub-chapters (Metal, Plastic, Wood, etc) and paints will be separated in a separate chapter.
Quantification of other elements
Areas and Rooms
Cost-It generates chapters with the areas and rooms in order to obtain the constructed and useful surfaces, as well as the parameters that have been defined.
From the export settings, the walls (floor-plan) areas and the openings contained in those rooms can be included. To do this, (in addition to the rooms category) the walls category must be exported and those of the elements embedded in the wall that generate the openings.
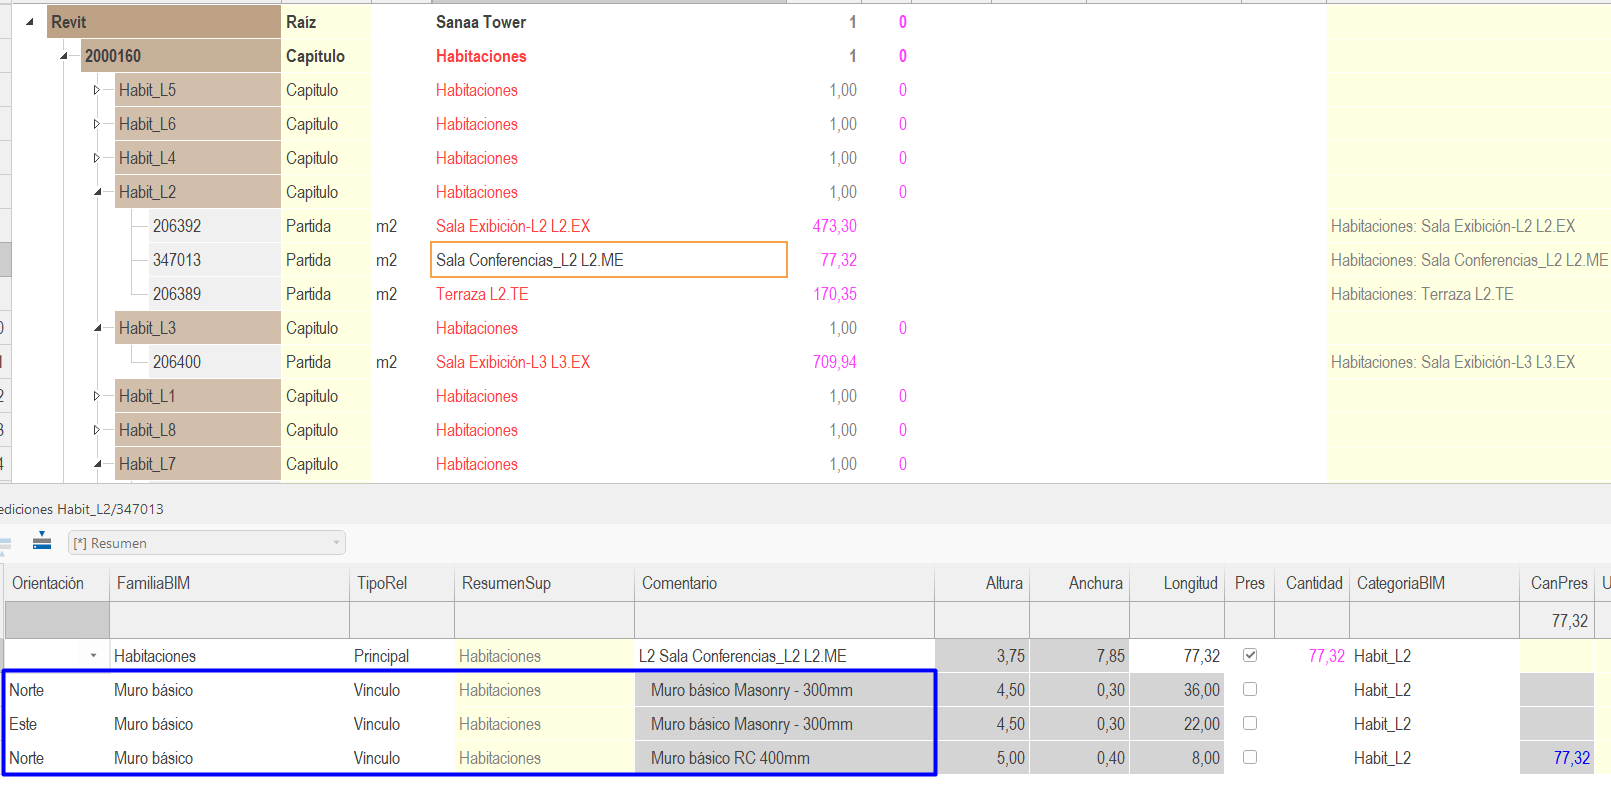
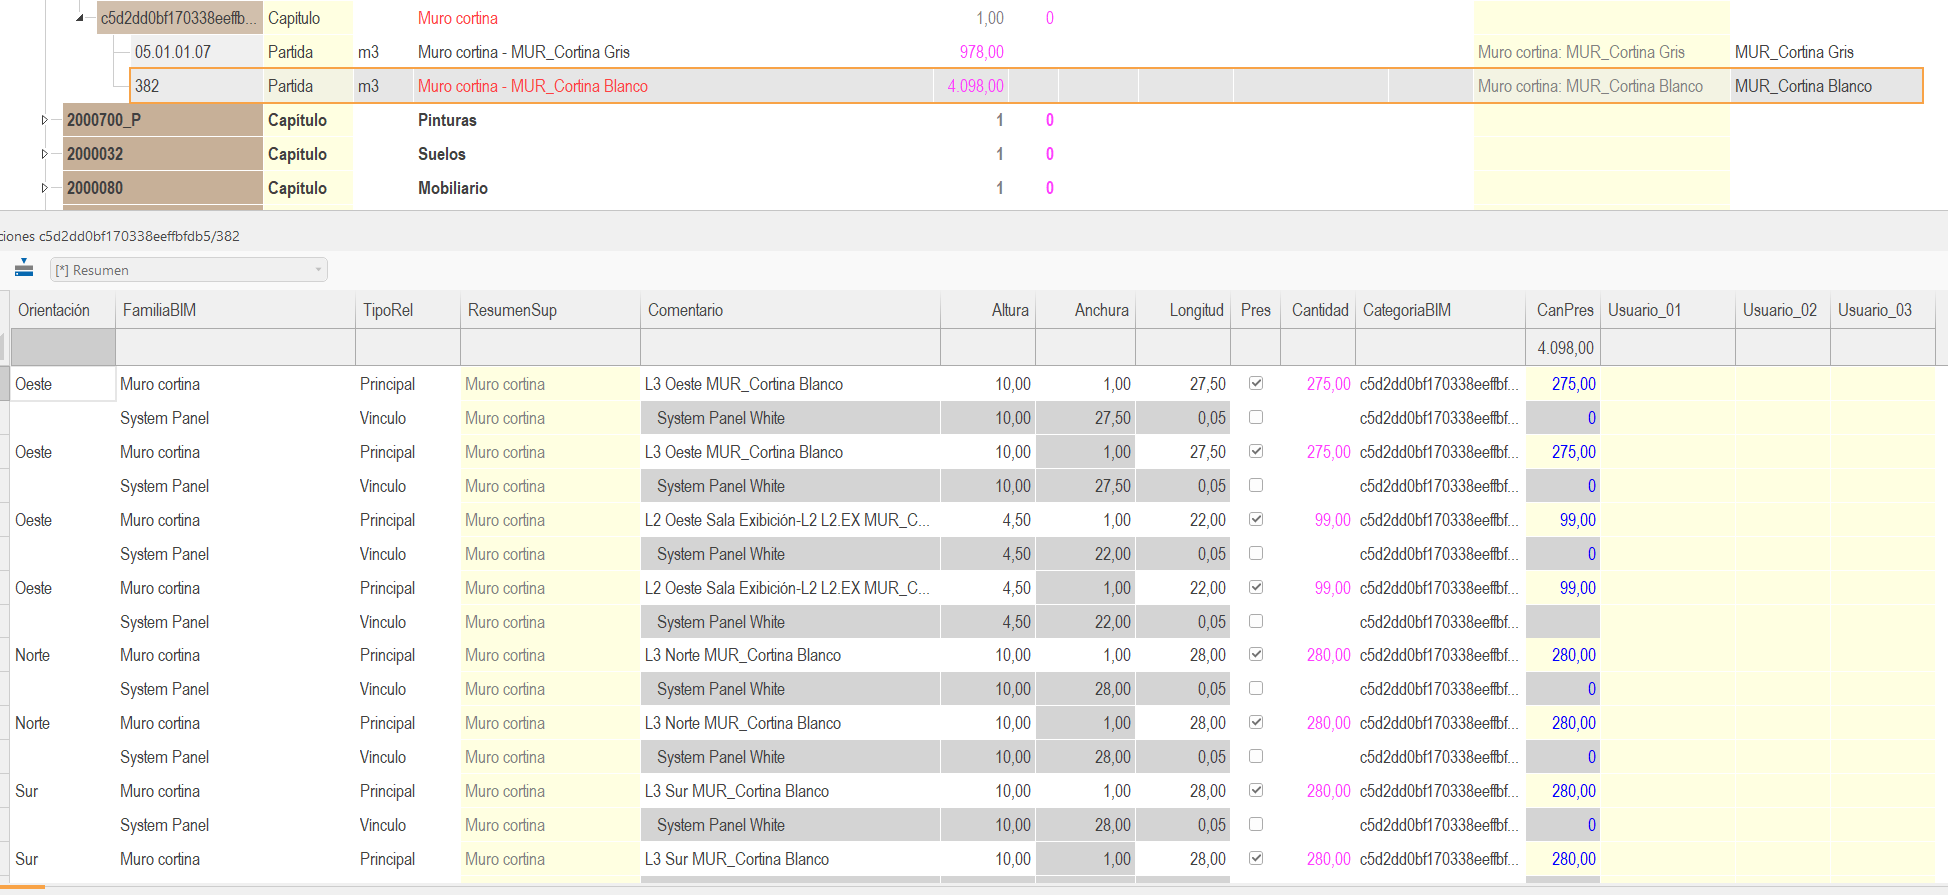
Linked elements
If this option is activated in the export, after the quantification line of each element, the elements that Revit considers linked are obtained, i.e. panels and mullions in curtain walls or railings or balusters in staircases.
The linked elements appear blocked, in grey, so the cost estimate is not affected, since each element as such is quantified in the corresponding work unit.
Non-modeled elements
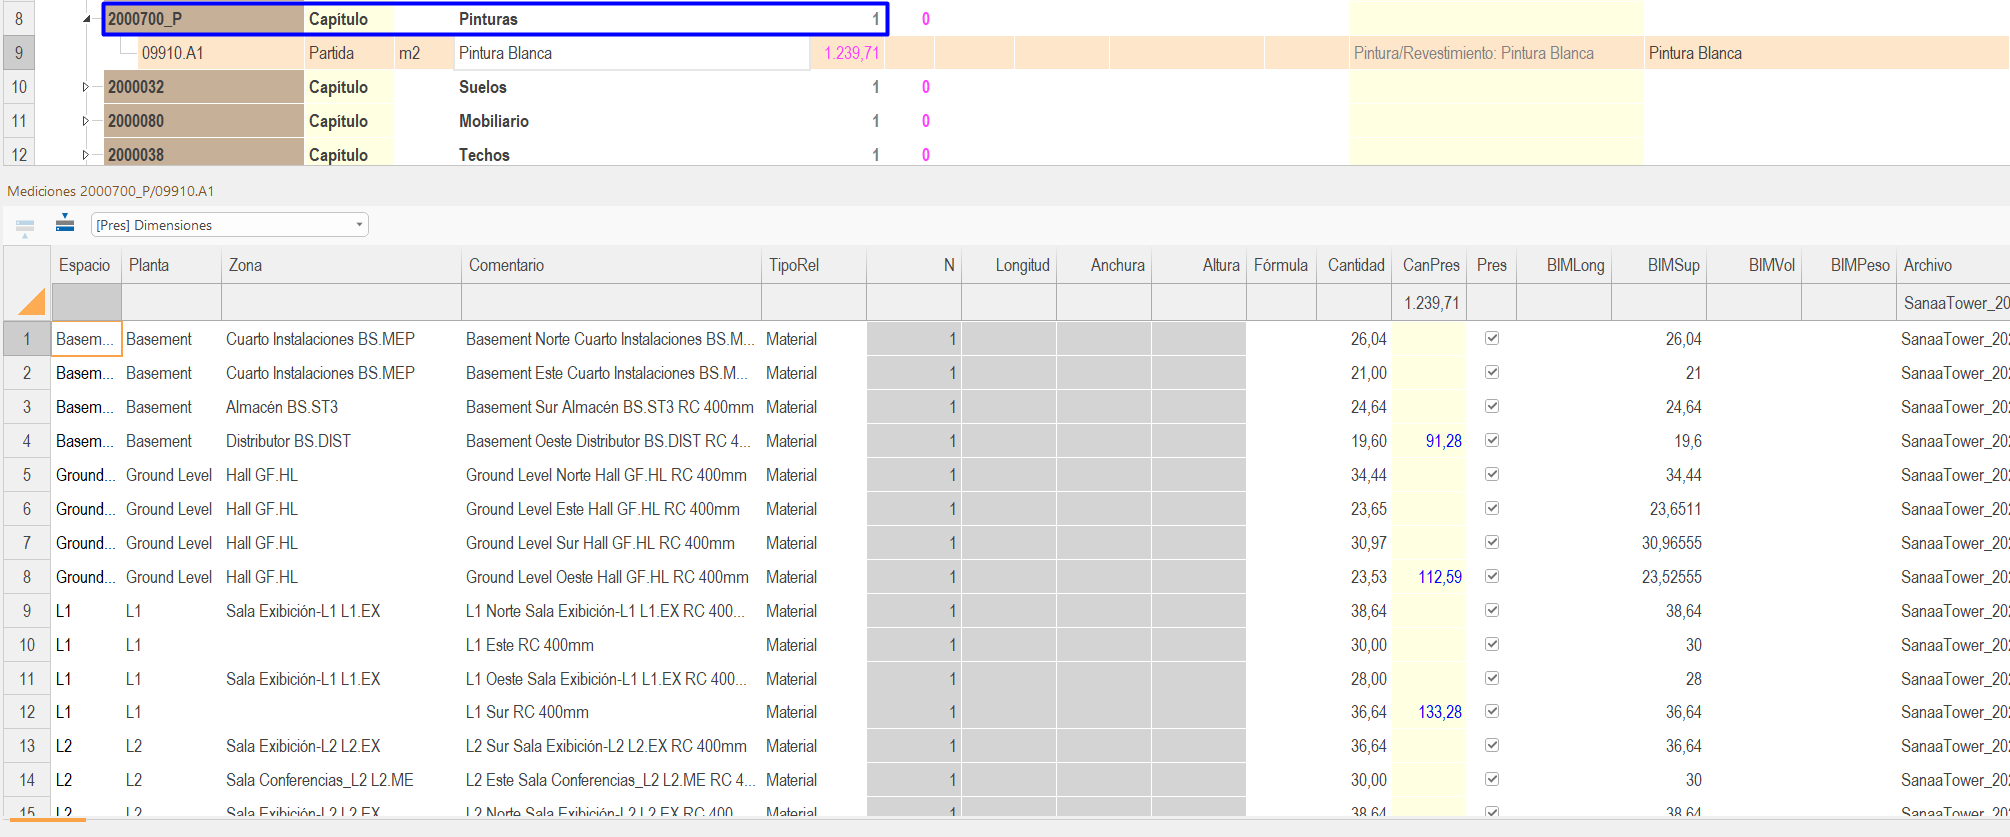
Many work units are not modelled but the geometry of other elements can be used to obtain the necessary quantities. For example, the quantification of paintings for partition walls, wall linings or ceilings can be obtained.
To do this, Presto automatically calculates for each work unit a set of complementary quantities that can be used to obtain other quantities.
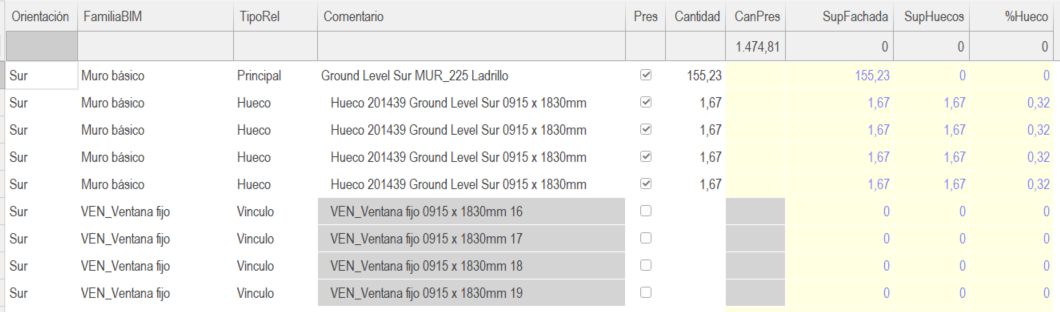
Openings
After the quantification line for each wall, a line is exported for each opening, identified in the column “TipoRel” (TypeRel).
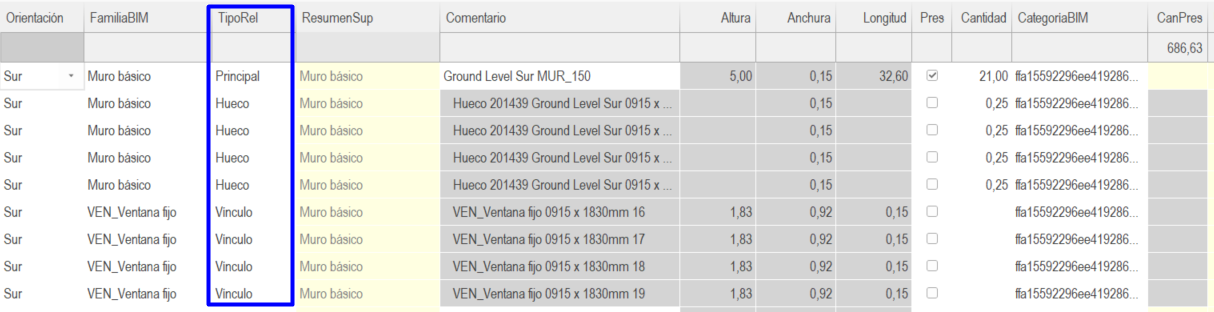
Depending on the data entered in the Cost-It exporter under “Descontar huecos mayores de” (Discount holes larger than), the cost estimate displays:
- If the void area is smaller than the size indicated the “Pres” field is checked, and the void area is added to the wall area. The voids are not discounted.

- If the area is larger, the “Pres” field is unchecked and the area is not added to the wall. The openings are discounted.
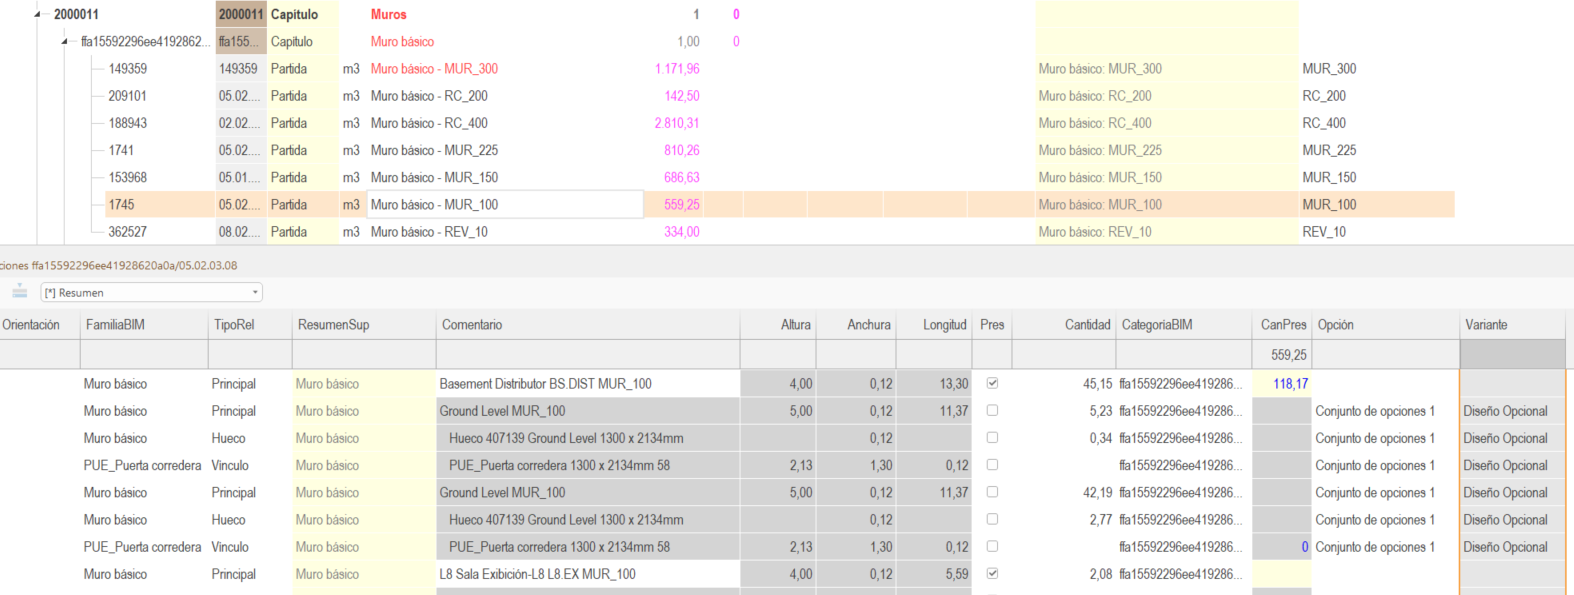
Design options
By default only the “Main Model” option is exported. To obtain the quantities of the alternatives, check “Elementos vinculados y otros que no forman parte del presupuesto” (Linked elements and other elements that are not part of the cost estimate). With the “Pres” field unchecked your elements won’t be added to the cost estimate. The option and variant names are displayed in the “Opción” (Option) and “Variante” (Variant) fields, respectively.
Quantification of finishes
The quantification of finishes can be quantified by:
- Modelled finishes. By modelling finishes as independent elements.
- Finishes per room. By assigning the material in the finish floors, ceilings, and walls parameters of each room in Revit.
- Paint finishes. By using the paint tool on the surfaces of the elements.
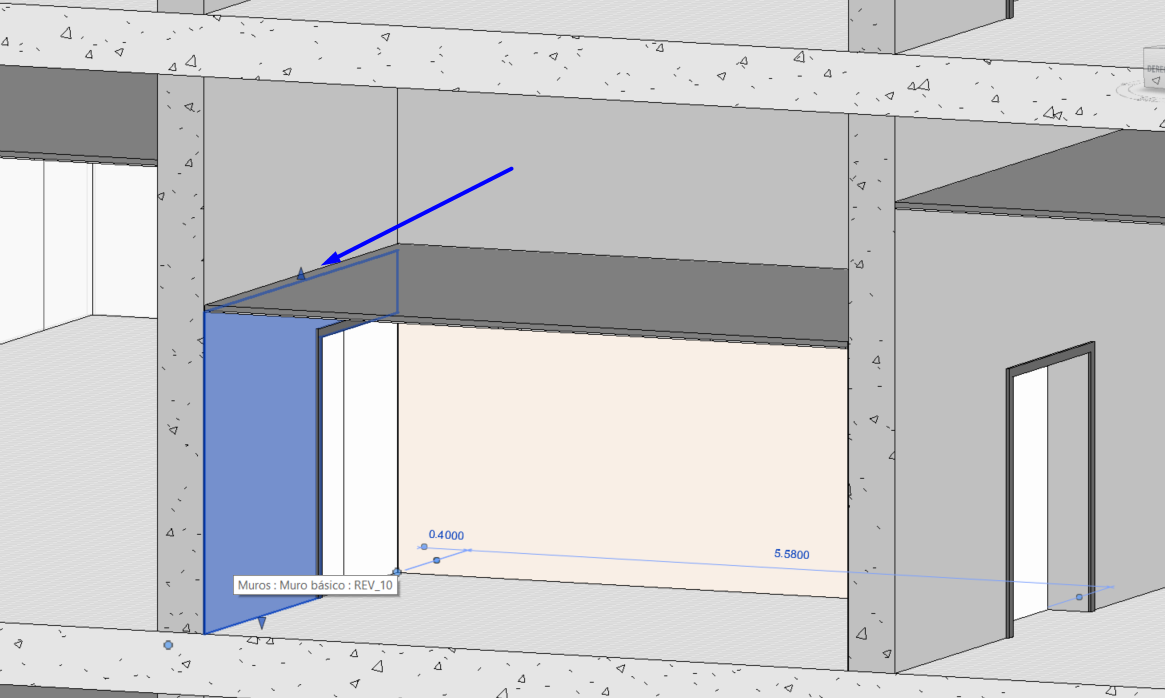
Modelled finishes
Specific walls that exclusively represent the finish can be created. These walls are joined to the main wall, so that they automatically assume its openings, and at the same time they can have a different height, i.e. a tiling that does not reach the floor slab. In this case, the finish is quantified as another wall.
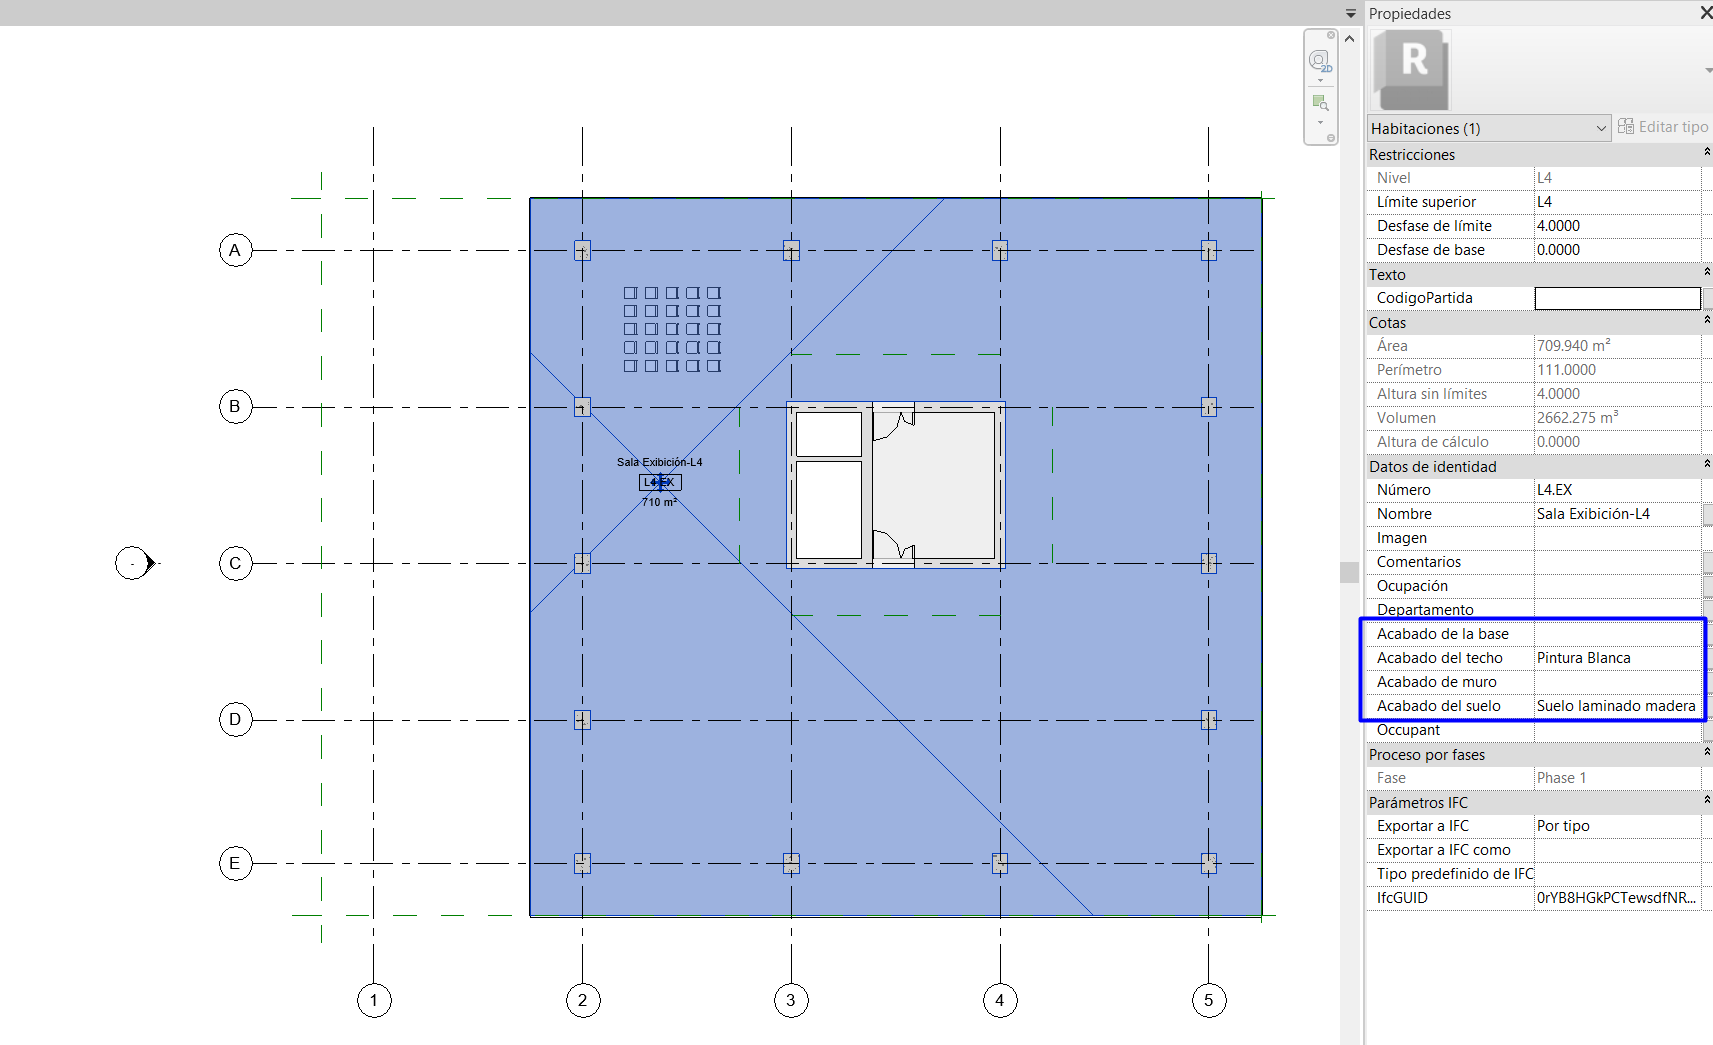
Finishes per Room
If you populate the finish parameters assigned to each room with a material name, Cost-It will export each of them as a line item within the “Materials” chapter. Each material contains a quantification line for each room in which it appears.

Paint Finishes
Paints are finishes that can be assigned to the surface of an element. It is not a widely used method for exporting the quantification of paints as such, but it is a very useful tool for measuring complex surface finishes without explicitly modelling them as elements.
Visualisation of elements in Presto
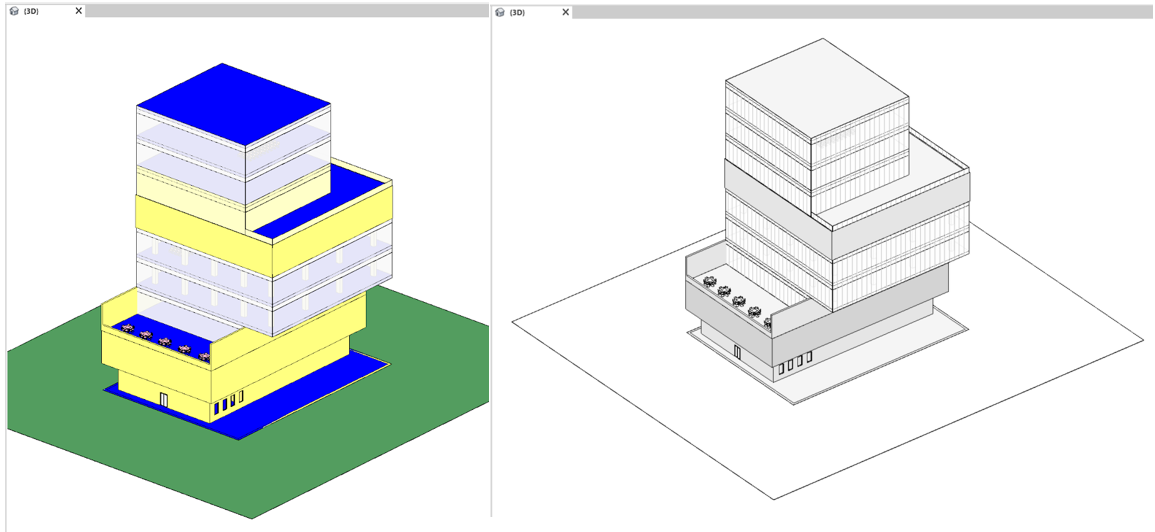
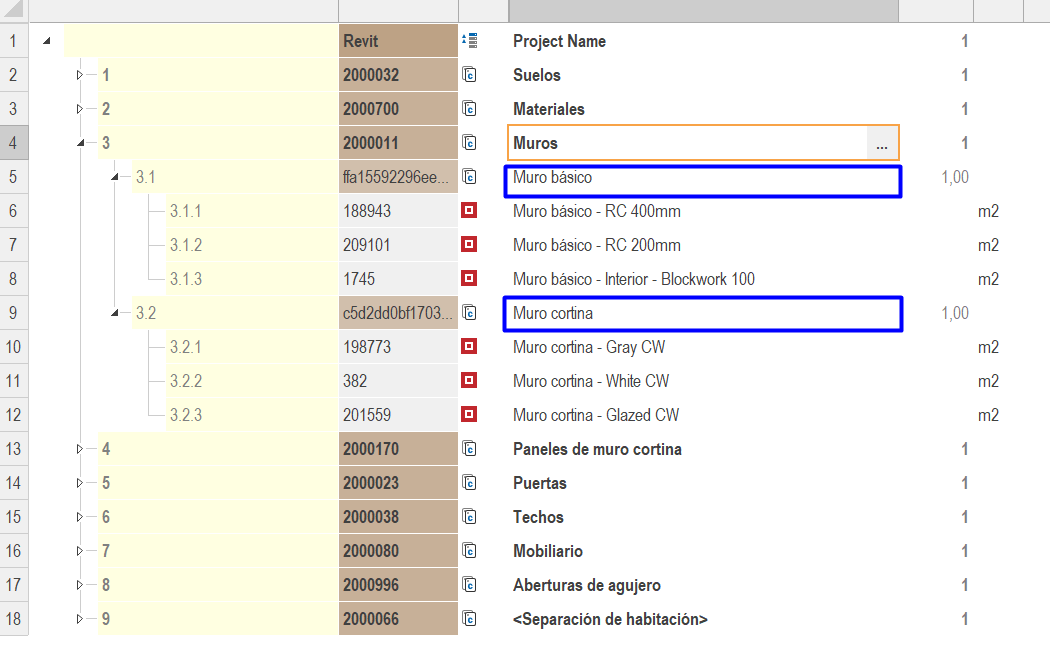
Coded and uncoded elements in Revit
If all elements in a chapter have the work unit code assigned to them, both the chapter and the line item will appear in black status. On the other hand, if any type has not been coded, both will appear in red status.
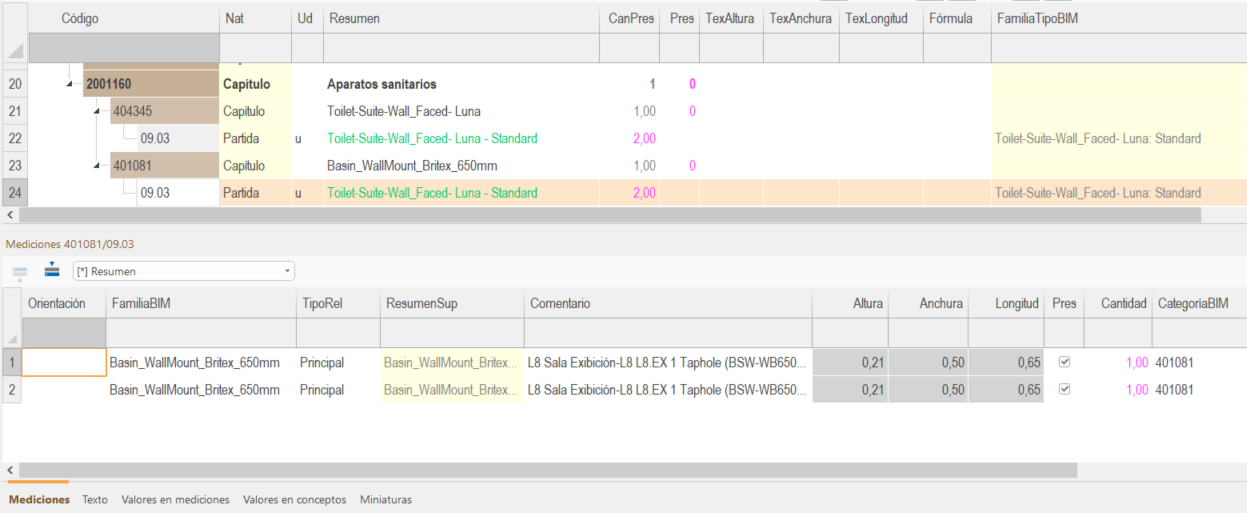
Different elements with the same line Item code
It can be the case that several types are coded with the same starting code, so the status of that line will be green. The quantification criteria and other properties of the work unit will be those of the first type displayed. The specific types will be visible in the line item quantities.
Tips to complete the cost estimate
It is likely that the result of the export will not be the final one and certain aspects will have to be completed, updated or customised.
For instance, adding information from the price tables, including the part of the project not modelled, reorganising the structure of chapters or line items or including line items or chapters from other teams' cost estimates.
Reorganising by Line items according to Cost estimate database
By default, Cost-It organises the cost estimate according to the pre-Export settings in the categories window.
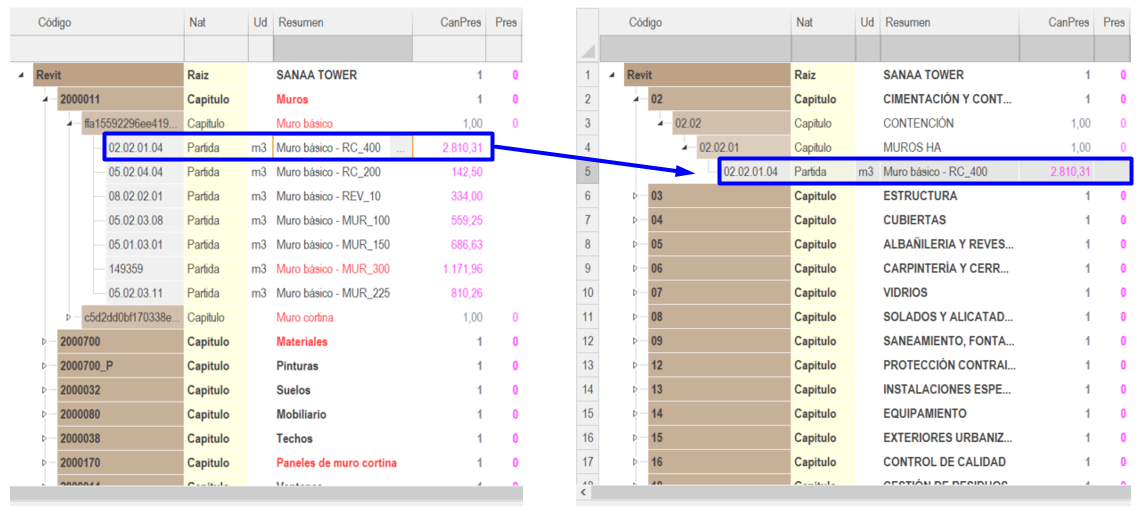
If a Presto template or a reference project is already configured, the selected line items can be relocated in a new chapter structure, based on the content of a concept field or a variable. To do this go to Herramientas>Reestructurar por partidas>Con máscara>Campo: Conceptos.Codigo>Buscar capítulos en: La ruta del archivo guardado> Aceptar (Tools>Rearrange by line items>With mask>Field: Concepts.Code>Find chapters in: The path of the saved file>OK).
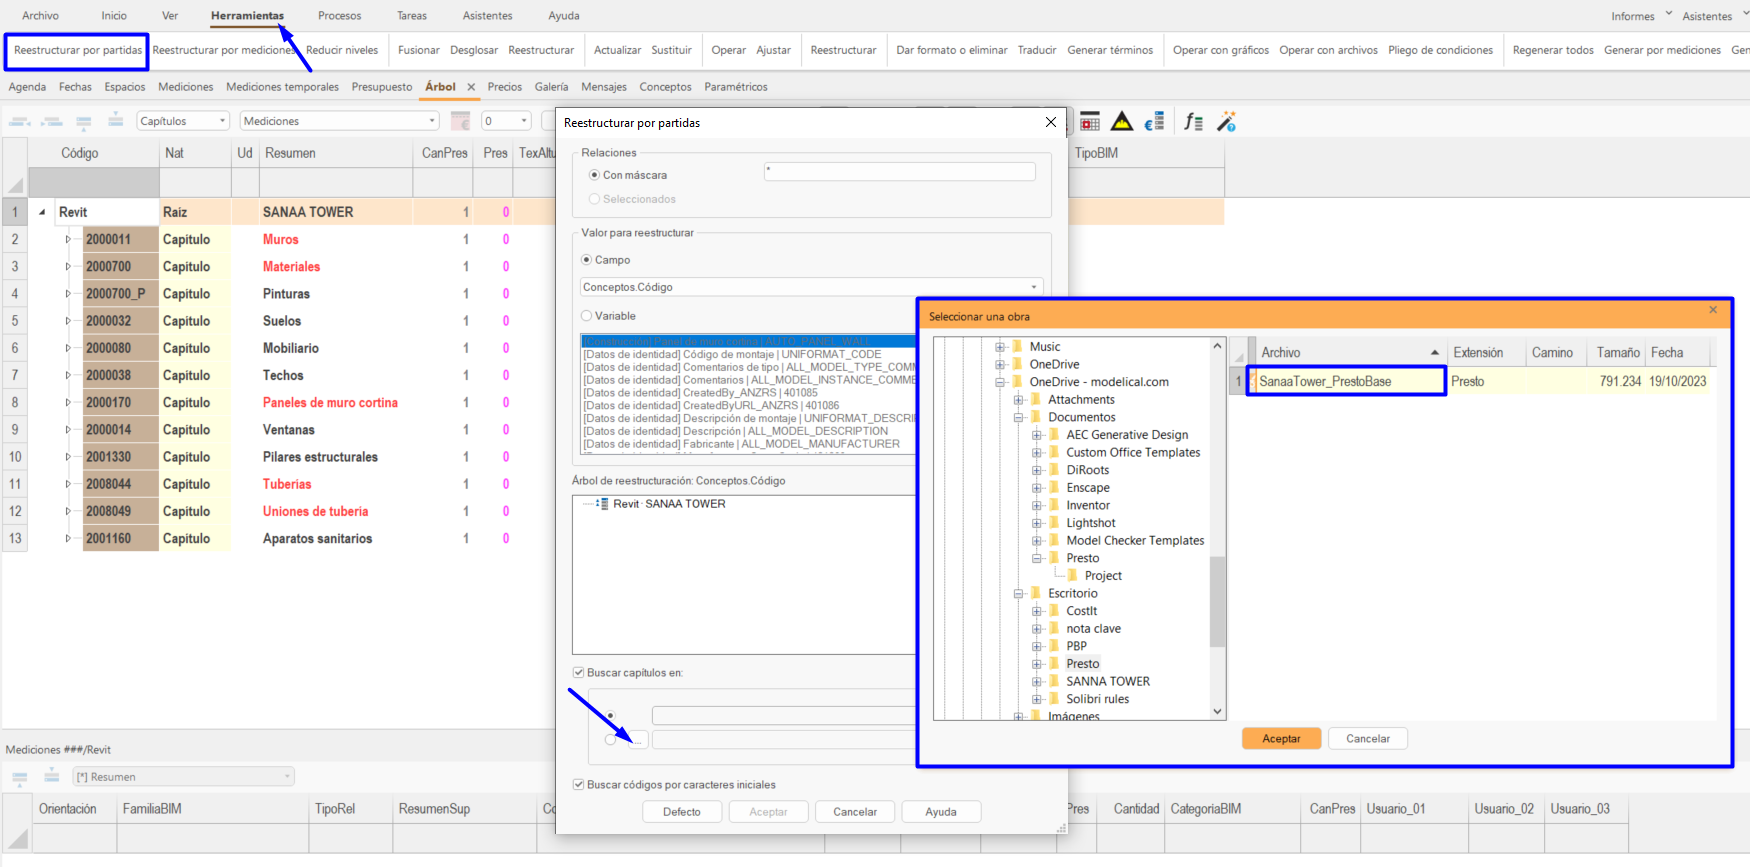
The affected work units will be moved to the new chapters. Those chapters that do not contain line items will be added in the same way. Line items that do not correspond to any chapter will be added to the original chapter before the end of the cost estimate.
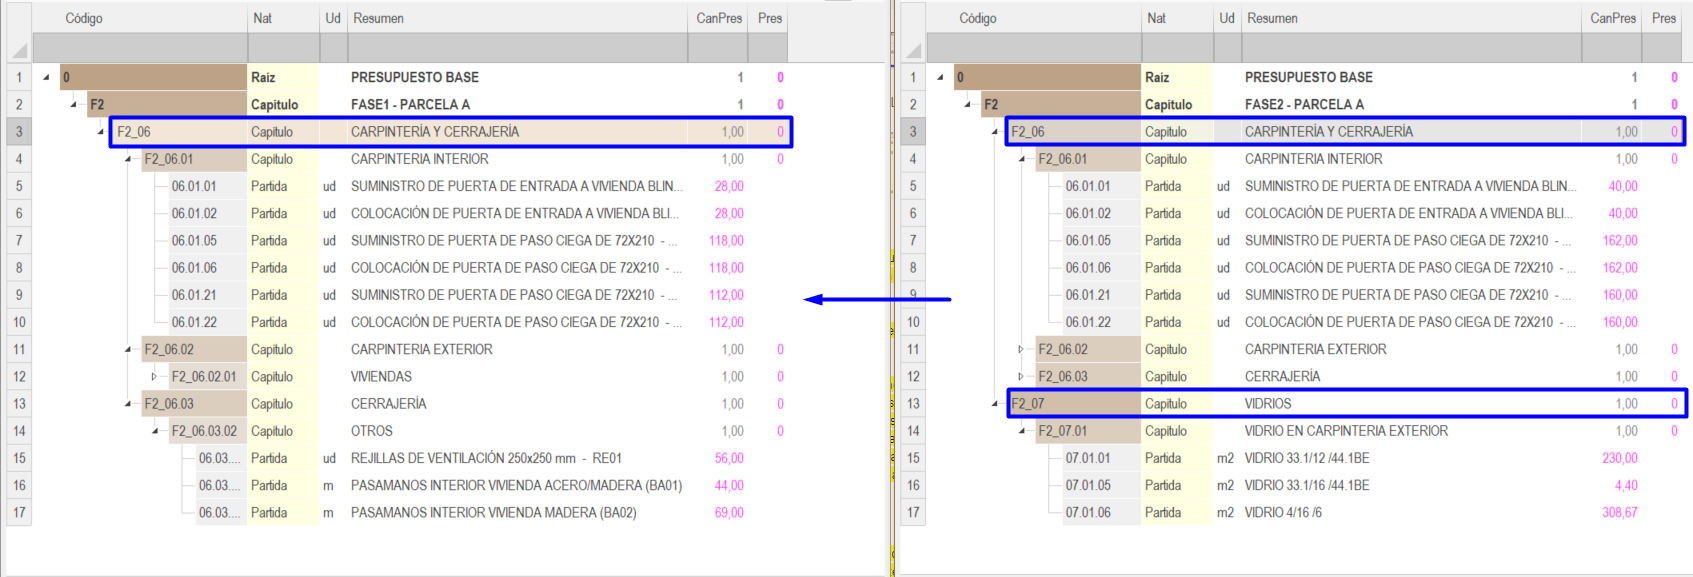
Merging cost estimates
When merging cost estimates there can be several cases, either combining different chapters, same chapters with different line items or similar cost estimates with different quantification lines.
Cost estimates with Different chapters
The simplest system is to drag or copy and paste the chapters of a cost estimate into the other.


Only the new line items or chapters will be copied. If the chapter or item already exists in our cost estimate, the existing information has priority.
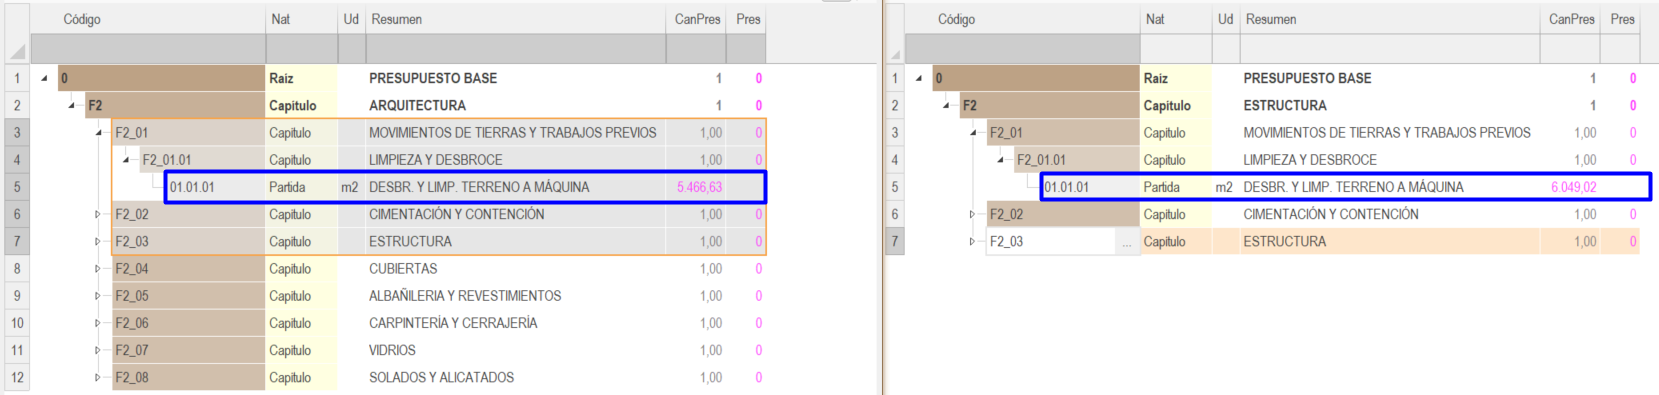
Cost estimate with Same chapters

To update line items from one cost estimate to another that share the same chapters, go to Herramientas> Actualizar (Tools> Update) and uncheck the option “Sólo partidas y naturalezas básicas” (Only basic line items and natures) in order to update everything, including the existing chapters.
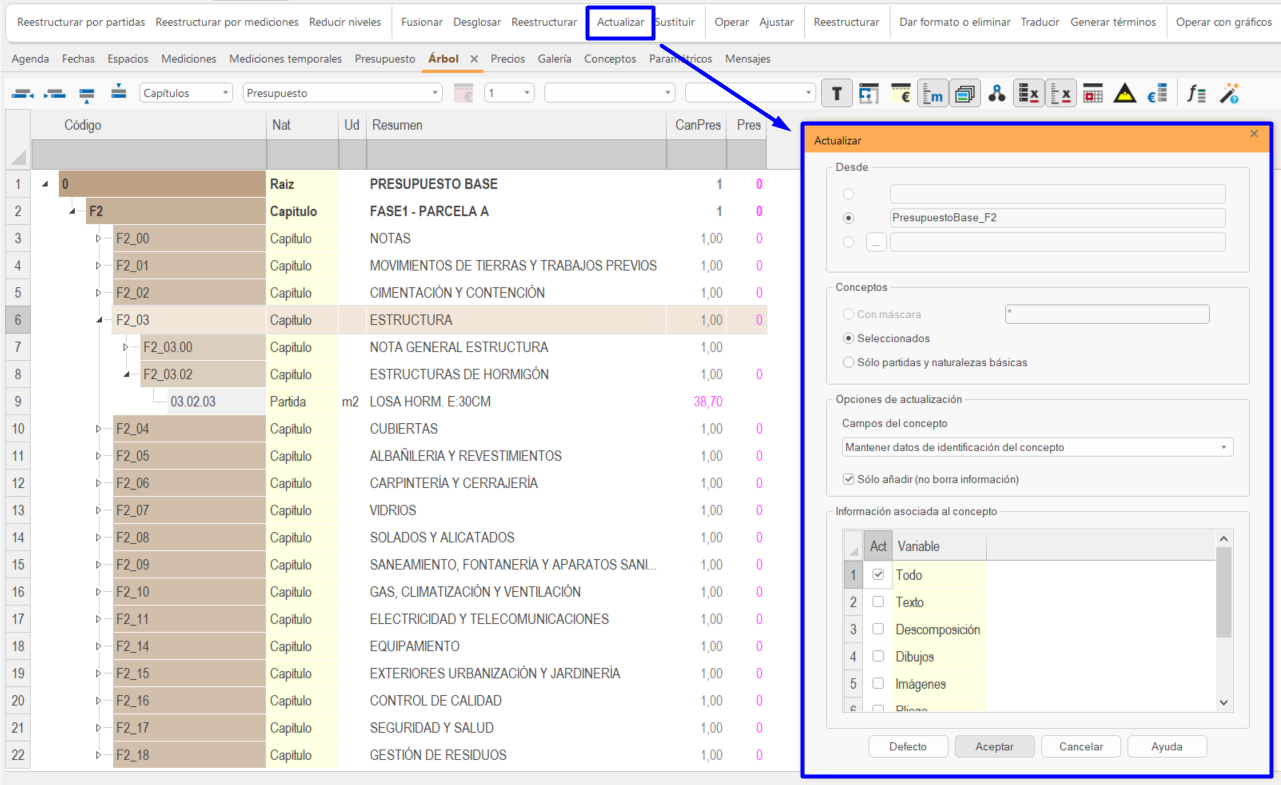
By selecting “Sólo añadir (no borra información)” (Add only (do not delete information))” only the new line items or chapters will be added but will not replace the existing ones.

Cost estimate with Equal line items
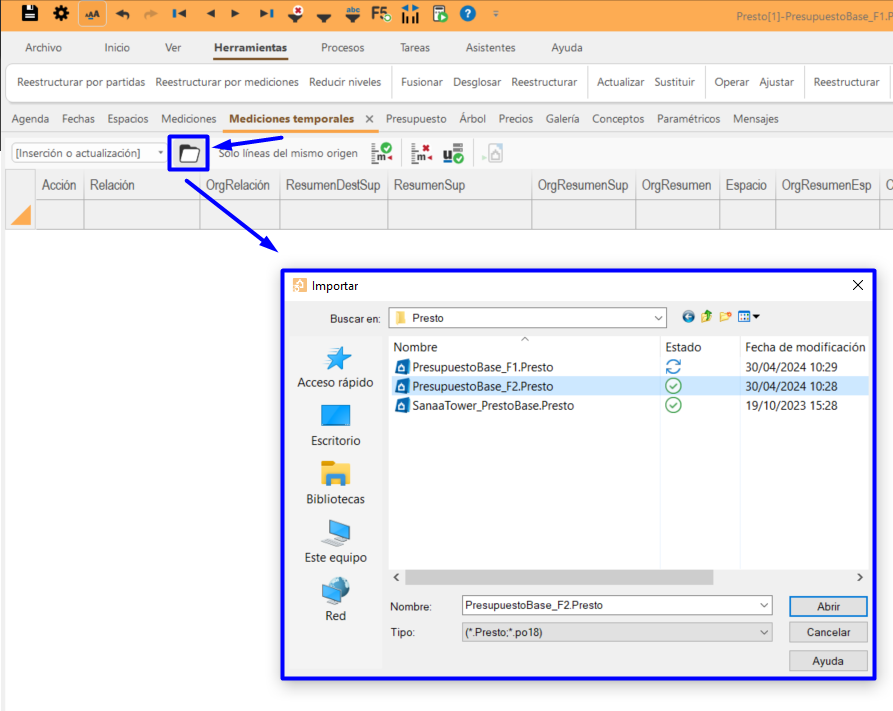
Import
To import a cost estimate into another one, to include its new chapters and line items, and to add the line items with the same work unit codes, the quantification lines must be exported.
The import of the file or cost estimate is executed from the target cost estimate from Ver>Mediciones temporales (View>Temporary quantities) and click on the “Importar” (Import) icon. If there were previous temporary quantities they will be automatically deleted.
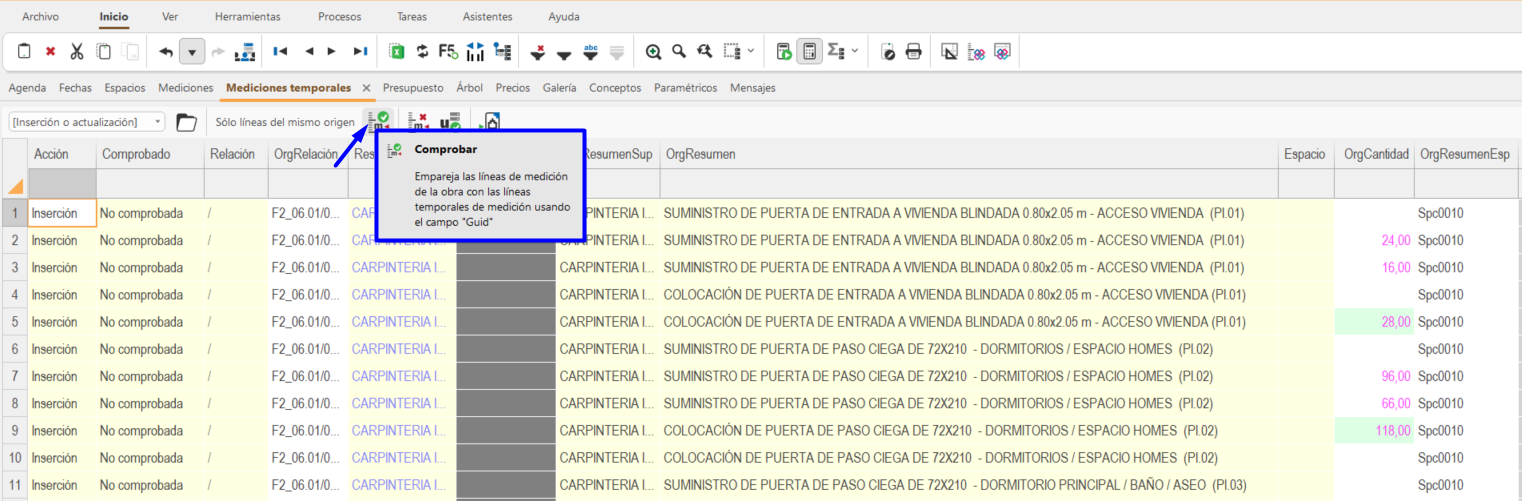
Lines matching
Since the Cost-It export always generates the same “Guid” for each item, the lines will be matched using this field, ensuring that they correspond exactly to the same original line. To match the lines, click on the “Comprobar” (Check) icon. The status of the “MedicionesTmp.Comprobado” (QuantitiesTmp.Checked) column will change from “No comprobada” (Not checked) to “Comprobada” (Checked).
Imported lines that do not find their equivalent in the existing cost estimate are considered new and will be included as such.

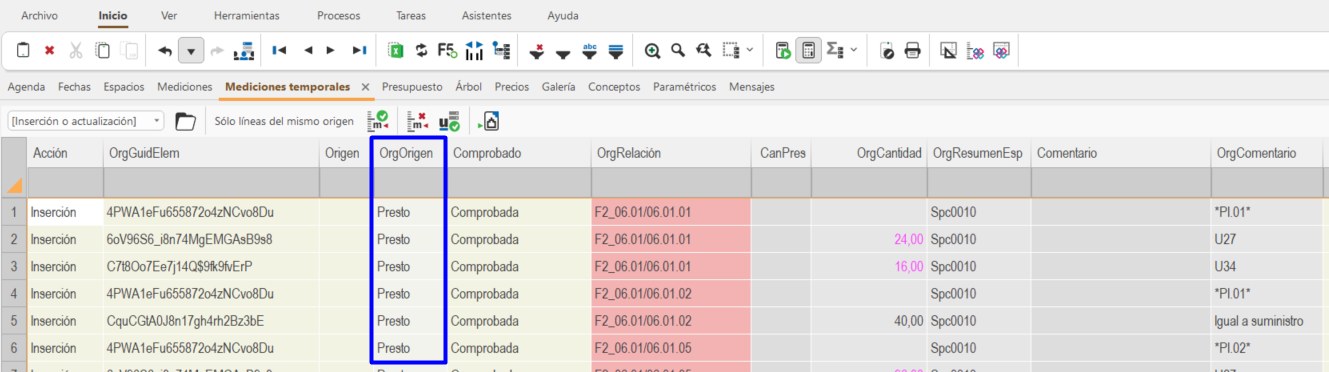
The option “Sólo líneas del mismo origen” (Only lines of the same origin) checks the differences between quantification lines with the same content in the “OrgOrigin” field. This possibility allows us to update quantification lines with the same origin either from Revit, Presto, etc.
Transfer of Quantification lines
Once the quantification lines have been matched, click on “Traspasar” (Transfer) to include them in the cost estimate. The “Acción” (Action) column will indicate what will happen to each of the lines. The lines can be inserted, update the existing ones, or no action can be taken because they do not affect the quantities.
Reorganising by Line items
Once the quantification lines have been transferred, the cost estimate may need to be restructured by line items.
Summary
To export a cost estimate from Revit to Presto using Cost-It will be needed:
- First, to have a correctly coded model, it will be necessary to define what and how our elements are going to be codified and in which parameters.
- A classification or a cost estimate database is needed with the codes that relate the elements of the model with the work units or line items.
- Customise the export in Cost-It. Choose the parameter where the elements have been coded, the quantification criteria, the categories to be included or excluded, the linked elements, materials, etc.
- Finally, the cost estimate must be reviewed and completed or updated if necessary.
Tips and tricks
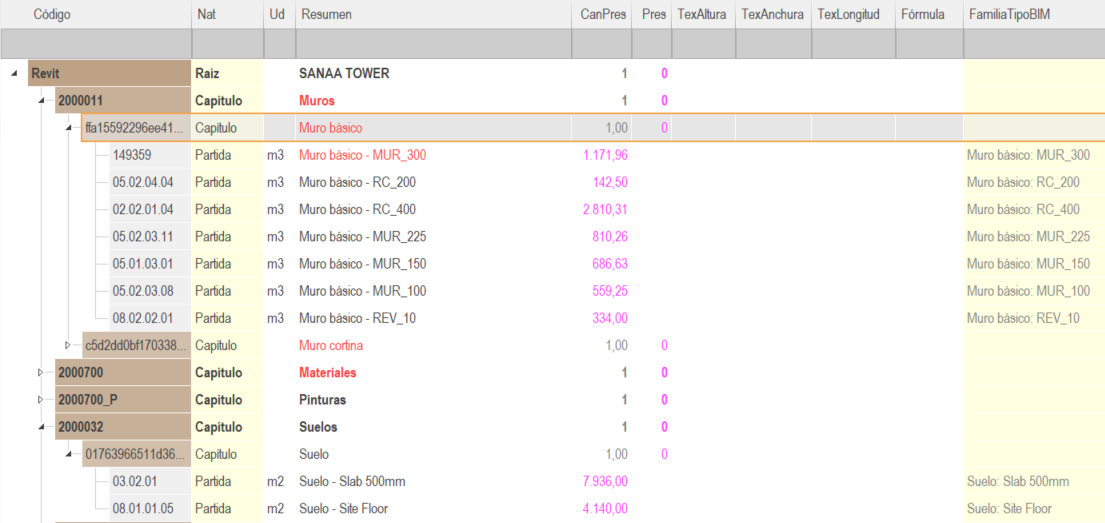
- It will be very helpful to understand and keep in mind how Revit information is related to Presto. As mentioned at the beginning of this guide, when exporting, the Revit categories will generate the chapters in the Presto cost estimate, the families will be subchapters, the types will become line items and each element will be a quantification line.
- In addition, before starting to model, it will also be very helpful to be very clear about what and how the elements of our model will be quantified. If the quantification will be by type, by instance or by material, or a combination of the above. Furthermore, the geometry of other elements, such as areas and rooms, can be used to export a specific quantification.
References
- Cost-It: BIM 5D con Presto (Cost-It: BIM 5D with Presto)
- Manual Presto: Cost-It (Presto Manual: Cost-It)
- Manual Presto: Integración y comparación de mediciones (Presto Manual: Integration and comparison of quantities)
- Manual Presto: Obtener el porcentaje de huecos en las fachadas (Manual Presto: Obtaining the percentage of openings in facades)
- Manual Presto: Personalización de la exportación de Revit (Manual Presto: Revit export customization)
- Manual Presto: Fusionar presupuestos (Manual Presto: Merging cost estimates)