

How to Script Photoshop – In Depth
Where do we come from?
I know that the last chapter in the “How to Script for Photoshop” series was not very well received. The fact that nobody read it and the revealing information on Google Trends about the topic, has not been enough to break my will. It is the absurd thing about my will that encourages me to go on. Or sideways. Or backwards. Or still. To go anyway, even stopped. Because I can go on without moving. I can even displace myself without moving. But that could be a topic for a new post, we will see.
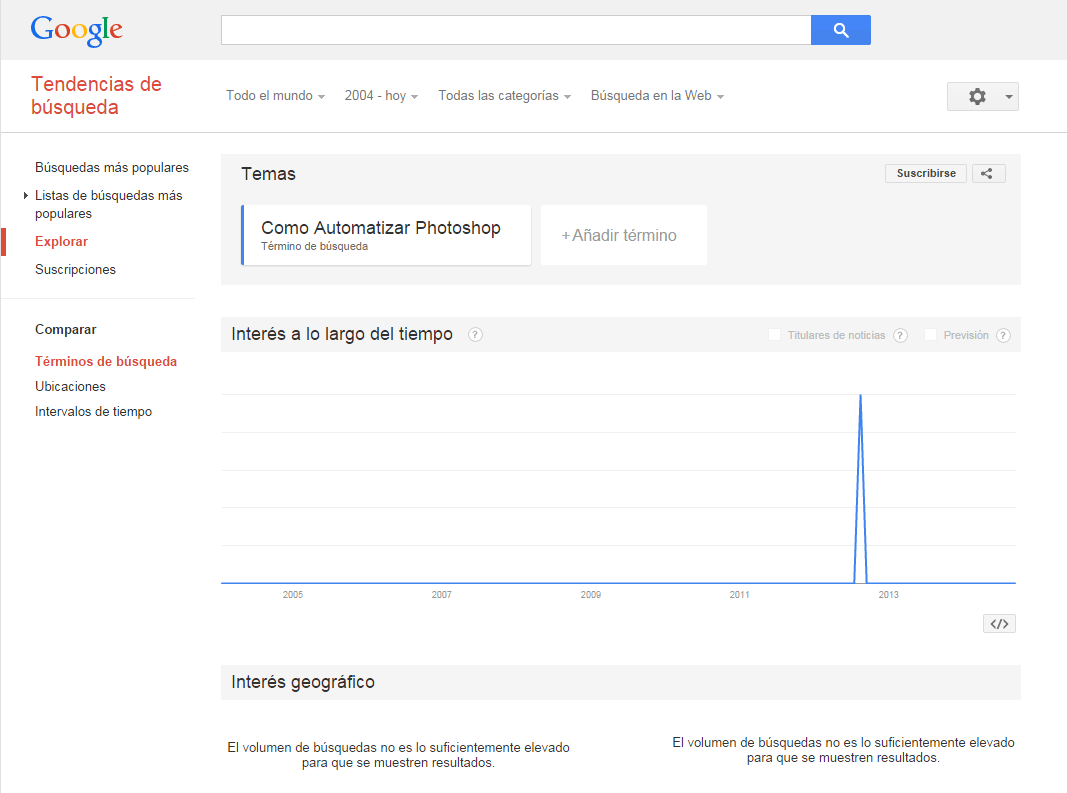 The ugly truth (sorry for the Spanish screenshot)
And that peak is not because of me 🙁
On the first chapter we were introduced in the Photoshop development environment usage, with a simple case. As we were saying the last time, we could have done that example with a Photoshop action, without having to write a single line of code. And that was done in purpose. Now, we are going to expand the aim of the script, reusing the code from the last chapter.
Where are we going?
Let’s add two goals for our script:
- Get different aspect ratio output images from the source image.
- Save the output images as JPEG, only if the source is JPEG, otherwise we will save as PNG.
As you can see, these goals are very difficult to achieve using only Photoshop actions.
Let’s start modifying our script, adding an array with the aspect ratio values we want for the output images:
var aspectRatio = [ [ 1, 1 ], [ 4, 3 ], [ 16, 9 ] ];
In this array we can add any aspect ratio we are interested on, like 5:4, 16:10, change it according your needs. Who is being obtuse now?
Now we are going to crop our image, so we need to calculate the new dimensions. But, stop right there you avid programmer! Approach no further! Let’s meditate. I made this pretty drawing. I like drawings. I hope it will be useful for our purposes.
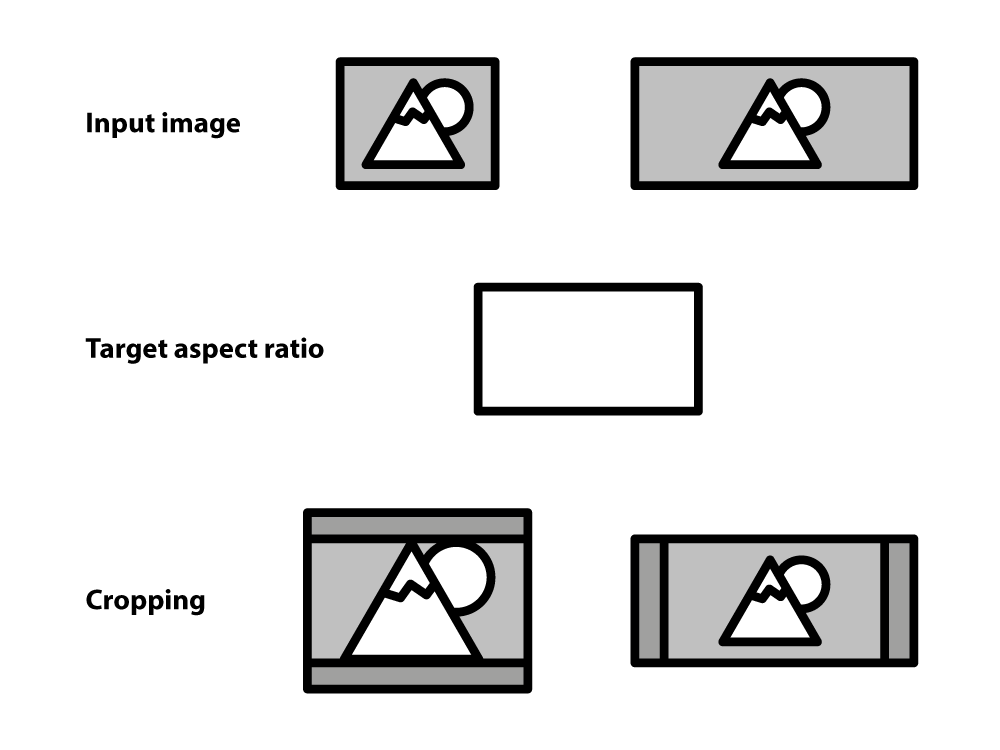 A pretty drawing
What this drawing is telling us is that we have to take into account the aspect ratio of the source image to know where we have to cut the image. As you can see, we are assuming that the source image will be always centered in the ouput image. I did not want to advance any contents, but, in the next chapter we will be trying to let the user decide the center of the cropped image. Who is being obtuse now?
Let’s concretize this in code, please:
var imageAspectRatio = doc.width / doc.height;
var currentAspectRatio = aspectRatio[j][0] / aspectRatio[j][1];

var tImageWidth = imageWidth;
var tImageHeight = imageHeight;

if(  imageAspectRatio > currentAspectRatio ) {
	tImageWidth = Math.round( aspectRatio[j][0] * imageHeight / aspectRatio[j][1] );
} else {
	tImageHeight = Math.round( aspectRatio[j][1] * imageWidth / aspectRatio[j][0] );
}
If we try to explain this with a more human language, but intrinsically more inaccurate, we have that if the source image aspect ratio is greater than the output aspect ratio, then we have to crop on the sides of the image. In other case, we have to crop the top and bottom parts.
We crop the image, and then we resample it using our target height:
doc.resizeCanvas( tImageWidth, tImageHeight, AnchorPosition.MIDDLECENTER );

var outputName = filePath + "/" + fileName;

var fileSuffix = "_" + aspectRatio[j][0] + "x" + aspectRatio[j][1];

if( imageHeight > targetHeight ) {
	var tWidth = Math.round( aspectRatio[j][0] * targetHeight / aspectRatio[j][1] );
	doc.resizeImage( tWidth, targetHeight );

	var fileName = getFileName( doc );

	fileSuffix += "_" + targetHeight;
}

fileName.name += fileSuffix;
saveFile( doc, fileName );
In this section we introduce the use of the resizeCanvas functions. As you can see, it takes three parameters: width, height and anchor point. In this chapter we will use a fixed anchor point.
At the same time, we are updating a variable that hold the final name of the output image, with the information that will enable us to identify the image. Notice that the fileName variable it is a pseudo-object, with two fields, name and extension.
In order to achieve our second goal, we are going to modify the saveFile function that we used in the previous chapter:
function saveFile( doc, fileName ) {
    if( fileName.extension == ".jpg" || fileName.extension == ".jpeg" ) {
        fileName.name += ".jpg";
        var jpegOptions = new JPEGSaveOptions();
        jpegOptions.quality = 10;
        jpegOptions.embedColorProfile = true;
        doc.saveAs( File( fileName.name ), jpegOptions, true );
    } else {
        fileName.name += ".png";
        var pngOptions = new PNGSaveOptions();
        pngOptions.compression = 9;
        doc.saveAs( File( fileName.name ), pngOptions, true );
    }
}
The part that saves the output image as JPEG is the same, we only added the option to save as PNG too.
And that is all! Let’s see how it looks all together:
var targetHeight = 512;
var aspectRatio = [ [ 1, 1 ], [ 4, 3 ], [ 16, 9 ] ];

for (var i = 0; i < app.documents.length; i++) {
	var doc = app.documents[i];
	app.activeDocument = doc;
	var imageWidth = doc.width;
	var imageHeight = doc.height;
	var imageAspectRatio = doc.width / doc.height;

    for (var j = 0; j < aspectRatio.length; j++) {
        var currentAspectRatio = aspectRatio[j][0] / aspectRatio[j][1];

        var tImageWidth = imageWidth;
        var tImageHeight = imageHeight;

        if(  imageAspectRatio > currentAspectRatio ) {
            tImageWidth = Math.round( aspectRatio[j][0] * imageHeight / aspectRatio[j][1] );
        } else {
            tImageHeight = Math.round( aspectRatio[j][1] * imageWidth / aspectRatio[j][0] );
        }

        doc.resizeCanvas( tImageWidth, tImageHeight, anchorPosition );

        var outputName = filePath + "/" + fileName;

        var fileSuffix = "_" + aspectRatio[j][0] + "x" + aspectRatio[j][1];

        if( imageHeight > targetHeight ) {
            var tWidth = Math.round( aspectRatio[j][0] * targetHeight / aspectRatio[j][1] );
            doc.resizeImage( tWidth, targetHeight );

            var fileName = getFileName( doc );

            fileName.name += "_" + targetHeight;
        }

        fileName.name += fileSuffix;
        saveFile( doc, fileName );
    }
}

function getFileName( doc ) {
    var filePath = doc.path.toString();
    var fileName = doc.name.toString();

    var lastDot = fileName.lastIndexOf( "." );
    if ( lastDot == -1 ) {
        lastDot = fileName.length;
    }

    var fileExtension = fileName.substr( lastDot );
    var fileName = fileName.substr( 0, lastDot );

    var outputName = filePath + "/" + fileName;

    return { name: outputName, extension: fileExtension };
}

function saveFile( doc, fileName ) {
    if( fileName.extension == ".jpg" || fileName.extension == ".jpeg" ) {
        fileName.name += ".jpg";
        var jpegOptions = new JPEGSaveOptions();
        jpegOptions.quality = 10;
        jpegOptions.embedColorProfile = true;
        doc.saveAs( File( fileName.name ), jpegOptions, true );
    } else {
        fileName.name += ".png";
        var pngOptions = new PNGSaveOptions();
        pngOptions.compression = 9;
        doc.saveAs( File( fileName.name ), pngOptions, true );
    }
}
What are we?
In the next chapter, we will take a look at the Photoshop plug-in we talked in the first chapter about. This plug-in will make us able to dump the actions made in the UI as JavaScript code, so we can use some Photoshop features not available in the API otherwise. We will also talk about custom dialog. Because sometimes you need human interaction. That human warmth that our inner animal needs from time to time (some people more than others and some people never). Stay tuned.