

Navisworks 4D Planning Workflow
4D Planning Workflow
Navisworks 4D Planning Workflow
Objectives
To understand the use of Timeliner for 4D planning in Navisworks.
Prerequisites
- User can navigate Revit files.
- User has basic skills in BIM modelling with Revit Software, and understand the language used.
- User has knowledge about construction and planning.
- User has basic skills in Navisworks. If not, read before Navisworks guideline.
Description
Navisworks basic ideas
- Is an Autodesk software that enables the analysis, simulation and communication of design and constructability.
- It allows shared viewing and review of models of different disciplines (Revit, Inventor, Rhinoceros, Solidworks, Sketchup, Allplan, Robot, CYPE, ...).
Main Naviswork uses
- Clash Detection: Interferences detection and management. It allows us to anticipate, prevent and resolve problems in the virtual model before construction begins, to reduce costs and minimize changes and delays.
- Planning: 4D simulation. Navisworks Manage combines spatial coordination with construction planning, allowing the simulation and analysis of it, and also you can manage the changes that occur during the construction progress.
Navisworks products
- Autodesk Navisworks® Freedom is a free professional version so it is even easier to get and use. This version only opens and combines NWD extension files (also 3D DWF). It allows the visualization of the objects hierarchy and their properties, however, you can not edit those objects.
- Autodesk Navisworks® Simulate: this product allows you to combine and display multiple models simultaneously from different disciplines. You can view the objects hierarchy and their properties and also edit them. It allows the use of "Timeliner" tool for construction planning, but not the use of "Interference Detection and Management" tool.
- Autodesk Navisworks® Manage: this is the complete Autodesk product, all tools are available.
Extensions
NWC (cache files)
They contain the Revit extracted geometry and we are going to have as many as the number of Revit files we want to export.
Those files must be exported to the same folder where its origin file is located, with its same name, and be overwritten when it is exported again. In this way, when you refresh the NWF file the last cache version will be automatically reloaded.
NWF (federated files)
Those kinds of files are containers for several cache files. The way of reviewing several files together (ARC, MEP, STR) is making a new NWF file and appending (link) many NWC files to it. If the location of the NWC file changes, they must be reloaded.
NWD (document files)
Is the kind of file you use for delivering purposes, because it integrates all NWC files as imported elements, capturing the geometry and forgetting the relation with the NWC file. It saves all generated views, annotations and comments. It’s considered as a full file and it can be opened in the Freedom viewer.
Procedure
Timeliner tool

Basic topics
- The Navisworks tool to plan a construction is the Timeliner.
- It’s convenient to generate the planning file previously from a specific software. Then, you can import it to Navis and manage it there.
- The planning software that best works for importing in Navisworks is MS Project. You can also use other formats, as a generic CSV or Primavera, but they require a more careful workflow.
Selection Tree organization
- Level (Layer)
- Category
- Family
- Type
- Instance (Object)
- Solid (Geometry)
Step by step
- Prepare the file. Add required parameters.
- Export cache file from the right view.
- Have the planning ready.
- Append cache files.
- Define Data sources
- Select objects and Append to Tasks
- Using rules
- Add real data
- Configure playback.
- Start the simulation.
Define Data sources
- Open and dock the Timelines palete.
- Go to Data Sources tab, click Add, select MS Project 2007-2013.
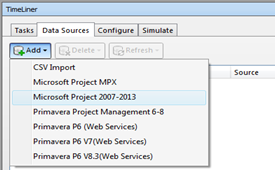
- Select your MPP file.
- Map (at least) each of the following parameters to the corresponding MPP column.
- Task type -> Text 1
- Synchronization ID -> ID
- Planned Start Date -> Start
- Planned End Date -> Finish
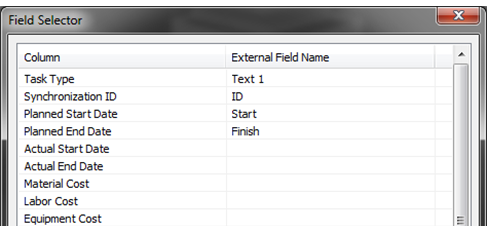
- Press OK and rename your data source.
- Right click and select Rebuild Task Hierarchy.
- Check everything went well and the Schedule has been imported.
Select objects and Append to Tasks
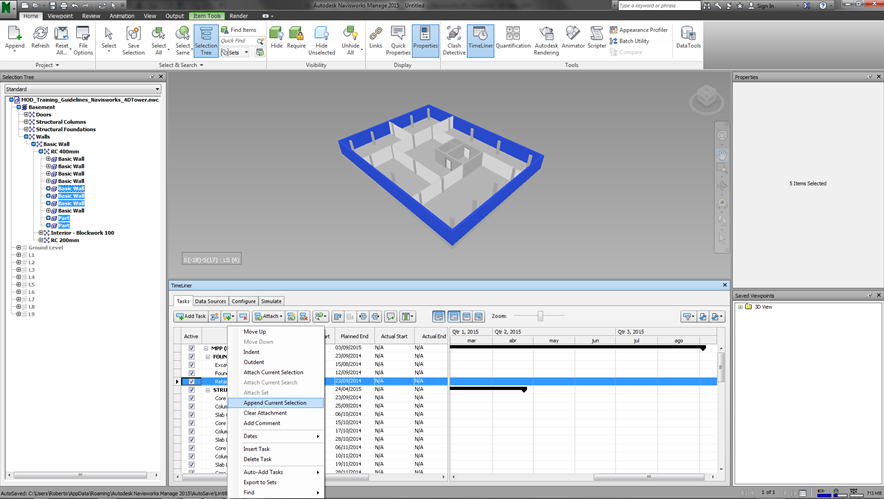
- Always use SEARCH SETS as they are dynamic and will update with changes in your models.
- Use the FIND ITEMS tool to filter your query depending on several properties.
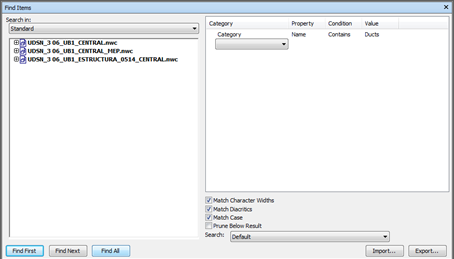
- Use the OR condition to concatenate various conditions rather than AND.
- Click FIND ALL and save your set.
- Under SETS, click Save Search and name it properly.
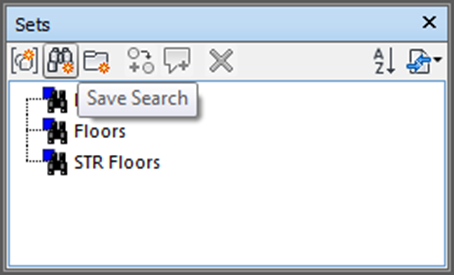
Using rules
- Make a new project parameter in Revit. Name it “NavisTask”.
- Assign values based on the names of the planning tasks.
- Export cache file again and reload it.
- Click on Auto Attach using rules.
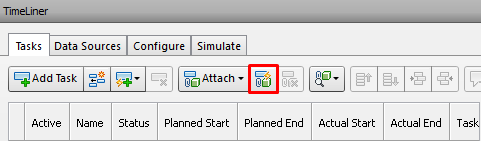
- Add a new rule, select Attach Items to Tasks by Category/Property and fix the expression changing ‘<category>’ to ‘Element’ and ‘<property>’ to ‘NavisTask’.
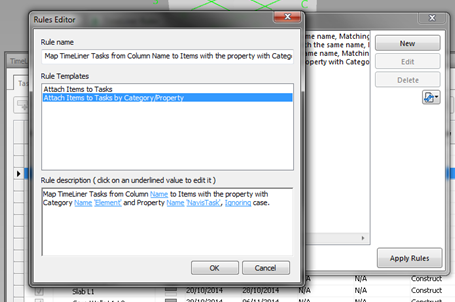
Add real data
- Assign the actual start and end dates.
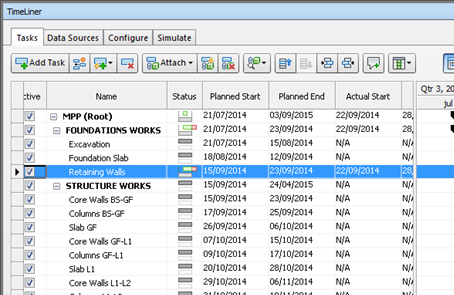
- Set the appearance to differentiate what has been executed in time, before or after planned.
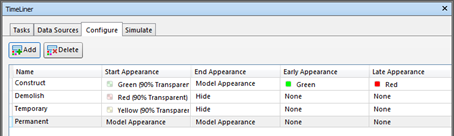
- Set the simulation to show the actual dates with planned dates.
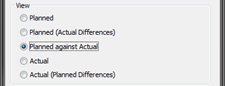
Configure playback
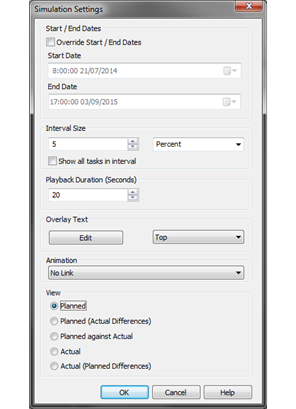
- You can play a specific portion of the timeline.
- Set the interval size to choose which tasks will be considered.
- Playback duration must be specified as a whole.
- Text overlay edition is a token from the past and looks quite ugly.
- You can connect your playback with a predefined camera/object animation.
- View has a deep impact on the way information is presented:
- Planned and Actual work as expected, just showing the dates.
- Planned Actual Differences shows things at their planned dates but with color info about real late start or early finish.
- Planned against Actual uses the actual dates but includes info if something starts or finishes out of time.
- Actual Planned Differences shows things at their actual dates but with color info about planned early start or late finish.
Tips&Tricks
- You can use Navisworks for model reviewing of several file formats. It can import natively from most of the CAD formats.
- You can work with other BIM platforms by using IFC files.
Conclusion
With the Timeliner tool you can review and coordinate the construction process, associating with planning data from other softwares or creating your own inside Navisworks. You can preview an animation to check the construction progress.