

Links & Copy/Monitor
Configuration in Revit
Links & Copy/Monitor
Objectives
- Understand when Copy/Monitor is useful and worthy.
- Be able to decide when and why copy/monitor something from a link is necessary.
Prerequisites
- User has basic skills in BIM modelling with Revit Software, and understands the language used.
- User has notions about the data structure in models.
- User has basic notions of parametrization.
Description
In a real project, it is very common to split our model into several files. There are several reasons to do this:
- To reduce the size of the files that we should handle. There is an unwritten rule that sets the recommended maximum size for a file as 250MB, something more if it's related to structures (without rebar) and something less if they are about MEP because of the overload associated to system and calculations.
- To divide the model by disciplines, so dispersed teams can work without bother. This is combined with worksharing to enable teamwork on Revit files.
- To protect intellectual property and share only the information that is required.
- The files can be split at the beginning of the process of modelling, which is ideal, or once the work has started. In any case, both scenarios require careful planning.
Procedure
Working with links
Add Revit links
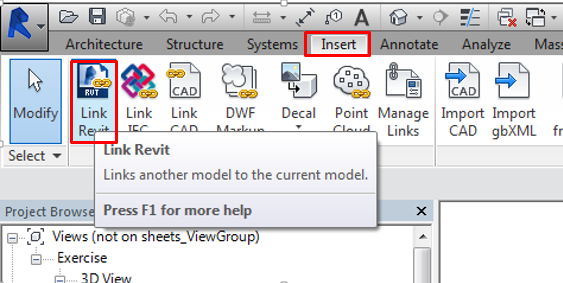
- To link a Revit file is made from the Insert menu in Revit.
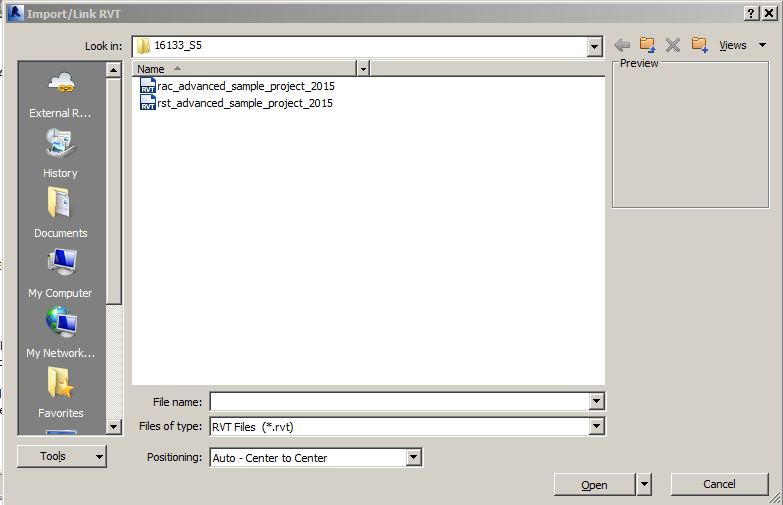
- Then you should choose the file and its position.
- Once the file is loaded we have to make sure that it is correctly located. If we did not use “shared coordinates”, you should check that the file is properly aligned with our host model. For this, it can be useful to take as reference a combination of two grids and a level.
- It is convenient to place the links on a workset dedicated to this purpose. If the files are very large, do so in a single workset reserved for each link. This will allow you to turn on or hide the link in many views without having to unload it, which may have an effect in the performance of the model.
Link type properties
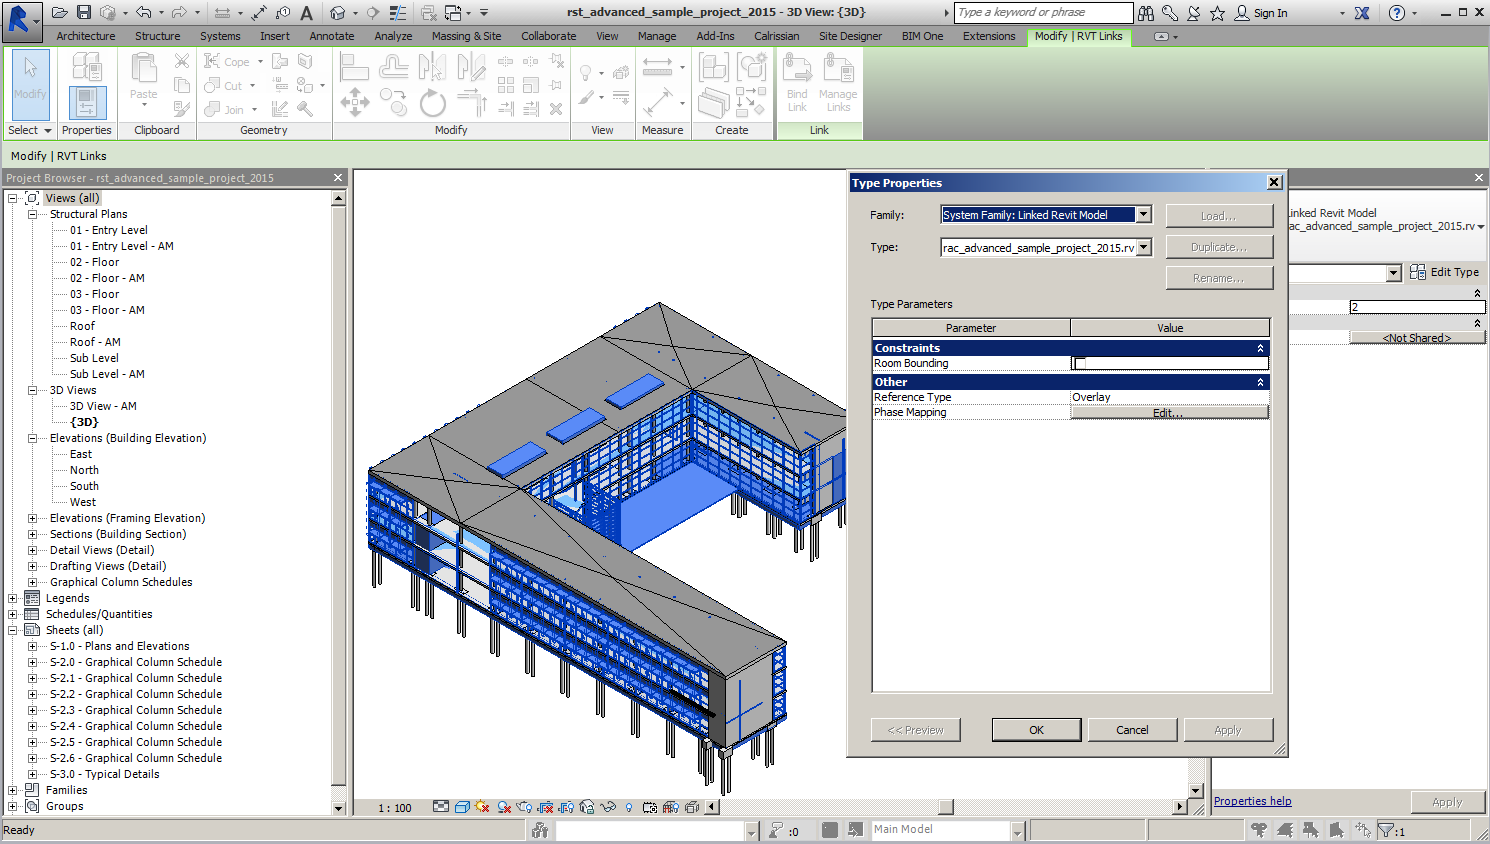
- Room bounding: It defines whether the link will be taken into account for the computation of rooms. It can have a big impact on the performance of our model. By default it should be turned off if our model doesn’t contain elements that affect room calculations.
- Reference Type: Use Overlay by default.
- Overlay: links that are nested in the linked file will not be displayed in our project.
- Attachment: links that are nested in the linked file links are also displayed in our project.
- Phase Mapping: serves to establish a correspondence between the phases of our host project and those of the linked file.
Manage links
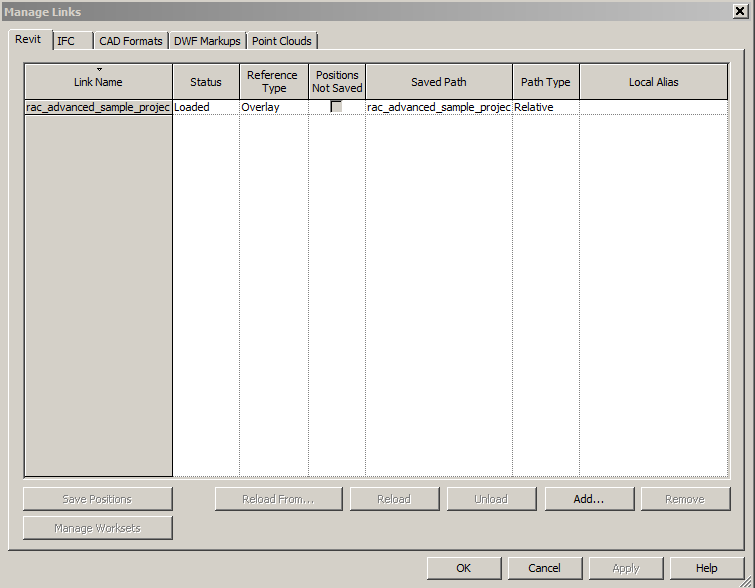
- Unload and reload a link if we know that it has changed in the middle of our session. The links are automatically reload when we close and open the project.
- Reload the link from another location.
- Change the reference between overlay and attachment type.
- When you link a file with the same links that you already have, a window will appear to warn you that it will not link those files because they already exist in your model.
- Change the path between relative type, and absolute, which keeps the full location of the link on the file server.
- Delete a link. After the removal of any link Ctrl-Z will not be able.
Bind link
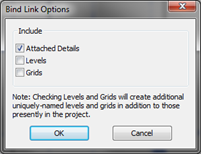
Use the Bind Link tool to select the elements and datum from a linked model to convert to a group in the host file. It will become elements in our model that can be ungrouped. To do it, you must have in the linked model just the elements you would like to copy in the host model.
Use of linked files
The use of linked files as host for model elements is not suitable. It could cause undesired effects:
- The use of wall face families are discouraged when used on elements of linked files, because the alteration or elimination of such elements can make them orphans, negatively affecting the performance of our model.
- Something similar occurs in the case of annotations, if we tag elements of the linked file from the host, it can occur that references are being deleted and those elements become orphans.
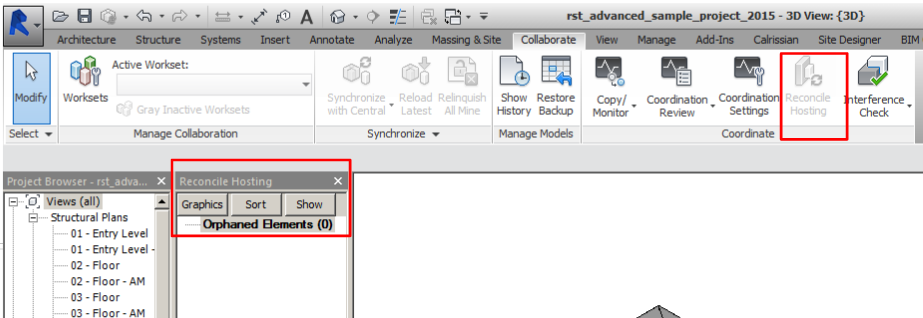
In both cases Reconcile Hosting tool can be used to show orphaned items and rebuild the references that may be necessary.
Links visualization
By default, you will see all model categories and datums of the linked file like the view settings of the host view in which we are. However, we can customize the visibility of each link if we accede to the Revit Links tab of the Visibility and graphics window.
Annotation elements will not be displayed.
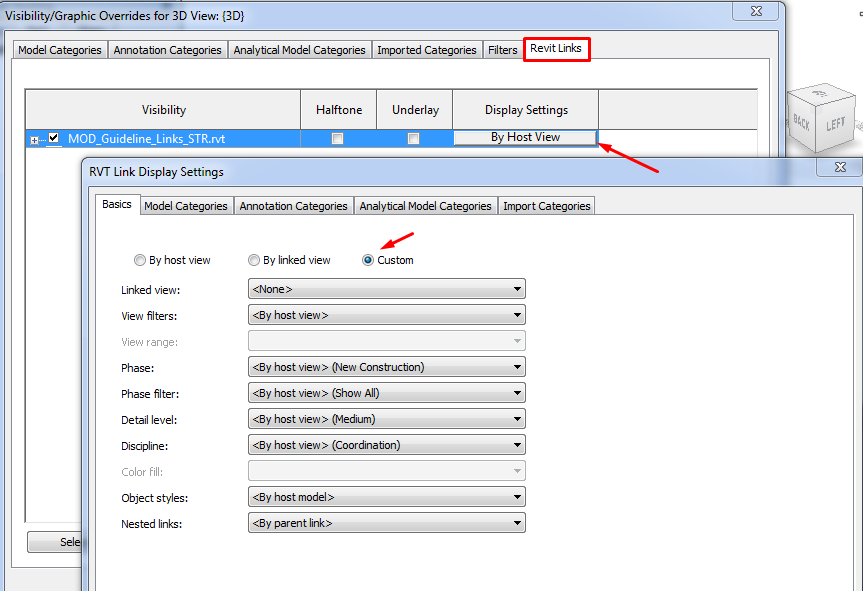
- By Host View: It is the default mode, the elements are according to the view settings in the host model view options. Any modification must be done as we would do in a normal case. This does not allow to make distinctions between the host and the link elements.
- By Linked View: It allows you to inherit the visibility settings according to a particular view of the link. It is useful if the link has already any suitable view and you want to take advantage of it. We have to remember the name of the view reference. With this option we will see annotation elements placed in the reference view.
- Custom: Lets you specify the visibility of the elements of the link independently. Select this mode unlocks the other options and allows you to change settings on other tabs, tweaking the visibility of some elements.
Copy/Monitor
An advanced function in Revit consists in the monitoring of linked files. It allows us to keep track of the changes that have taken place regardless if we have been informed or not.
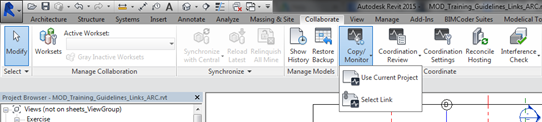
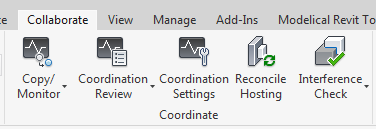
- From the Collaborate tab we can launch the Copy/monitor order by selecting a linked file.
- Once chosen, we select a linked file to open monitoring configuration mode. Let’s take a look at the options in the tools bar.
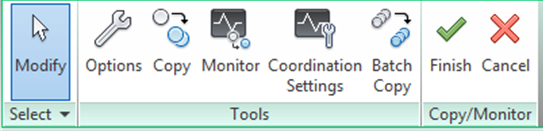
Monitoring essentially consists of a relationship between a host model element and a linked element, so if it changes, that will generate an alert that must be reviewed by the BIM Manager and make any decision.
There are two cases:
- Copy: Creates a copy of a selected item and establishes a monitoring relationship between the copied element and the original element. If the original element changes, a warning alerts you when you open the project or reload the linked model. (This Copy tool is different than the other Copy tools, which are used for copying and pasting.)
- Monitor: Establishes a monitoring relationship between two elements of the same type. If an element changes, a warning alerts you when you open the project or reload the linked model.
Copy or monitor elements
- Check the Copy/monitor settings.
- Select the copy command. Select the link.
- You can Use the Copy/Monitor tool to monitor changes to the following types of elements: Levels, grids, columns (but not slanted columns), walls, floors, openings and MEP fixtures.
- You should see a new element appearing in the host model with a symbol that reveals that it is a monitored item.

- To monitor any element the procedure is the same.
Settings
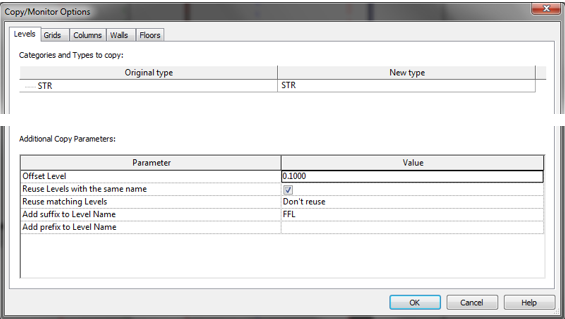
Levels
- Offset: Copied the level vertically from the original level by a specified offset value.
- Reuse levels with the same name: When you select this option, if the current project contains a level with the same name as a level in the linked model, a new level is not created. Instead, the existing level in the current project is moved to match the location of the level in the linked model, and monitoring is established between these levels.
- Reuse matching levels.
- Don’t reuse: Creates a copy of a level, even if the current project already contains a level at the same elevation.
- Reuse if Elements match exactly: If the current project contains a level that occurs at the same elevation as a level in the linked model, the level is not copied. Instead, Revit creates a relationship between these levels in the current project and the linked model.
- Reuse if within offset: If the current project contains a level that occurs at a similar elevation as a level in the linked model (within the value of the Offset Level parameter), the level is not copied. Instead,Revit creates a relationship between these levels in the current project and the linked model.
- Add suffix to Level Name: Enter a suffix to add to the names of copied levels.
- Add prefix to Level Name: Enter a prefix to add to the names of copied levels.
Grids
- Reuse grids with the same name: When you select this option, if the current project contains a grid line with the same name as a grid line in the linked model, a new grid line is not created. Instead, the existing grid line in the current project is moved to match the location of the grid line in the linked model, and monitoring is established between these grid lines.
- Reuse matching grids.
- Don’t reuse: Creates a copy of a grid line, even if the current project already contains a grid line at the same location.
- Reuse if Elements match exactly: If the current project contains a grid line that occurs at the same location as a grid line in the linked model, the grid line in the linked model is not copied. Instead, Revit creates a relationship between these grid lines in the current project and the linked model.
Columns, walls and floors
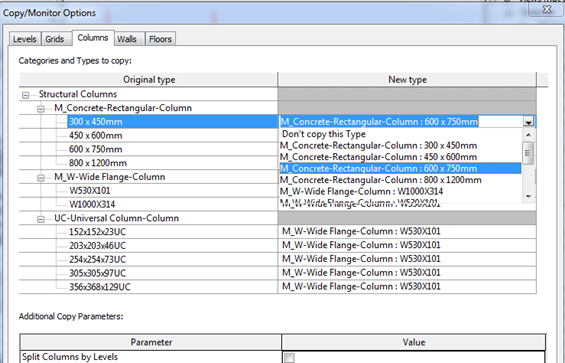
- In the case of model elements, we can establish a correspondence between the types of both files. As we see, Revit offers us pass all columns MConcretre-Rectangular-Column 300 x 450 mm to any other type of the loaded project, or do not copy them.
- At the same time options allow you to copy Windows/doors/openings in the case of the walls and many other options that should be checked.
Monitor elements in the current project
It is possible to establish a relationship between two elements of the same type on the file itself without copying them. When any of the monitored elements change, revit will warn us of that change.
Elements of different types, for example a grid and a level, can not be monitored.
Coordination review
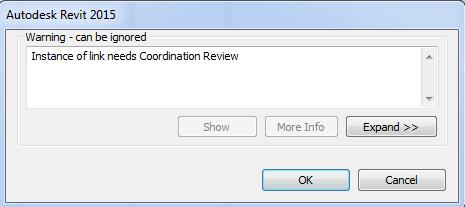
- Set the copy/monitor between pairs of elements is only the first step in a real workflow. The interesting thing occurs when an element in the linked file is modified and then the BIM Manager, operator or designer has to take action in the host project.
- The Coordination Review will always be available from the collaboration menu, and an alert will warn us in one of these two situations:
- When loading or reloading a linked file in which some monitored element has been made a relevant change.
- When a monitored element is modified in the host project.
- To run the coordination revision select link tab, and then click on the linked file involved. The table below will open:
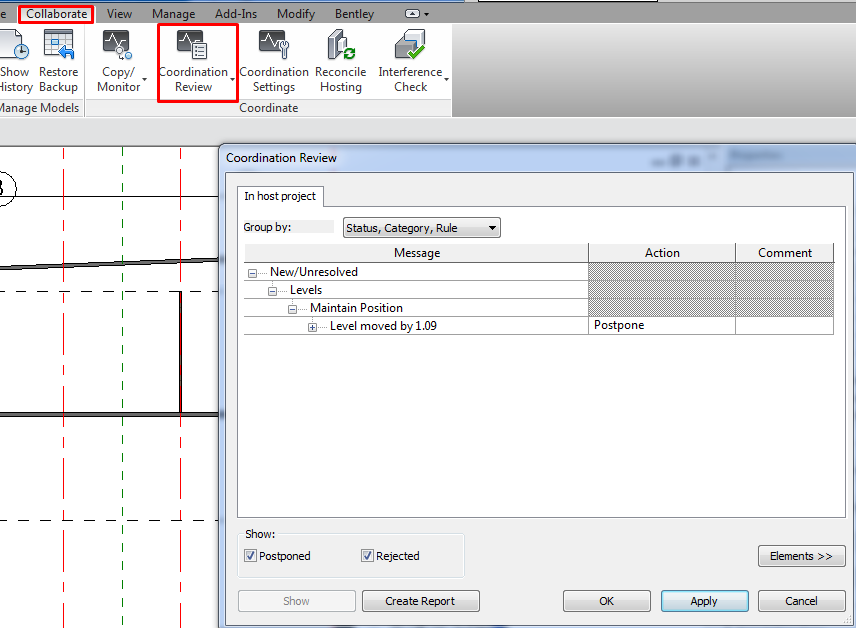
- The list shows the set of changes that have taken place between the link and the host, relating to the characteristics of the monitored item. The user must set the action to run:
- Postpone/Do nothing: Take no action. This value leaves the change to be addressed at a later time.
- Reject: Select this action to indicate that the change made to the element in the project is incorrect. Instead, a change must be made to the associated monitored element in the linked model.
- Accept difference: Select this action to indicate that the change made to the monitored element is acceptable, and to update the relationship without changing the corresponding element.
- Modify: A grid line or wall centerline has changed or moved. Select Modify to apply this change to the corresponding element in the current project.
- Rename: The name of a monitored element has changed. Select Rename to apply this change to the corresponding element in the current project.
- Move: A monitored element has moved. Select Move to apply this change to the corresponding element in the current project.
- Move Fixture in Host to Position of Fixture in Link: A monitored fixture has moved. Select this action to move a fixture in the host model to the location of the fixture in the linked model. This action only works for fixtures that are not hosted. If the fixture in the host model has been hosted on a surface using the Pick New Host tool, then selecting this action will display a Fixture is Hosted warning message.
- Ignore new elements: A new hosted element was added to a monitored wall or floor. Select this action to ignore the new element in the host. It will not be monitored for changes.
- Copy new elements: A new hosted element was added to a monitored wall or floor. Select this action to add the new element to the host, and monitor it for changes.
- Delete element: A monitored element has been deleted. Select this action to delete the corresponding element in the current project.
- Copy Sketch: The sketch or boundary of a monitored opening has changed. Select this action to change the corresponding opening in the current project.
- Update extents: The extents of a monitored element have changed. Select this action to change the corresponding element in the current project.
- Those conflicts can be exported in a report in HTML format for sharing between users.
Tips&Tricks
- Performance: Use Copy/Monitor to monitor changes to the smallest number of elements required to coordinate efforts across teams. Overuse of Copy/Monitor without thoughtful planning can result in performance degradation.
- File names: After you link a model to the current project and establish relationships between elements for monitoring, do not change file names for the linked model or the current project. If you do, the monitoring relationships cannot be maintained.
- Grids: Do not associate grids with a scope box until you have copied the grids from a linked model to the host project. You cannot view scope boxes that are defined in a linked model on releases previous to Revit 2019.
- Levels: Use Copy/Monitor to copy levels from the origination model (typically the architectural model). Monitor other elements only if required to meet your design requirements.
Bottom-line
- Clarify the process about coordinate efforts between the architectural team and the engineering team working on the same building using linked models.
- Understand the copy/monitor tool and the benefits we can get from it.
Hola, tengo una consulta con respecto a las herramientas de Copiar/Supervisar.
Siempre que empezamos un proyecto y que utilizamos esta herramienta, en algún punto ya avanzado del desarrollo del mismo, muchos elementos pierden el vinculo con el link anfitrión y no envían las alertas respectivas cuando se hace un cambio o ajuste.
Me gustaría saber que estamos haciendo mal, por ejemplo, porque una columna que cambia en el modelo de arquitectura, deja de enviar la alerta en el modelo de estructura y se corre el riesgo de una mala coordinación entre las diferentes disciplinas.
Quedo atenta a su respuesta, saludos.
Hola Osiris. Se me ocurre que puede que el modelo que esta monitorizando haya perdido la referencia al modelo original donde estaban los elementos monitorizados por alguna razón, quizás por una recentralización o un copy paste a otro modelo, pero es complicado de diagnosticar sin algo de contexto del proyecto.
Un saludo