

Collaborative UE Project with Perforce
Best practices, configuration, and known issues
/p4 sCollaborative UE Project with Perforce
File: Collaborative UE Project with Perforce
Description
This guideline shows best practices to work on a collaborative Unreal project using Perforce as the version control software. It also explains the set-up procedure, and describes some known issues and special cases.
Download
https://www.perforce.com/downloads/helix-visual-client-p4v
A Set-up procedure
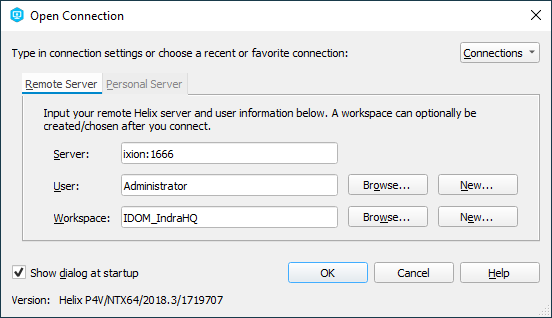
1. Open Perforce, complete the following fields, and click on “New…” Workspace.
Server | From Madrid HQ: ixion:1666 |
From outside: ixion.modelical.com:1666 | |
User Name | XXX (your initials) |
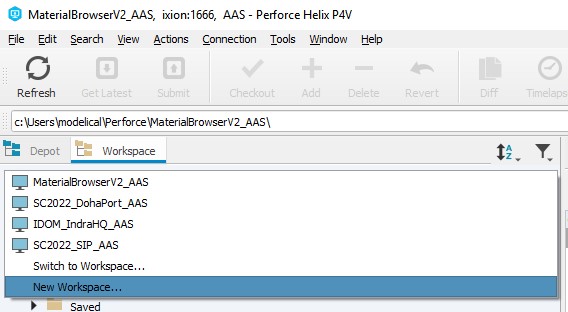
2. If you have already logged in, you can also select the workspaces drop-down menu and click on “New Workspace”:
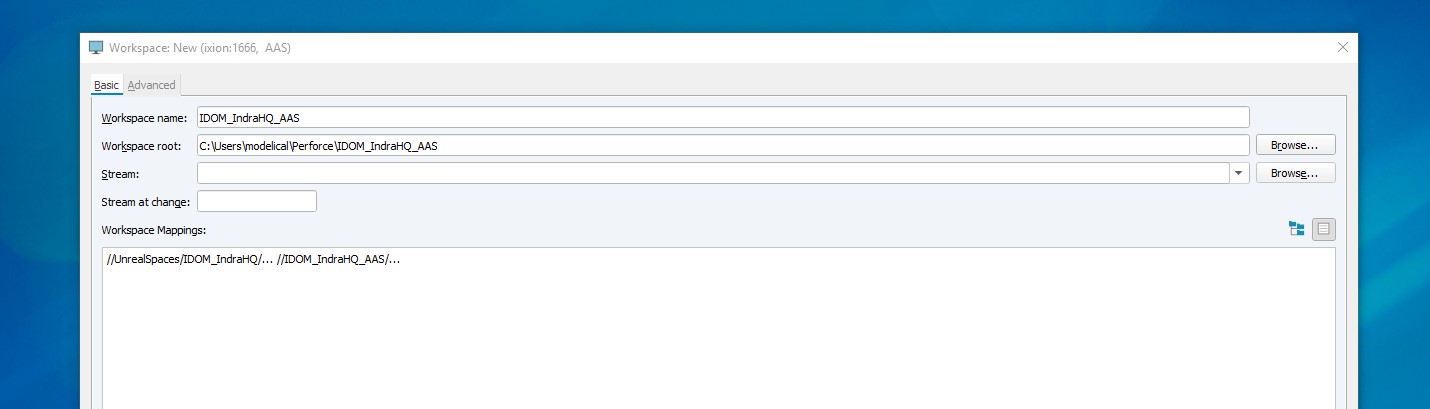
3. Under the “Basic” tab, complete the following fields (“XXX” refers to each user’s initials):
Workspace name | [project_name]_XXX |
Workspace root | the local directory in your machine, the last folder should be named the same as the workspace |
Workspace mappings | //UnrealSpaces/[project_name]/... //[project_name]_XXX/... Delete //depot/… //[project_name]/depot/... |
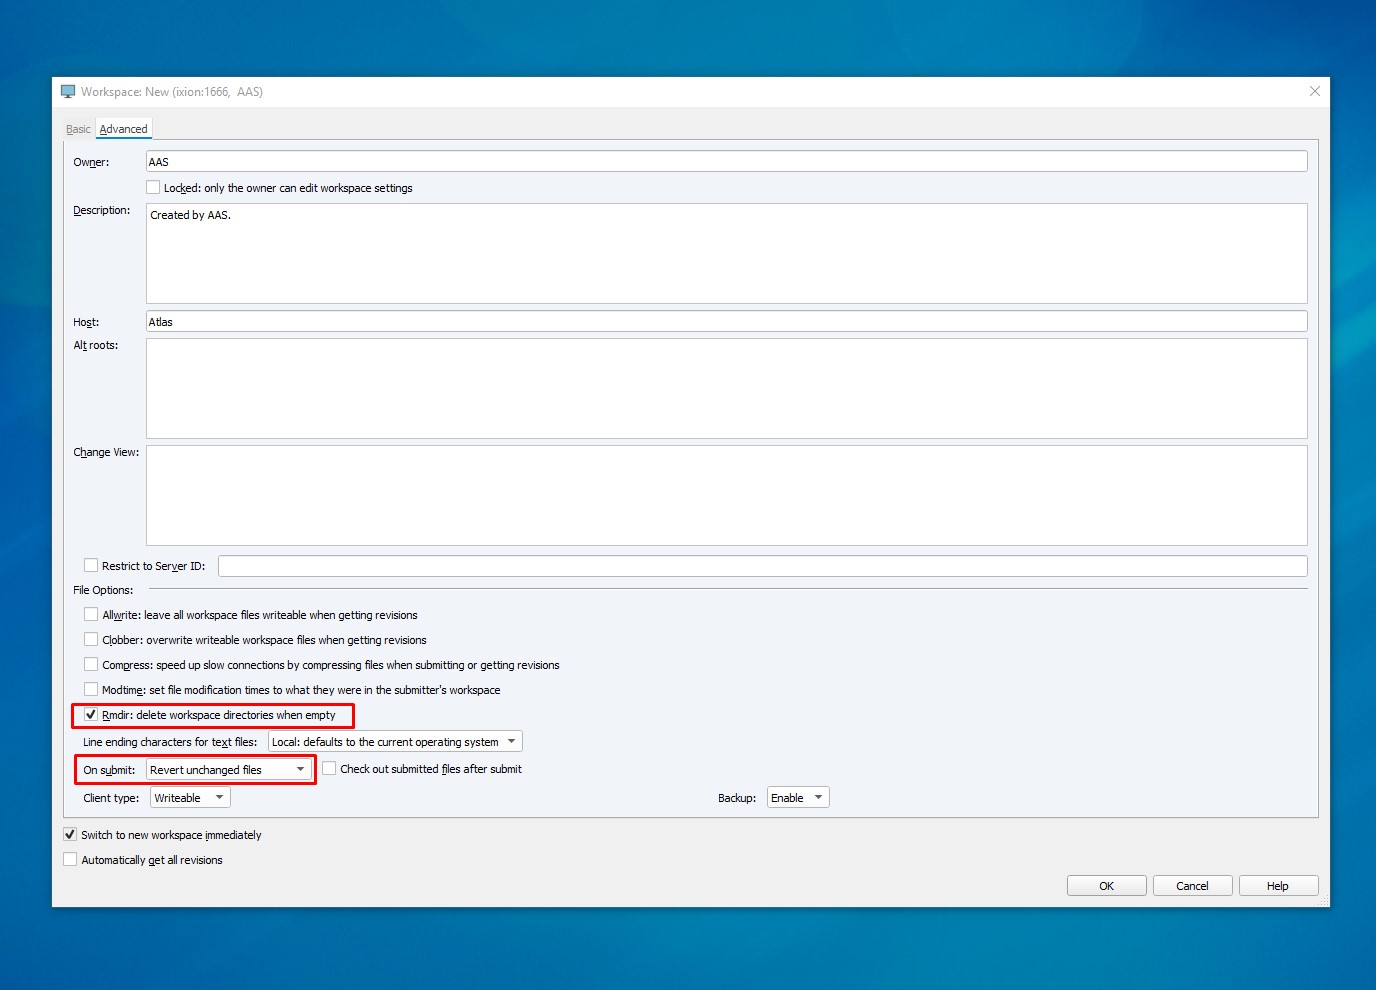
4. Under the “Advanced” tab, change the following settings:
- Enable “Rmdir:delete workspace directories when empty”.
- On submit: “Revert unchanged files”.
5. Next step depends on if the workspace is new and the first one for that project or if it’s a synchronization from an existing one:
- New project:
- Add newest .p4ignore file (G:\Unidades compartidas\30017_SPACES\02_DEV\00_Common) to workspace folder.
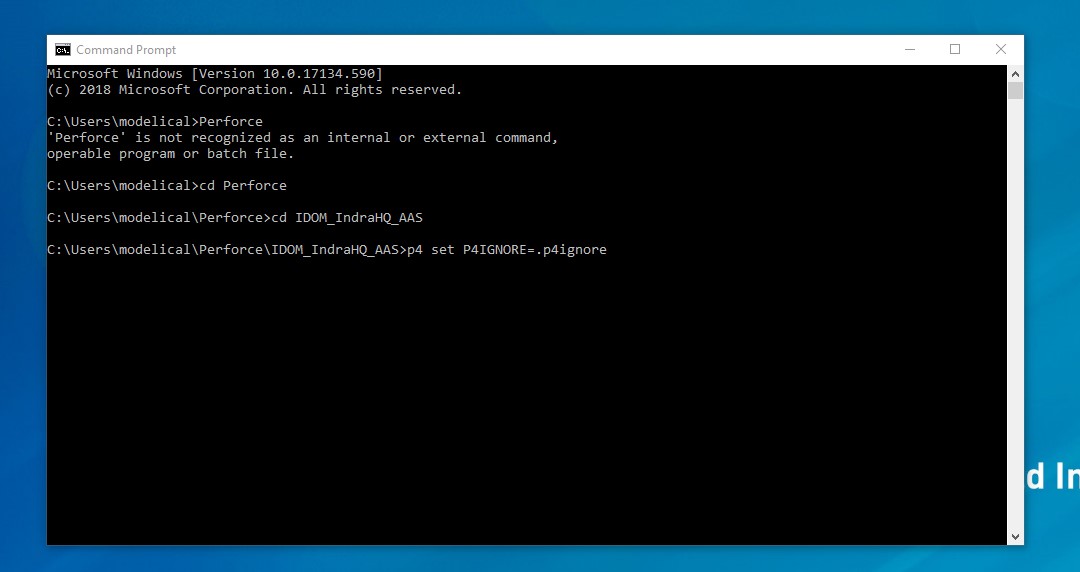
- Set up ignore file: Open the Command Prompt and navigate (cd path) to the project folder (the same as the “workspace root” in step 3). Then, type: p4 set P4IGNORE=.p4ignore
- Mark for add .p4ignore file and submit
- Finally, mark for add the rest of the project and submit as “-Initial submit”
- Existing project:
- Get latest to fill workspace root with the project synchronized in the depot
- Set up ignore file: Open the Command Prompt and navigate (cd path) to the project folder (the same as the “workspace root” in step 3). Then, type: p4 set P4IGNORE=.p4ignore
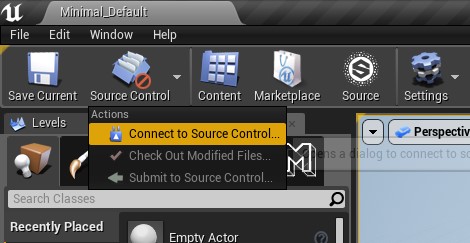
7. Open the Unreal Project. On the toolbar, click on Source Control > Connect to Source Control.
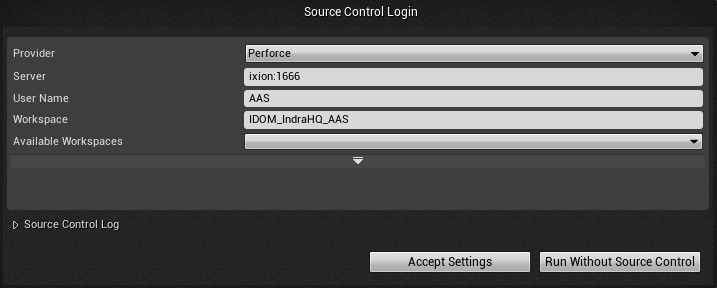
8. Complete the following fields:
Provider | Perforce |
Server | From Madrid HQ: ixion:1666 |
From outside: ixion.modelical.com:1666 | |
User Name | XXX |
Workspace | [project_name]_XXX |
B Best practices
General Perforce Operation
Perforce is a “distributed version control” utility, which is “a form of version control where the complete codebase - including its full history - is mirrored on every developer's computer”. In other words, all the files of a project are hosted in a server, but there is a full copy of them in each user’s local machine. This allows different developers to work on the same project simultaneously.
Once the workspace is set-up (following the steps above), we can just open the Unreal project normally either from the Epic Games Launcher or opening the project file from the Windows Explorer. However, everytime we want to open the project, we should first make sure we have the latest files. To do this, open Perforce, navigate to the required workspace (=project), select the root folder, and click on “Get Latest”:
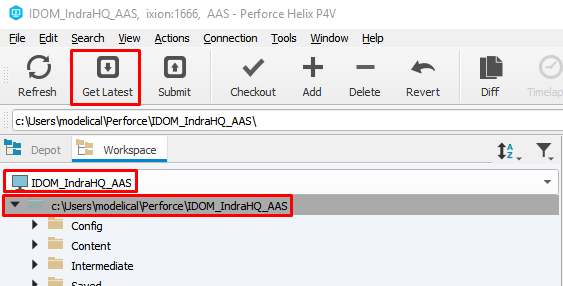
This operation compares the files in our local directory with the files in the server, the “depot”, which are always the most updated ones. Then, it detects which files in our machine are out of date, and replaces them downloading the latest version from the depot. This operation is shown in the following diagram:
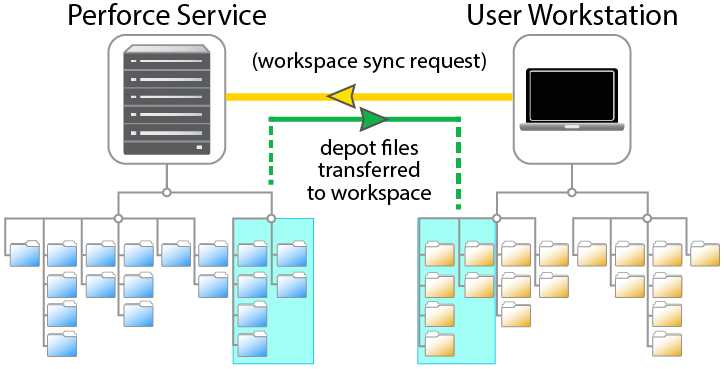
Source: Perforce documentation
The “Get Latest” operation should always be done without the project being opened.
Then, we will open the Unreal project from our local directory. As we work online, the program tracks in real time which files we modify and which files are modified by other users, to avoid two users changing the same file, which would create two different versions of it in each user’s local machine; these, when submitted to the depot, would create a “conflict”.
Thus, before we make any changes to a file, we should “check it out”. We can do this by right-clicking the asset in the Content Browser and selecting Source Control > Check Out.
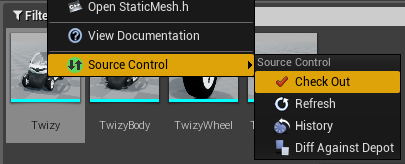
If a file is “checked out” by a user, it will prevent other users from making changes to it. If we modify a file without checking it out first, a pop-up window will inform us about this and ask us to do it. Similarly, if a user tries to modify a file checked out by a different user, a pop-up message will inform him about this situation.
When we make a submit, all our checked out files will be “checked in”; i.e. they will be uploaded to and updated in the depot in the server, as shown in the diagram below:
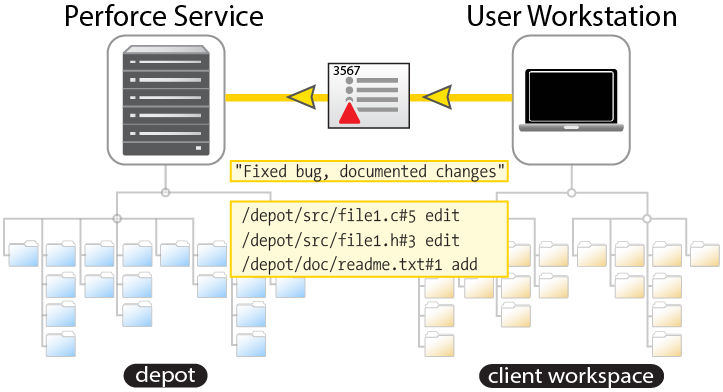
Source: Perforce documentation
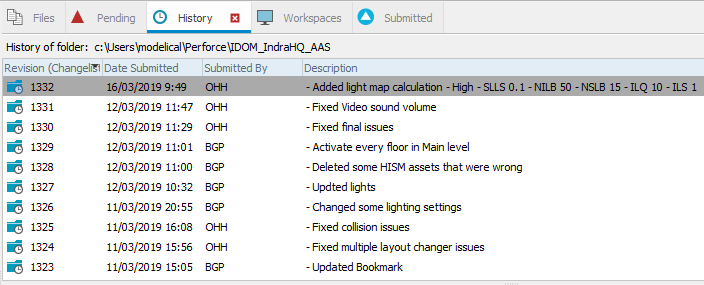
As shown in the image below, each submit is registered with the following information: an automatically assigned and chronological number called “revision”, timestamp, the user, and a description. This way, it is easy to keep track of the changes, and revert to a previous version of any file, if necessary.
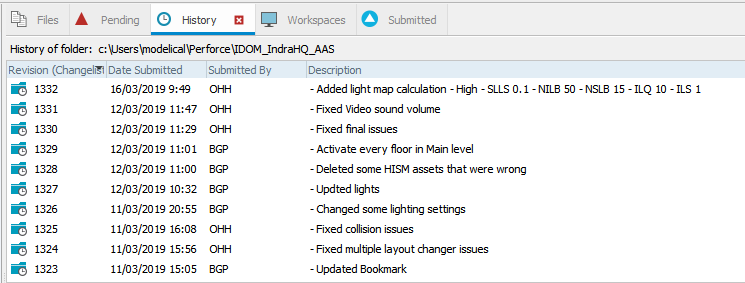
Submits
Submits should be accompanied with a descriptive message of the developed work. The software accepts submits without any message but we as individuals must make an effort to write a list of changes we have introduced with a submit. This message should give a general overview of the changes but should also try to avoid giving low level technical details of how the features were achieved. That is, we must describe what was done but no how it was done.
A regular submit is composed of a list of changes with each change described in a single line. Each line should start with a dash character, a space and then one of the keywords listed below. You really should stick to the following list of terms:
- Added
- Changed
- Updated
- Removed
- Fixed
If you really think that none of the above terms suits you to describe what you have done… Think twice then proceed.
An example:
- Added Postprocess to PCNew - Updated static people as movable - Changed cars to movables |
Source Control symbols
When working on a project connected to source control, we will notice that some assets have some icon in the top right corner. These give us valuable information. In general, a yellow symbol indicates there is some kind of problem we should be careful with.
The asset is checked out by us | |
(add image) (same but in blue) | The asset is checked out by another user |
The file in our local machine is out of date. There is a more recent version in the depot we should download. | |
The asset is “marked for add”. This means that this is a new file we have created and does not exist in the depot, and will be created when we make a submit. | |
The asset is new (we have created it) but it is not “marked for add”. If we do not “mark for add” it by right-click > Source Control > Mark for Add, the file will not be uploaded to the depot when we make a submit. This will create problems if the asset is referenced in the scene or by other assets, as the rest of the users will not get this file, and all references will be lost. | |
The asset is “marked for delete”. If we see this symbol in UE, it might be a problem: if it has been deleted, it should not be seen in the Content Browser in the first place. It might cause problems (for an example, see here) |


Commented out code
It is a common practice while developing a feature to comment out certain sections of the code, to test replacement code, or, in the case of blueprint, keep old nodes and graphs. However, when we successfully complete the new code, these commented sections of code should be not submitted to the repository.
Why?
Because the commented code is already on the repository. If you ever need it again you can always come back to a previous submit and take what you need. This helps in keeping clean and understandable code and blueprints.
“Make writable” is NOT your friend
If we try to modify an asset which is checked-out by another user, a pop-up message will inform us about this and give us two options: not modify the file, or “make writable”. The latter means that we will be able to modify the file and keep working on it. However, we are creating two different versions of the file: one in the local workspace of the user who checked it out (and presumably modified it) and one in our local workspace. Thus, when both users make a submit, a “conflict” will arise that will need to be manually inspected, and the changes of one of the users will be inevitably lost.
Therefore, except in rare occasions and if you know what you are doing, do not use “Make writable”. Instead, check who checked-out that asset and ask him/her to check it in.
C Delete a workspace
Deleting a workspace is a task that can be done by the owner of the workspace or the administrator. In the workspace view (it needs to be activated, Ctrl+5 or View > Workspaces), right click on a workspace and select Delete:
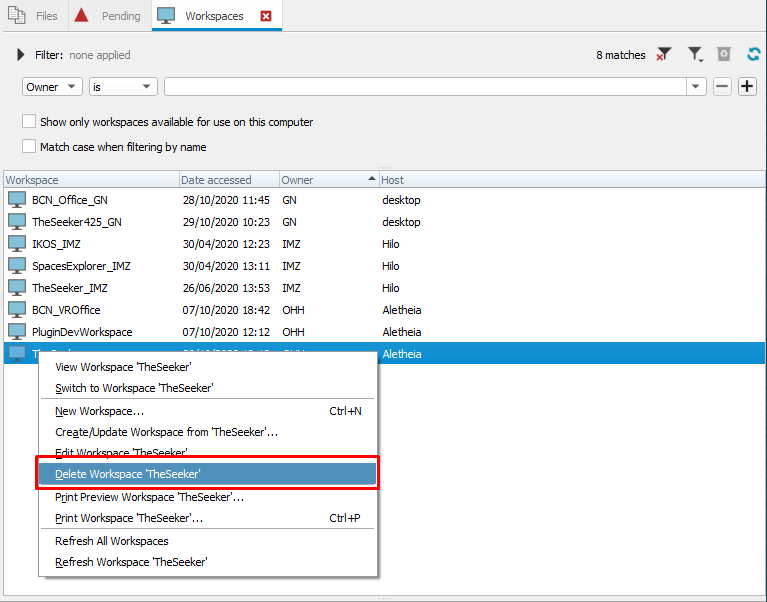
It is important to keep in mind that if there are files opened to edit (checked out) users won’t be able to delete the workspace, only the administrator will be able to do it.
Deleting a workspace only removes the connection between the local workspace and the depot, then the project still in the local disc and can be used, modify or removed without affecting the server copy.
D Known issues
Migrating assets
Migrating assets from one project to another is a common but not Perforce-friendly operation. We can distinguish two problems:
If we are migrating assets that do not already exist in the destination project, this should be added to the project successfully. However, they are not marked for add. Because migrating usually moves assets in many different folders and subfolders, we should not mark for add each asset individually. The best option is then to mark for add the whole “Contents” folder.
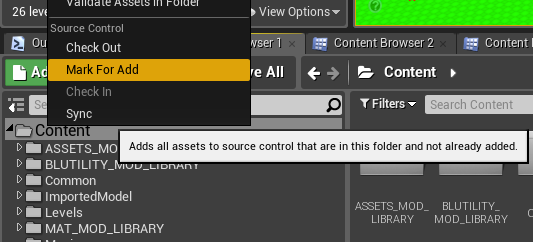
If we are migrating assets that already exist in the destination project, they will not be overwritten and updated unless they have been checked out before. This situation is more delicate… the solution is to check out the files we need to update before; however, remember that migrated assets might carry many other referenced assets, and this might give rise to different situations. For example, if are updating a static mesh asset, we might want to:
- update the static mesh AND its referenced materials and textures.
- update ONLY the static mesh.
- …
Therefore, there can be different solutions: checking out only the static mesh, the static mesh and its referenced assets, check out the whole Content folder,... If we are not migrating one asset, but hundreds, this can get very complicated. Therefore, before migrating assets, stop for a second and think about what you need to do, and if you do not know what you are doing, ask someone or migrate the assets little by little.
Finally, even though you think you are migrating assets that already exist in the destination project, make a “mark for add” to the Content folder anyways, as there might be new assets you were not counting with.
Assets losing their references
Sometimes, a user might see that some assets have lost their references (for example, a static mesh asset loses the reference to its materials assets). The most probable cause for this is a bad migration of assets (see Migrating assets above).
Solution: …
A renamed file shows “marked for delete”
This usually happens in a scenario such as this one:
- I have an asset “myAsset”
- I make a copy or import a newer version called “myAsset_v2”
- I decide this should be the final version so I delete “myAsset” and rename “myAsset_v2” to “myAsset”.
- we “myAsset” is marked for delete. Before this, you would usually get the following message:
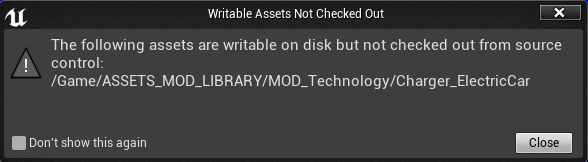
This happens because the existing “myAsset” asset has been marked for delete, but this change is pending to be submitted to the depot. Therefore, when “myAsset_v2” is renamed to “myAsset”, it is not detected as a new asset but as the original asset which is marked for delete. Making a submit like this will cause errors and cause the asset to disappear. The correct workflow would be:
- Delete “myAsset” and not rename “myAsset_v2”
- Submit
- Fix up redirectors in folder
- Submit
- Rename “myAsset_v2” as “myAsset”.
An asset cannot be renamed...
…because “an asset with the same name already exists at this location”, but I cannot see it.
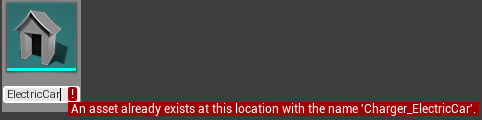
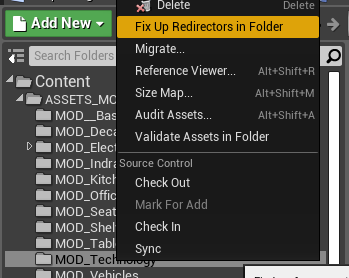
This problem can be related to the previous one, and might have to do with Source Control issues. However, most likely this is due to existing redirectors in that folder, which are not shown in the Content Browser. To solve this, right-click on the folder and select “Fix up redirectors in folder”:
Unreal cannot connect to Source Control
Possible problems:
- Cannot connect to source control
- Cannot check-out or check-in files
- A pop-up message such as this one:

Possible solution: most likely, your Perforce session has expired and you have been logged-off. Open Perforce and log in again.
All actors disappear after syncing a level
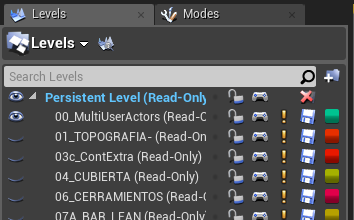
As shown in the image above, a level might also show the “outdated” icon. Again, before making any changes in that level, we must get the latest version. Sometimes, when selecting Source Control > Sync to load the latest version, all actors disappear from the scene. The reason for this error is unknown, but it is usually solved by unloading and reloading or hiding and showing the level.
The project seems outdated, even after doing a “Get Latest”
Problem: …
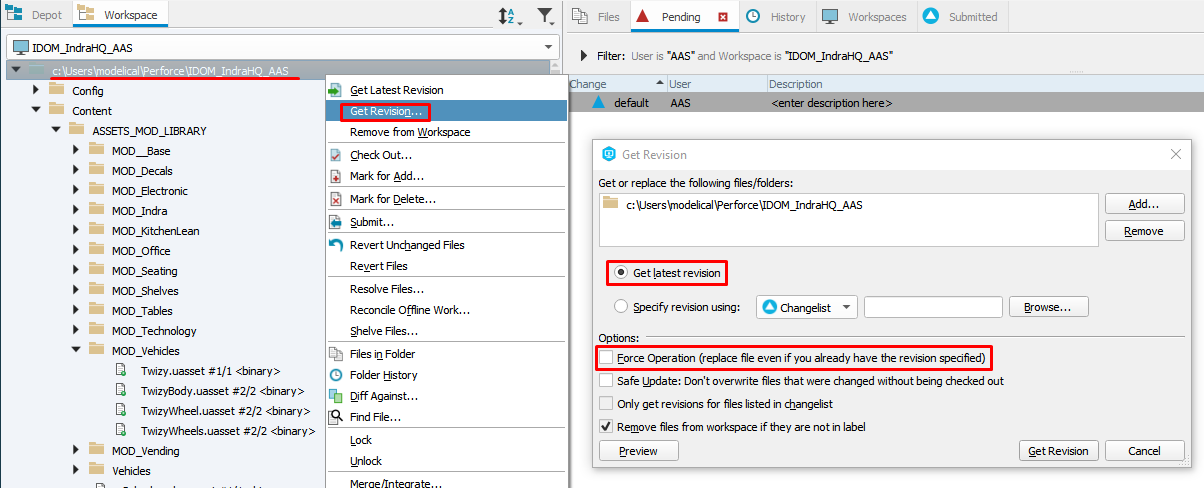
Possible solution: Force the Get Latest Operation. To do this: right-click on the root folder in the workspace > Get Revision… > Check “Get latest revision” and “Force Operation” > Get Revision.
Unloaded plugins keep showing up
If a plugin is disabled in a project, all users must disable it in their configuration. Otherwise, if a user does not disable it and makes a submit, the corresponding files will be re-uploaded and the rest of the users will get a warning message. In addition, there will be conflicts in the project file.
Anyways, to get the latest revision of a project it is generally recommended to close Unreal, perform a “Get Latest” from Perforce, and open the project again.
The DefaultInput.ini file gets corrupted
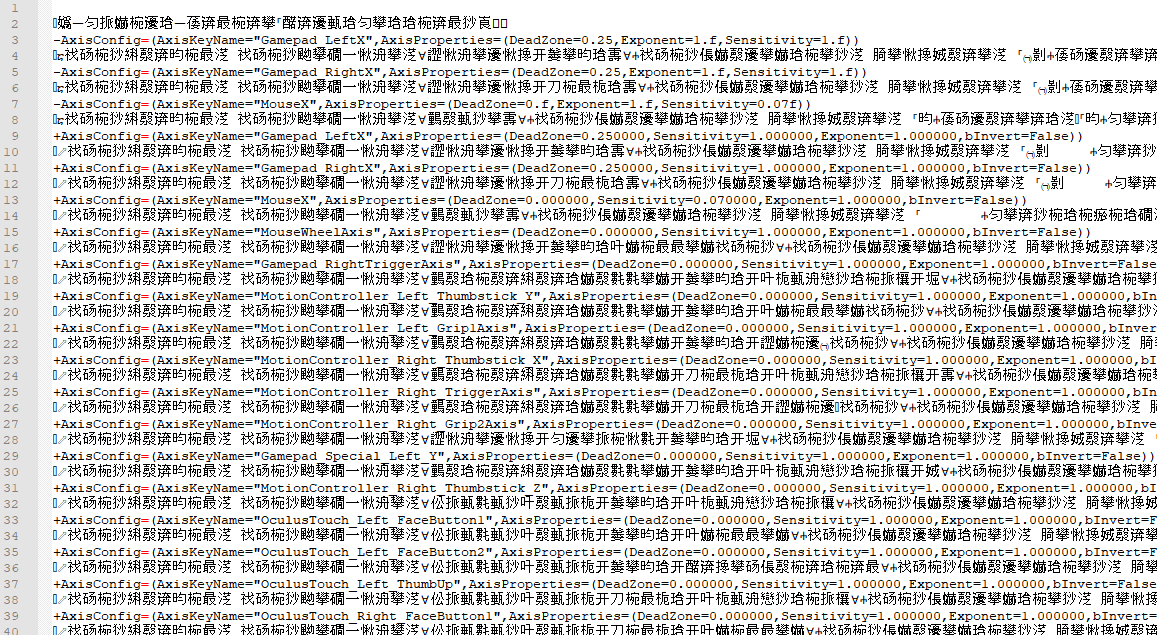
In some occasions, Perforce might corrupt the DefaultInput.ini config file. If opened in Notepad++, it will show Chinese characters, making it unreadable for Unreal. If this happens, check if any user has an uncorrupted version in their local workspace. If all files are corrupted, it can be recovered by editing the file in hexadecimal mode. Ask JM.
Assets do not show Source Control symbols
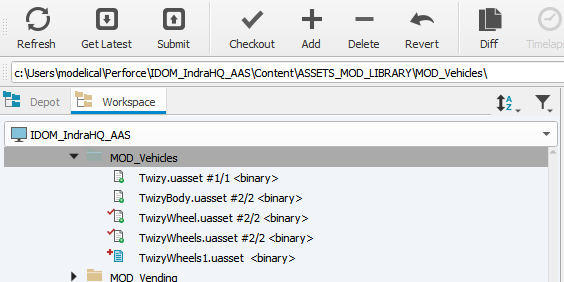
Sometimes, an asset might be checked out or marked for add, but it does not show the corresponding symbol in the content browser. This happens especially when the check out / mark for add operation has been done on a folder instead of the assets, or from the Perforce application. In these cases, check directly in the Perforce application, it is a more reliable source.
Working on a non-collaborative project, UE asks me to connect to Source Control
Problem: we are working on a local project that is not connected to Source Control (and maybe it never was), but when we modify an asset, a pop-up window asks us to connect to Source Control to be able to save it.
Most probable cause: the asset has been migrated from a collaborative project connected to Source Control, and was not checked out when migrated.
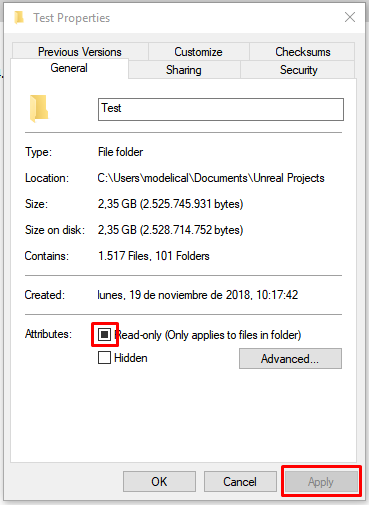
Solution: as the file was not checked out, it was “locked”. The solution is to unlock it from the Windows Explorer. To do this, right-click on the asset and select “Show in Explorer”. A new Windows Explorer window pops up. We can unlock that specific file, or even better, unlock the root project folder to unlock all the files that might be locked in the project. Therefore, navigate to the root folder, right-click > Properties > disable “Read-only” > Apply.
UnrealGameSync (UGS)
https://docs.unrealengine.com/en-us/Programming/Deployment/UnrealGameSync
Conceptually, UGS is a tool that promotes code and content integration in a collaborative development environment, enabling teammates distributed over time and distance to labor on the same project as it gets updated. Technically, UGS provides a graphical front-end to sync UE4 projects from Perforce, optionally building those projects with Microsoft’s Visual Studio Compiler.
UE 4.22: Multi-user editing
https://docs.unrealengine.com/Editor/MultiUser/MultiUserOverview
https://docs.unrealengine.com/en-us/Editor/MultiUser/MultiUserGS
https://docs.unrealengine.com/en-us/Editor/MultiUser/MultiUserReference