

Visibility and Graphics Management
Operation in Revit
Graphics Management
Objectives
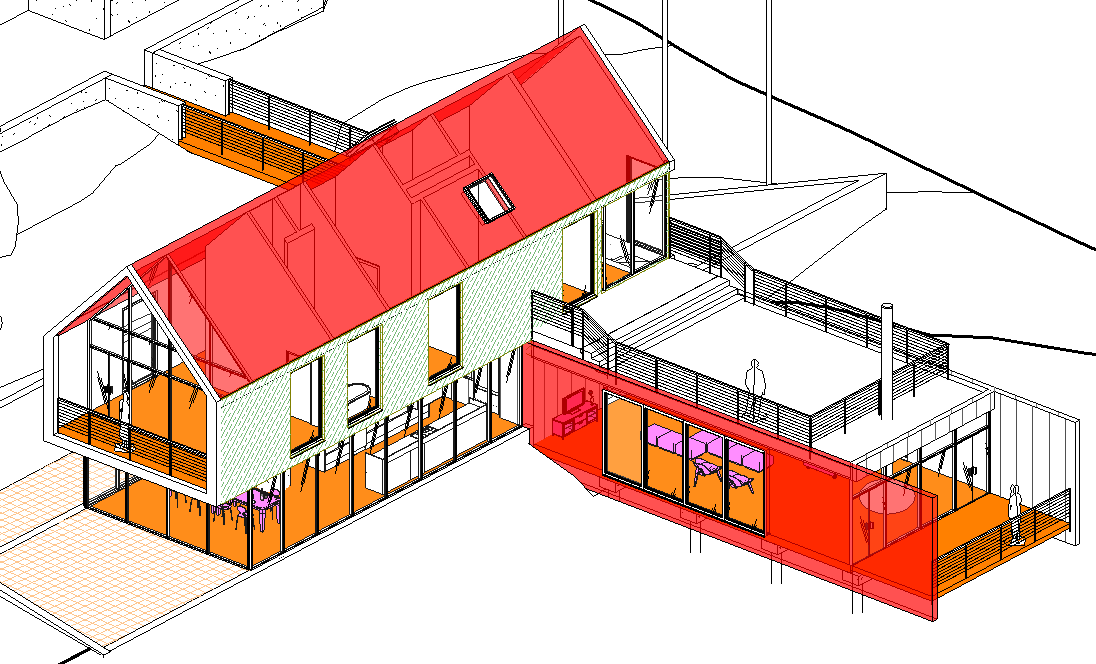
- Control the visibility and graphic display of model elements, datum elements, and view-specific elements for each view in a project.
Prerequisites
- User has basic skills in BIM modelling with Revit Software, and understand the language used.
- User have notions about the data structure in models.
- User have basic notions of parametrization.
Description
The way Revit is able to display an element, enables you to modify this element in several ways, some having priority over others. In addition to the aforementioned, there is a hierarchy in place, which needs to be followed. For this reason, it is important to configure the visibility settings in any one view, thus enabling you to control it better.
Procedure
1 Hierarchy
The visibility hierarchy is set out in order of priority is:
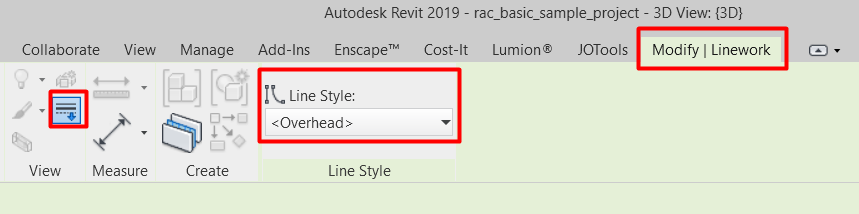
- Line Work: Within this view, from Modify > Panel View > Line Style (or with the shortcut "LW") it’s possible to select and change the linestyle you wish to apply to every line from every element.
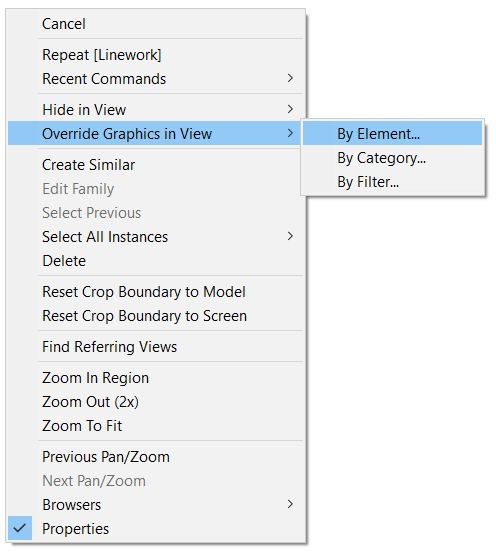
- Override Graphics in View > By Element: “Right click>Override graphics in view>By element” will change the appearance of the selected elements in the specific view you are working.
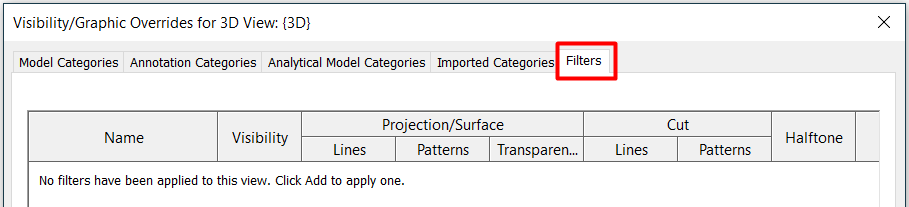
- View Filters: It change the appearance of a group of elements that share a parameter in a specific view (i.e. Doors with the same fire rating will be displayed in green)
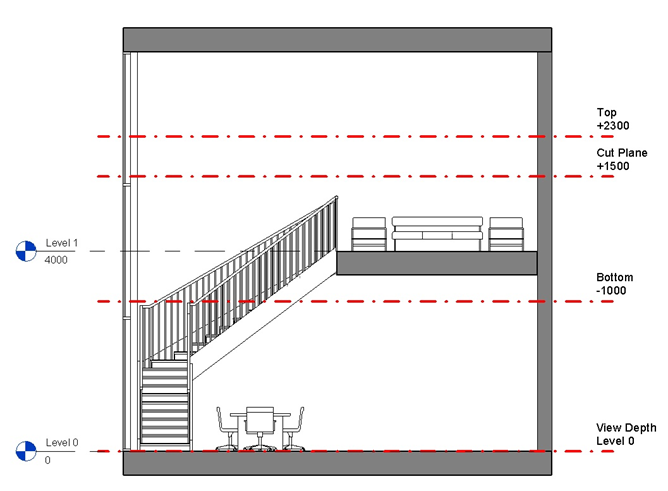
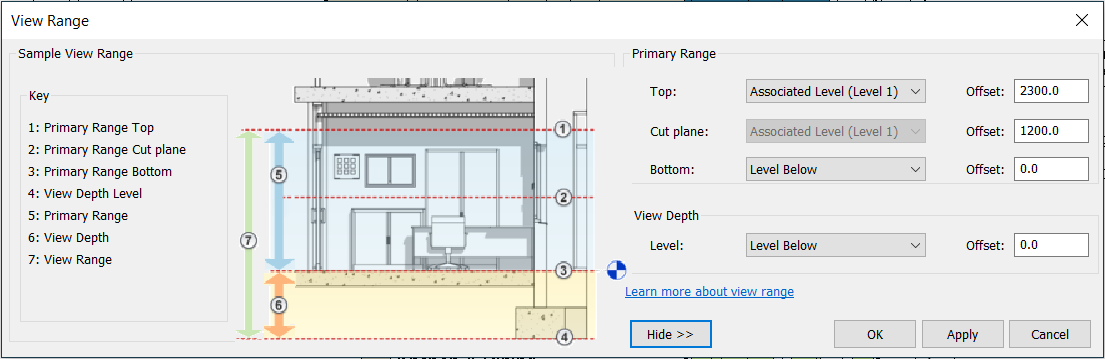
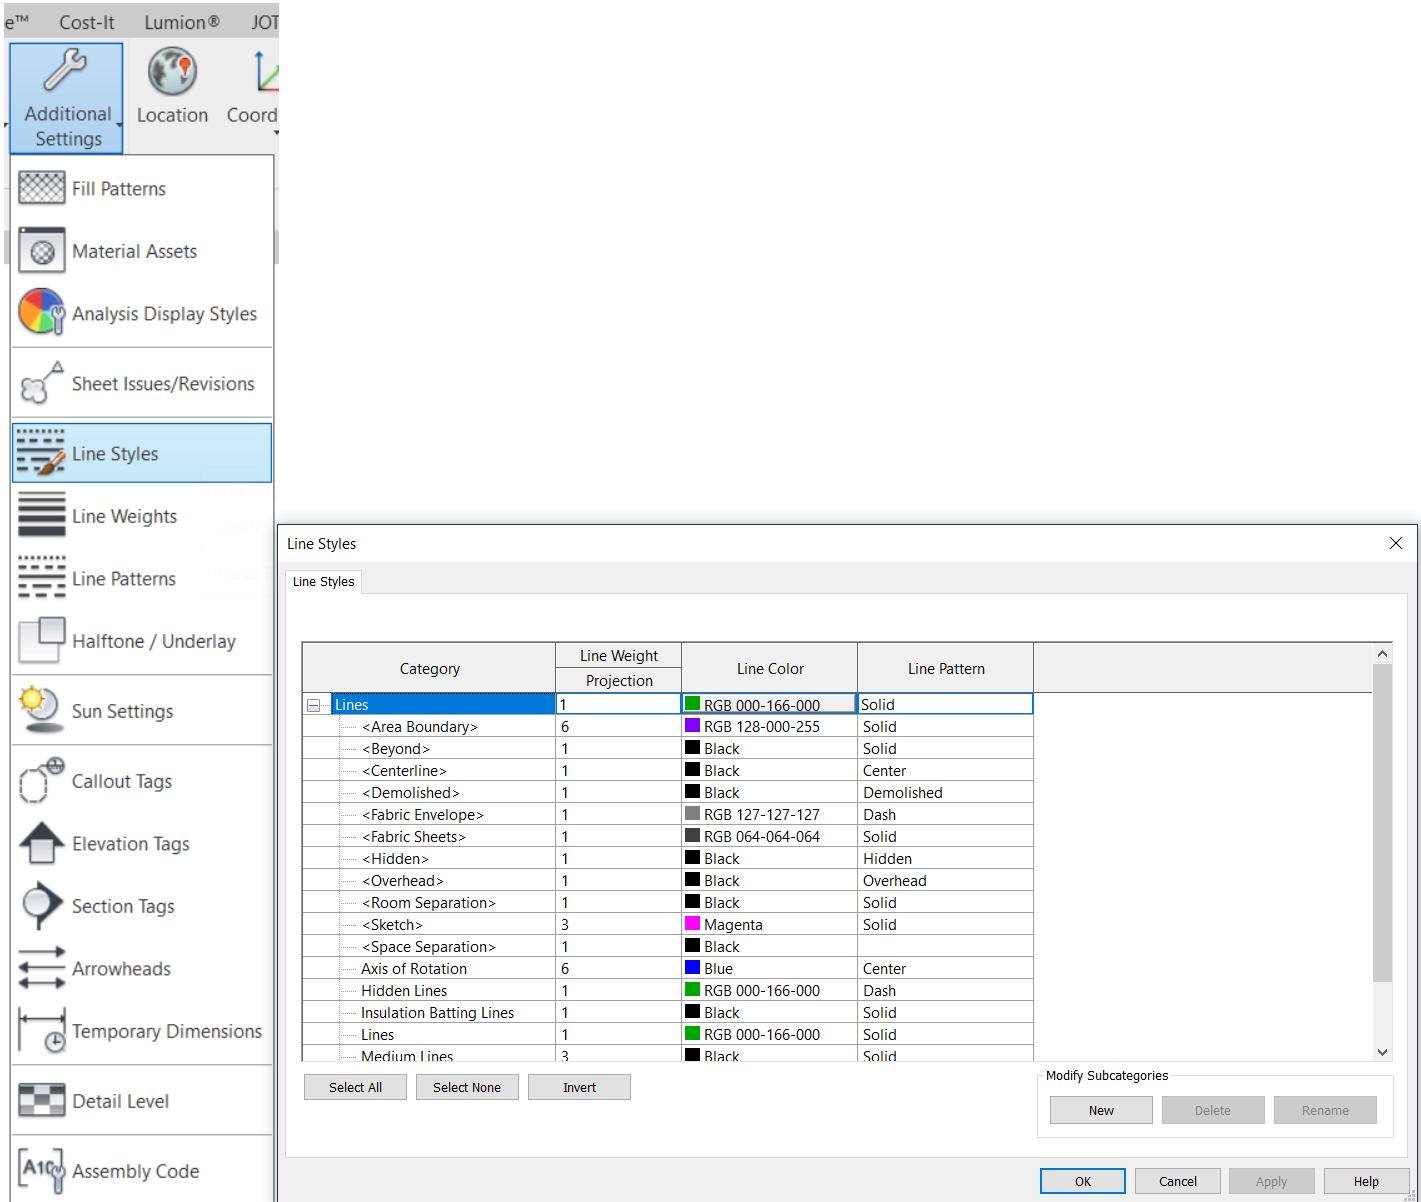
- View Depth – “Beyond” line style: When one element is placed between the Bottom Plane and the View Depth Plane, the element´s lines will be shown as the "Beyond" line style configuration.
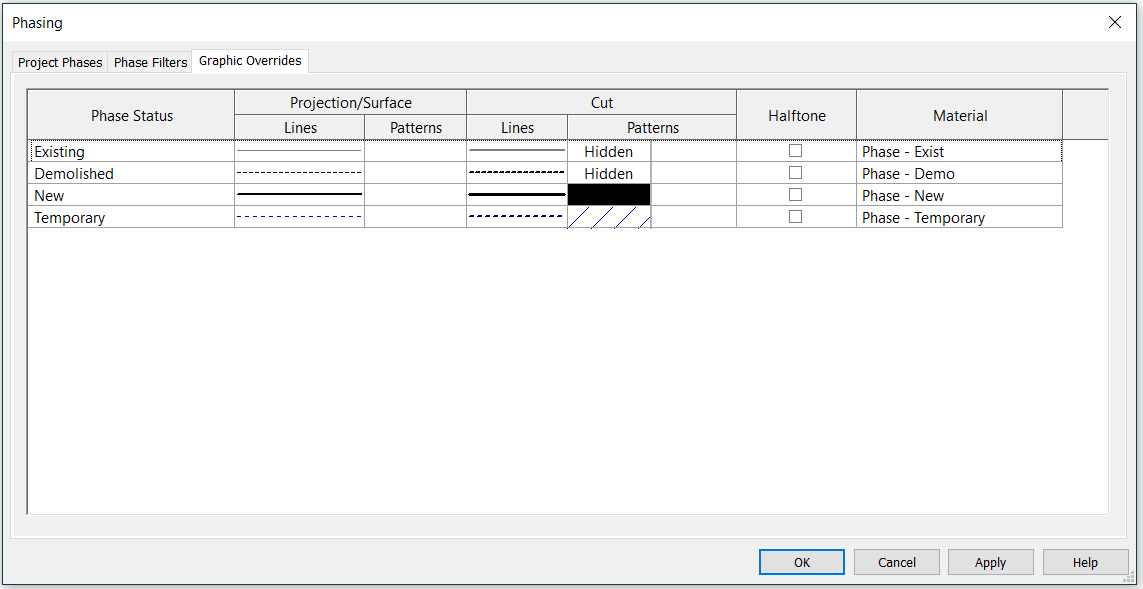
- Phasing Graphic Overrides: This changes the display settings of the elements, depending on the phase in which each element has been modeled.

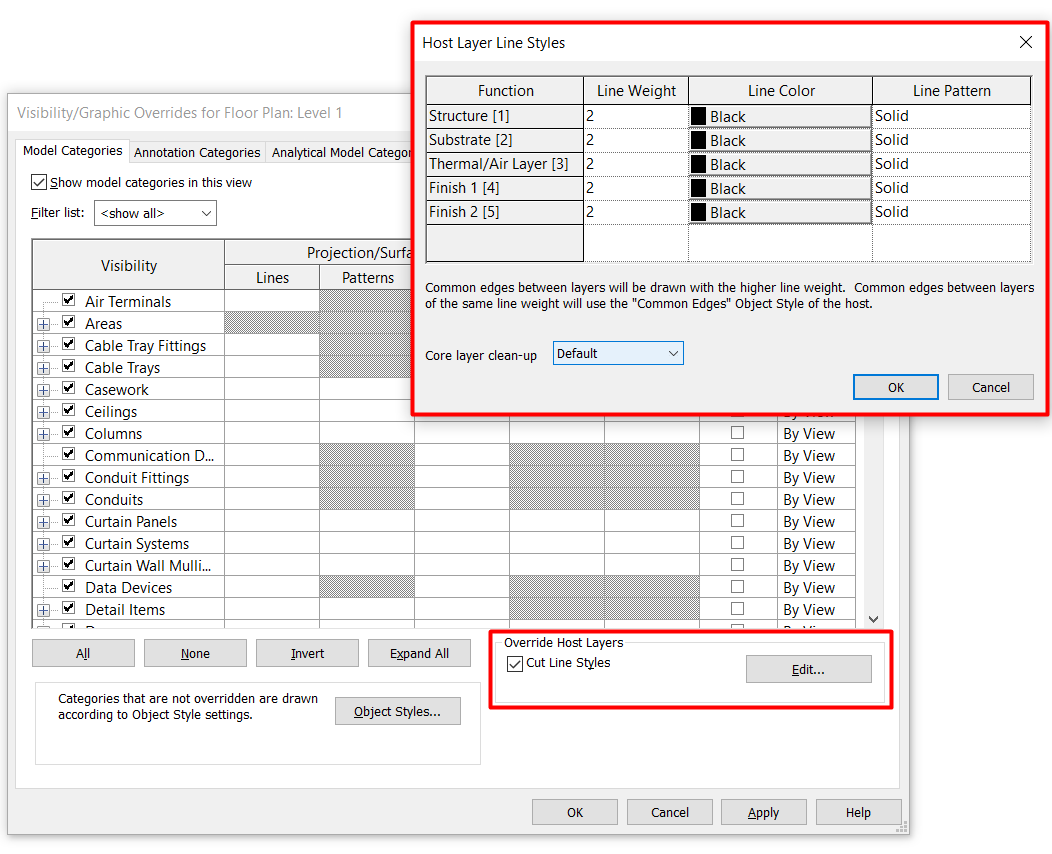
- Visibility / Graphic Overrides > Override Host Layers > Cut Line Styles: They are the lines in between the layers.
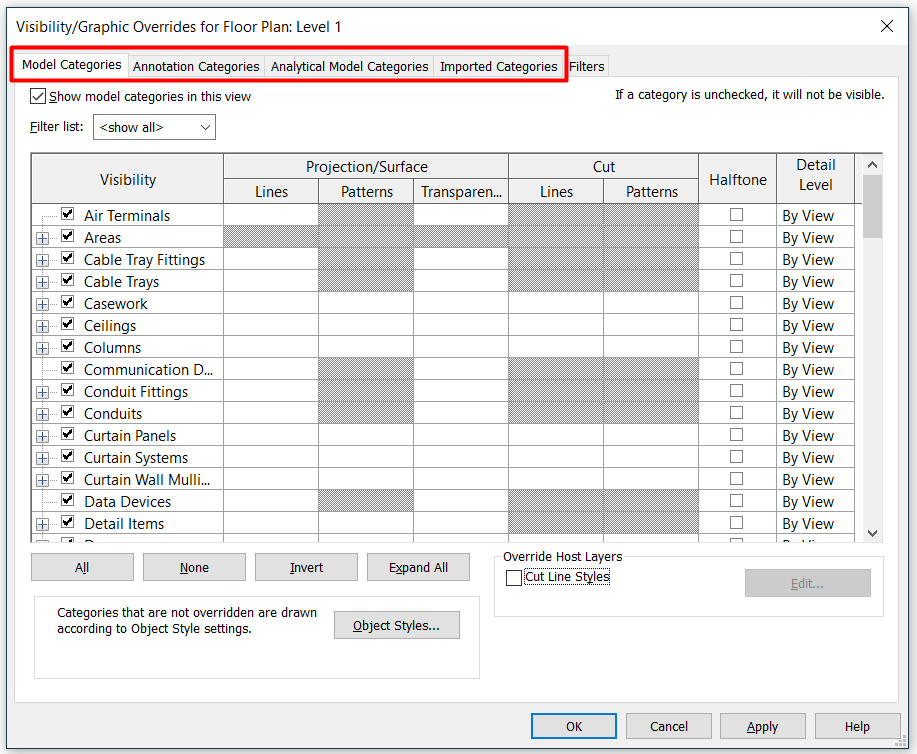
- Visibility / Graphic Overrides (VV): General settings of the visibility of a view. From this window it is possible to manage the visibility of all categories for the current view.
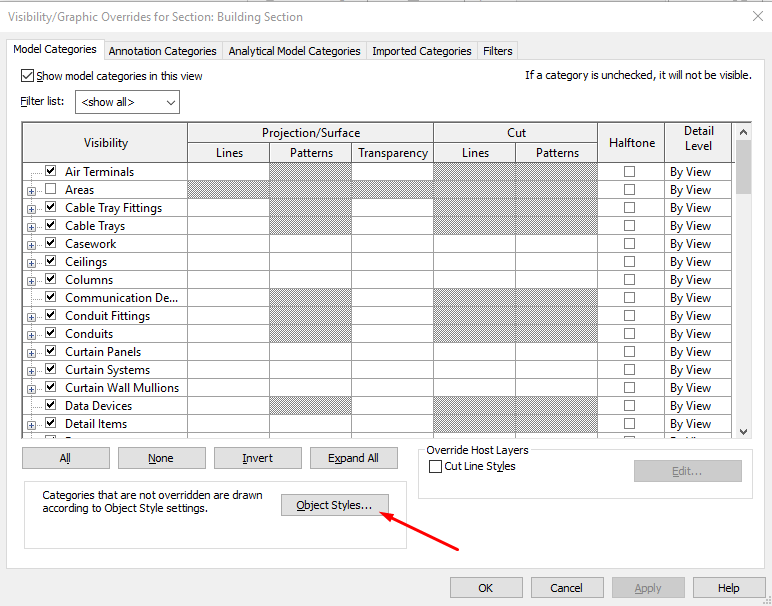
- Project Object Styles: The object style settings apply to all views of the model. These are the settings that will be shown in all elements by default in any view if the visibility has not been modified. They can be found in Manage > Object Styles, or from the Visibility/Graphics window.

Bearing in mind the hierarchy, the best way to adjust these parameters is by selecting the last method in the list, and, if required you can scroll up to the other "methods" should you need to carry out further adjustments. In this way, the parameters of many elements can be adjusted at the same time, resulting in a faster and easier approach when making subsequent changes.
2 Project object styles
From this section it is possible to modify the appearance of the elements for all the views of the project. This is the way Revit represents the elements by default. If you make a good adjustment of these parameters, you will not need to resort to too many modifications in the views.
For each category we will find different subcategories. This is something to keep in mind when creating families. It is important to assign each part of the family the appropriate subcategory in order to have a better visualization of the family in the project. It can occur that when the family is loaded in the project it can be visualized in a different way, since the settings made in the project will be applied, which could be different from those of the family.
We will find them going to Manage > Settings > Object Styles. A good practice would be to take the adjustments we make in this section, and save it into a project template.

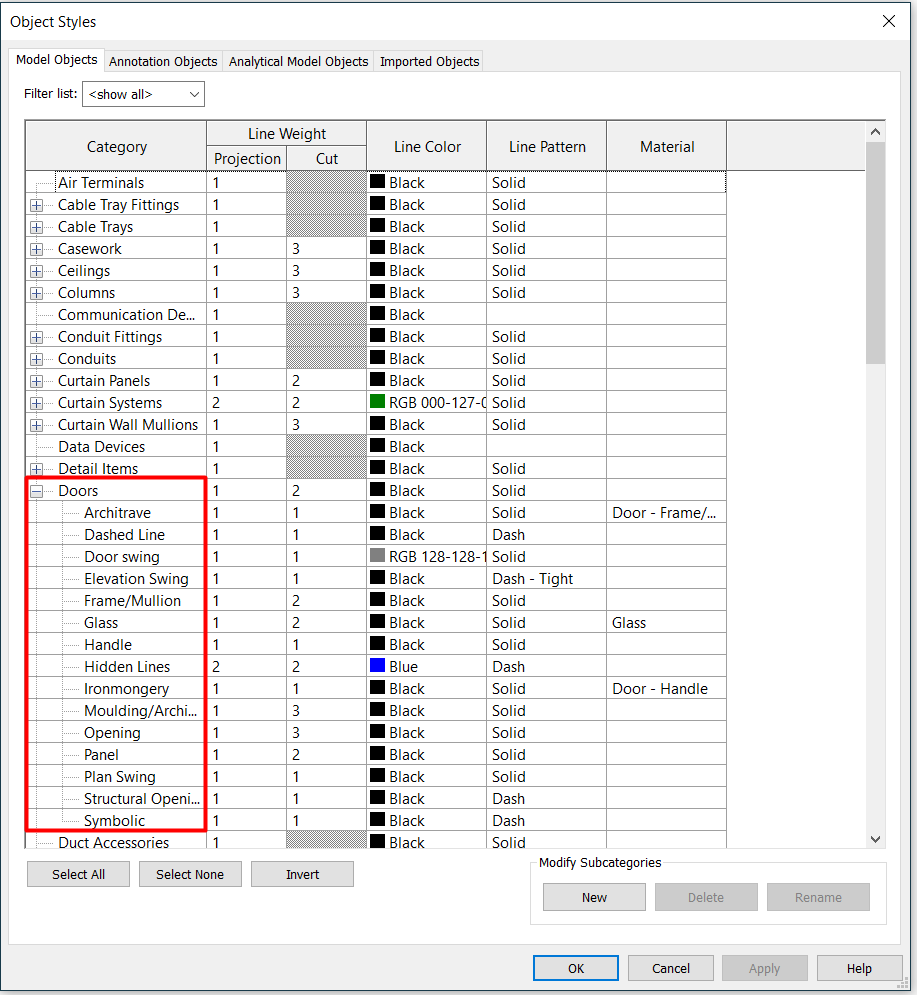
Dialog box is divided in four tabs: Model Objects, Annotation Objects, Analytical Model Objects, and Imported Objects. Let’s have a look at the first one, Model Objects. A Category list appears, as usual we can filter them by Discipline, for each category following settings are established:
- Line Weight
- Line Color
- Line Pattern
- Material
Line weight
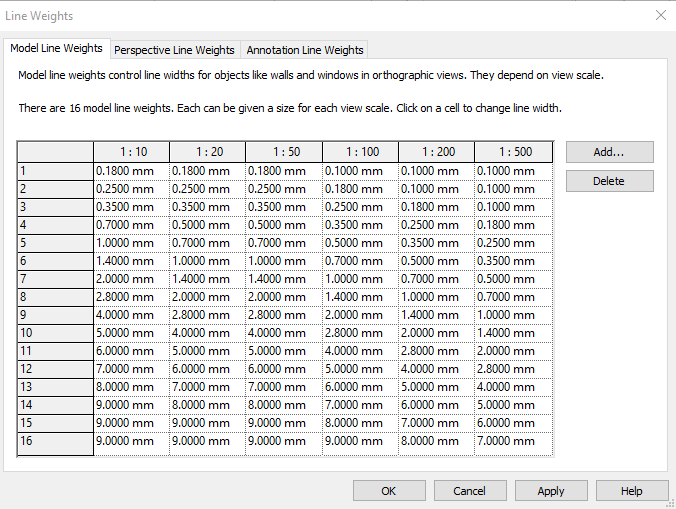
- In Line Weight settings we can distinguish between weight for an element line seen in “Projection” or seen in “Cut”. Line Weight is set by a number, but it does not correspond with mm weight, in fact it correspond with a kind of “level” of weight
- We have to move into Manage/Settings/Additional Settings/Lines Weight dialog box. REVIT establishes 16 “levels” of Line Weight. By default, 1 is set as the finest and 16 is set as the thicker. Each level has assigned a line weight for each scale. However, Perspective and Annotations lines just have one weight, which makes sense: you will always want to see the same weight for a dimension line despite which scale has the view where it is shown.
- It’s possible to modify these values, but not create or delete. You can also transfer this configuration from another file with “transfer project standards”
Line Color
Here we choose the color in which each category will be shown on screen and printed. Notice that in Print Setup Options we can choose “Grayscale” or “Black Lines” which will override Object Styles Colors Settings.
Line Patterns
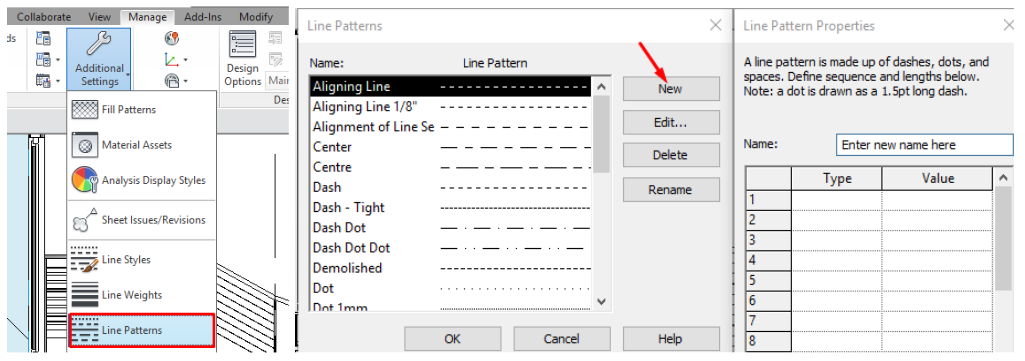
We can choose Line Patterns. To configure them again we have to move into Manage/Settings/Additional Settings/Lines Pattern dialog box. REVIT proposes some Patterns by default but also allows us to easily define new ones playing with dashes, dots and spaces.
Material
Material defined in Object Styles Settings will be used by elements whose “Material” property is set “By Category”.
3 Visibility by view
“By view” means that settings will apply to that view, although using “View Templates”, if wanted, same visibility settings will be applied to all the views desired.
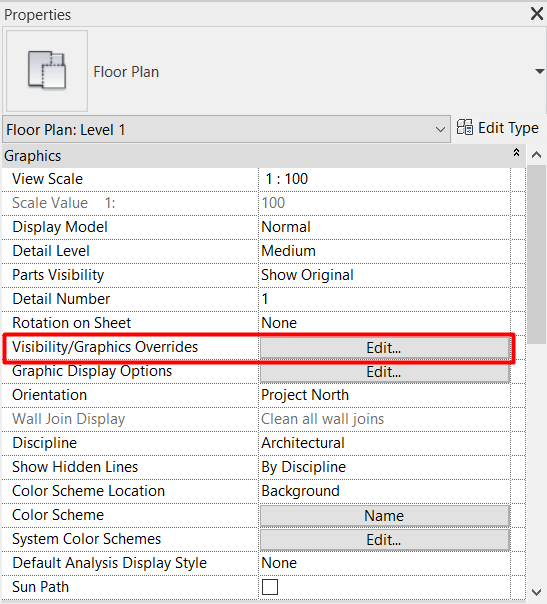
Let’s focus on Visibility / Graphics Override by View, that dialog box opens usually with “VV” shortcut or by: View/Graphics/Visibility/Graphics.
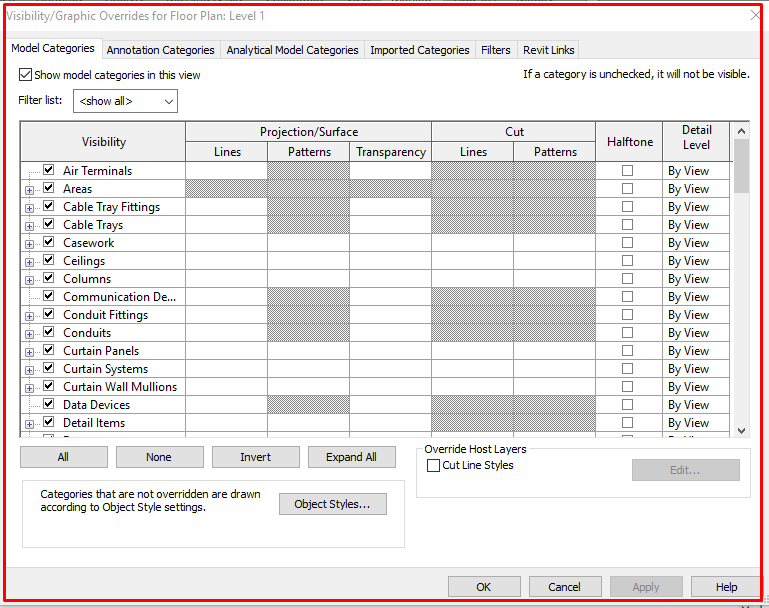
It’s divided in at least 5 tabs: Model Categories, Annotation Categories, Analytical Model Categories, Imported Categories and Filters. If we had the model divided into worksets another Worksets tab will appear and same thing with Revit Links, Design Options and Point Clouds.
Two main things can be done here:
- Show or Hide elements
- Choosing how we want to see them.
Categories
Here we can choose category by category whether we want it or not in our view.
- We can decide the way revit displays any category, depending on if it is cut or projected. It is possible to override the pattern and the line colour/weight/pattern as well. From Revit 2019 it is possible to overlap two types of patterns (one for the Background and another for the Foreground)
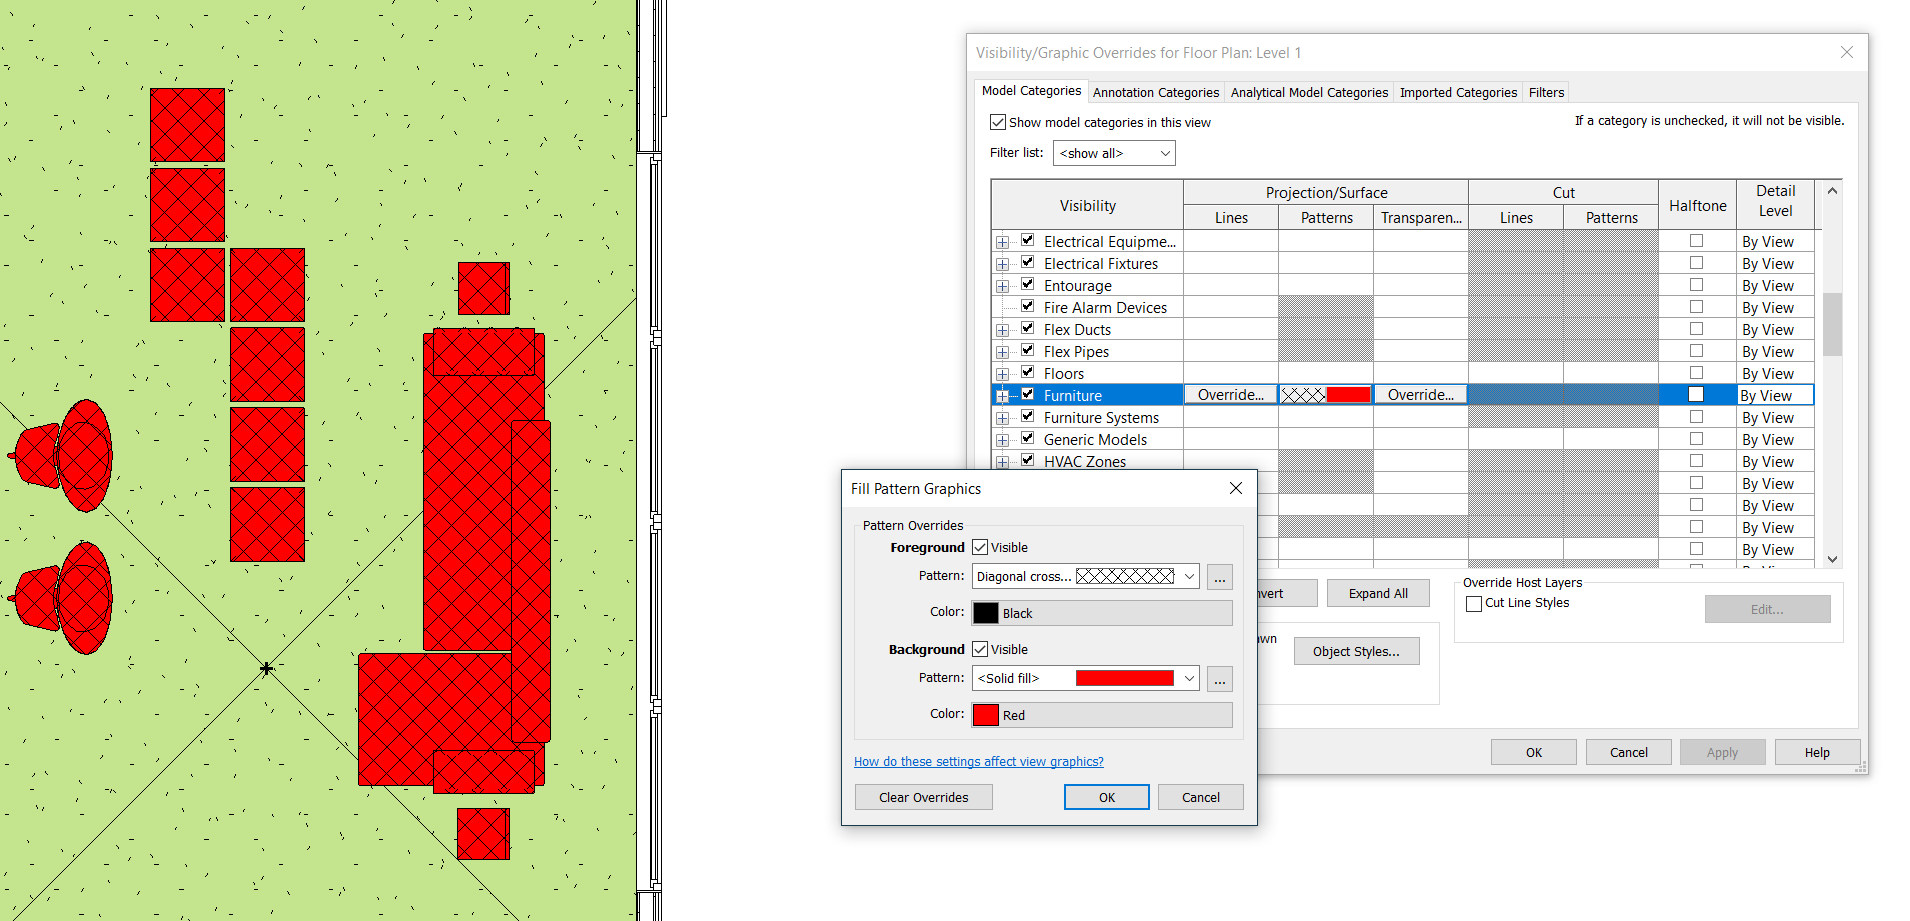
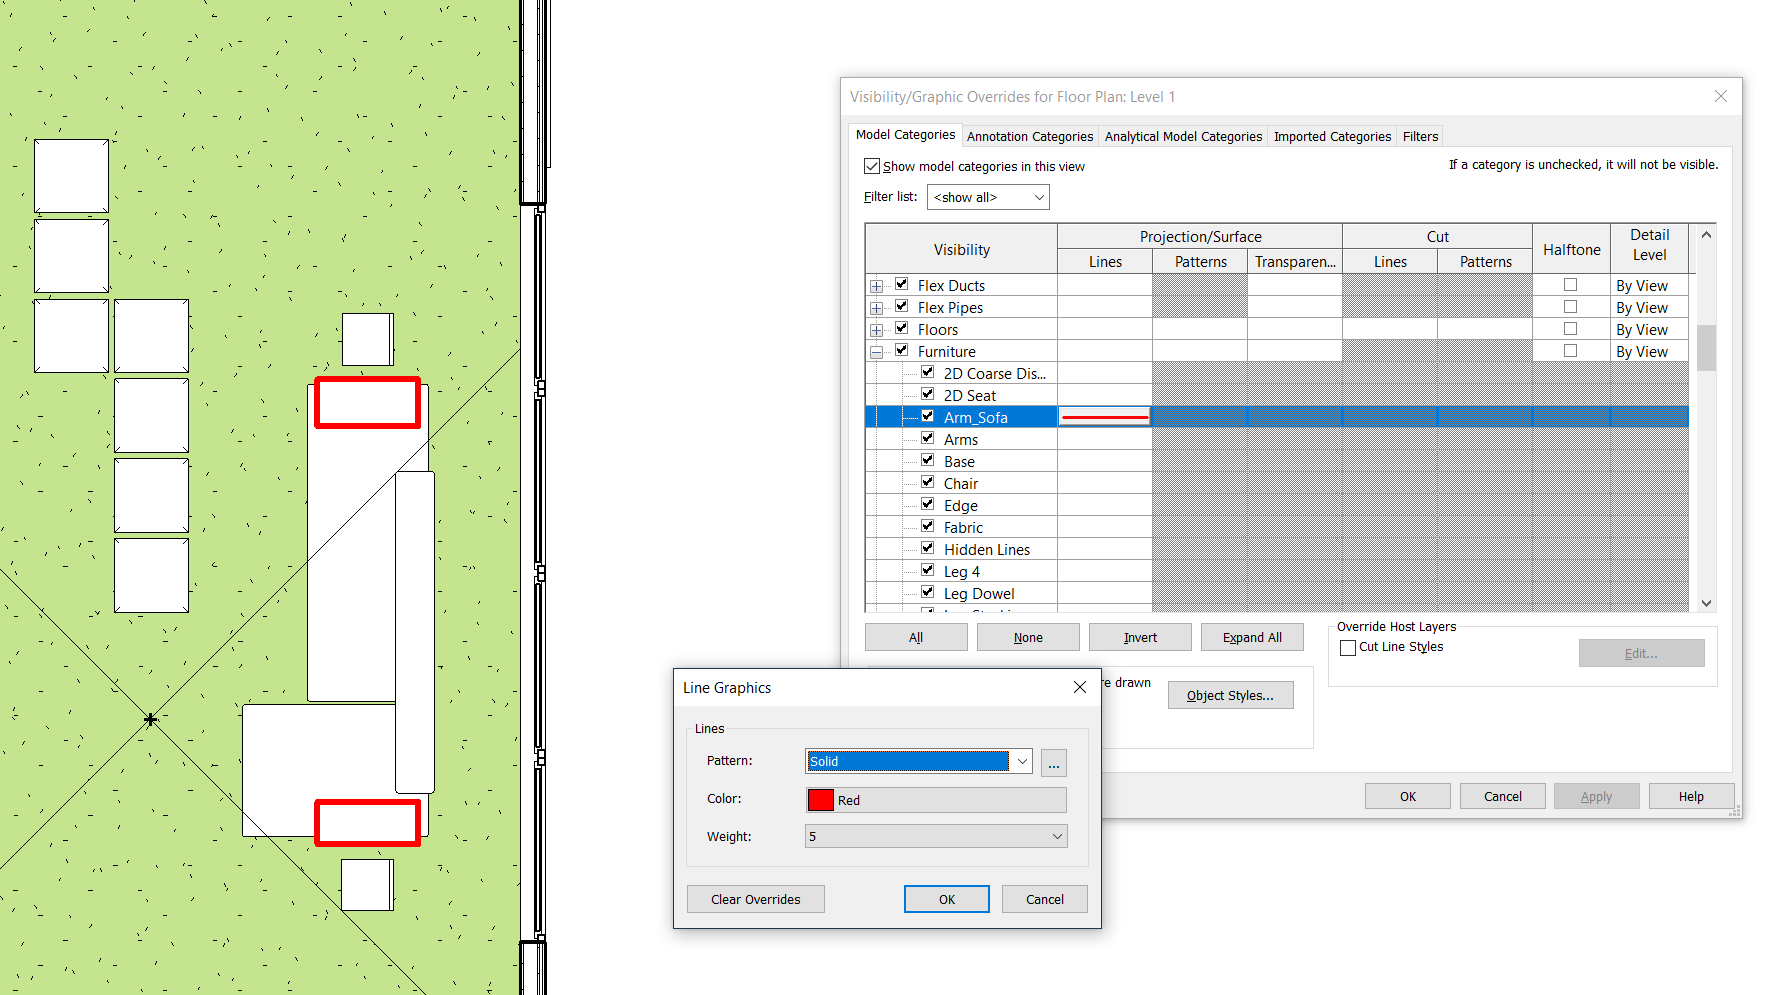
- We can use Subcategories. I strongly encourage you to create new subcategories when creating new family, they provide a very useful control of visibility.
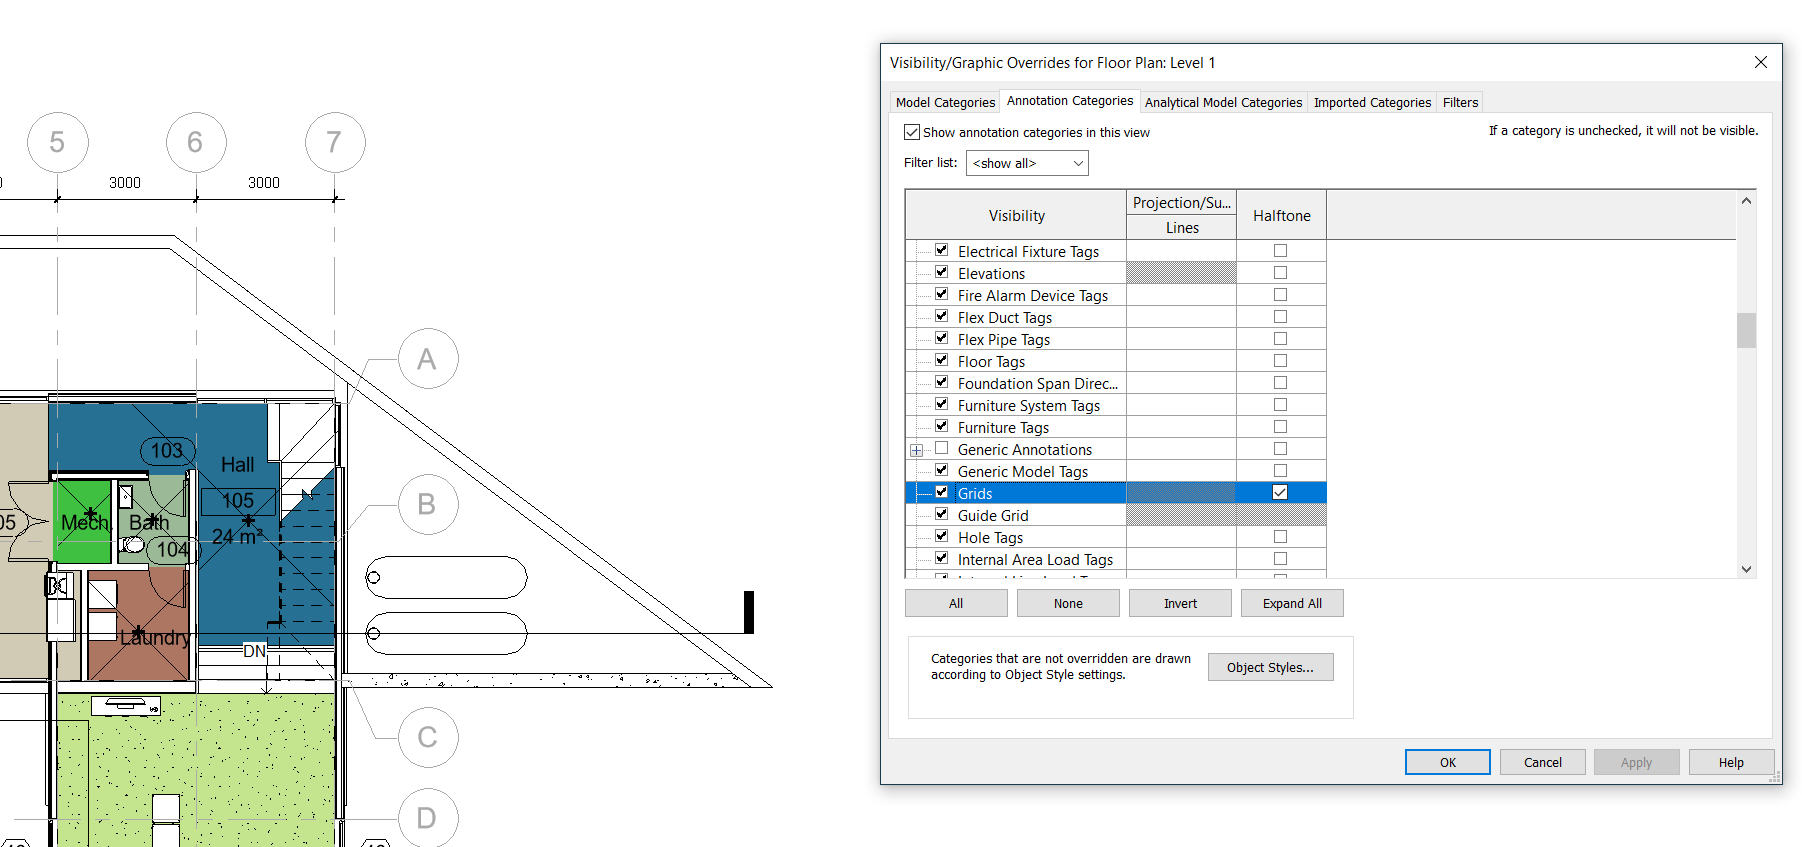
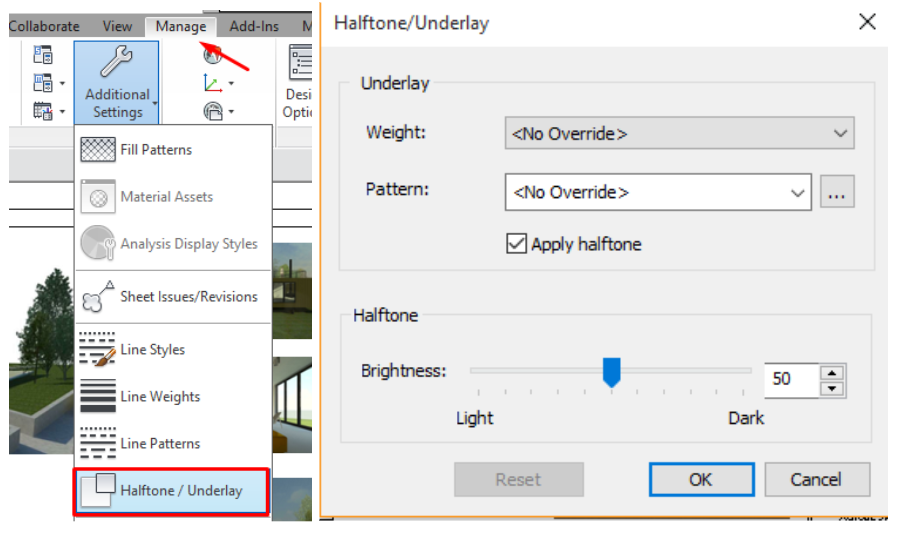
- To modify annotation categories the process is exactly the same. There is another option: Halftone. It turns the category selected into a lighter color. You can modify its settings at manage>Additional settings>
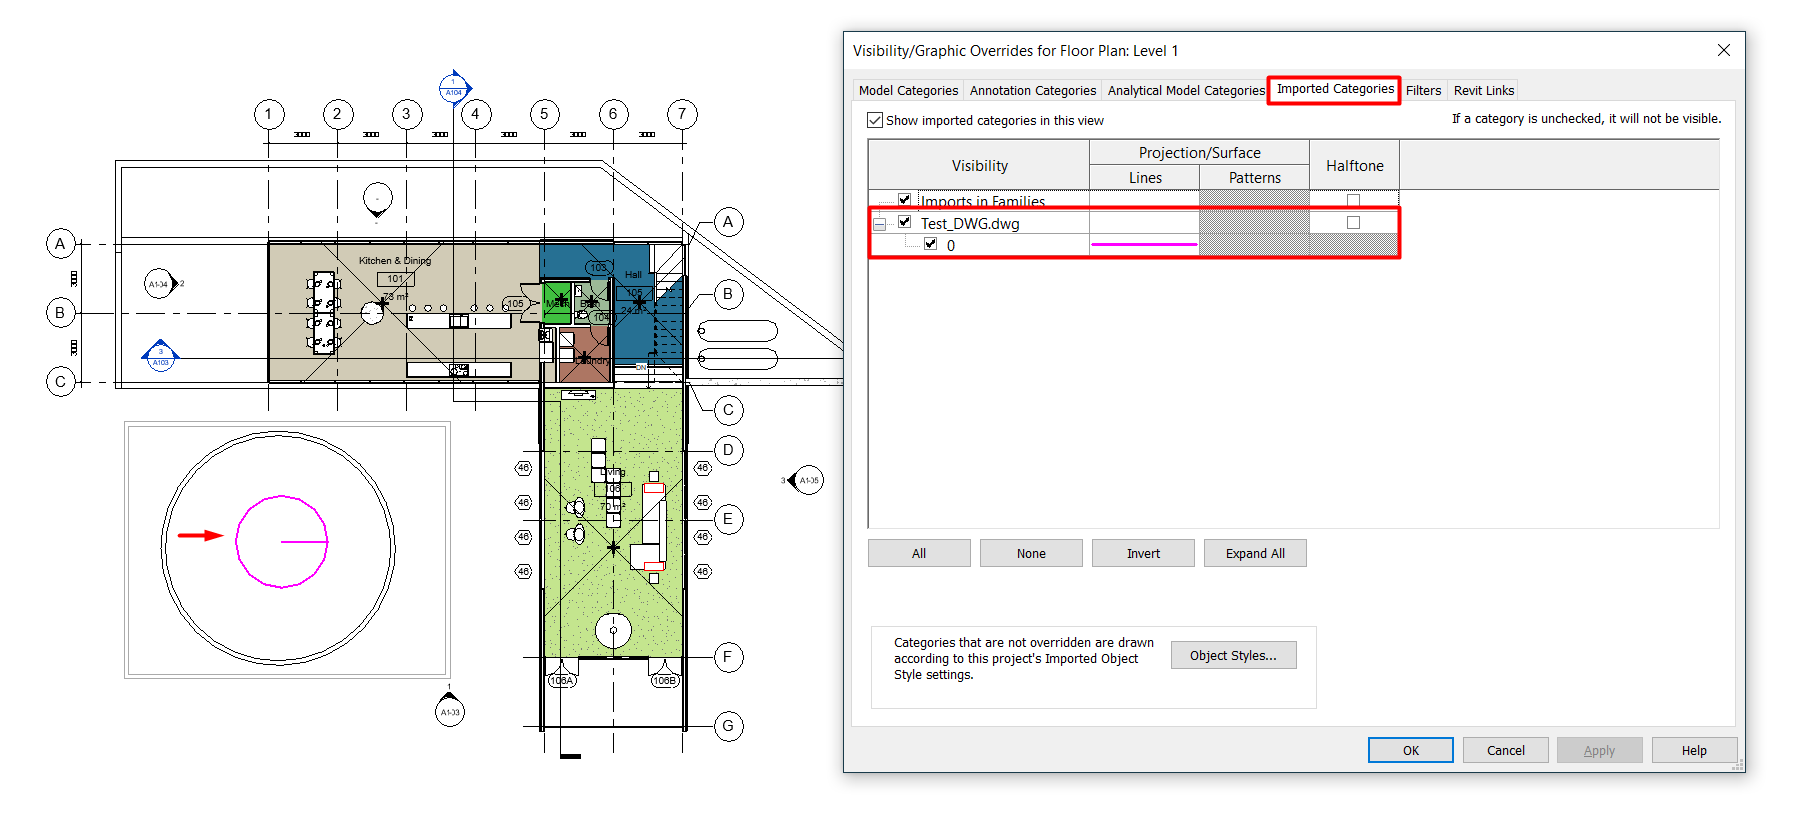
Imported Families
Sometimes we have DWG files linked showing complementing 2D items to our model, it’s time to decide if we really want or not to see them in our view. We can even modify the visualization of each layer from a DWG.
Filters
The use of the filters allow:
- Add or Remove filters applied to the view.
- Adjust de visibility to the elements affected by the filter, in the same way as we modify the visualization of the categories.
- Create new filters that define a group of elements that are going to be modified or modify a filter that has been already created.
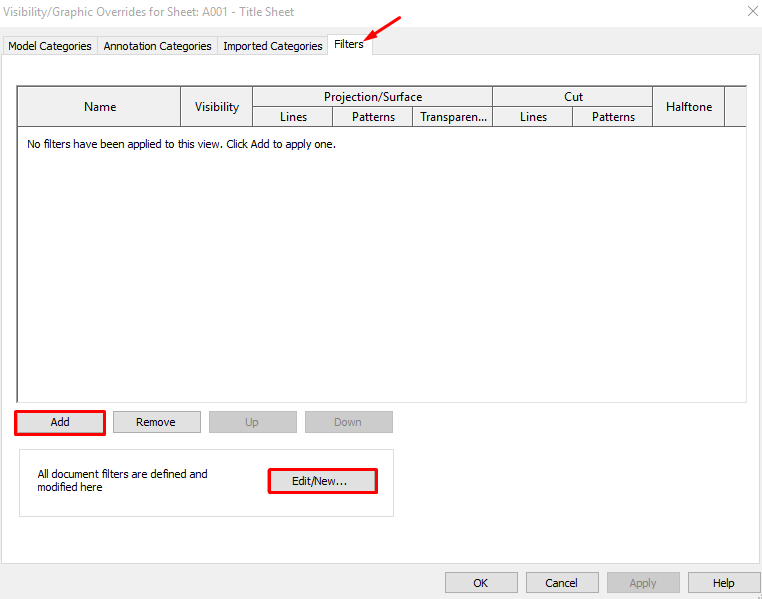
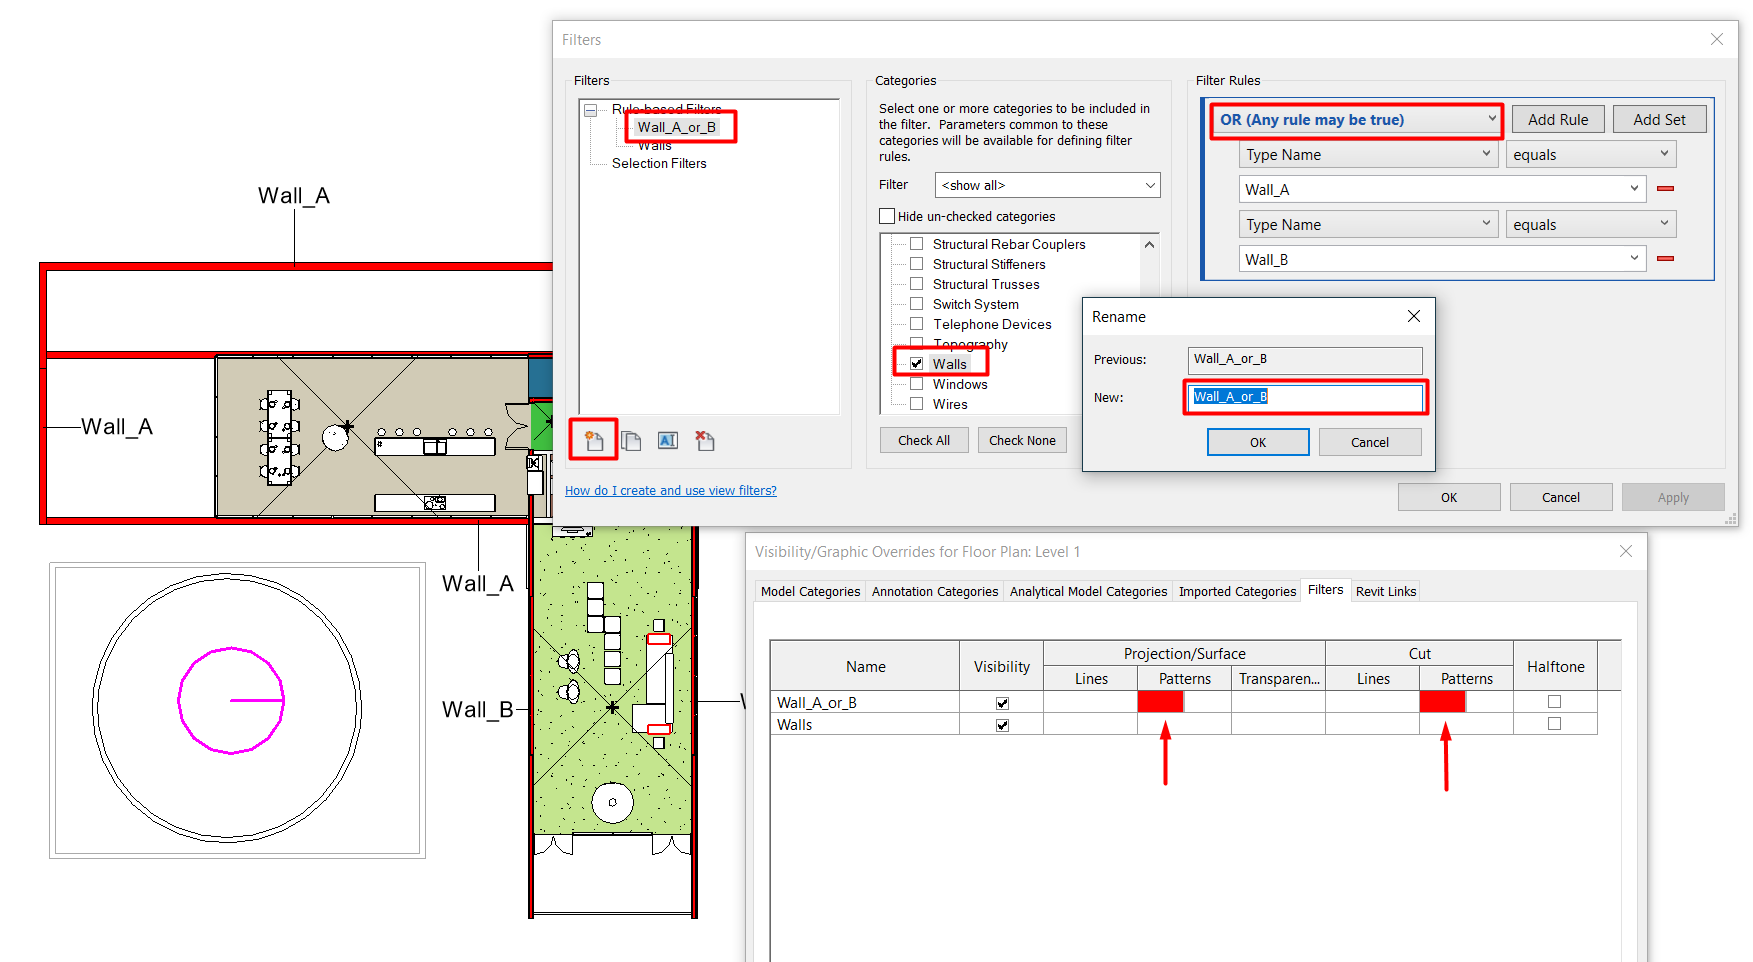
For creating a new filter, we can access from the “Edit/New” button:
- Create a new filter
- Name it properly.
- Select the category or categories that must be affected
- Defines the rule.
- Choose the parameter: To do this, Revit shows you just the common parameters among the categories selected.
- Once chosen the parameter is chosen the "rule":
- Type a key or choose among the possibilities. If you need to act over elements from the link you should type the parameter name exactly in the same way, because it will not appear in the dropdown.
- If you add two rules, the elements that will be affected from the filter will be the ones that fit both rules. From 2019 It can be AND or an OR. In the image below the filter will colour the walls that are named as “Wall_A” OR “Wall_B”.
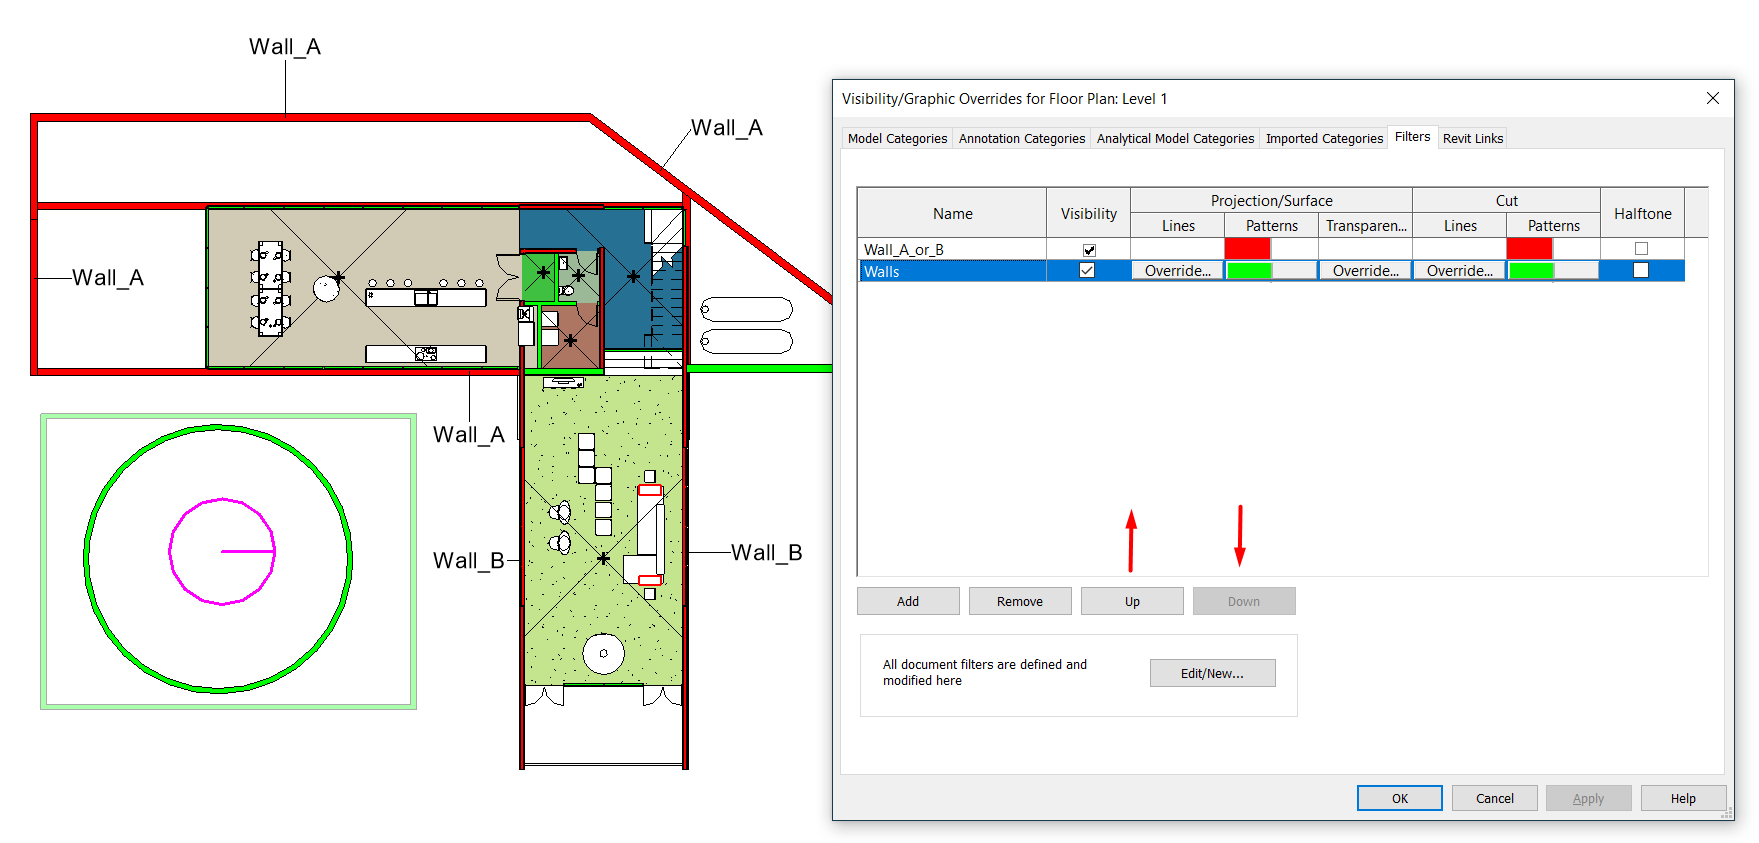
Filters follow a hierarchy too. When we add several filters, the one which is on the top will remain from the others below. SO if we have a filter about all the walls, and then others about some walls that share a specific parameter, we should place this last on the top, to get them coloured.
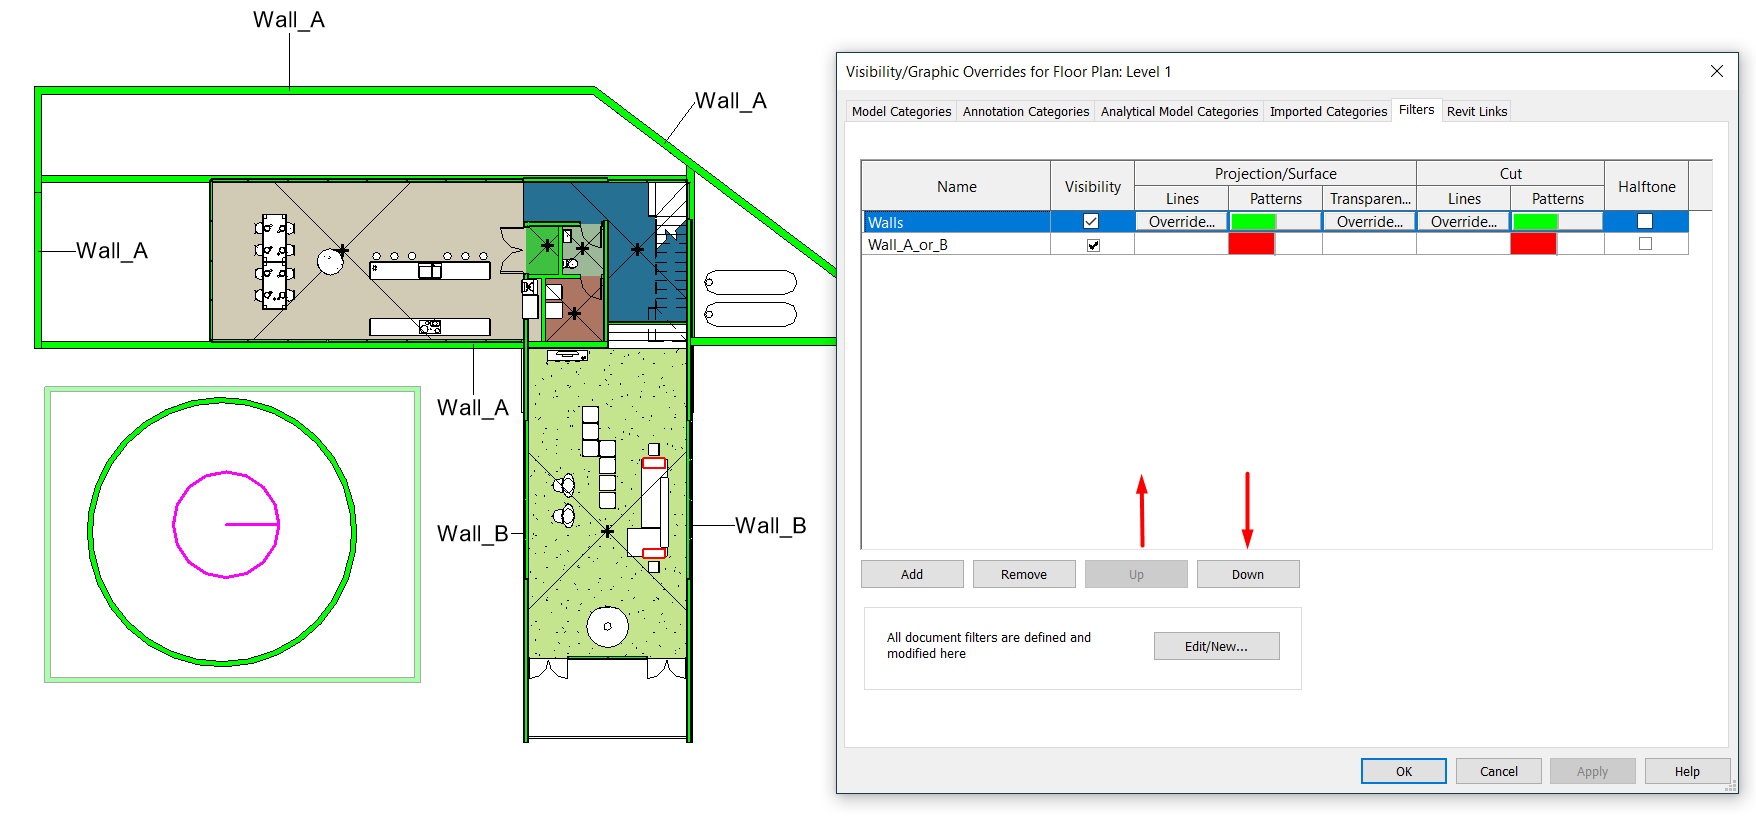
Sometimes when we are modeling, the number of filters created grows, and that can become an issue to manage them. We can not group them, so it’s very important the way we name them in order to have it under control. We propose a way of naming those filters to make them easier to find.
- Doors_FR_90
- Sections_Type_STR_No
- First part shows the category on which the filter is acting. We recommend using a filter by category, it is more useful later for recognising it.
- Second part indicates the property of the elements we want to filter.
- Third part indicates the value of the parameter.
- “No” would indicate that we are acting on elements that do not comply with the rule. Here, the rule is negative: “Sections no STR”
REVIT Links
When we are in a view modifying the visibility/graphic overrides, we can go to the "Revit Links" tab to change the visibility of the linked models. From there we can hide completely or show the link, we can assign the halftone or underlay mode, or we can make more specific adjustments in their visibility using the display settings.
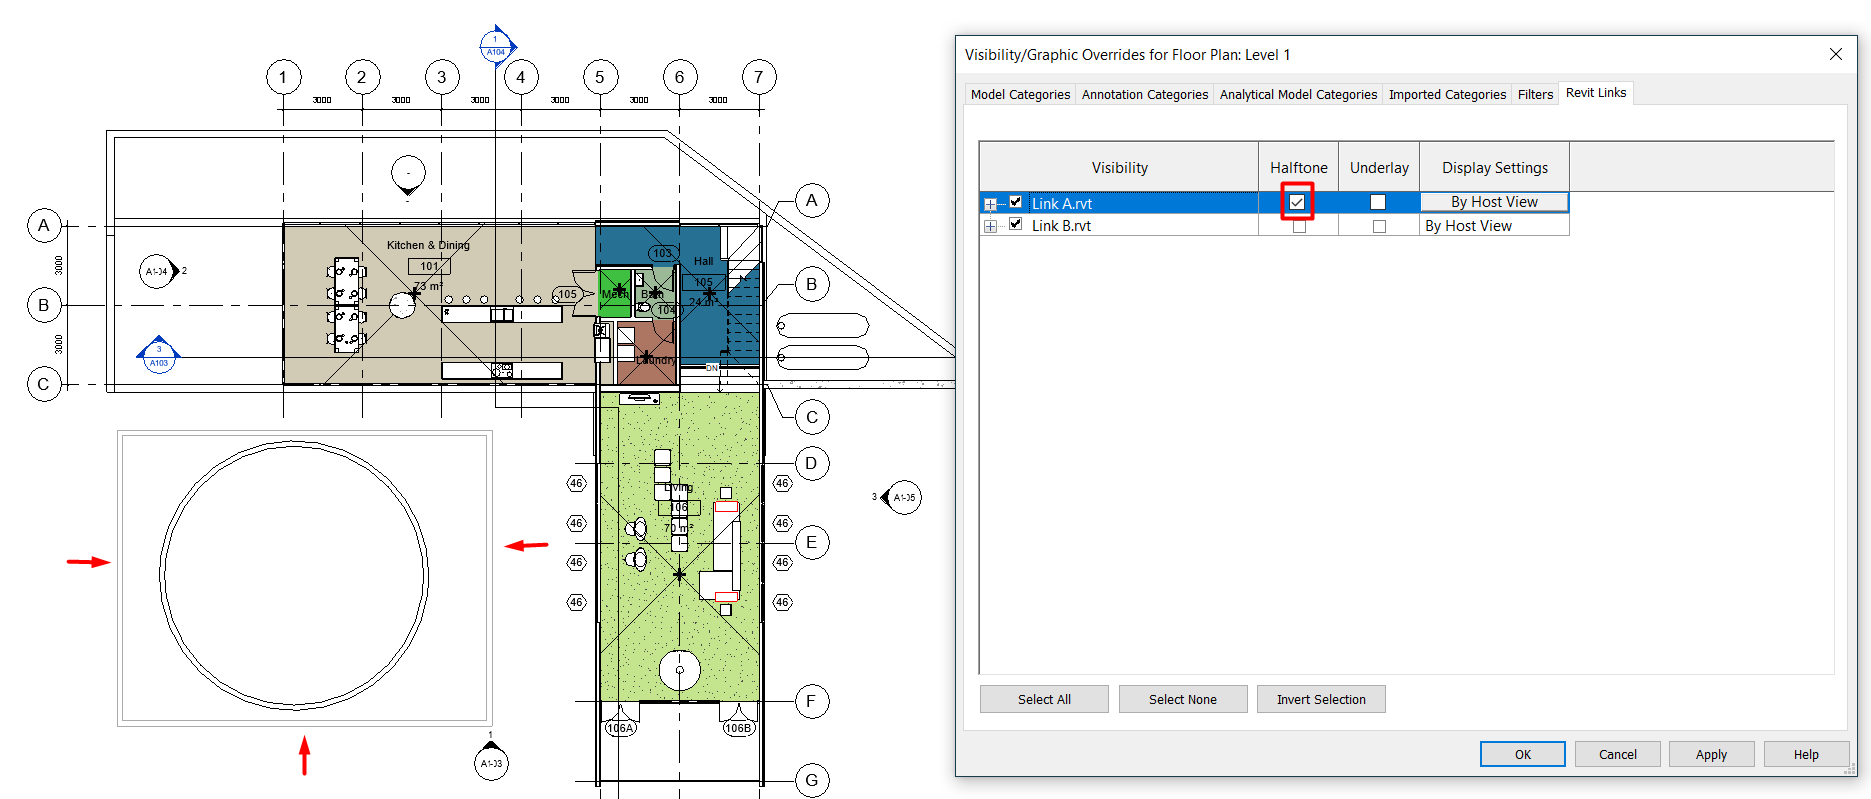
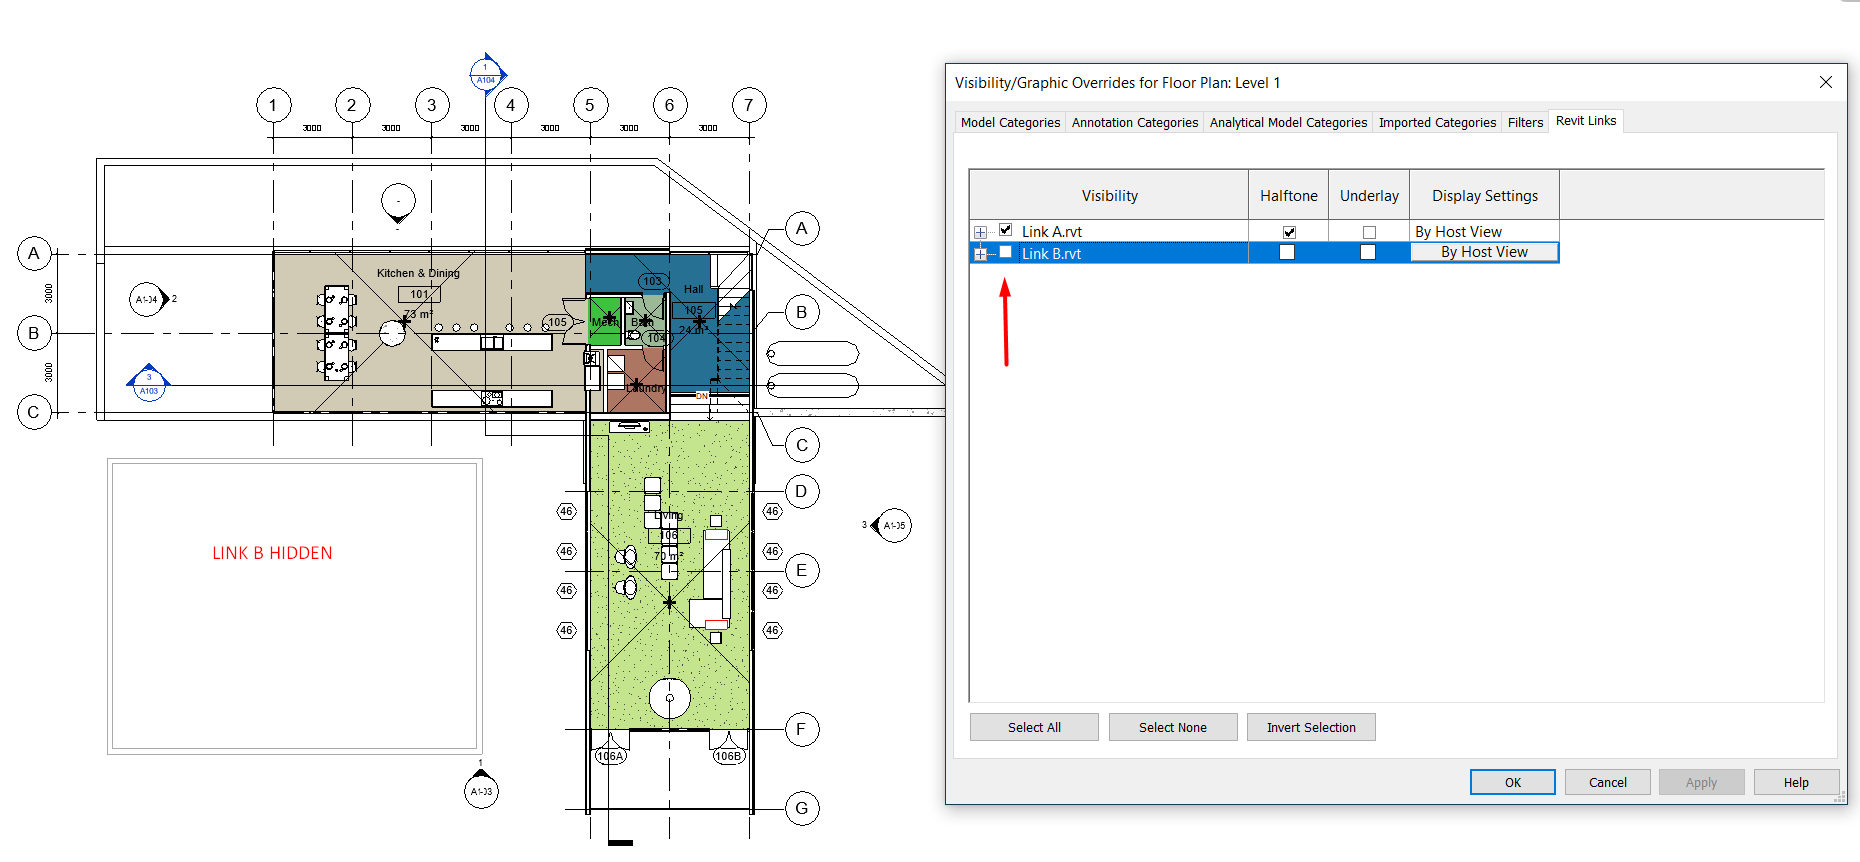
We can access the settings from each link.
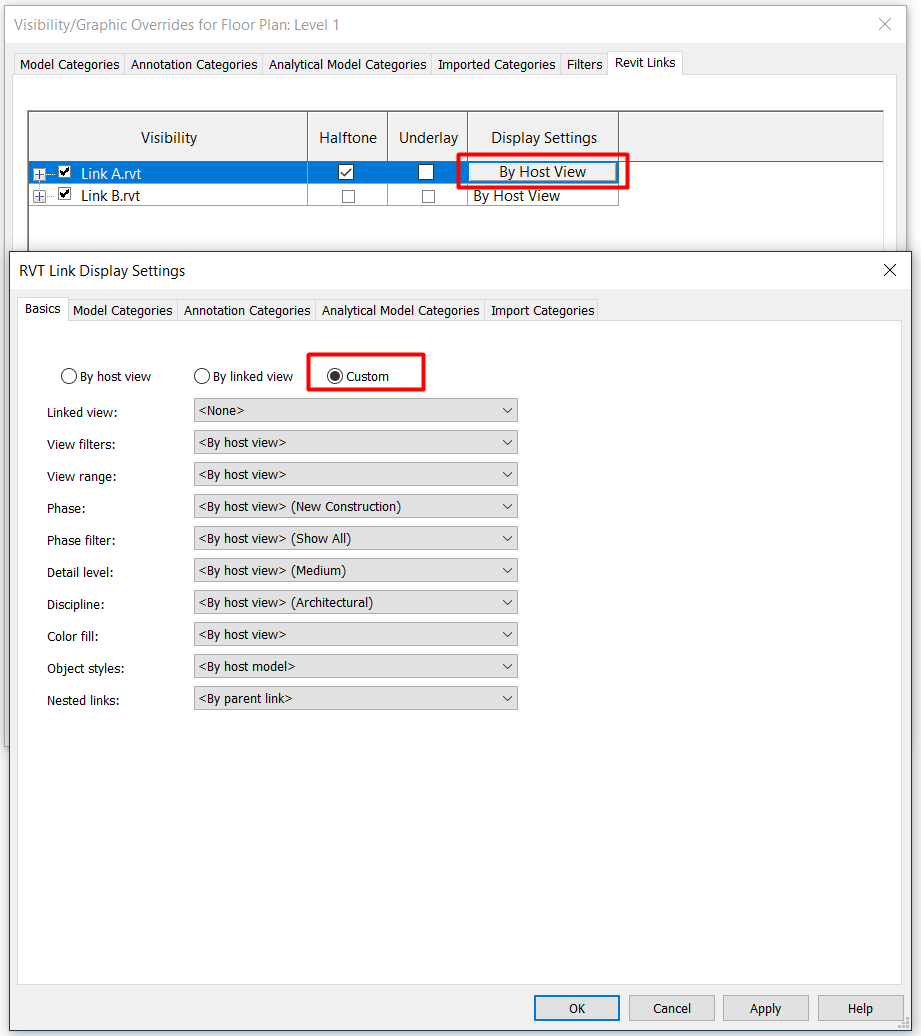
In the top of each tab, will appear three options, that will allow us to configure those parameters
- By host view: This is the default configuration. This means that all the adjustments we make to the categories of the model will affect the same way the categories of the linked model. If we press there, a new window will appear that will show a similar appearance than the visibility/graphic overrides of the view. Here we can change the visibility parameters of the linked model in this view or in this group of views if we are using a template.
- By linked view:Revit will let us choose a view of the linked model, and will apply the visibility settings applied in that view in the view we are working on.
- Custom:we will be able to change the visibility of the elements of the link, by categories and worksets, but without filters.Filters applied to the model, will affect also the elements of the linked models. If we want to filter an specific element of a link, Revit will not suggest us the information of that element, but we can write it and it will work the same way as we said before.
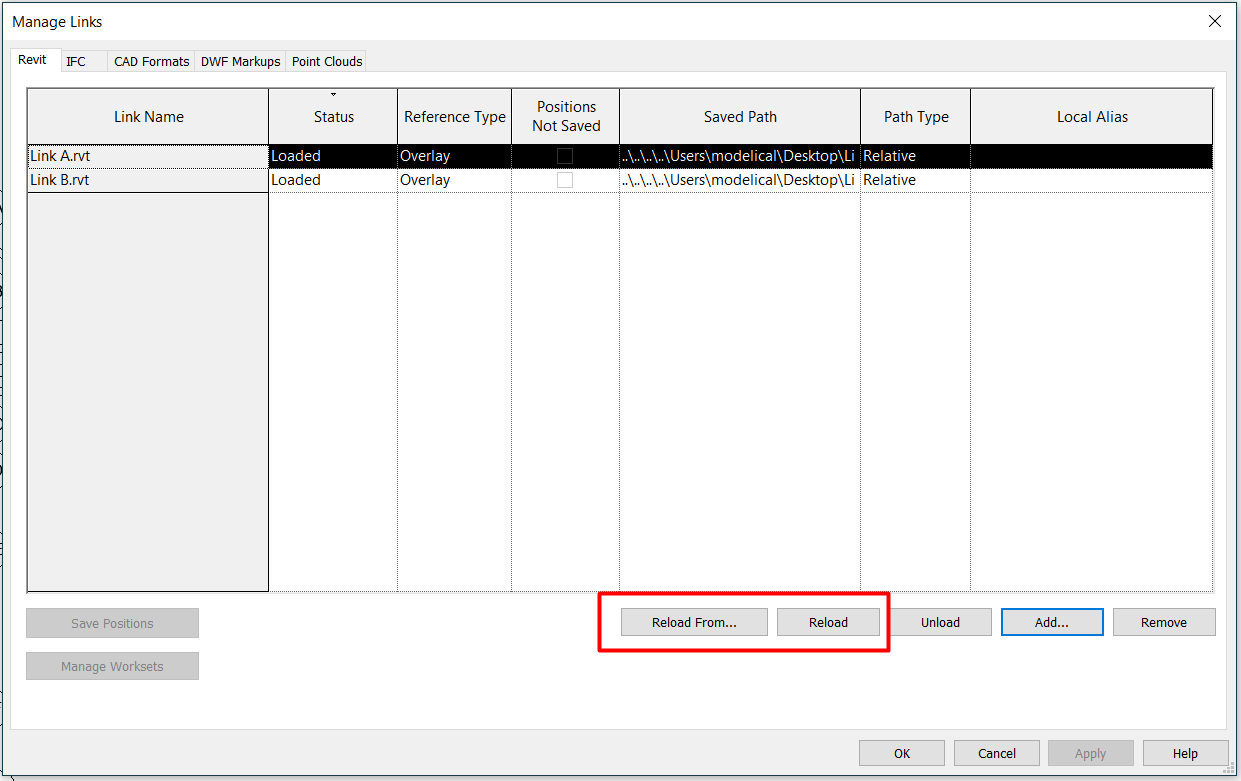
Visibility adjustments of links will remain when we replace them, but we have to do it using "Reload" or "Reload from" in the "Manage links" window. If we Remove them we will lose all our configuration.
Worksets
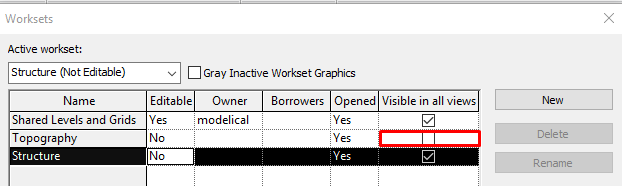
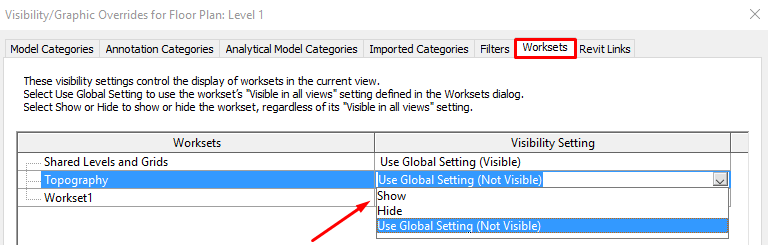
It just appears if we are working on a worksharing environment. We can easily decline seeing elements belonging to a defined workset. They can be maintained with the global visibility configuration of that workset. The global settings can be changed from the worksets control window, under Collaborate > Worksets. For instance: I could say “Topography workset” never must appear in any view unless I tell it to appear.
Design Options
This tab will only appear when there are sets of design options in the model. From this tab we can control the option shown in the view for each set of design options that exist in the model.
4 Visibility by element
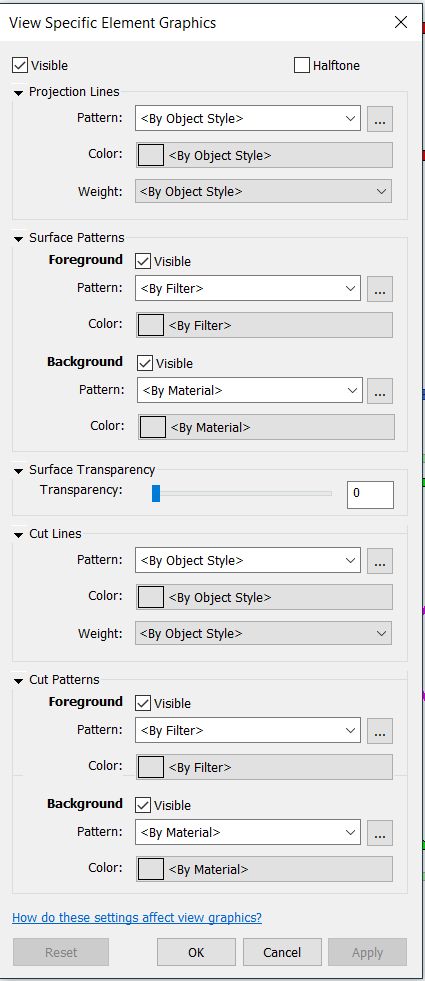
Finally, it is possible to adjust the visibility of the elements individually in each view. By selecting the element and right-clicking on it, it is possible to select the options "Hide in view" and "Override graphics in view".
From the window "View Specific element Graphics" it is possible to modify the visibility of the selected element (or elements), of its lines and patterns, as well as to change its transparency if the element allows it.
This method is the least recommended as it makes it very difficult for a subsequent user to know how the visibility of the elements has been adjusted, and therefore to modify that configuration.
5 View Templates
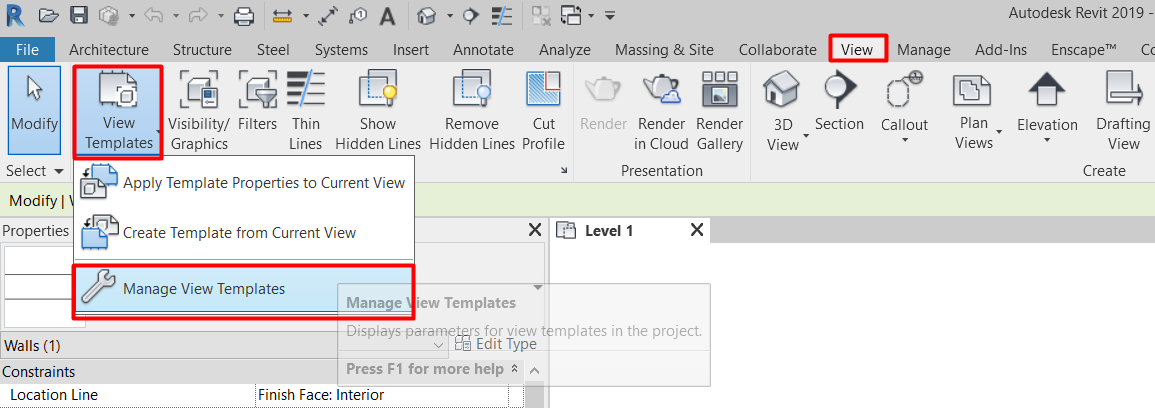
The View templates in Revitt allow us to adjust the visibility of several views at the same time. We can control them from View > View Templates > Manage View Templates.
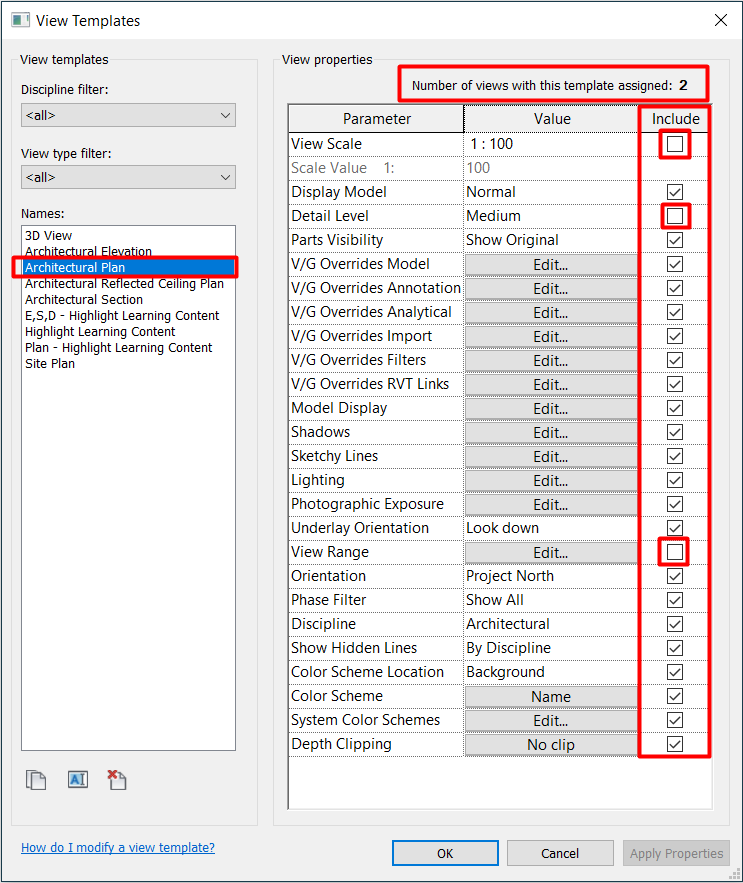
If we want a view template applied in a great number of views, it is better not to include some parameters. It is not a good practice to duplicate templates for views that only differ in terms of visibility in the scale or in the view range. Is better not to include this field and then adjust it in the views. In this way we will have a great number of views with their visibility controlled by one template, and if we want to modify it we only have to do it once, in one template, instead of reviewing those adjustments in several templates. We will avoid having a lot of templates used in a few views each one.
If we want to know in how many views a template is applied we have to go to View > View Templates > Manage View Templates, and then selecting one template we can see it.
The best way of working with view templates is modifying the visibility of one view by categories, and when we think it is ok, we can create a template that will keep the modified parameters of this view we are working on. We can create this template from View > View Templates > Create Template from Current View.
View templates can be applied to a view from the "View Template" field. When applying a template to a view, all aspects included in the view template will appear uneditable in the view settings, and will have to be modified in the view template settings.
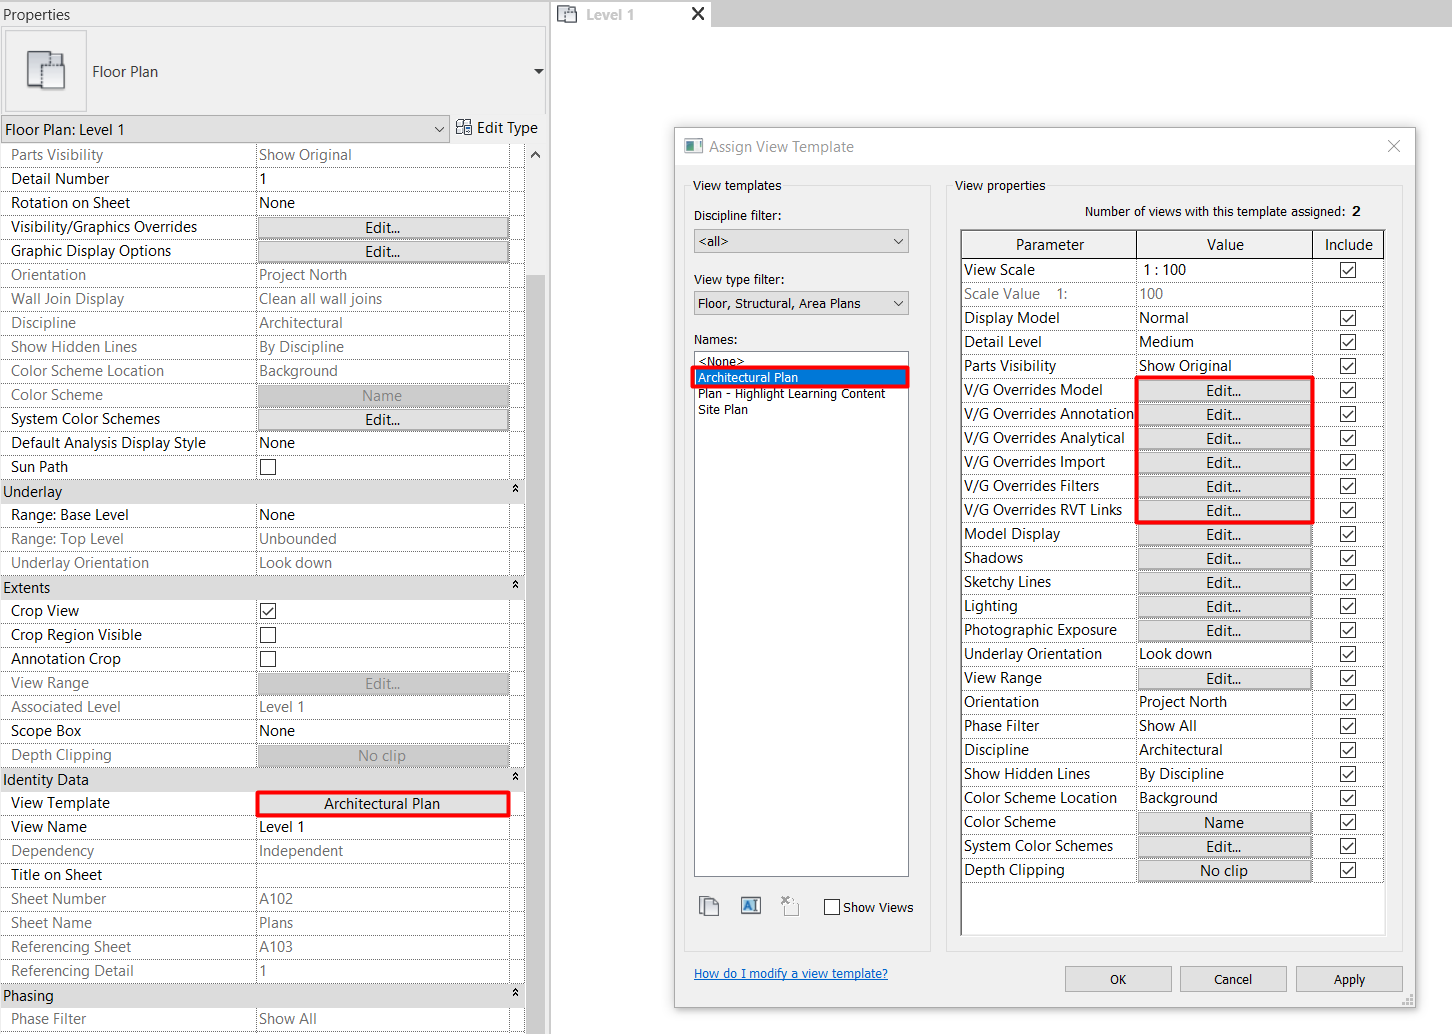
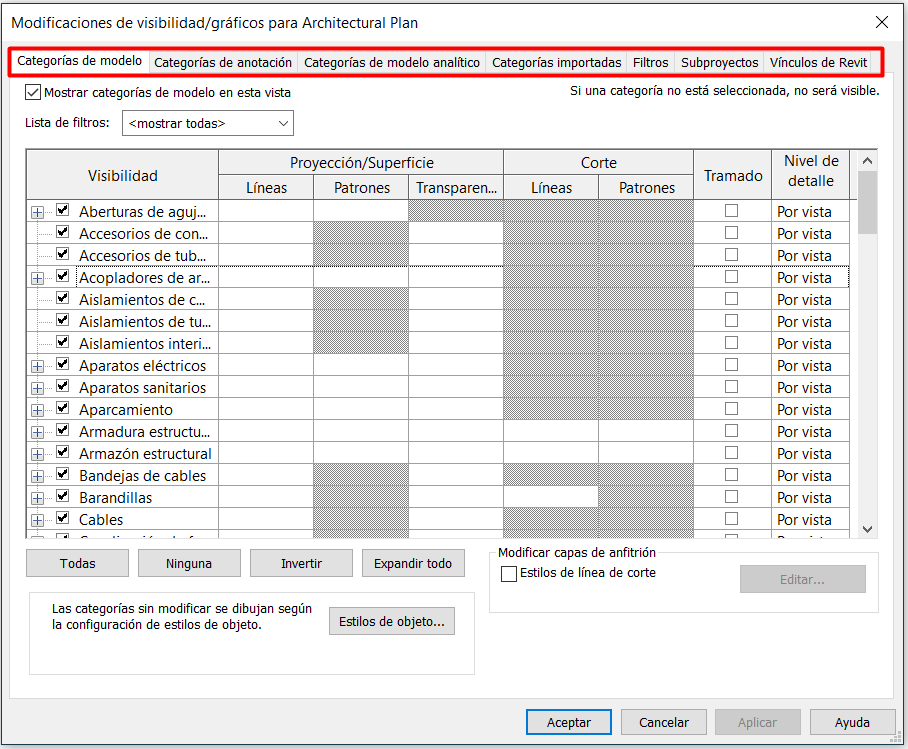
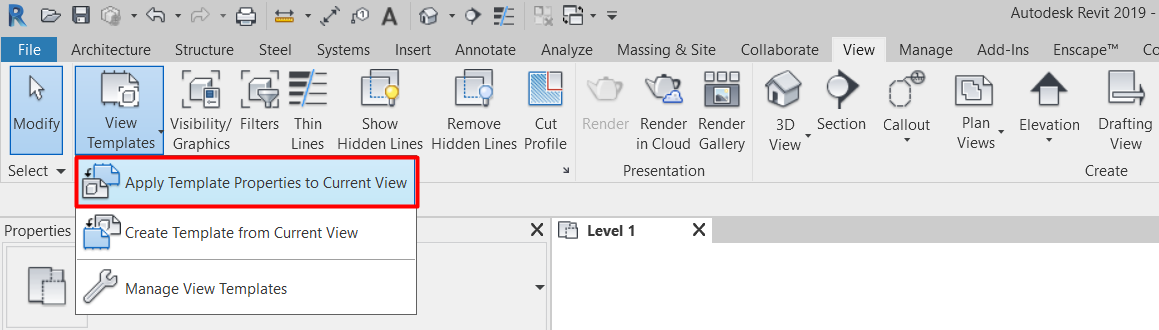
If you apply the view template throughout view > View templates > ApplyTemplate Properties to Current View, this view will get the visibility settings from this template at this point. If any change is made in the view template, that will not affect the view, and any change can be made by VV, because there isn't any view template applied.
Tips&Tricks
- You can modify Object Styles Settings whenever you want during the modelling process or also you can transfer them from another model in Manage/Transfer Project Standards, changes will have effect unless visibility of the elements have been modified “by View”. It’s the best option when we want to change the visibility from an element in the whole project
- The use of worksets as a tool to control visibility is a very powerful but dangerous tool. At some point in the project, it may be necessary to convert the file to local (that is no longer shared and therefore the subprojects disappear) for some reason, thus losing all related visibility settings. In addition, it is necessary to have a control that all objects are in their corresponding workset.
- Graphical modifications of an element by view should be not considered unless it is strictly necessary, especially in a collaborative environment, as it becomes very difficult to control changes on those elements later. The same happens with the Linework Tool (LW), it can be very powerful but it is necessary to control its use.
- We don’t recommend controlling visibility using Materials. It’s better to modify the visibility graphics by Category, then by Subcategory and finally by Filter. Materials can be applied but we recommend to put “none” in the Surface and Cut Pattern menu and in the Model Display Options we always select Hidden Line.
Bottom-line
- Clarify the process about managing graphics in the project. Understand which is the correct order to avoid unnecessary modifications.
- Managing the graphics of the elements of a project is a very extensive subject, and getting a good visualization can be a priority in a project, but it is important to know the techniques to get a logical management of visibility that saves time in the present and for future users.