

Model Schedules
Model Schedules
Notes
The current guide has been created according to the existing functionalities in Revit version 2023.
Objectives
- Understand that BIM models are a database, not only a geometric model.
- Understand that information works in real time from model to schedule and vice versa.
- Use schedules to quantify modelled elements.
- Use schedules to control the model and consequently the project.
- Use Revit schedules to document the project with existing model information.
Prerequisites
- User has basic skills in BIM modelling with Revit Software, and understands the language used.
- User fully understands data structure in models (category > family > type > instance).
- User understands that models are not only geometry but contain information that can be used for scheduling.
Introduction
A BIM model is a database. Each element that constitutes the model is defined through data. Some of this data regards the element’s geometry (if there is any), which is why the computer is able to process it and obtain graphical images of these elements—such as floor plans, sections, 3D views…
However, you can also represent this data in an alphanumeric format using schedules. . In these schedules we can see both geometrical and non-geometrical data.
Schedules allow for modifications of the data that is shown, just like the graphical views—which is why schedules are considered to be model views (in fact, they are created from the View tab).
Schedules can be configured to show the data according to the needs of the moment, allowing for their count, revision or correction. It’s worth noting that schedules work bidirectionally: the information edited on the schedule affects the model, and vice versa.
Schedules are an extremely useful and powerful tool.
Use of Schedules
Schedules can be used for very different purposes. The main uses are:
- Quantifying elements in models
- Showing information about elements in models
- Project control
- Model editing
Types of Schedules
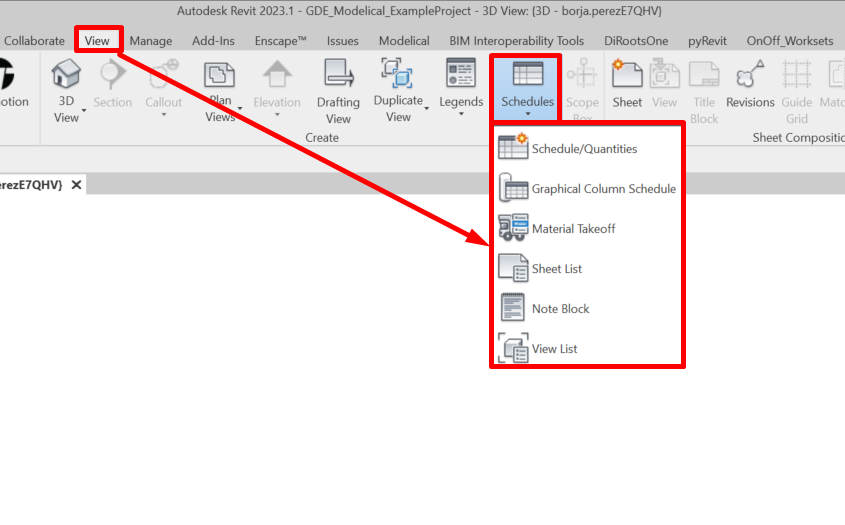
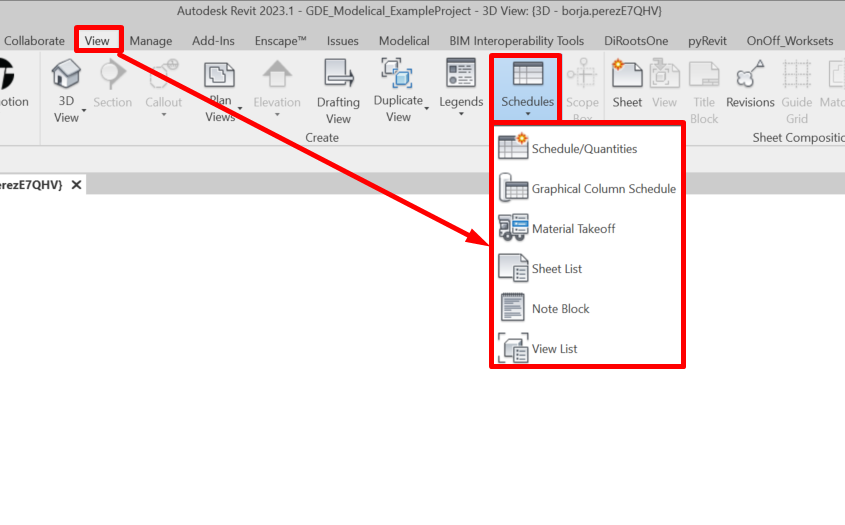
In the Schedules drop-down on the View tab we can find six different types of schedules. The basic difference is the kind of objects the schedule will include, but all of them work in a similar way.
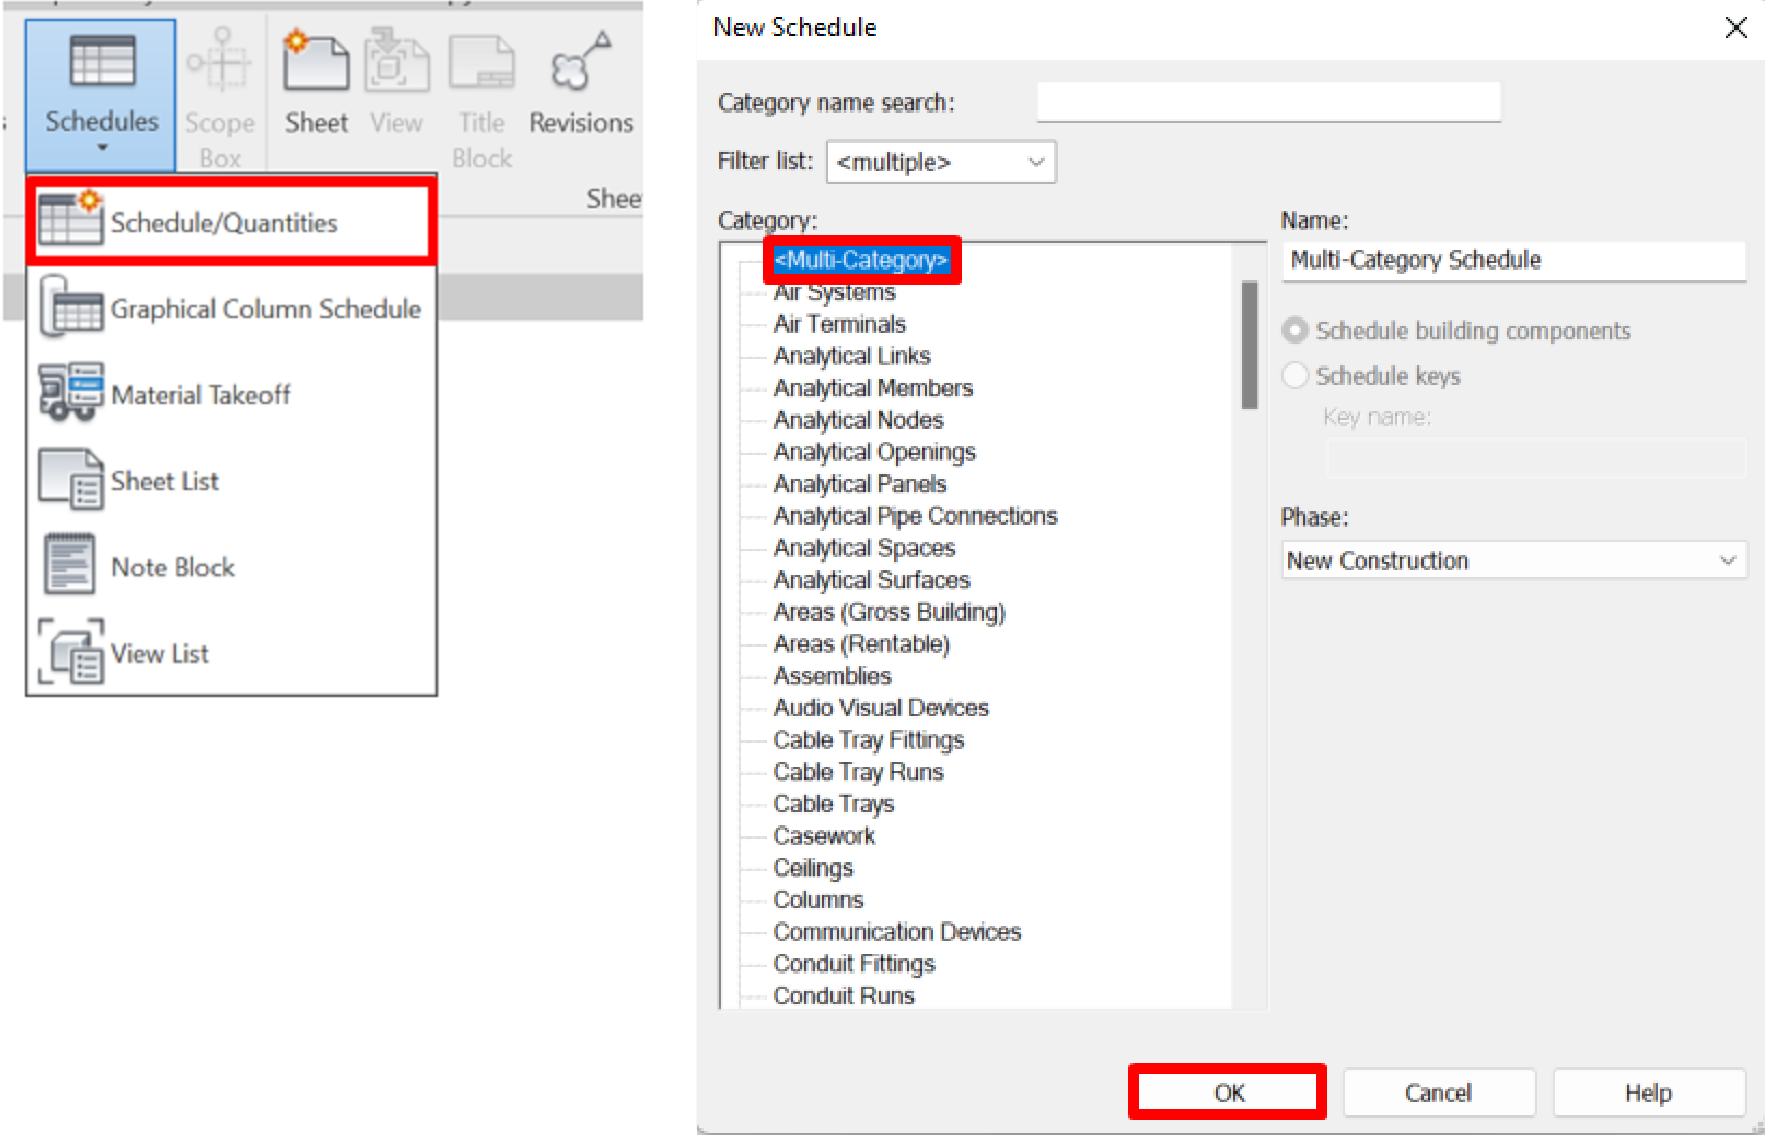
1. Schedule/Quantities
Schedule/quantity take-offs show information about model elements that relate to one or more categories.. That’s why we have “By Category” and “Multi-Category” schedules, respectively.
In these schedules we can consult project parameters of each category, as well as custom shared parameters and parameters of other related categories—such as Rooms, Spaces, Project Information, RVT Links. We can also make them show only the elements modelled in the current file, or those contained in our model’s linked Revit files as well.
By Category Schedules
It focuses on one Revit category and shows the parameters assigned to that category. It works for model categories, detail item families, analytical categories, rooms and areas.
When we create a schedule and select a category, we will be able to choose between two schedule subtypes:
- Schedule building components: It’s a schedule of modelled elements from the selected category.
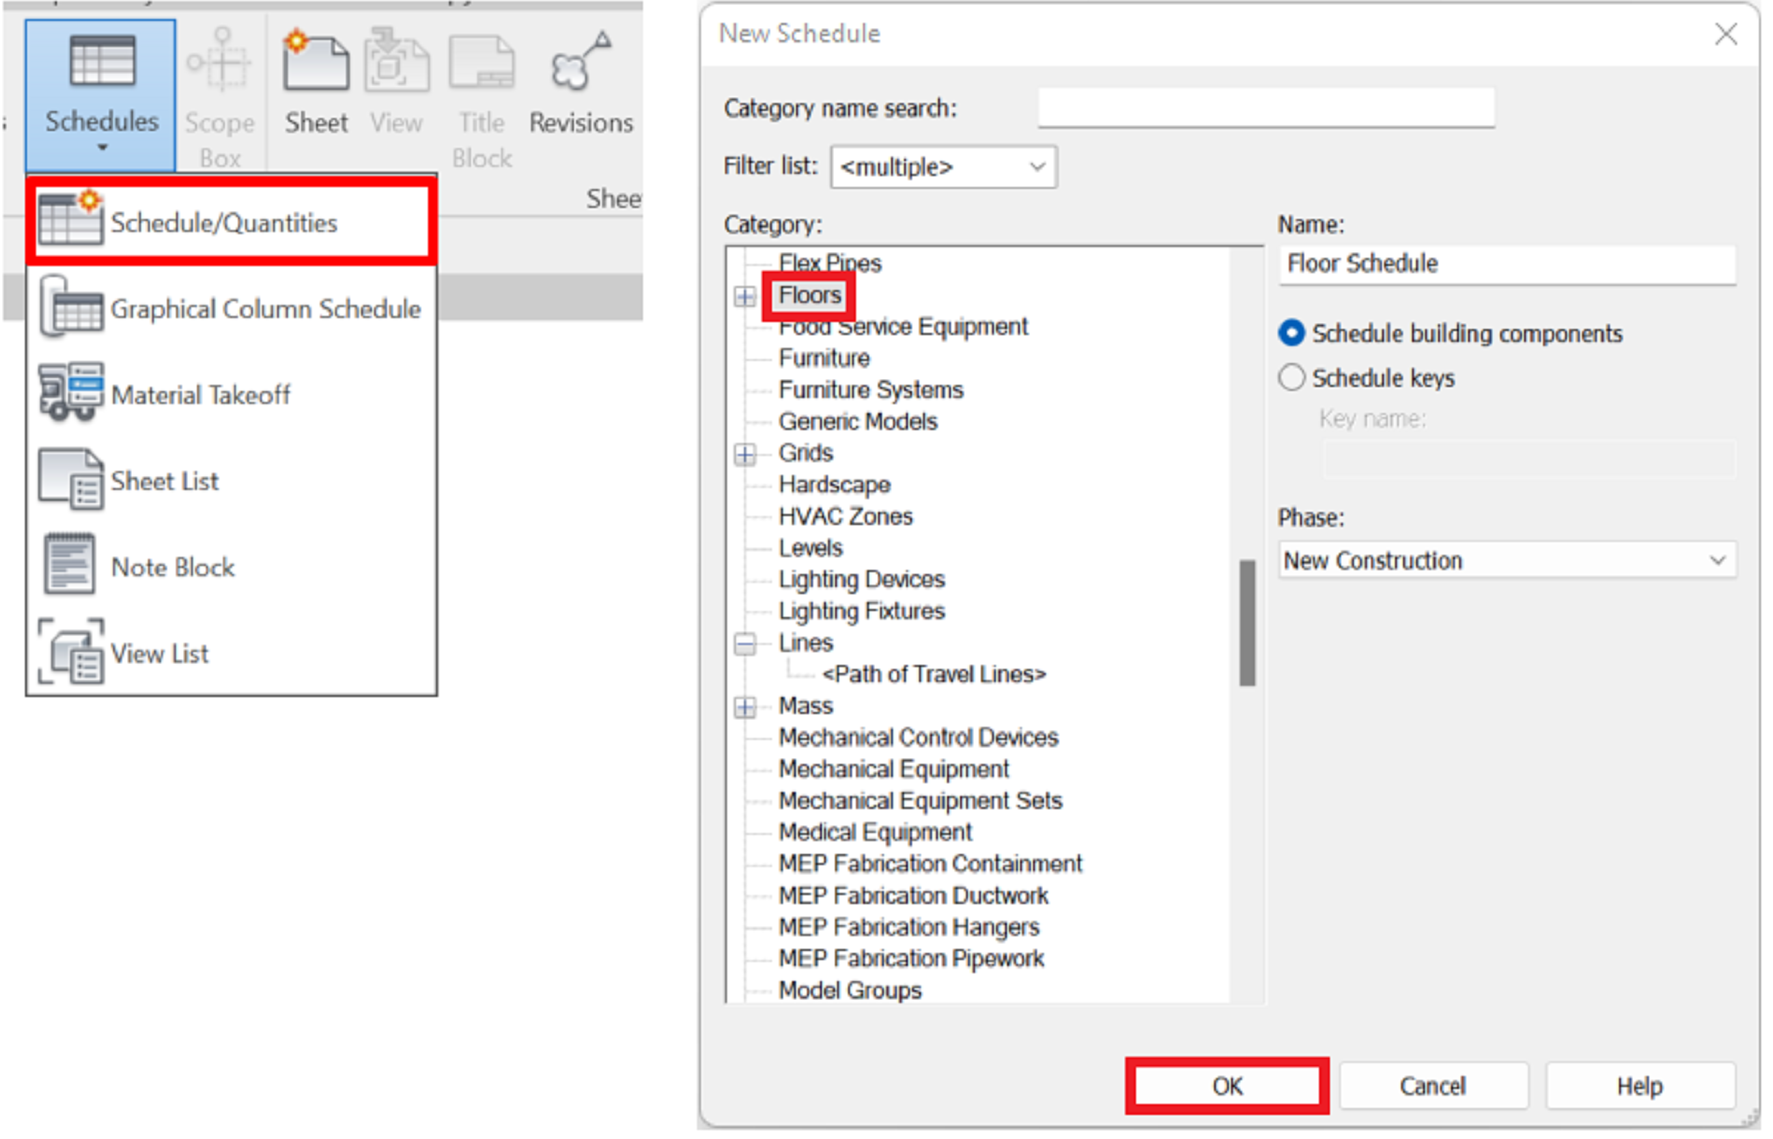
- Schedule keys: These schedules allow us to define keys for automatizing the creation of other schedules, and allow us to batch-complete its parameters. They are frequently used for defining style or design options.
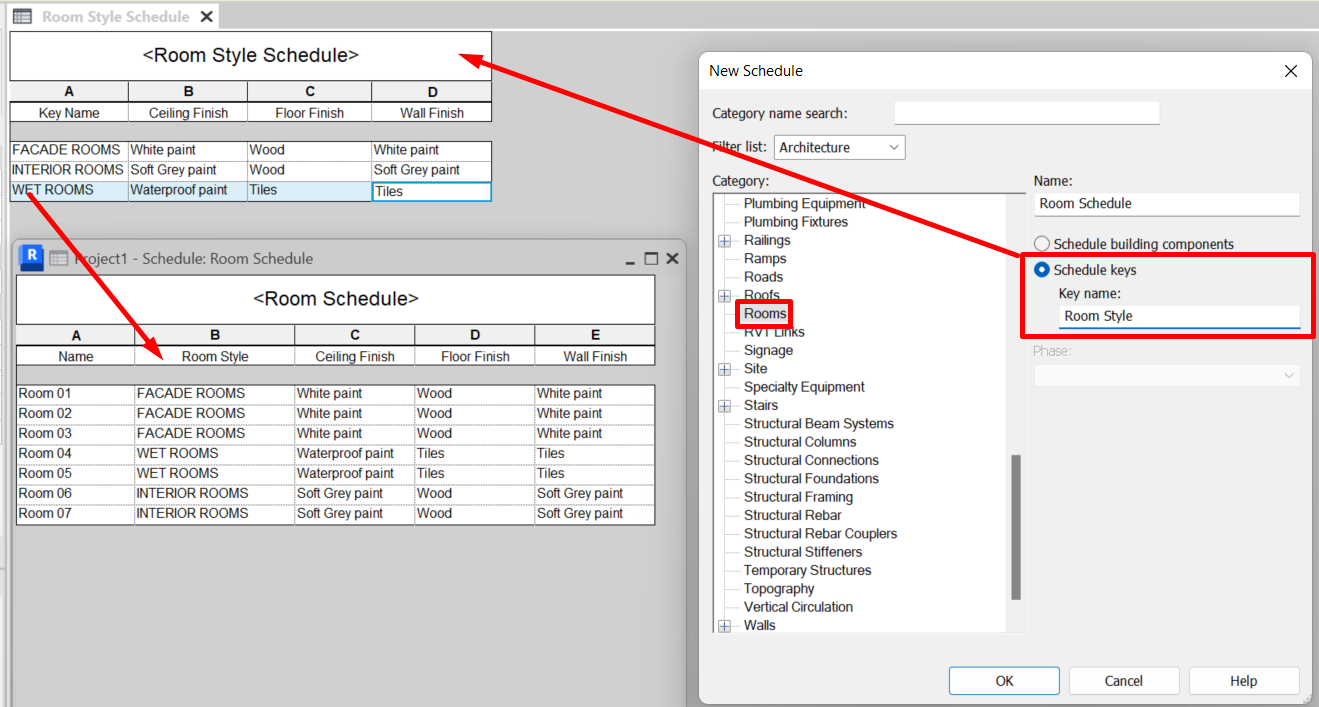
The following would be a typical example:
- We have a model that contains over 100 rooms, to which we need to batch-assign their finishes (ceiling, floor and walls finishes).
- We create a schedule key containing four parameters:
- Key Name: the title of each of the possible “room styles” (for instance: wet room, interior room, façade room, etc.)
- Ceiling finish, wall finish and floor finish: for each room style we define which finishes should be used.
- Finally, we create a room schedule introducing the four parameters that we just created in the schedule key. Each room will be defined by a key name (for instance, every bathroom and kitchen will be wet rooms), and thus the finishes for each of these rooms will be defined.
The schedule keys admit only some of the selected category’s parameters, mainly those related to finishes and materials, but they also allow for shared parameters.
On the other hand, within the schedule key’s editing properties, only the sections Fields, Grouping/Sorting, Format and Appearance are available—the Filters section cannot be edited.
Multi-Category Schedules
This type of schedule shows all model elements, with the following caveats:
- It doesn’t show masses nor areas.
- It only shows parameters that are common to all categories.
- The phase parameters cannot be shown. However, just as in the schedules by category, the phase of the elements to be visualised can be controlled in the schedule’s properties.
- Multi-category key schedules cannot be created.
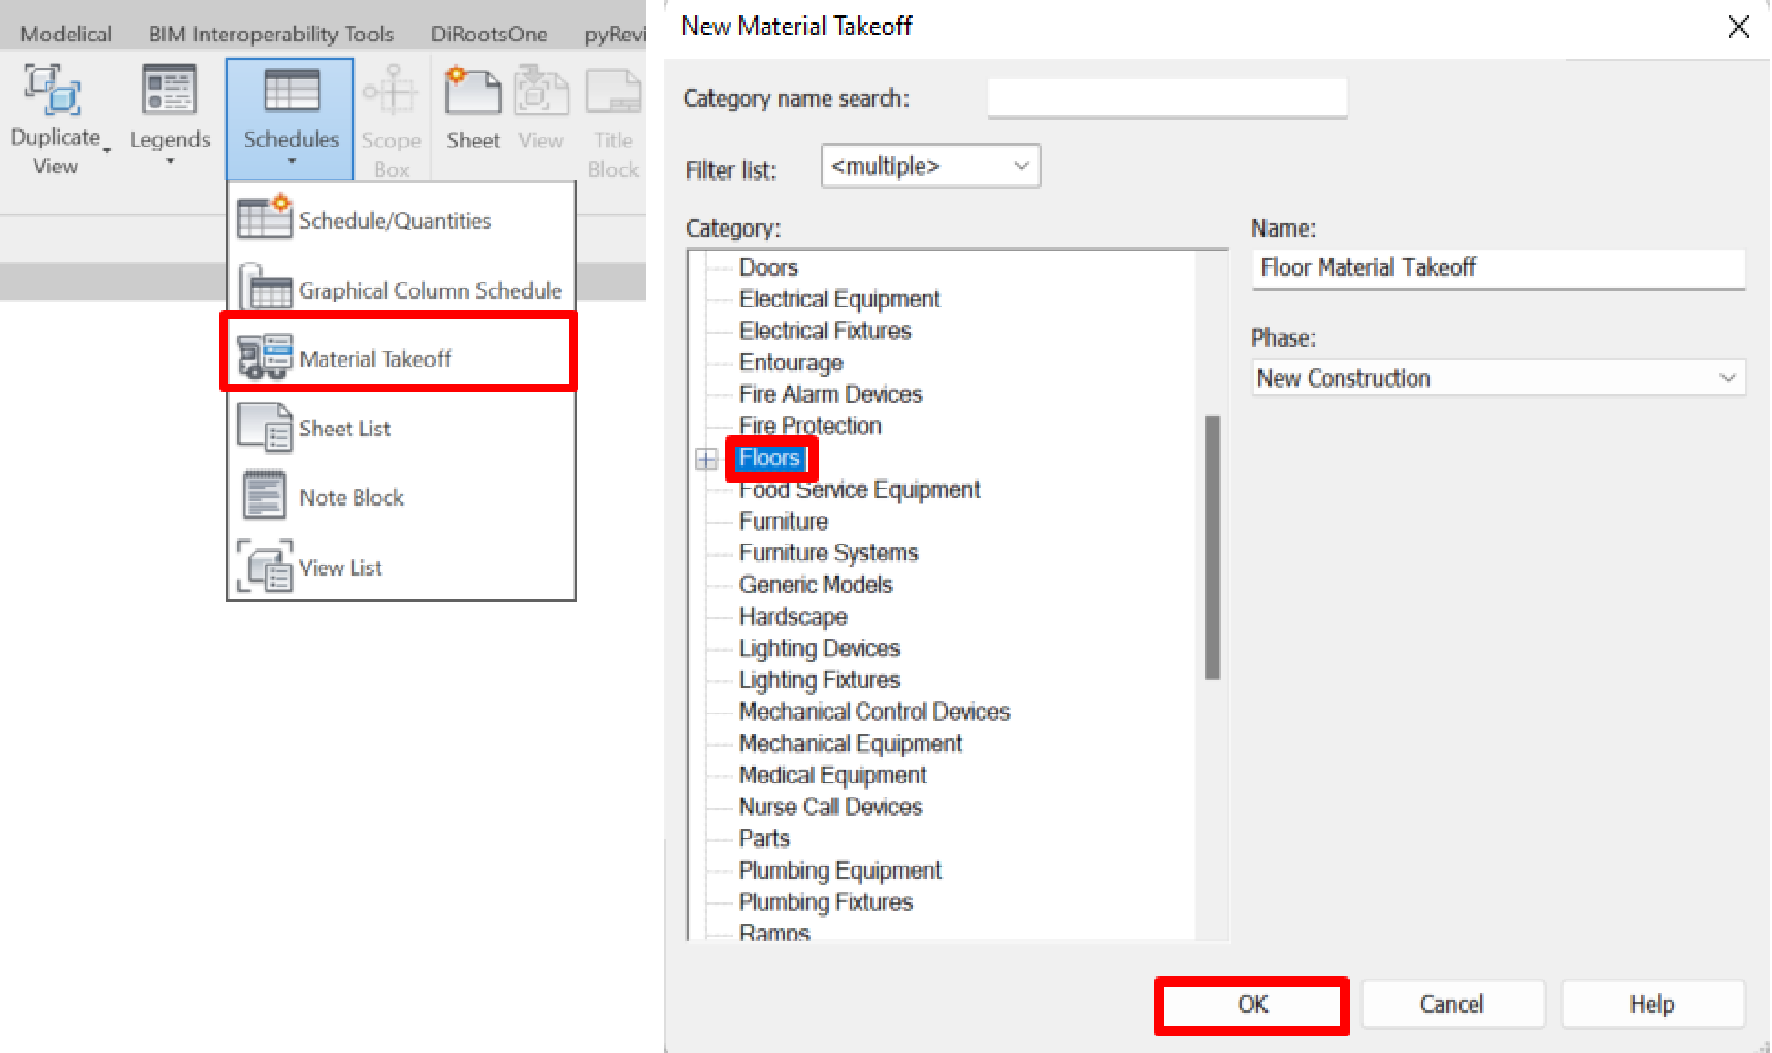
2. Material Takeoff
It details the quantities by material and indicates the elements from which the materials proceed. It’s always necessary to include at least one material parameter.
Here we also find two types of schedules:
- By category: it focuses on one Revit category.
- Multi-category: it includes loadable and system families.
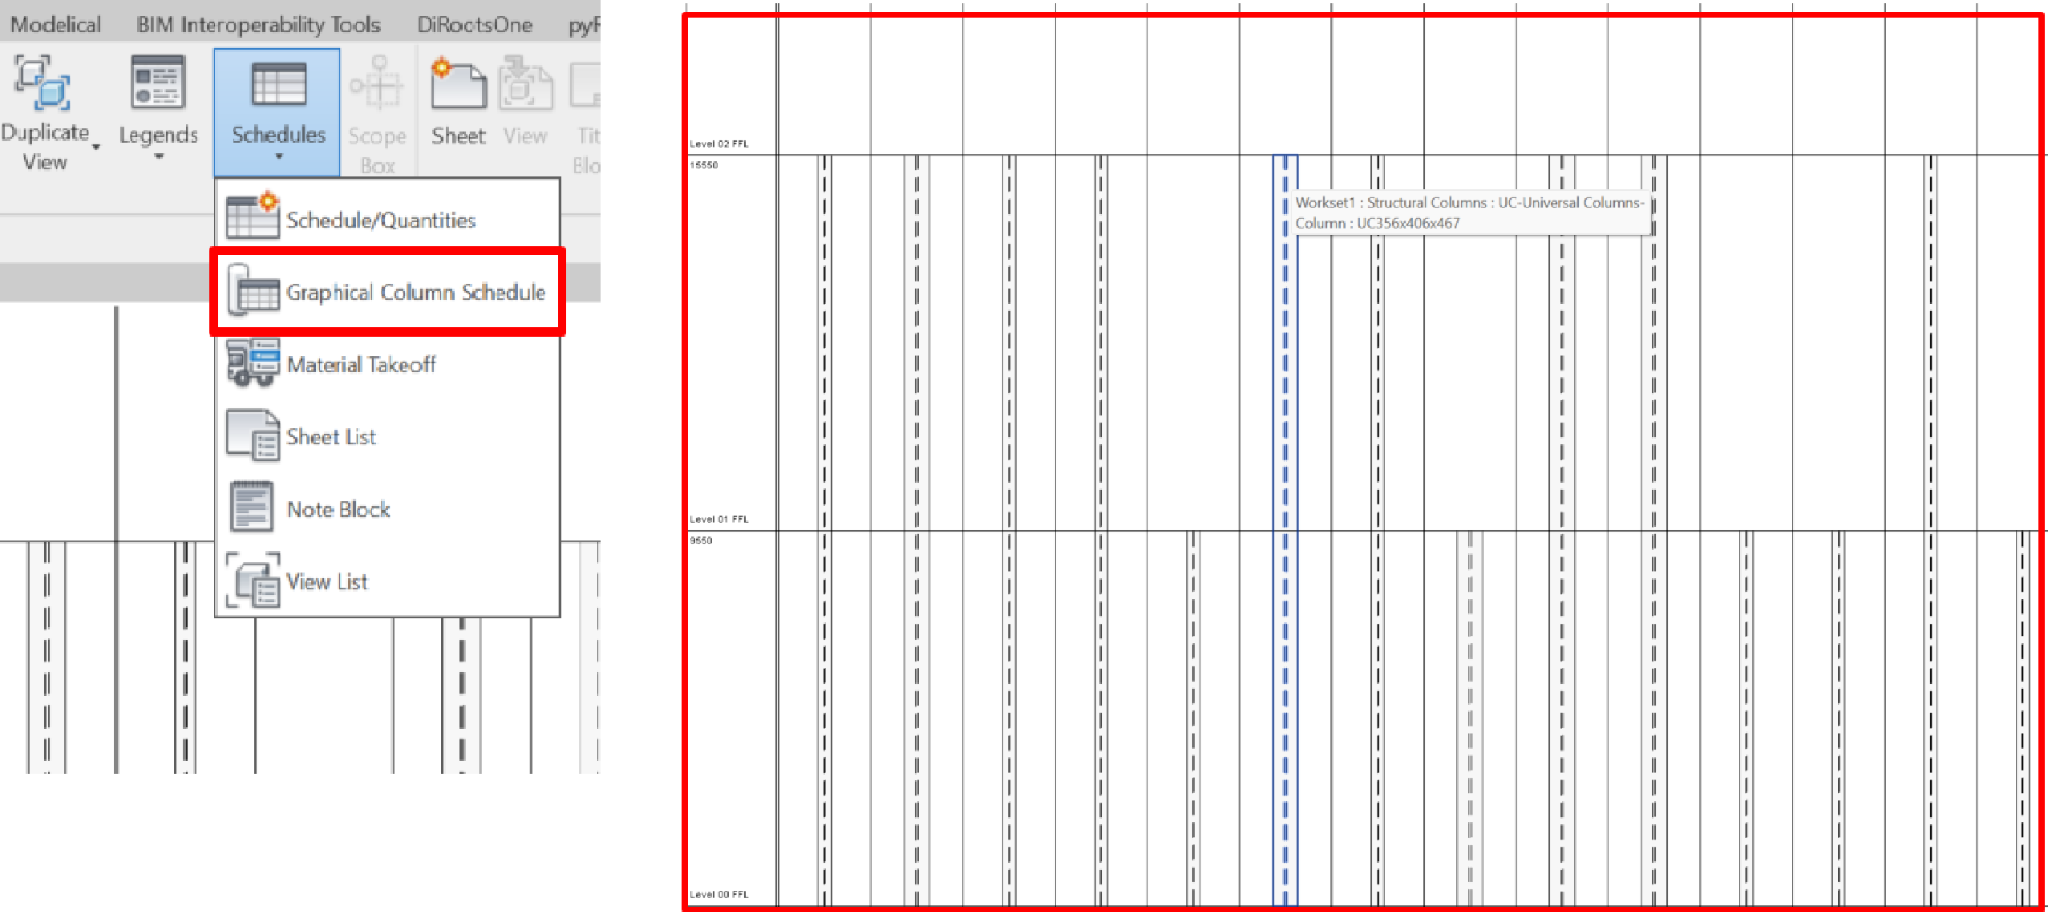
3. Column Graphical Schedule
Structural columns are identified in a column schedule by intersecting grid lines and by their top and bottom constraints and offsets. It’s worth noting that this schedule only affects the structural column category, not the architectural ones.
It can only be created within a model that includes structural columns, and only those modelled in the current file can be shown. To be able to see a link’s structural columns we should copy and monitor the linked columns into the model containing the column graphical schedule.
The structural columns are shown in sectional view, not in plan view as we are used to seeing in structural plans. This cannot be changed.
4. Sheet List
Sheet lists are a fundamental tool for tracking the project. They are schedules that show the project’s sheets, and they typically include some project parameters such as sheet number and sheet name, as well as shared parameters to help us group, classify and review them.
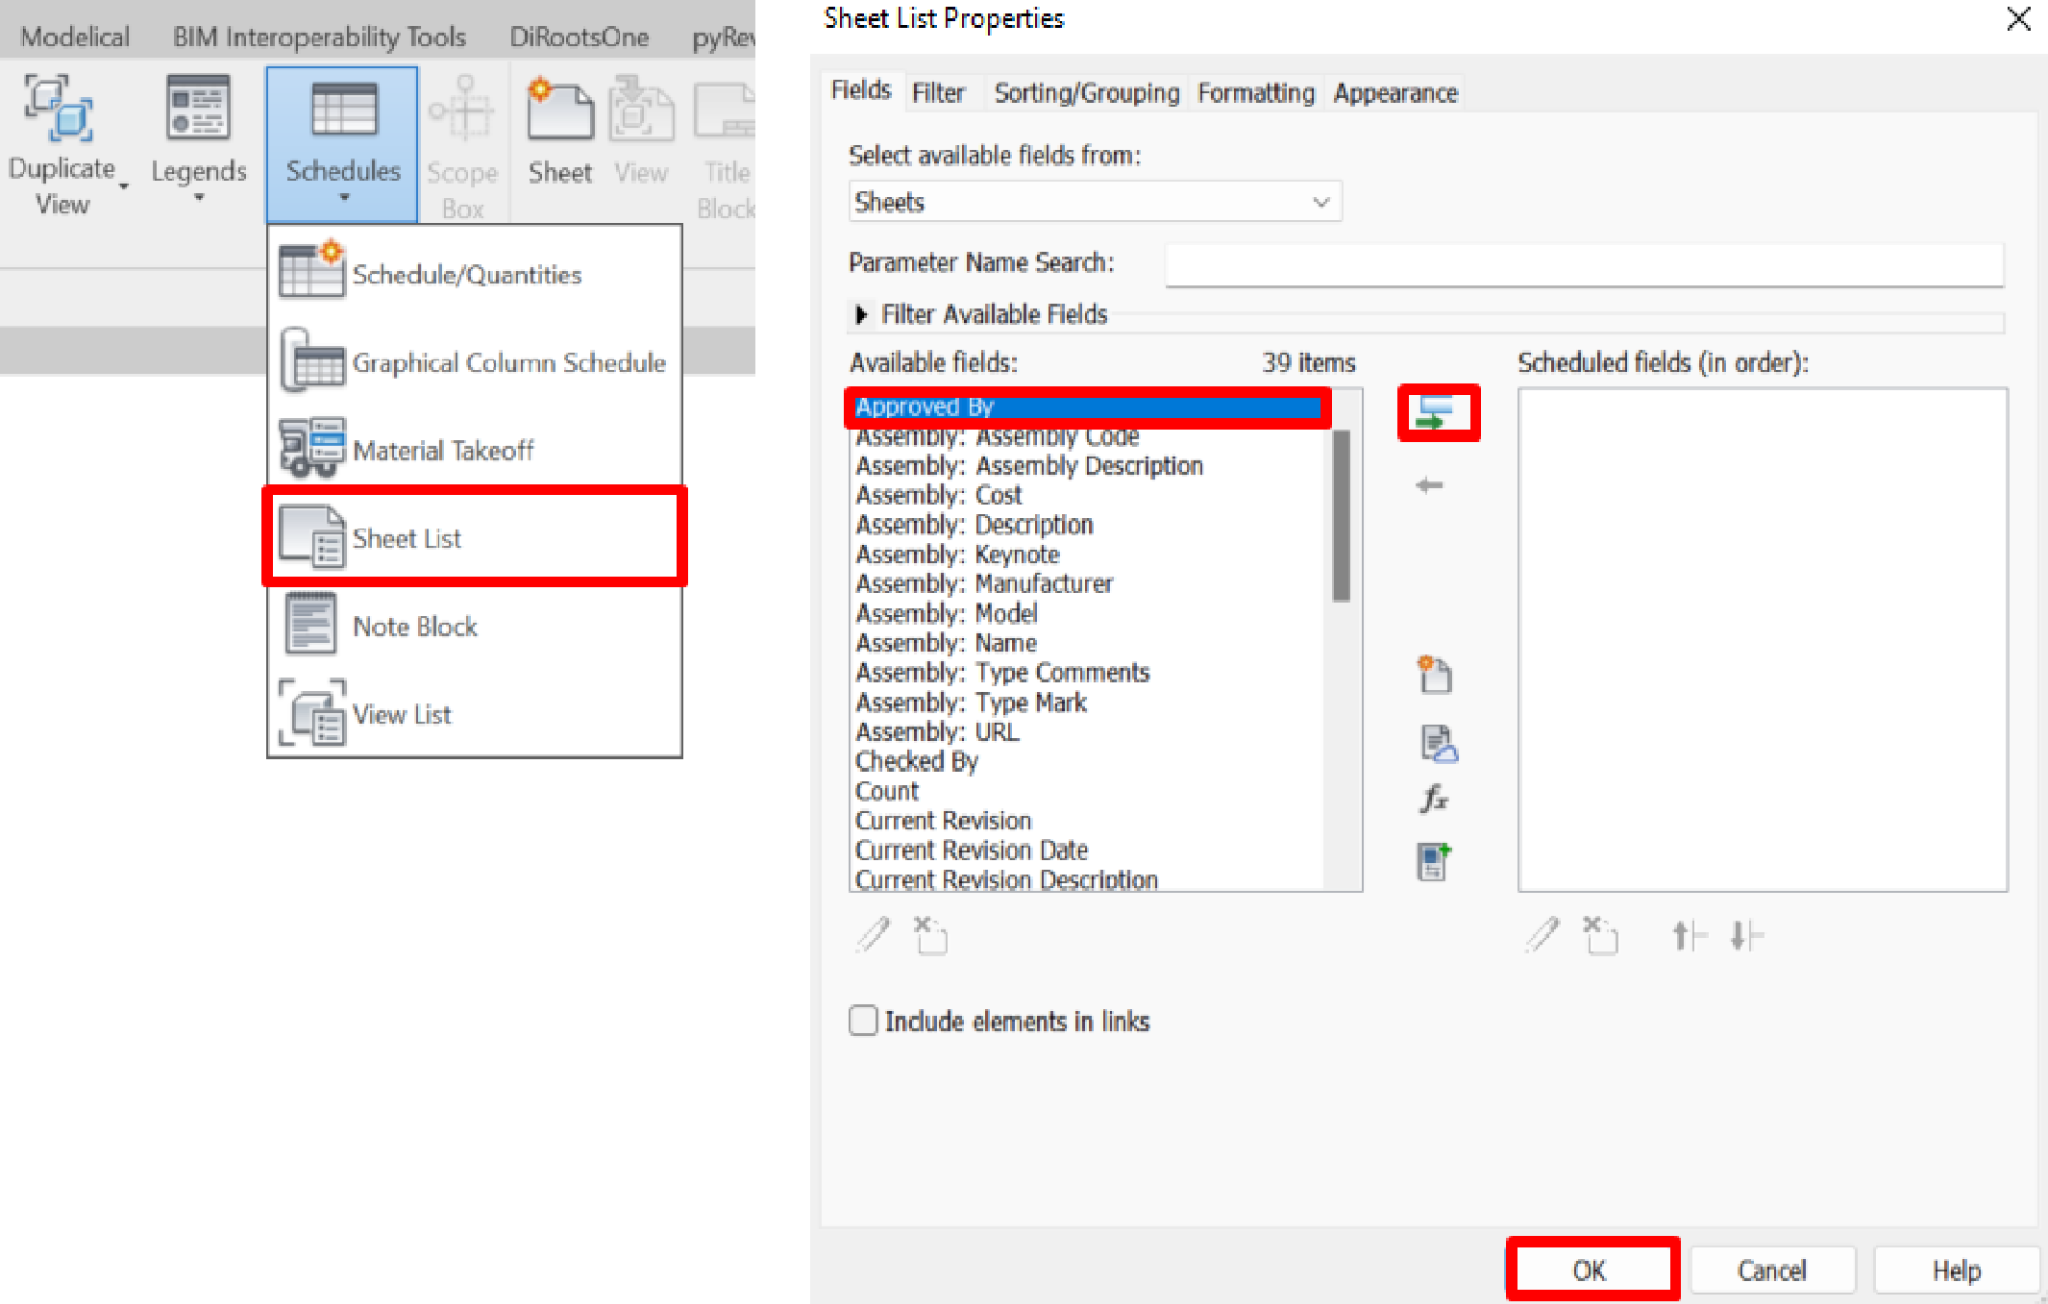
In them we can create entries corresponding to sheets before they are created in the model, as placeholders.
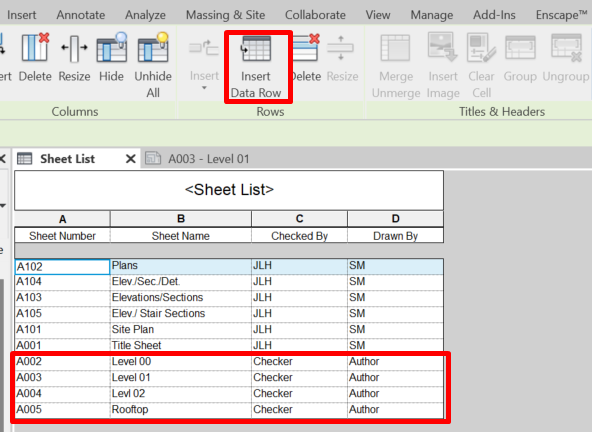
- To do this, with the schedule opened, in the Rows group of the upper menu, we will click on Insert Data Row to include a new, empty entry. We have just created a placeholder for a sheet, to which we can now assign each of the parameters loaded in the schedule—but which does not yet (physically) exist in the model.
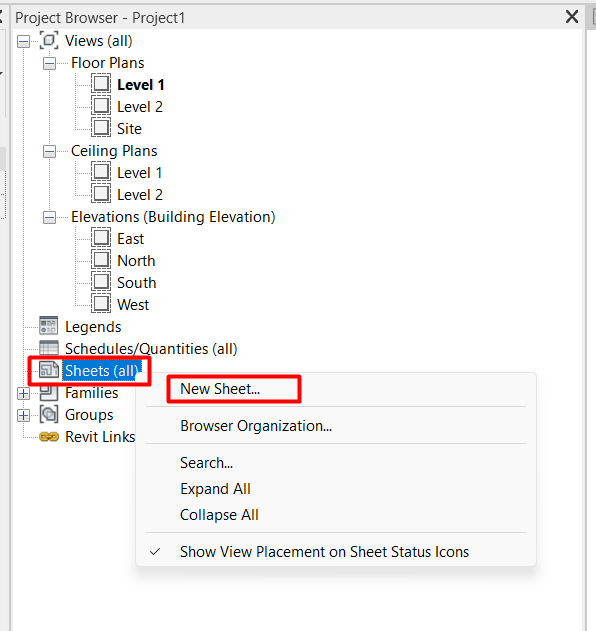
- To create in the model the sheets that were previously defined as placeholders, we can go to the project browser and right-click on Sheets > New Sheet… A new window will open with all the placeholders that exist in the schedules but are not yet created in the project.
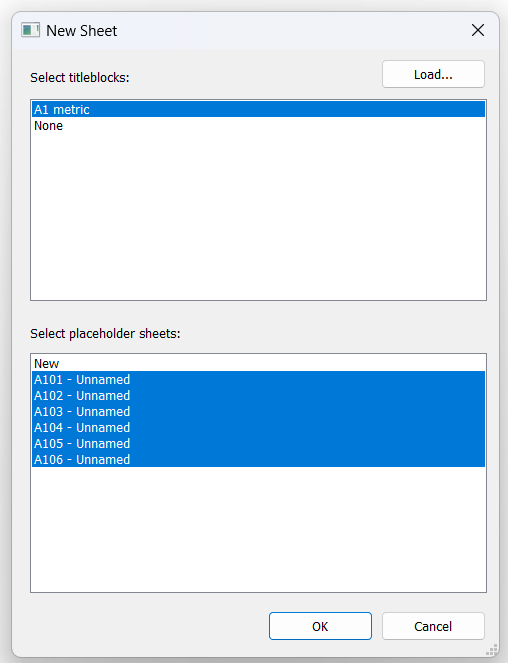
- Once we have selected all the placeholders we want to create and the titleblock we want to use, we click OK and the sheets are created with their parameters correctly assigned.
It’s always advisable to have an external file with the full list of project sheets with each of the defining parameters’ values. The project’s BIM Manager should manage this file assuring the quality and consistency of all its data, since by their nature they are quite sensitive data about the project. To do so, he can extract the sheet list by exporting it for control into a different software (see the section 4. Exporting a Schedule of Creating and Setting Up Schedules).
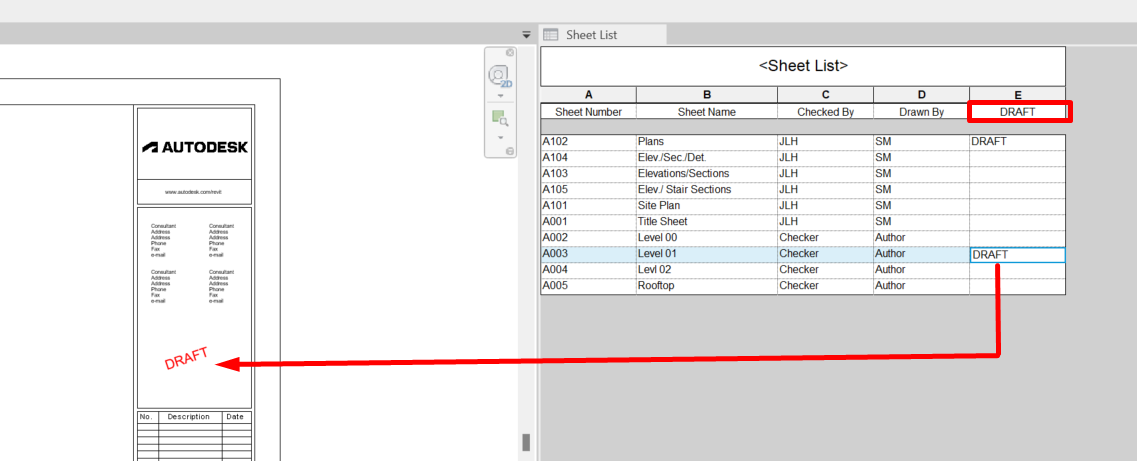
We can also control the titleblock families’ parameters such as Drawn by, Checked by, Designed by or Approved by. Furthermore, we can control shared text parameters, for example if we wish to add some extra information to a sheet, like an indication on whether it’s a draft.
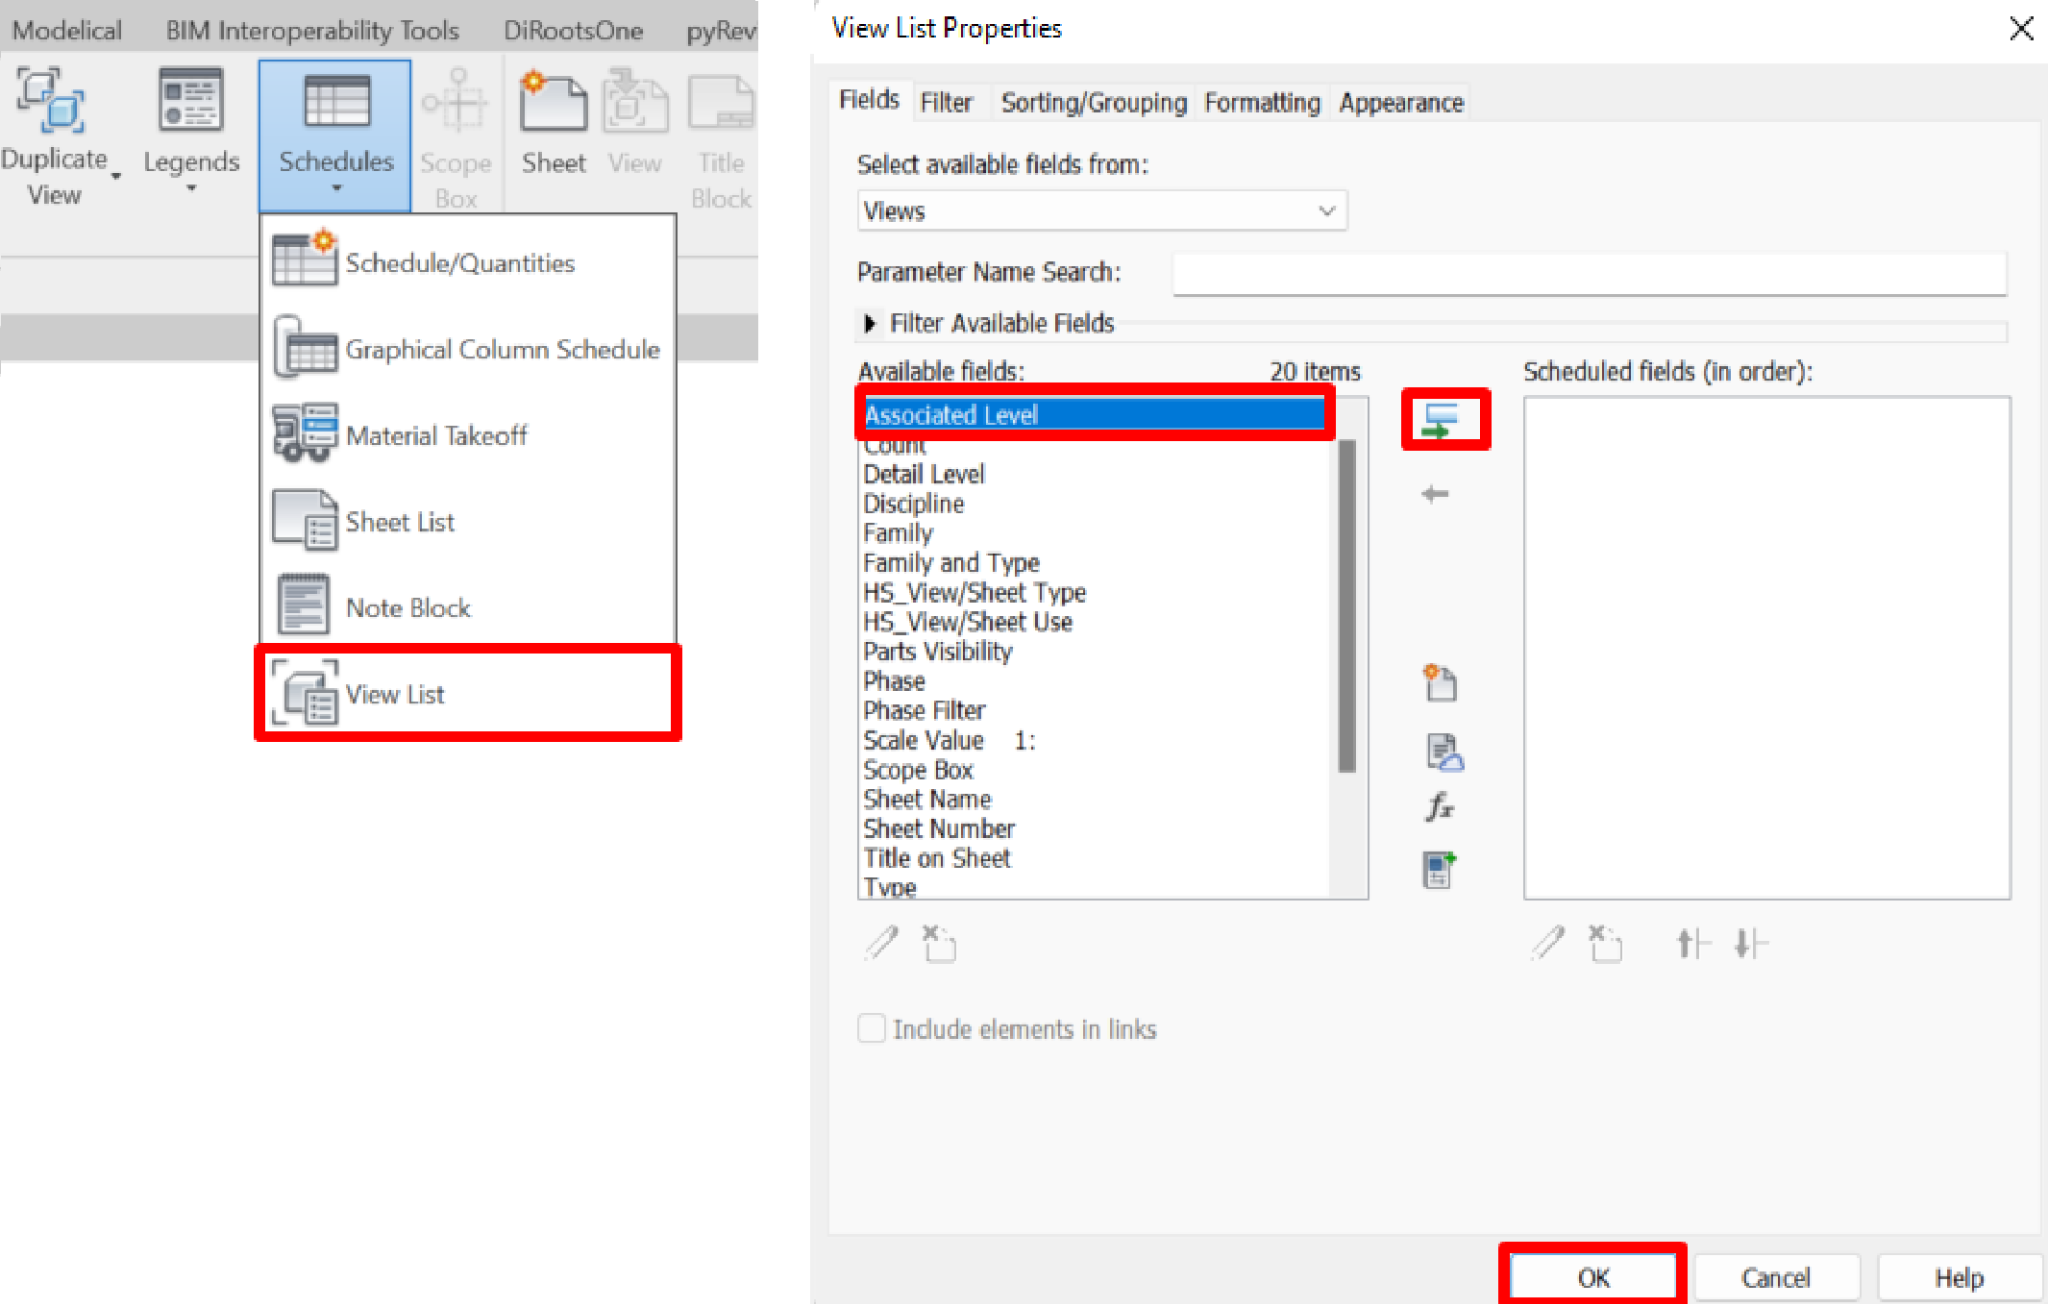
5. View List
It shows the views in the model. It’s a useful element when controlling a model’s views, making batch-changes on them, and controlling that certain settings are right regarding important views that constitute the project’s documentation.
One useful example is to sort and classify the views according to the project browser’s parameters, which allows for a full visualisation of the views that follows the same structure as the project browser—so that we can quickly identify views with wrong or missing parameters.
6. Note Block
It shows a symbols schedule (category: Generic Annotation). The symbols are loadable families that can have useful parameters.
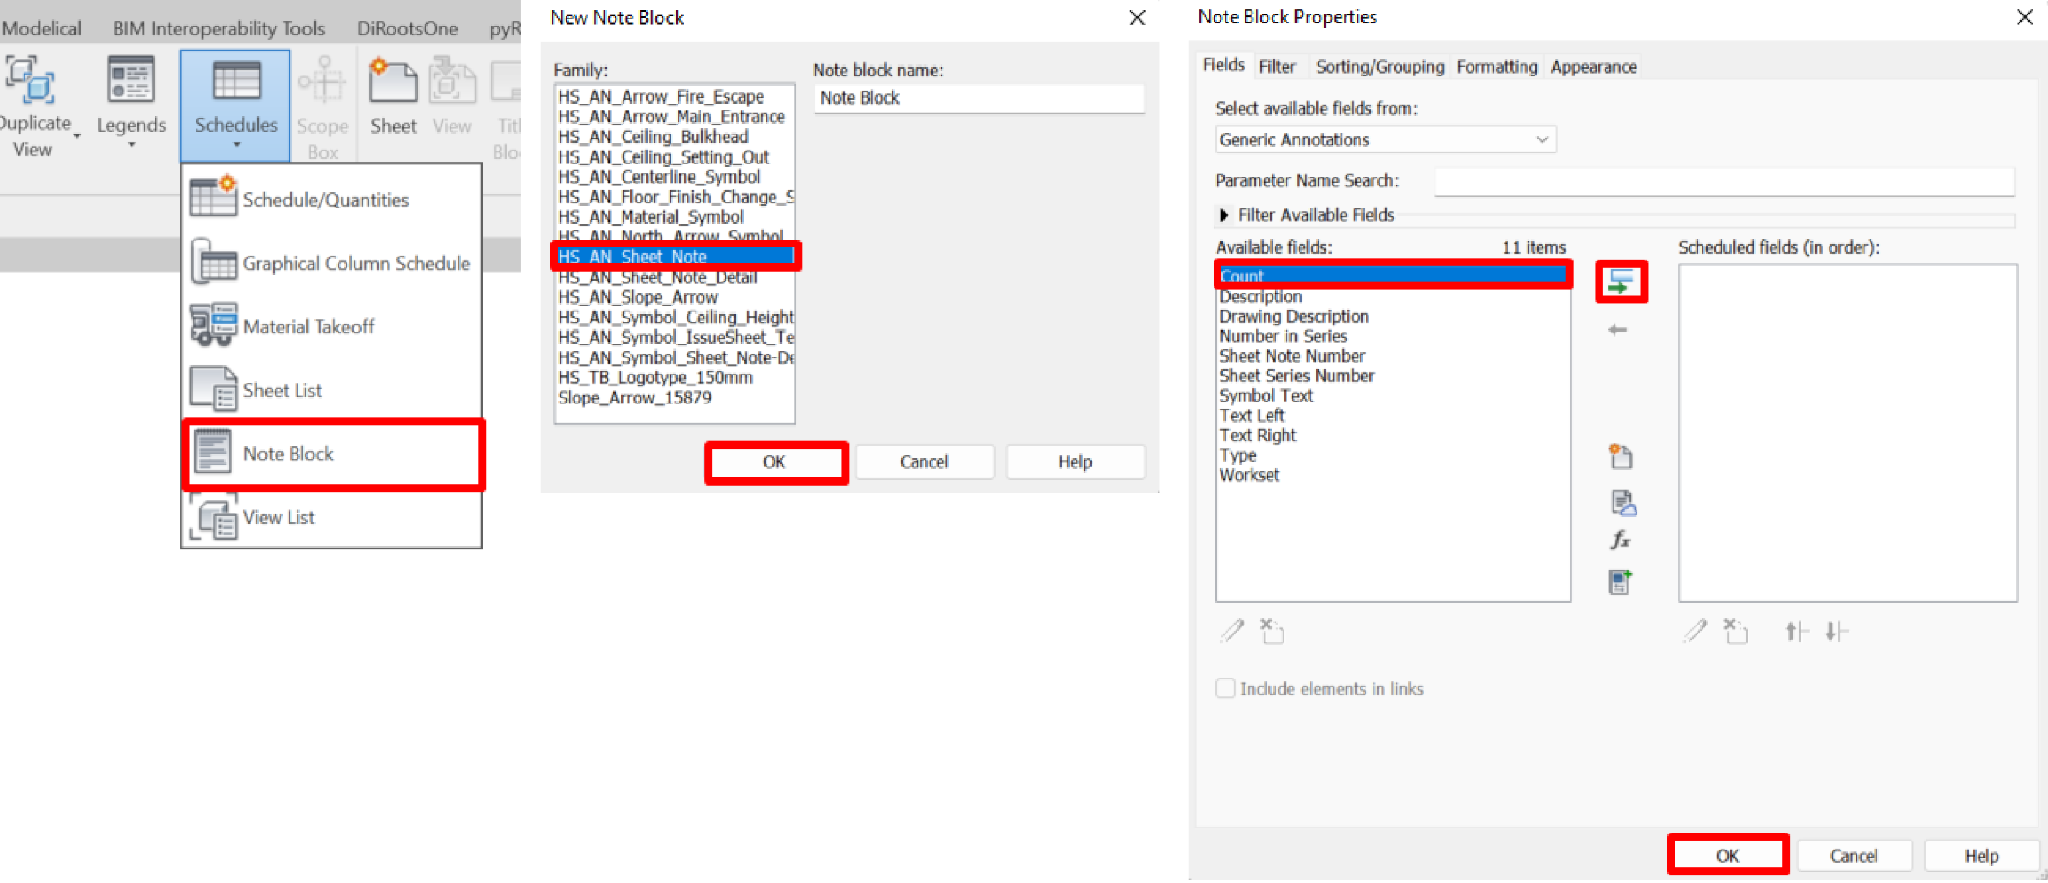
One example could be an annotation family for custom reviews which includes two parameters, for instance: incidence number and incidence description. If we review sheets by placing this family in various zones, we can finally include a note block inside the titleblock, indicating which revisions are found in the sheet, with the corresponding descriptions. It is a quick and orderly way of showing comments and corrections.
Additional Schedules
Revit allows for the creation of other types of specific schedules.
1. Electrical Panel Schedule
When working with electrical elements, Revit allows us to create Panel schedules, which can be found in the Reports & Schedules group, on the Analyze tab.
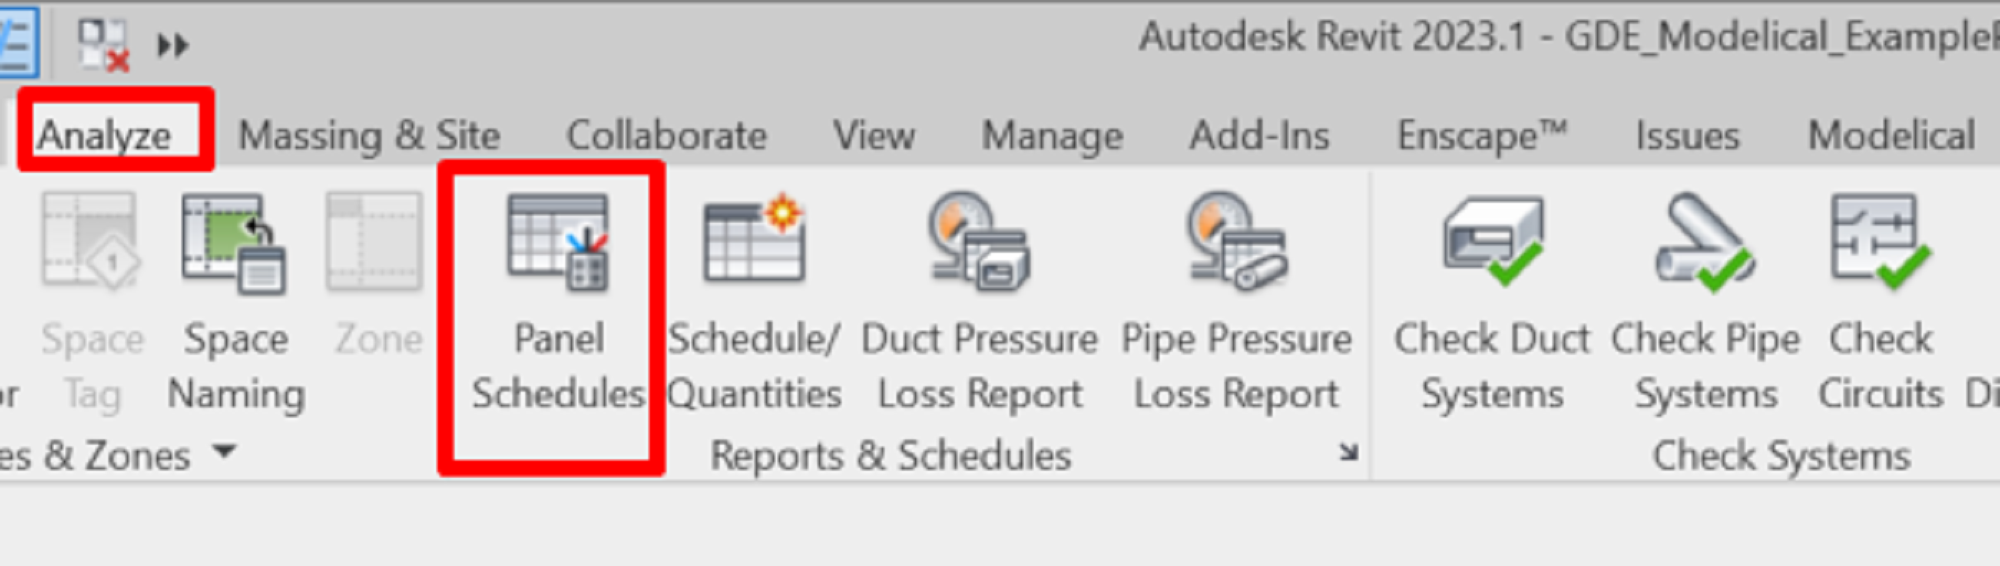
Panel schedules contain information regarding the electrical panels and their associated circuits, and allow us to manage the electrical loads registered in them. They can only be created in models containing electrical panels, and they can be made for just one panel or a set of panels.
2. Revision Schedule
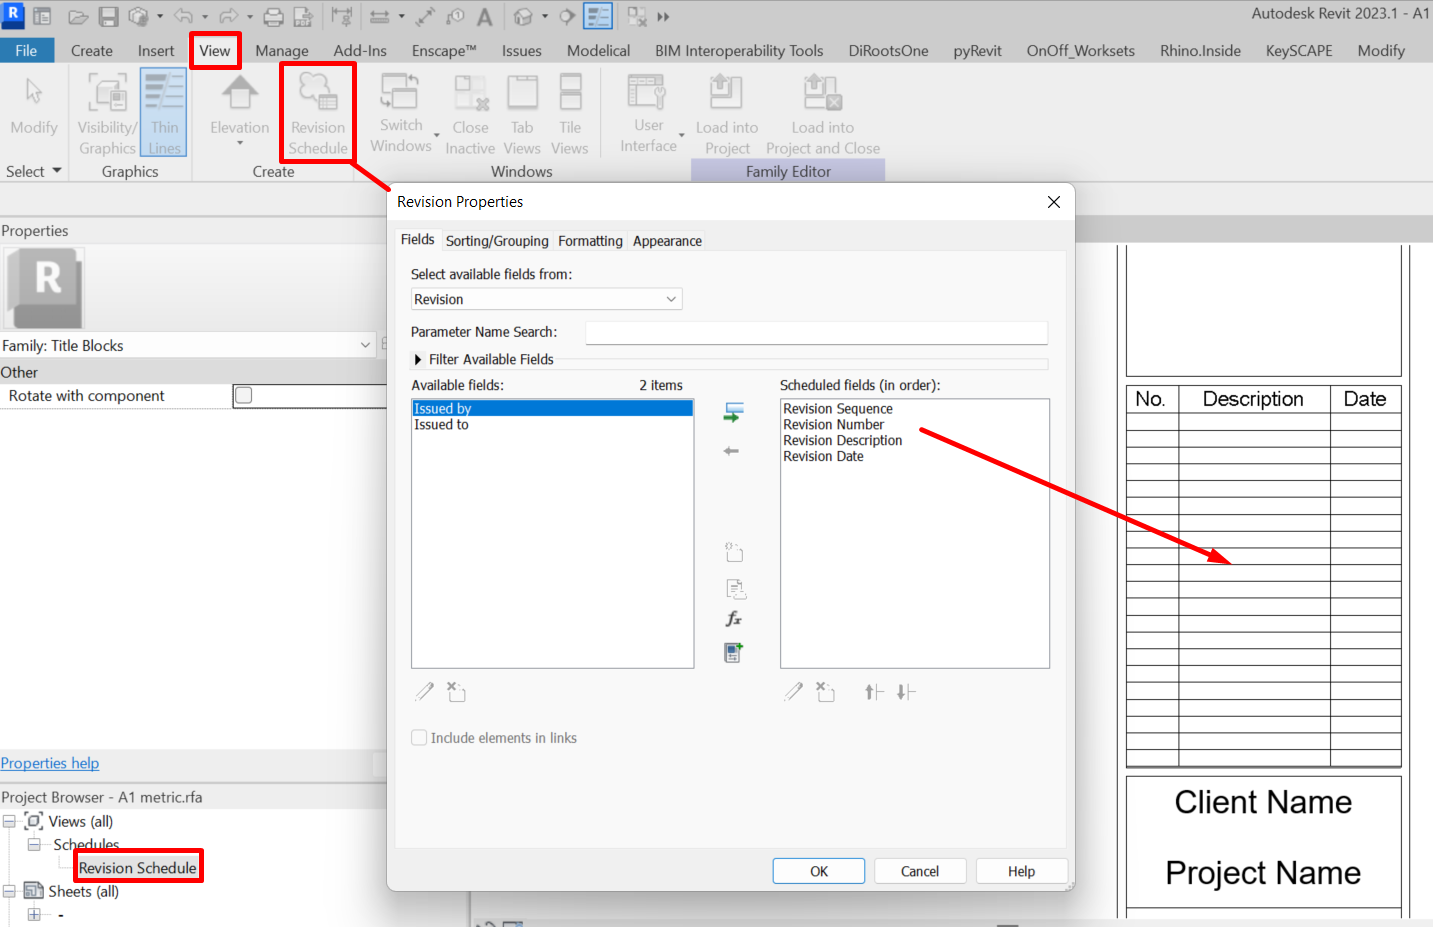
Within the titleblock families, Revit allows us to create Revision schedules.
To create these schedules, we open a titleblock family and click on Revision Schedule, in the Create group, on the View tab.
The schedule settings are just like those of any other schedule, although we cannot use the Filter section. Once created, it will show up on our project browser and we’ll be able to place it inside the titleblock.
We should keep in mind that this schedule will pick up the information of the revisions made in the sheets or in the project. The management of incidences or revisions in the project is done with Revisions, in the Sheet Composition group, on the View tab.
Creating and Setting Up Schedules
1. Creating a Schedule
View tab > Create group > Schedules menu > Pick the schedule type.
Created schedules can be visualised in the Schedules/Quantities (Schedules) section of the project browser.
We can also create a schedule by right-clicking on Schedules/Quantities (Schedules).
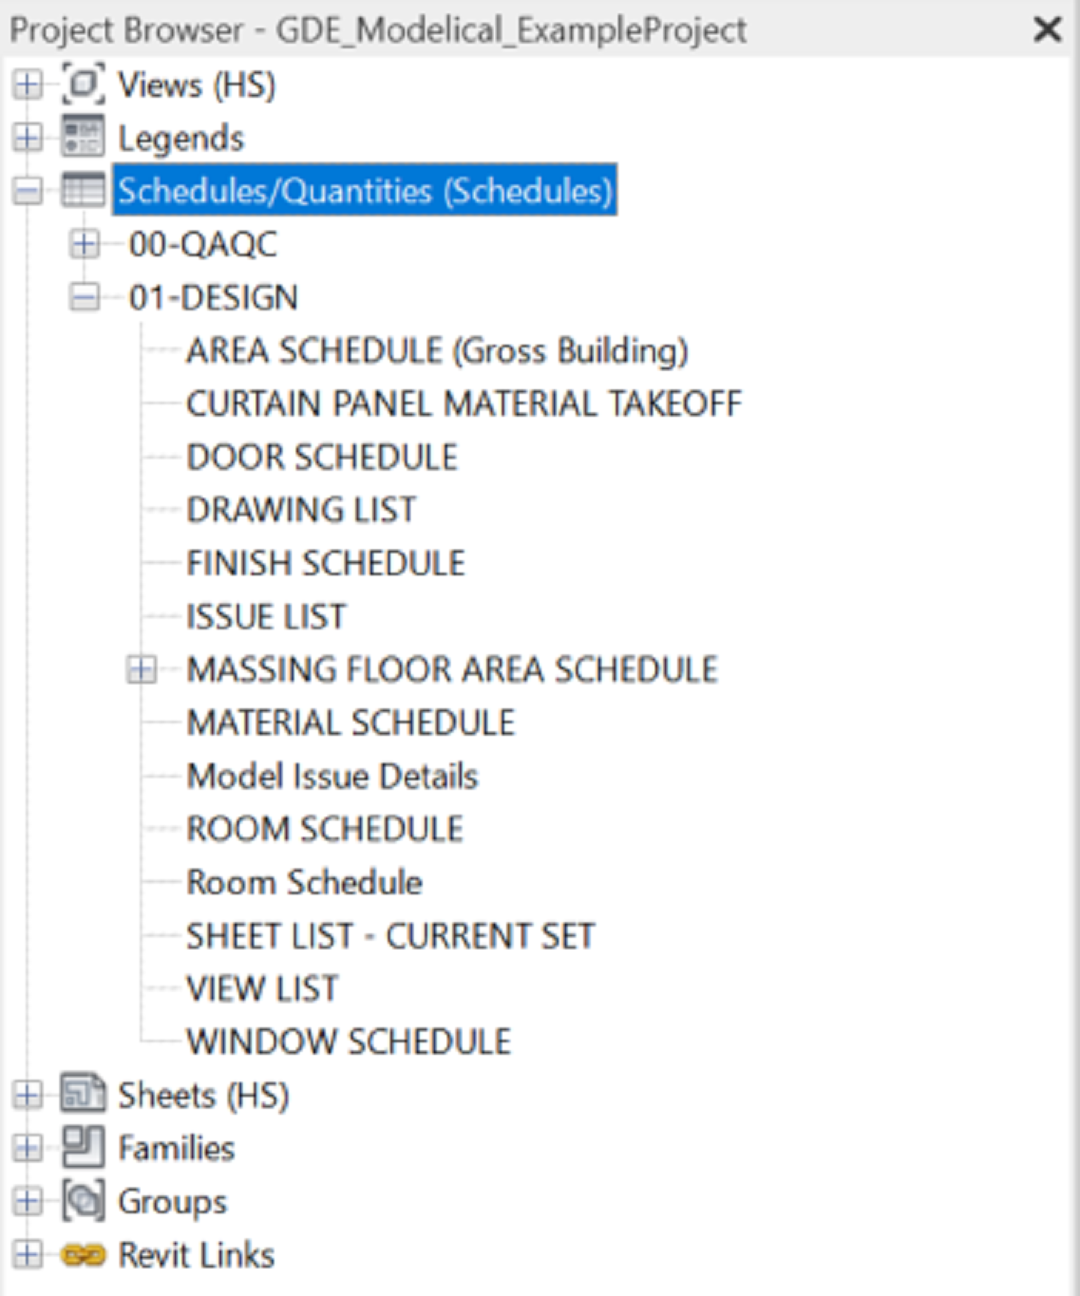
Once the schedule has been created, it can be accessed whenever we need it, be it for consulting, editing, or working with it—in the same way as with any other view in the project. In the same way, we can also change the schedule’s phase and phase filter.
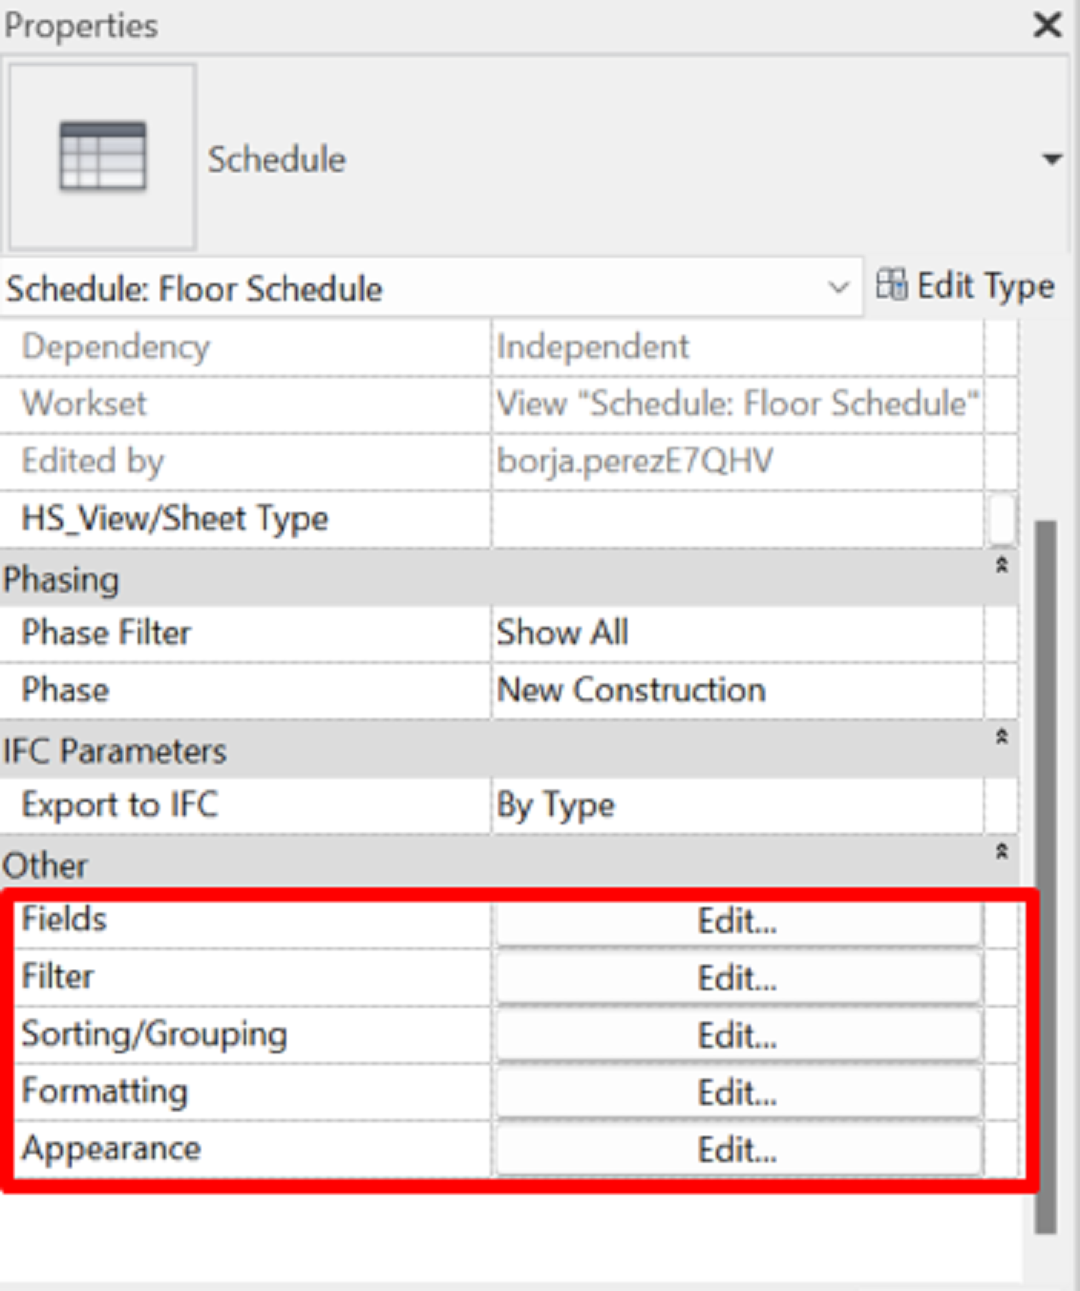
Once the schedule is open, the properties menu will show the tabs where we'll be able to configure the different aspects of the schedule.
This menu can be found at the bottom of the properties window, and can be opened at any time to edit the schedule as needed. It consists of five different sections:
- Fields
- Filters
- Sorting/Grouping
- Formatting
- Appearance
1.1 Fields Tab
In this section we can select the fields that will make up the schedule. The fields are the available parameters for the selected category.
This means that, for a single-category schedule, the available fields will be those applicable to the elements of that category. The parameters that will show up are system, project, and shared parameters.
In a multi-category schedule, the available fields will be those common to all the selected categories, as well as the shared parameters.
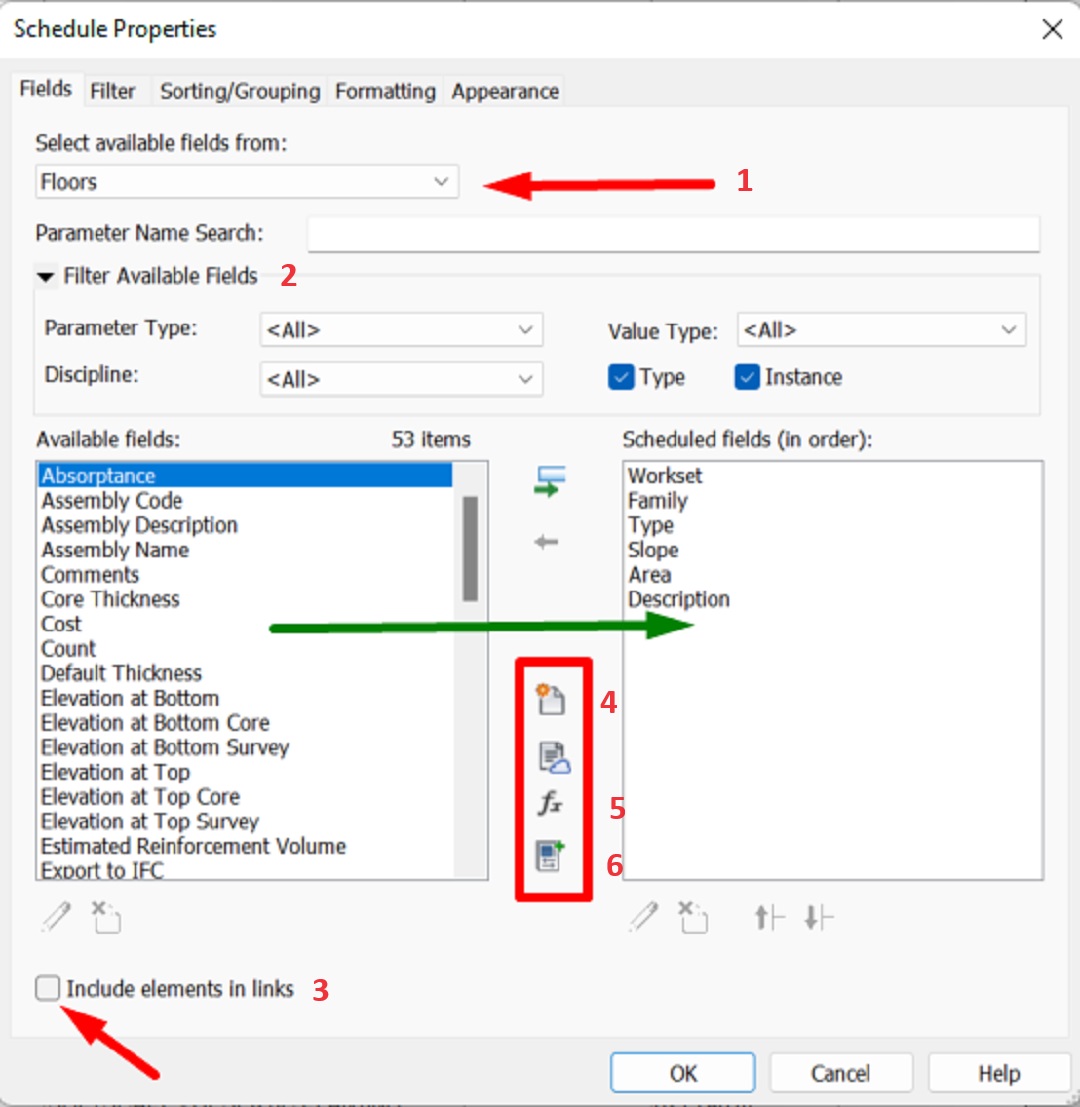
The list on the left (Available fields) shows all the available fields for the selected category. The fields we add to the list on the right (Scheduled fields (in order)) define the columns of our schedule, and the order of these fields (from top to bottom) defines the order of the schedule’s columns (from left to right).
Some other options to pay attention to in this window:
- Select available fields from:
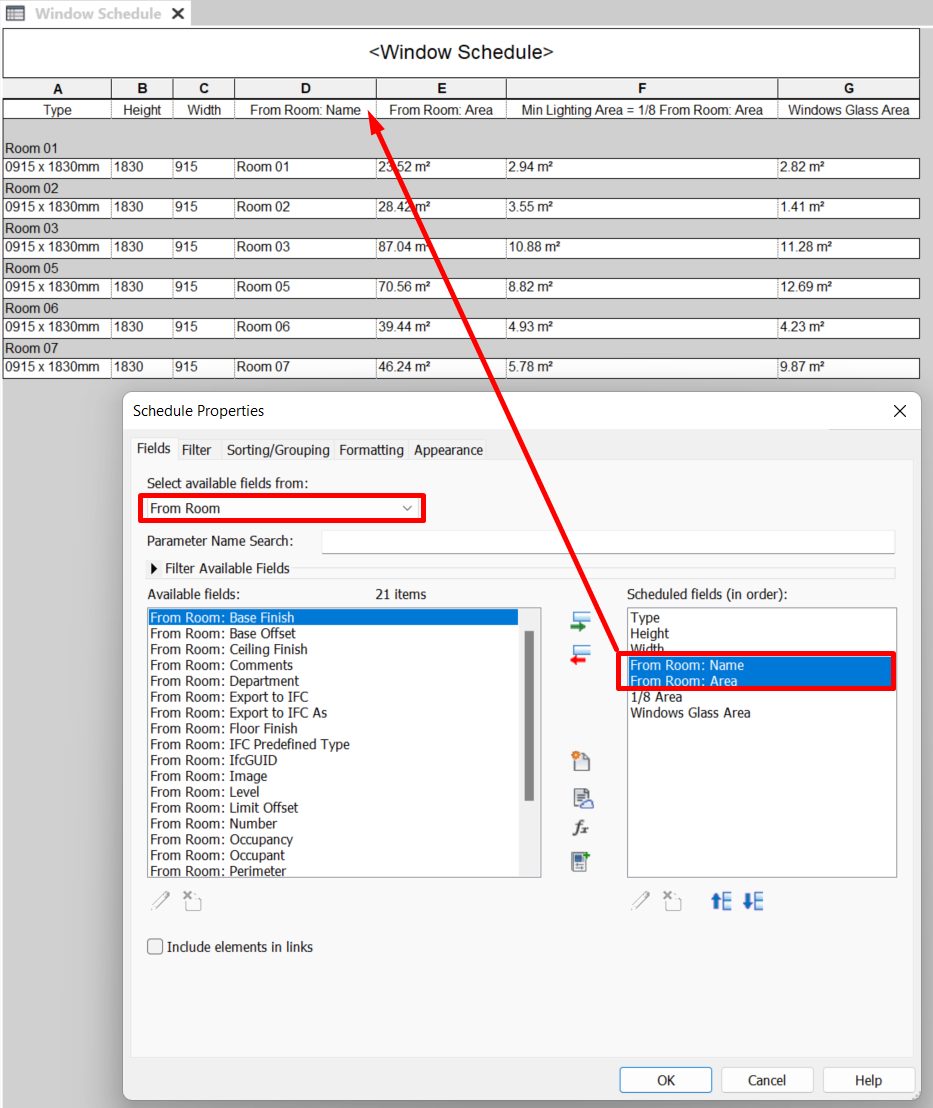
Both in single-category and multi-category schedules we can add fields from other related categories. The additional fields usually correspond to rooms, spaces, project information and RVT links; though sometimes we can have some other fields, like Structural Material or Analyse fields.
An example of how these additional fields can be useful is when adding names or surface information (From Rooms or To Rooms) to a window schedule. This exercise can allow us to calculate the minimum ventilation and lighting for the rooms in a dwelling—which, in many cases, is required by regulations.
To do this, it has to be taken into account that the parameter Room Calculation Point must be previously activated in the window or door families.
- Parameter Name Search & Filter Available Fields
We can search by parameter name or filter available fields by their type (system, project, shared parameters…), type value (material, cost, dimension parameters…), discipline (coordination, architecture, structure…) or whether they are type or instance parameters.
- Include elements in links
Checking this box will add to the schedule all elements of the selected category that are not modelled in the current file, but within the RVT links. This is a useful option for obtaining information from other linked models if the project is divided in multiple files by discipline or because of size.
A recurring example would be a documentation model containing only sheets: if we add the geometry through linked files, we can extract measurements for all the elements by checking this box in the schedules.
- Add Parameter
With this option we can add a parameter, not only to the schedule, but to the model, for every element of the schedule’s category—as if we were creating it through the Manage tab. The new parameter can be a project or a shared parameter (see Parameters Guideline).
It’s worth noting the importance of the proper use of shared parameters in these cases. It’s quite common to end up with tens of different parameters that are called the same in each one of our families, which in the end complicates their management. By using these parameters and a shared parameters file common to all our models we can avoid this kind of problem.
We can also check the “Add parameters from service” option in Revit, which allows us to use the shared parameters on Autodesk Construction Cloud controlled by the account manager.
- Calculated Value
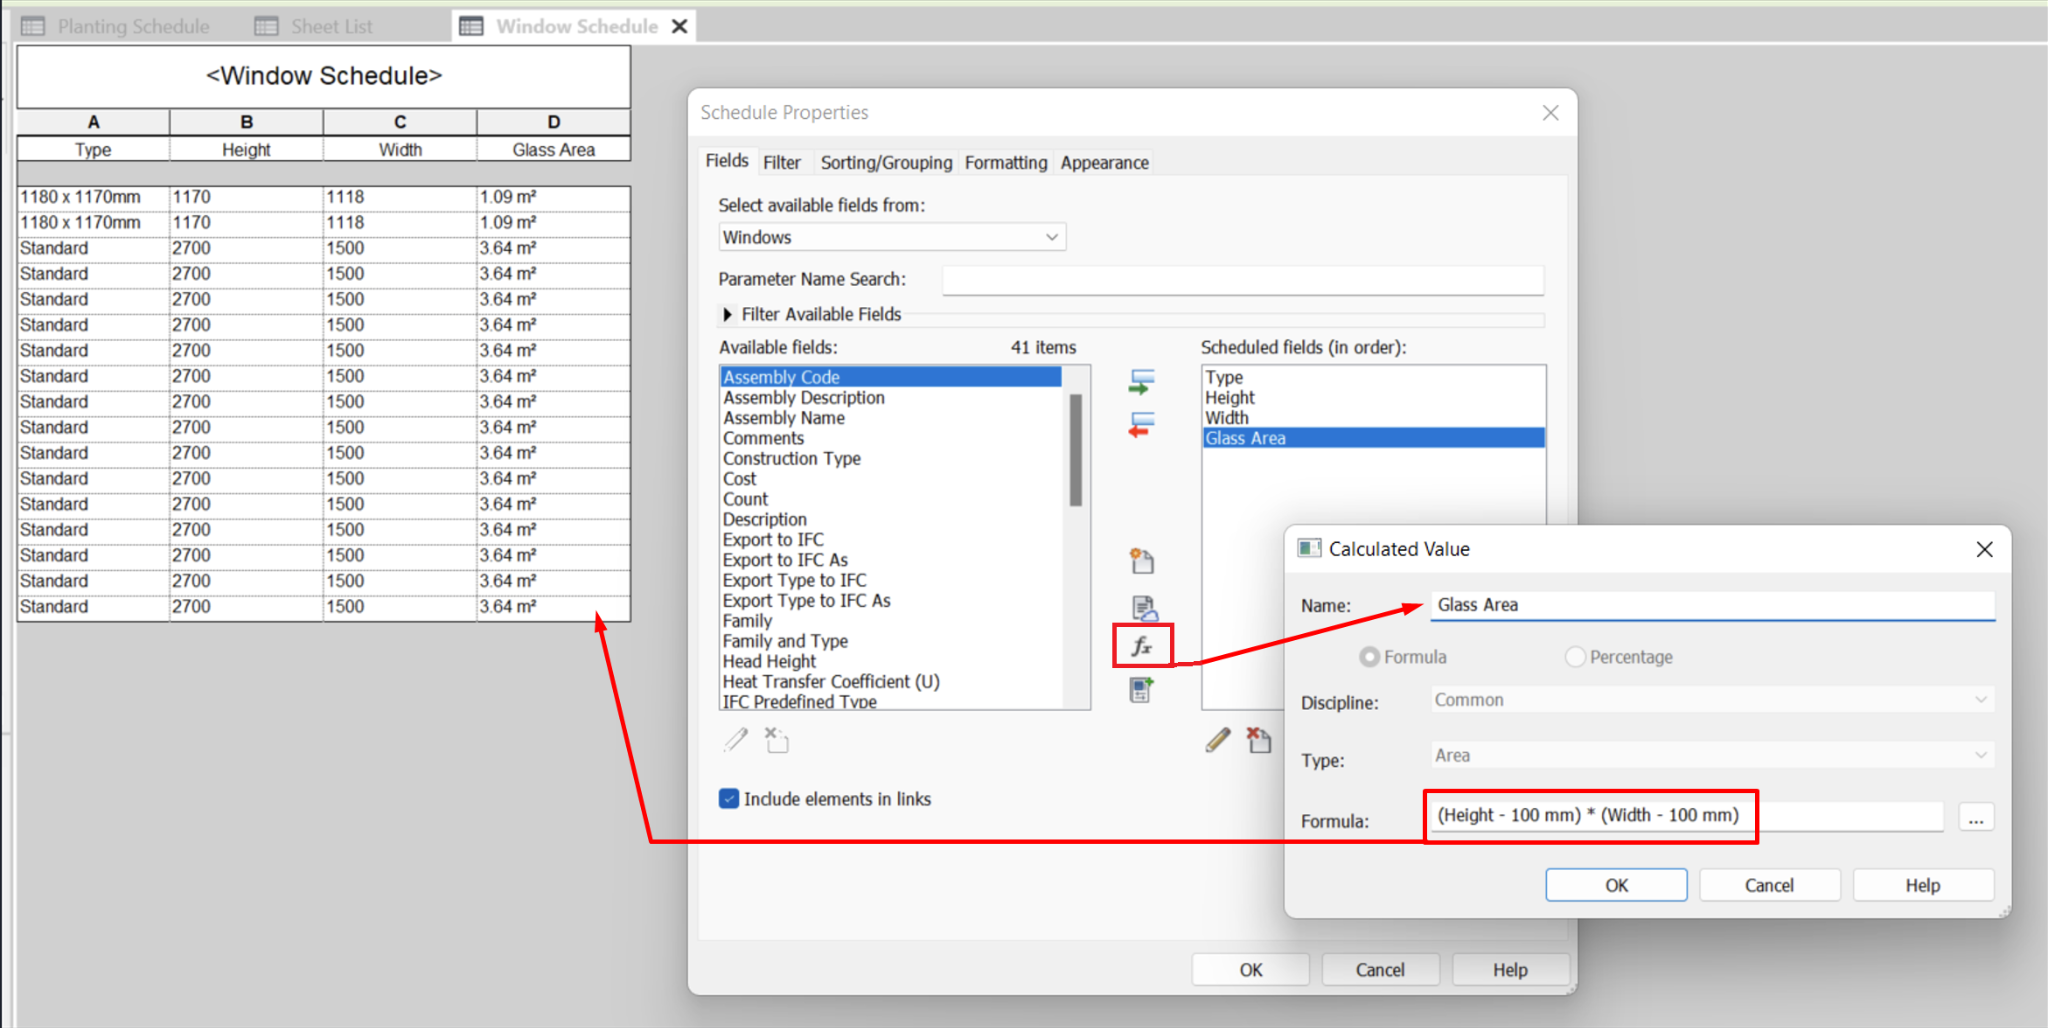
This option allows us to add a column to the schedules whose values will be the result of a function including other fields present in the schedule. It’s important to pay attention to the units in each field: the resulting units must be consistent with the chosen type of parameter.
One example could be the calculation of a window’s glazed surface. The calculated parameter can be configured with a formula that includes the product of the Height and Width parameters, minus the frame surface—which we can, in turn, calculate or retrieve via a shared parameter that provides this piece of data inside the family.
- Combine Parameters
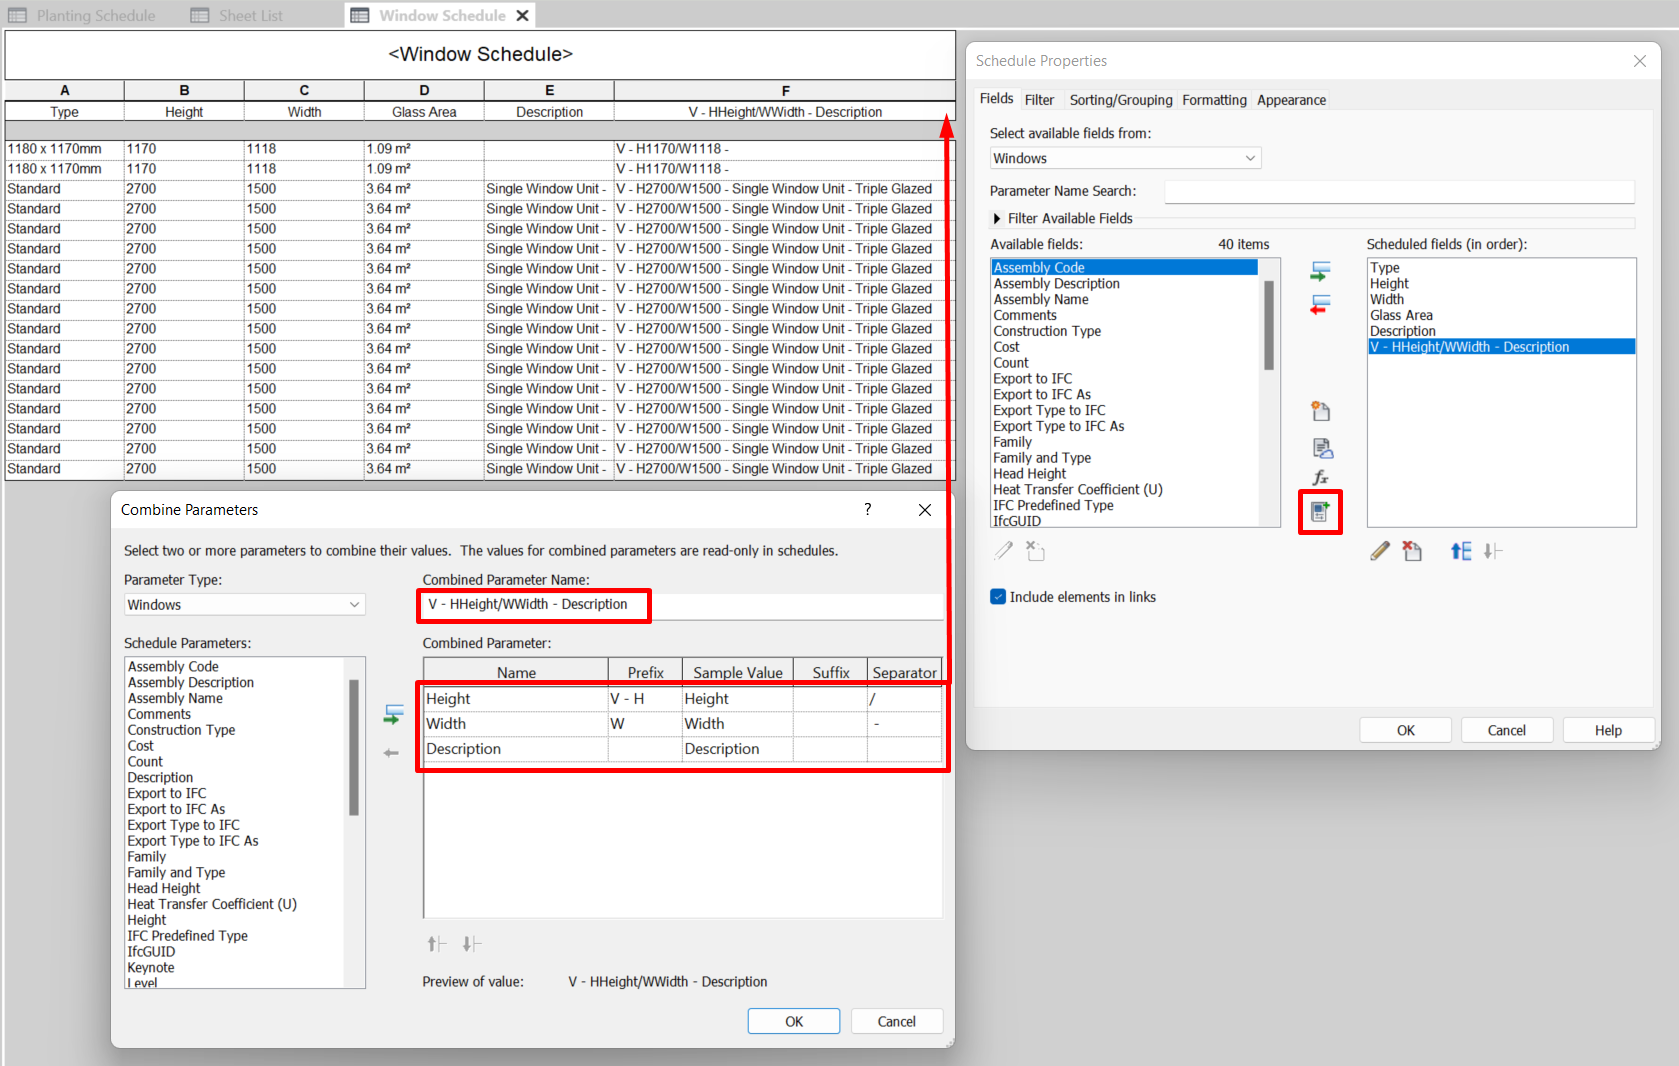
Allows for the creation of a parameter by combining two others pertaining to the available fields in the chosen category, with the possibility of adding a prefix or suffix. This new parameter will show as the concatenation of the conforming parameter’s data. It should be noted that combined parameters cannot be used for filtering, grouping or sorting.
An example of these could be combining parameters to obtain a code that’s stipulated in the project: for windows, it could be a combination of “V - H Height / W Width - Description”.
1.2 Filter Tab
It’s important to understand that schedules are not associated to any graphical view that may be open, but will, initially, show the raw information of all elements for which it has been configured.
Filters allow us to limit the data that’s shown in the schedule. This makes it possible to see only a certain type of information.
Next, we will go over the different Filter settings’ options:
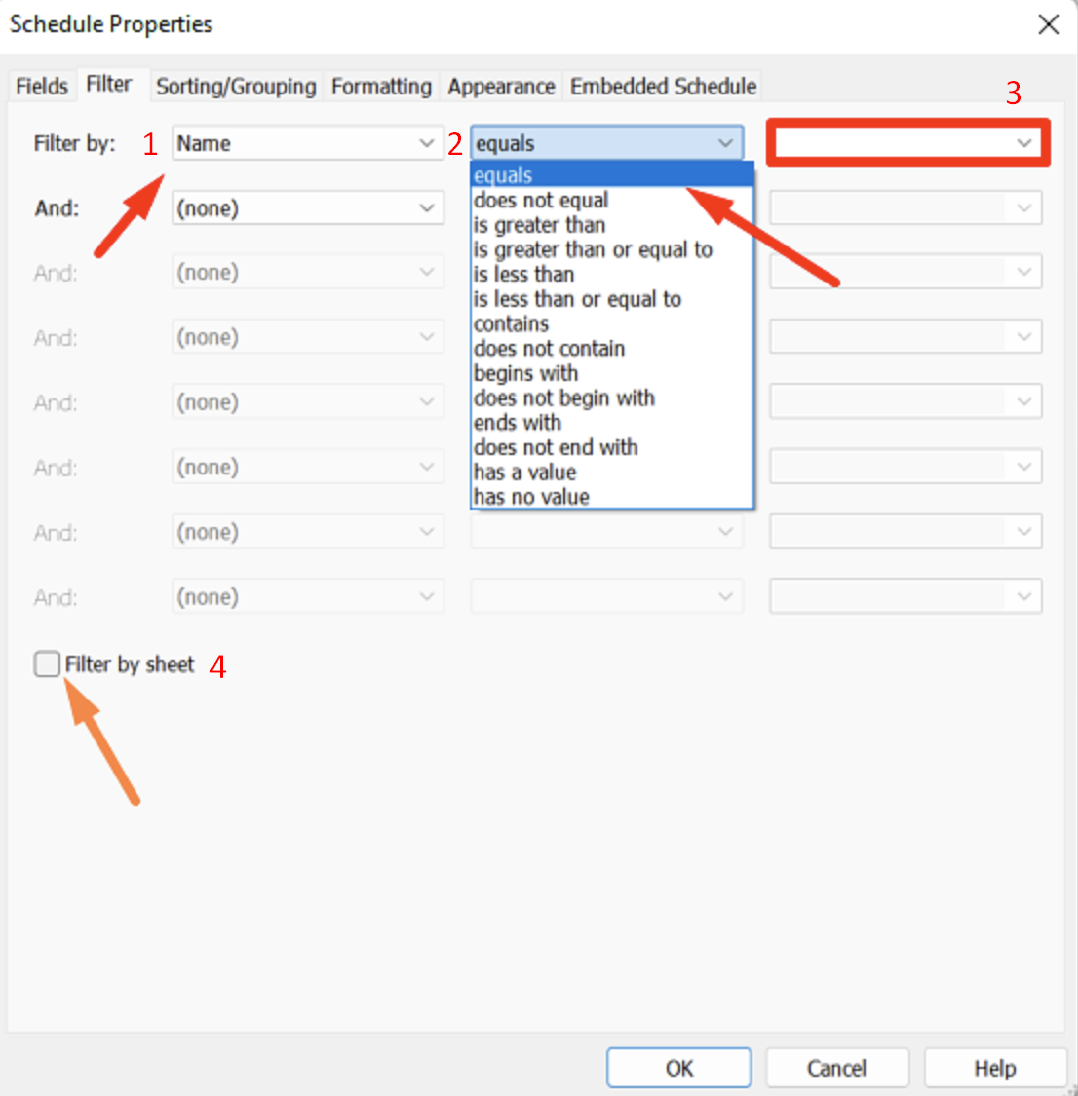
- Filter by
We can choose between the parameters previously included in the Fields tab.
There are certain parameters by which we can’t filter, such as: Area, Area Type (in Areas schedules) or material parameters.
Up to eight different filters can be added. If there’s more than one, the elements will have to meet the conditions for all filters simultaneously in order to be shown, since these are not “OR” filters.
- Filtering restrictions
- Filtering text
In this field we will include the text to be used for identifying the elements we want to keep or discard.
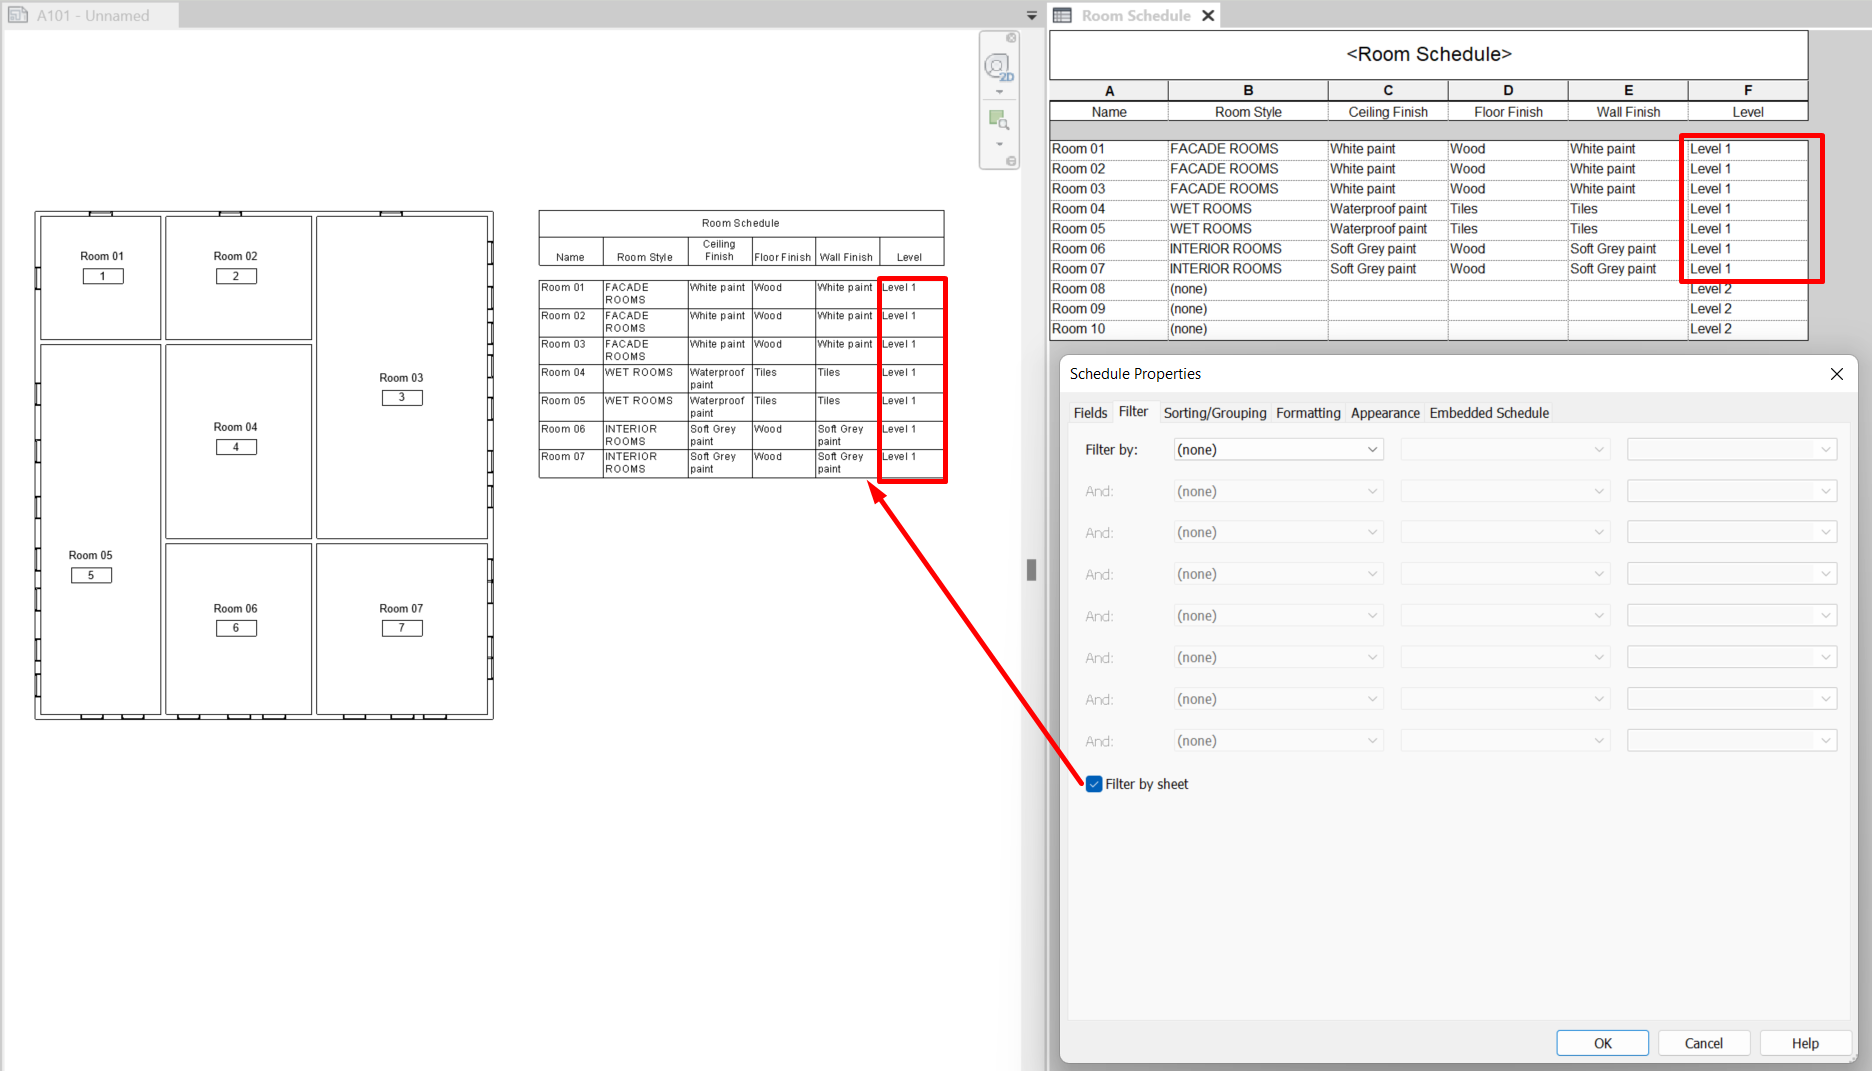
- Filter by sheet
This option allows for the schedule to be filtered to only show those elements visible in the views inserted on a particular sheet.
This may come in handy if we want to show various floor plans from different levels: we can use the same schedule, insert it with the “Filter by sheet” option checked, and obtain only the data from the floors that are present on the sheet.
1.3 Sorting/Grouping Tab
This is the tab where the organising criteria are established, in order to make it more understandable.
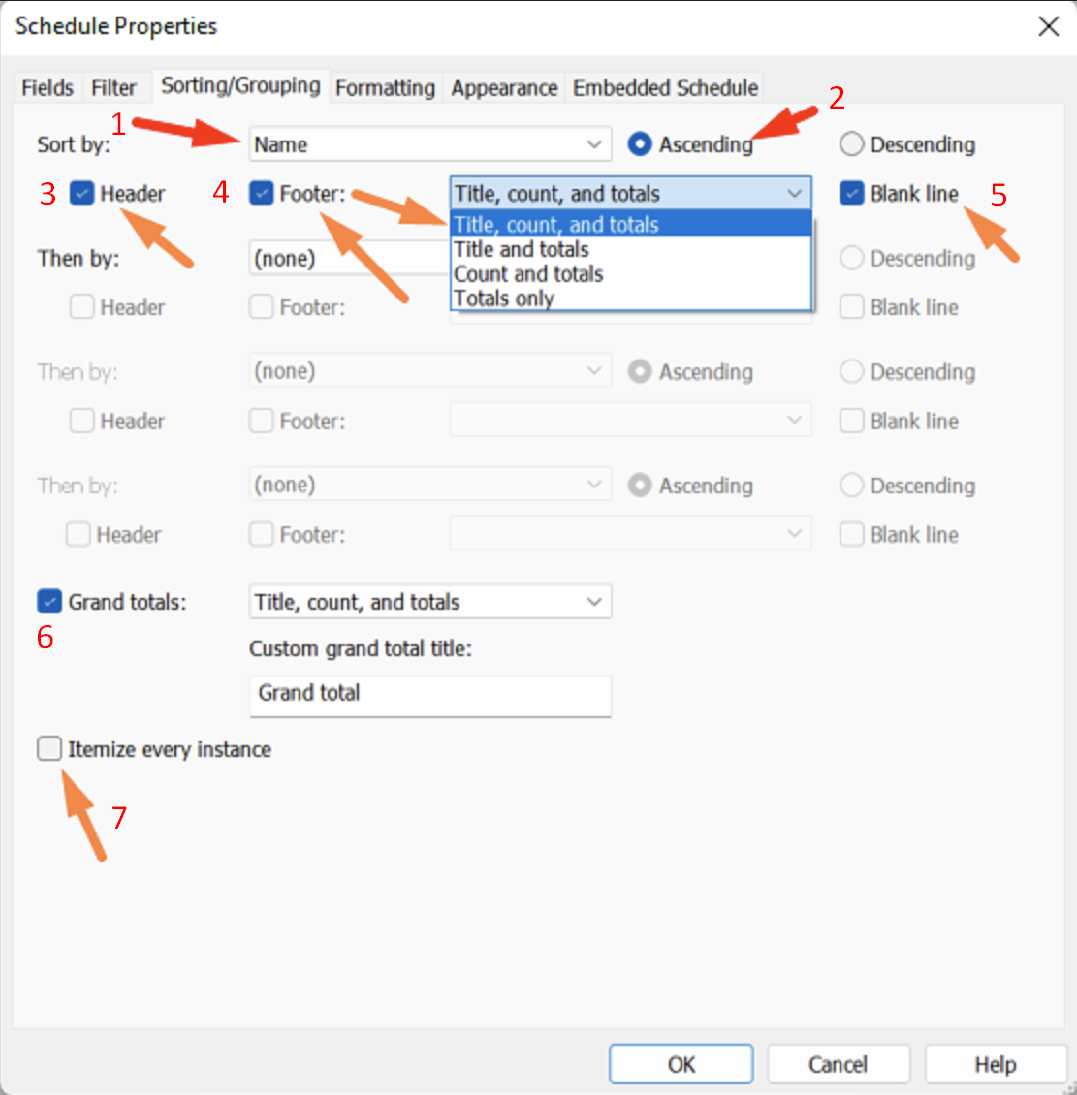
The following options for sorting and grouping can be configured:
- Sort by
A drop-down containing the previously selected fields allows us to pick up to four fields that will be grouped according to the chosen order.
- Ascending/Descending order
This option allows us to order the data classified in the previous point in an ascending or descending way.
- Header
This option makes the sorting parameter to be shown as a header for the sorting group.
- Footer
This option makes the sorting parameter to be shown as a footer for the sorting group. We can add the information seen in the drop-down:
- Title, count, and totals: Title shows the header information. Count shows the amount of elements in the group. Total shows the subtotal below a column that may have a total. To be able to calculate the totals for these columns we have to previously configure them in the Format tab, selecting the fields and changing their calculation format (see 1.4 Format section).
- Title and totals: shows the title and the subtotals’ information.
- Count and totals: shows the count and subtotal values.
- Totals only: shows only the subtotals for the columns that may have them. Only the parameters that can be added up (i.e., numerical parameters, not text or visibility parameters), such as Area, Length, Width, Height, Cost, Count, etc., can display their subtotals.
- Blank line
It separates different groups of elements with a blank line. It’s merely a visual matter.
- Grand totals
It works similarly to the Footer option, only that it applies to all the elements in the schedule, regardless of their classification. It shows at the bottom of the schedule, and the totals calculation is only applied to those parameters that can be added up (numerical parameters). The Grand totals’ title can be customised as needed, and we can configure in the drop-down menu the same options that we had for the footer.
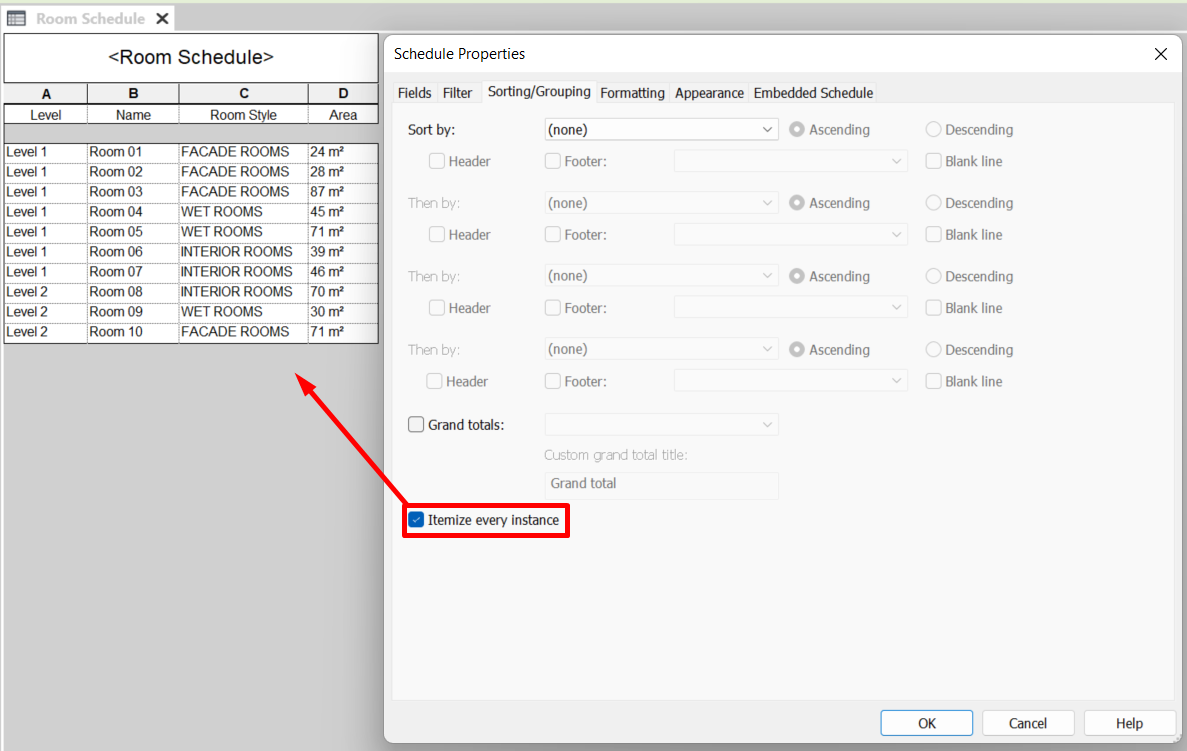
- Itemize every instance
Checking this option will show every element of the schedule in a separate row.
If this is not checked, the elements will be grouped in one same row following the sorting criteria.
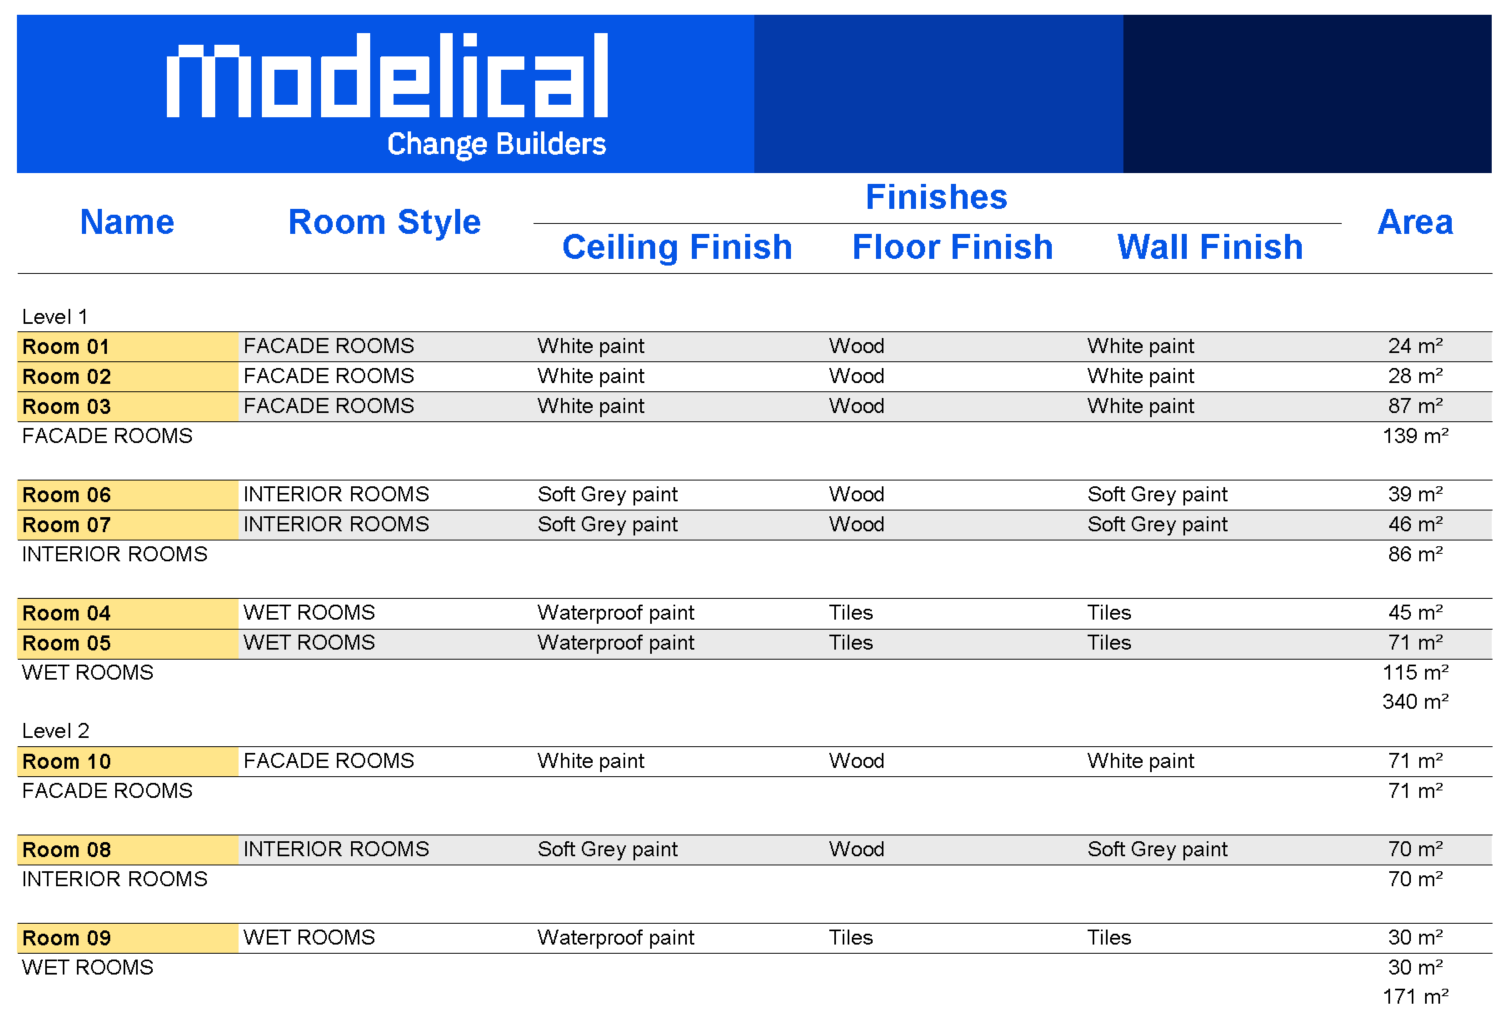
The following example shows how to group and sort a room schedule.
On the first image, we see an unsorted schedule with the Itemize every instance option checked.
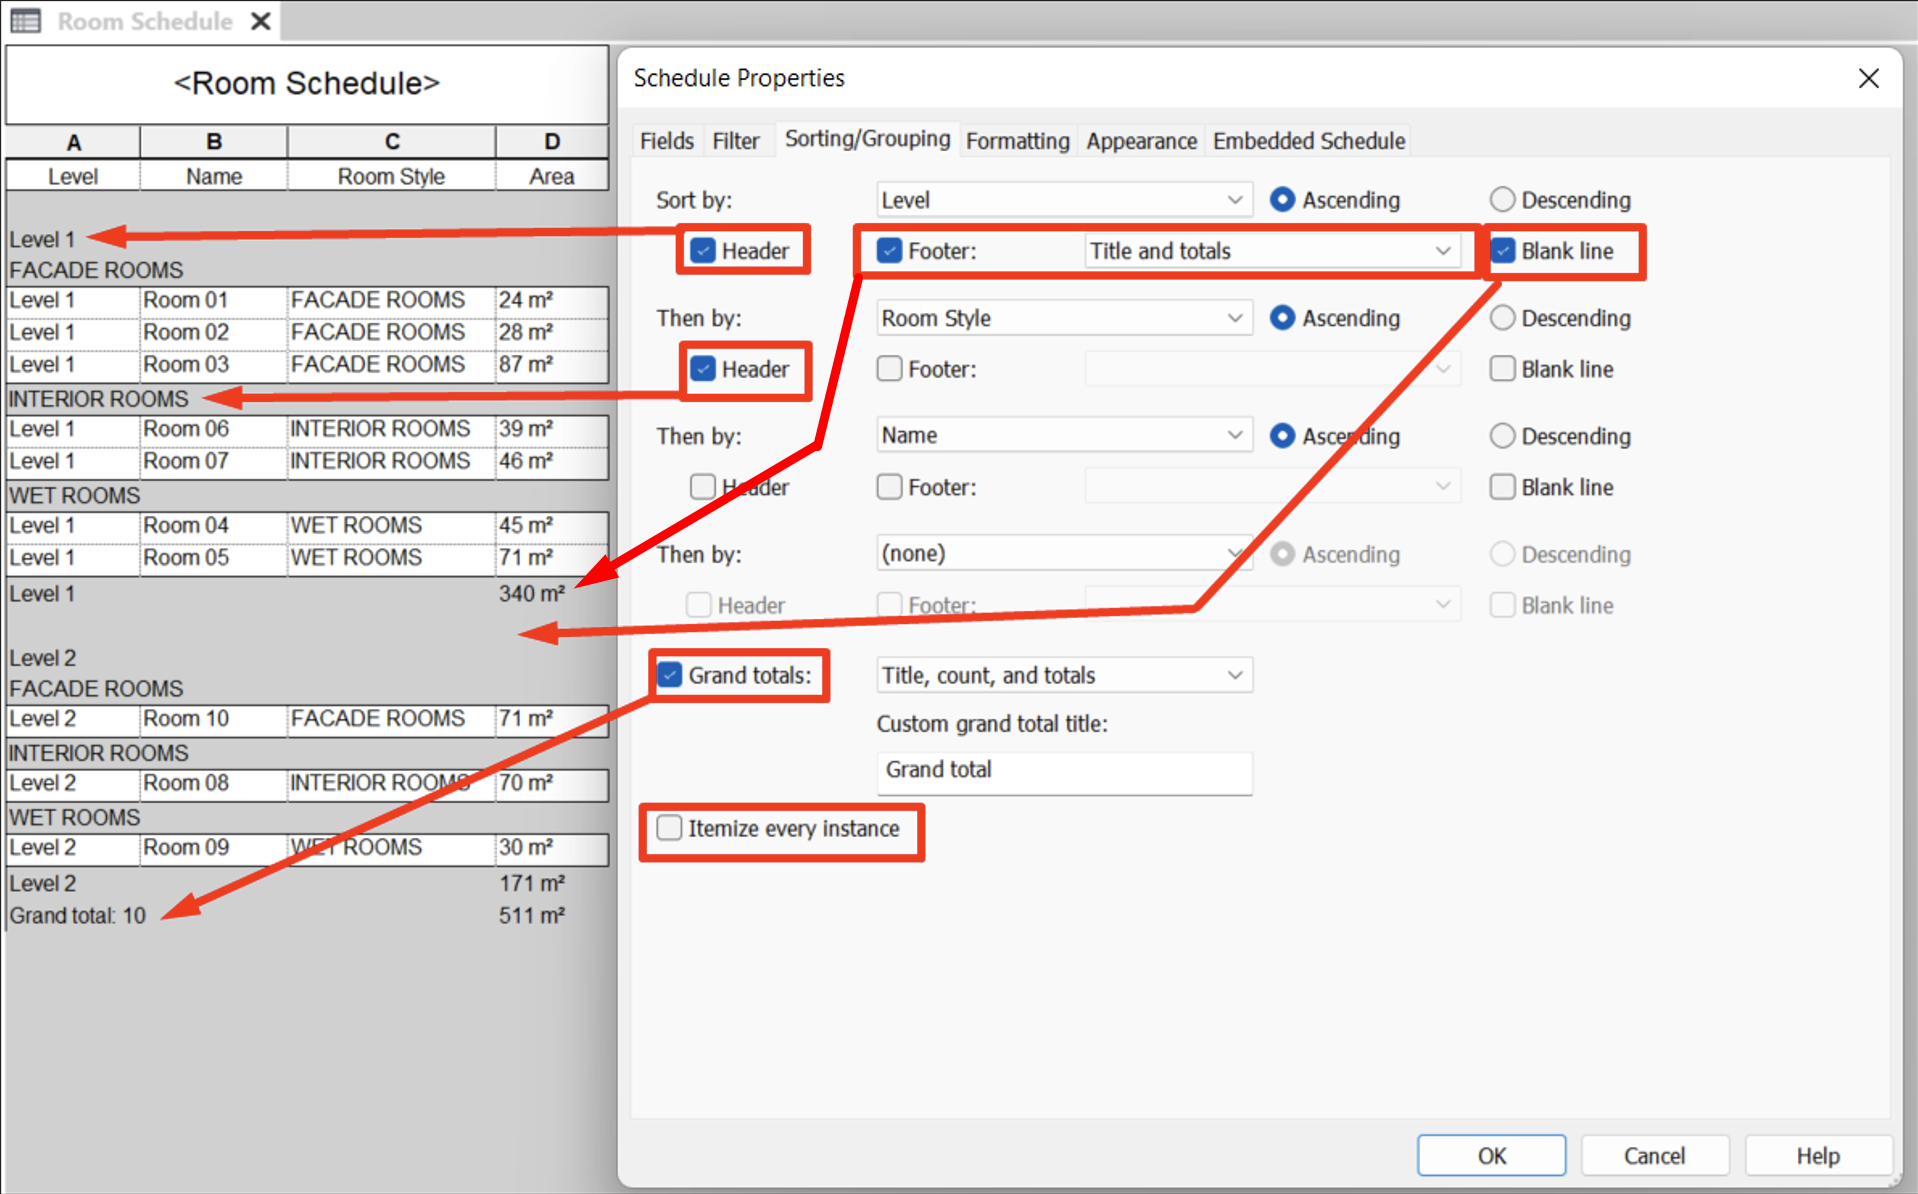
In the second image, we see a sorted schedule with various fields and visualisation criteria, according to the needs that we have chosen. We shall point out the following concepts:
- Header: Value of the sorting parameter in the header.
- Footer: Data below the grouped elements (title and/or count and/or totals).
- Blank line: Leaves a blank line between the different values for this parameter.
- Itemize every instance: If we filter the elements, for instance, only with the Level parameter, and this option is not checked, only one row per level will show, containing all the elements of said level; however, if this box is checked, a row will show for each of the elements contained in each one of the levels. This is discouraged in case of having lots of elements.
- Grand Totals: Title and/or count and/or schedule’s totals.
1.4 Formatting Tab
Here we will find some additional options to format the schedule in terms of presenting the data.
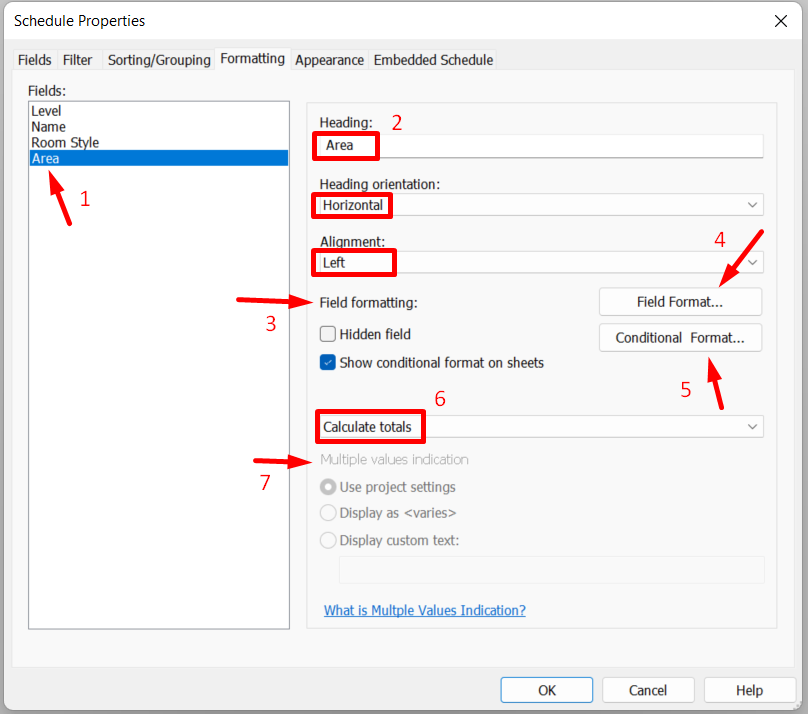
- Select the field whose format is to be edited
We can select the desired field to edit its format. Not all the fields allow for the same options: for instance, numeric fields allow for the calculation of totals, while the text fields can show the value of multiple data in a custom way.
- Heading, Heading orientation & Alignment
It allows us to add a custom title to the column, different from the field name. For example: changing Area to Usable Surface Area.
We can change the orientation (horizontal or vertical) and alignment (left, centre, or right).
- Hidden field
When a field is added, it will be present in the schedule and we’ll be able to operate with it. However, if we do not wish for this field’s column to be visible, we can check the Hidden field box.
It’s worth noting that we can still sort and group by this field, and we can even make it show in headers or footers.
A useful example of this is a room schedule by levels: if we don’t want the Level column to appear, we can check Hidden field and also the Header option in the Sorting/Grouping tab.
The image in the following point shows an example of a schedule in which this is done.
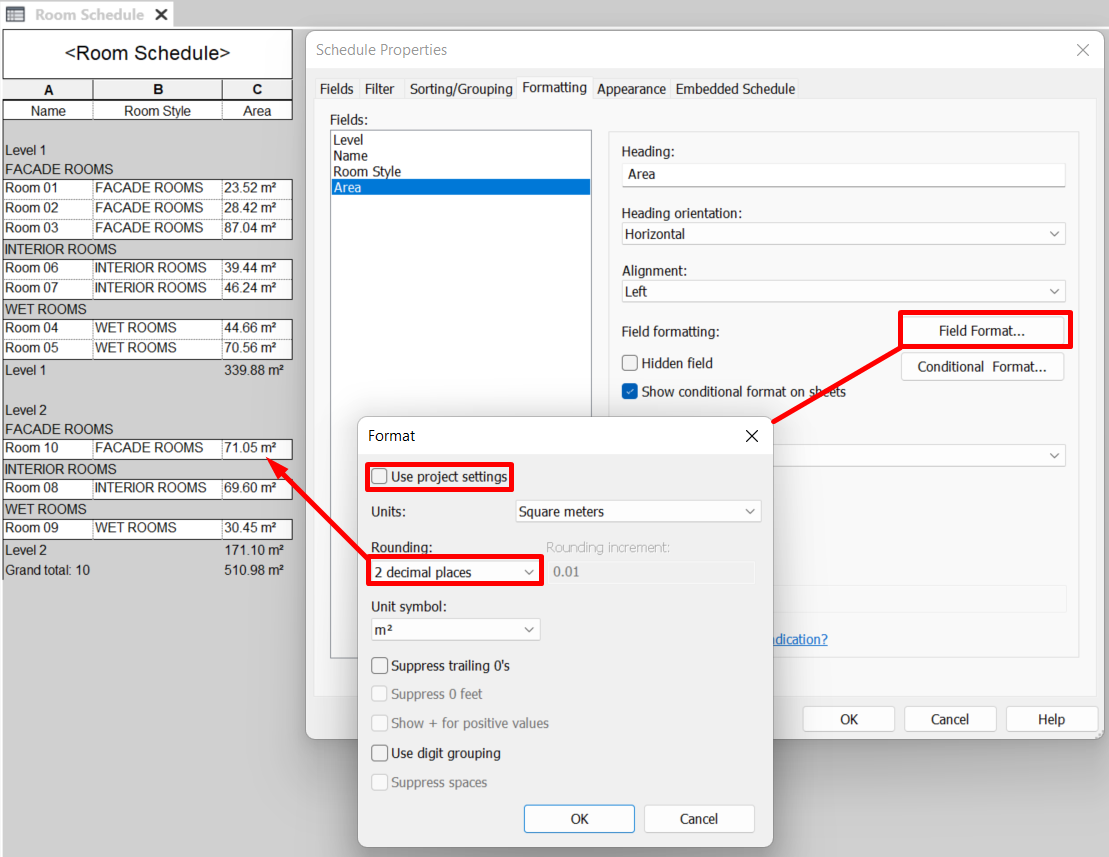
- Field Format
Each project has some general unit settings. If unchanged, the units in the schedule’s fields follow these settings. But they can also be changed independently, allowing for different formats, levels of precision, and symbols.
A recurring example would be representing the Area values with two decimal numbers, followed by the square metres symbol.
- Conditional Formatting
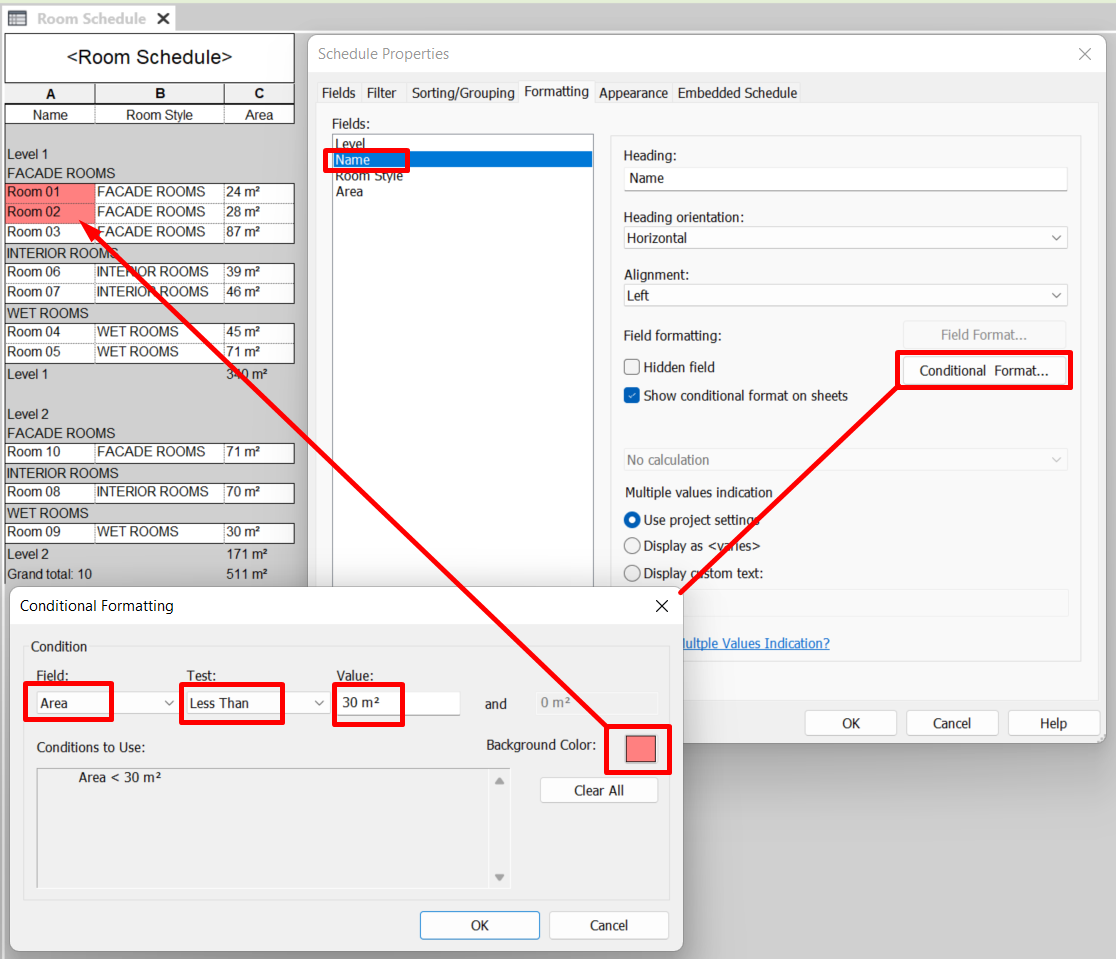
This option allows us to highlight the values in a column that meet a certain condition. It’s a powerful tool for controlling the project. We can also choose whether to see this conditional formatting on sheets, by checking “Show conditional format on sheets”.
We should keep in mind that we can only set one condition for each field, and that conditions can refer to other fields.
For instance, in a room schedule, we could set a condition that highlights the room names according to the desired area criteria. In the following example, the rooms with an area of less than 30 square metres are highlighted in red.
- Calculations
Within this drop-down we can choose among different options to show the values in each field, such as calculate totals, maximum, minimum, and an option to show both maximum and minimum.
Only available for numerical values.
- Multiple values indication
When grouping data within a sorting criterion, we sometimes get a single line of data or a blank cell, indicating that there are multiple values there.
There is a format option that makes this cell display the text <varies> or a custom text.
1.5 Appearance
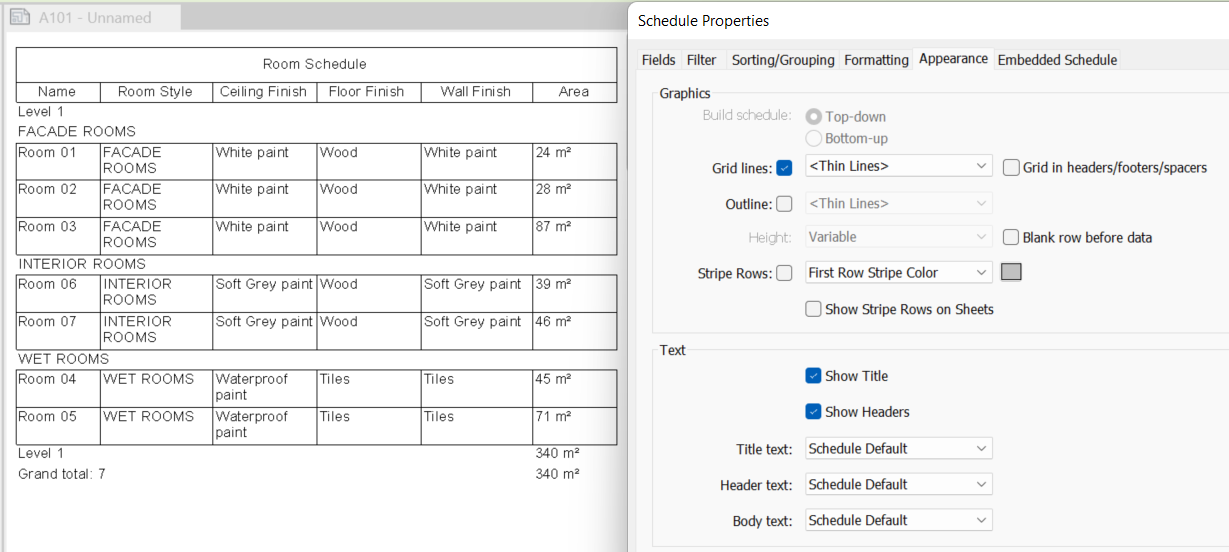
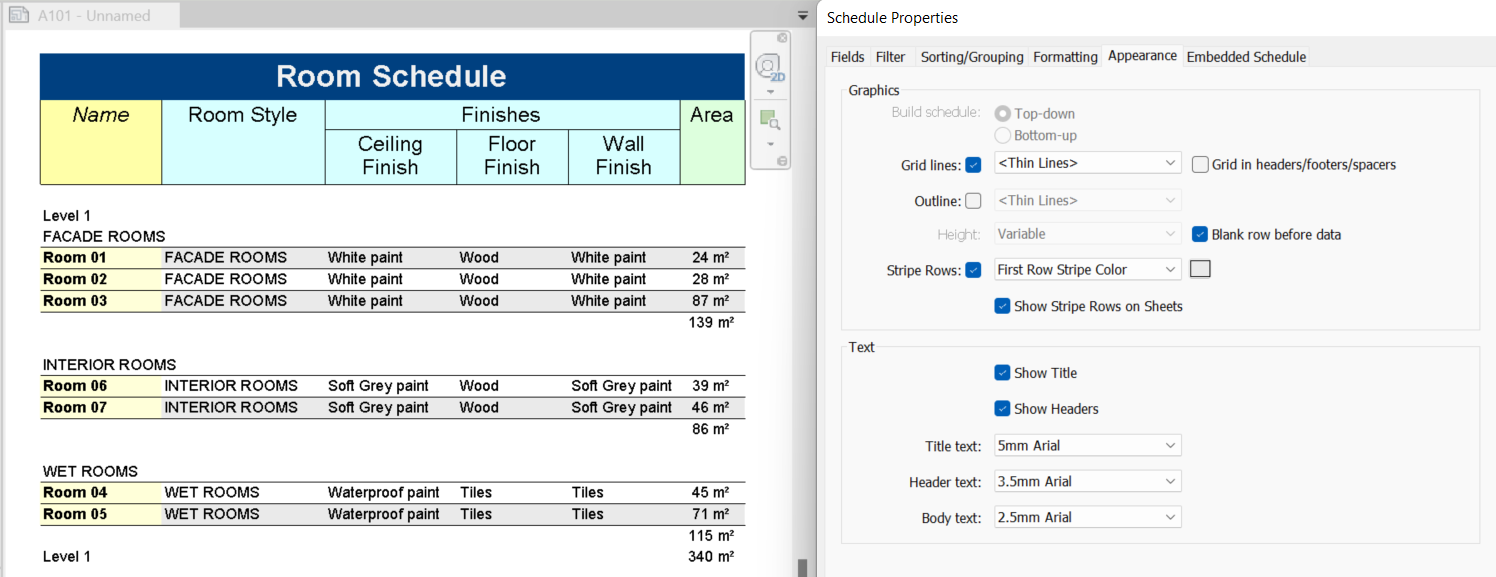
A schedule’s graphic appearance is not the same when it’s being edited as opposed to placed on a sheet. In this tab there are some general appearance settings (schedule’s grid lines) and text appearance settings.
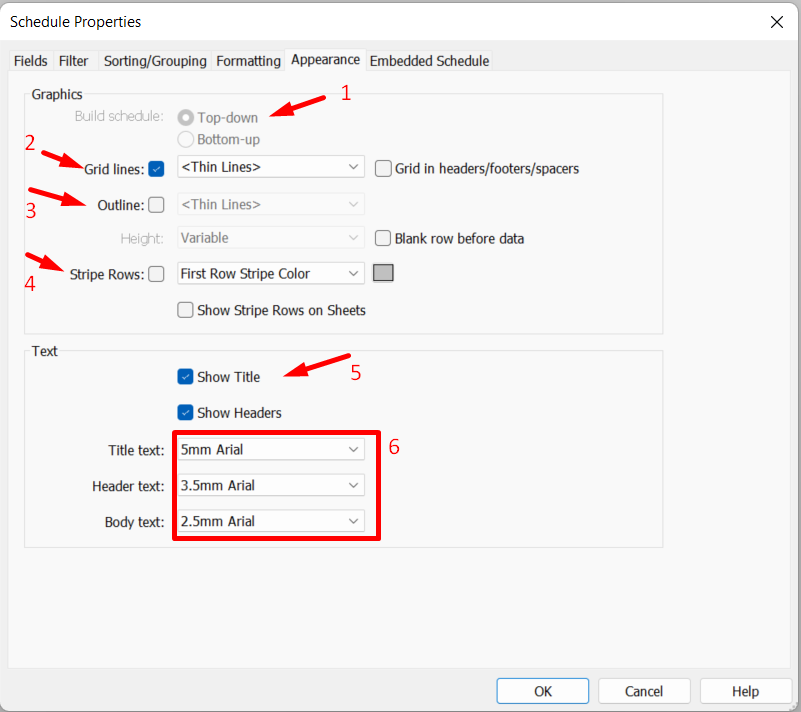
These settings affect the schedule’s appearance only when it’s placed on a sheet; the changes will not show in the schedule’s workspace, except for some settings like colour or title text style.
- Top-down or Bottom-up revision schedule
This option is only active when creating revision schedules in titleblock families. It allows the information to be displayed either from top to bottom or vice versa, from bottom to top, starting with the last data and ending with the header and title.
- Grid lines graphics
This option allows us to control how the grid lines are displayed, select the desired line style, and see the title and header with or without grid lines.
- Outline, Height, and Blank row graphics
This option allows us to control how the schedule’s outline is displayed, and choose its line style.
In revision schedules created inside titleblock families, the Height option is active, allowing us to change this schedule’s height in a variable or custom way. The latter allows you to display empty rows that will be filled with information about incidents or revisions.
We can show or remove the blank row that appears by default in a schedule below the header by clicking on “Blank row before data”.
- Stripe Rows
This option shows alternating colours for the rows in a schedule. Quite useful for long schedules’ readability. We can also control whether to display the stripes just in the schedule’s workspace or when placed on a sheet.
- Title and Headers visualisation settings
We can show or hide the title and heading.
- Title, Header, and Body text styles
We can choose the text styles for the schedule’s title, header and body.
Custom appearance for a schedule’s titles, headers, and body
In the schedule’s green editing ribbon (“Modify Schedule/Quantities”) we can customise and modify the appearance of titles and headers. There are two sections:
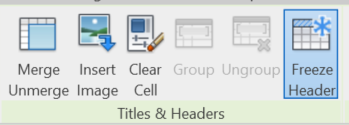
Titles & Headers Group
Under “Titles & Headers” we can edit a schedule’s titles by merging or unmerging cells, inserting an image or clearing the title. Moreover, we can group or ungroup headers and add a cell above with a header title. Lastly, we can freeze the header to keep it visible as we scroll down a long schedule.
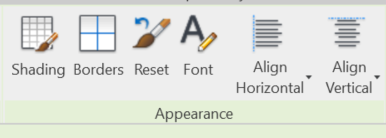
Appearance Group
Under “Appearance” we can individually edit each title or heading cell, as well as full columns in a schedule, regarding their shading, borders, text styles, and text alignment.
In the following example we show how the same schedule is visualised, first without editing its appearance, and then with some modifications in its appearance and placed on a sheet.
1.6 Embedded Schedules
With some specific categories, the schedules by category allow us to add an extra layer with fields from other related categories, known as “embedded schedule”.
These embedded schedules can be used only with the following categories:
- Rooms
- Spaces
- Duct systems
- Pipe systems
- Electrical circuits
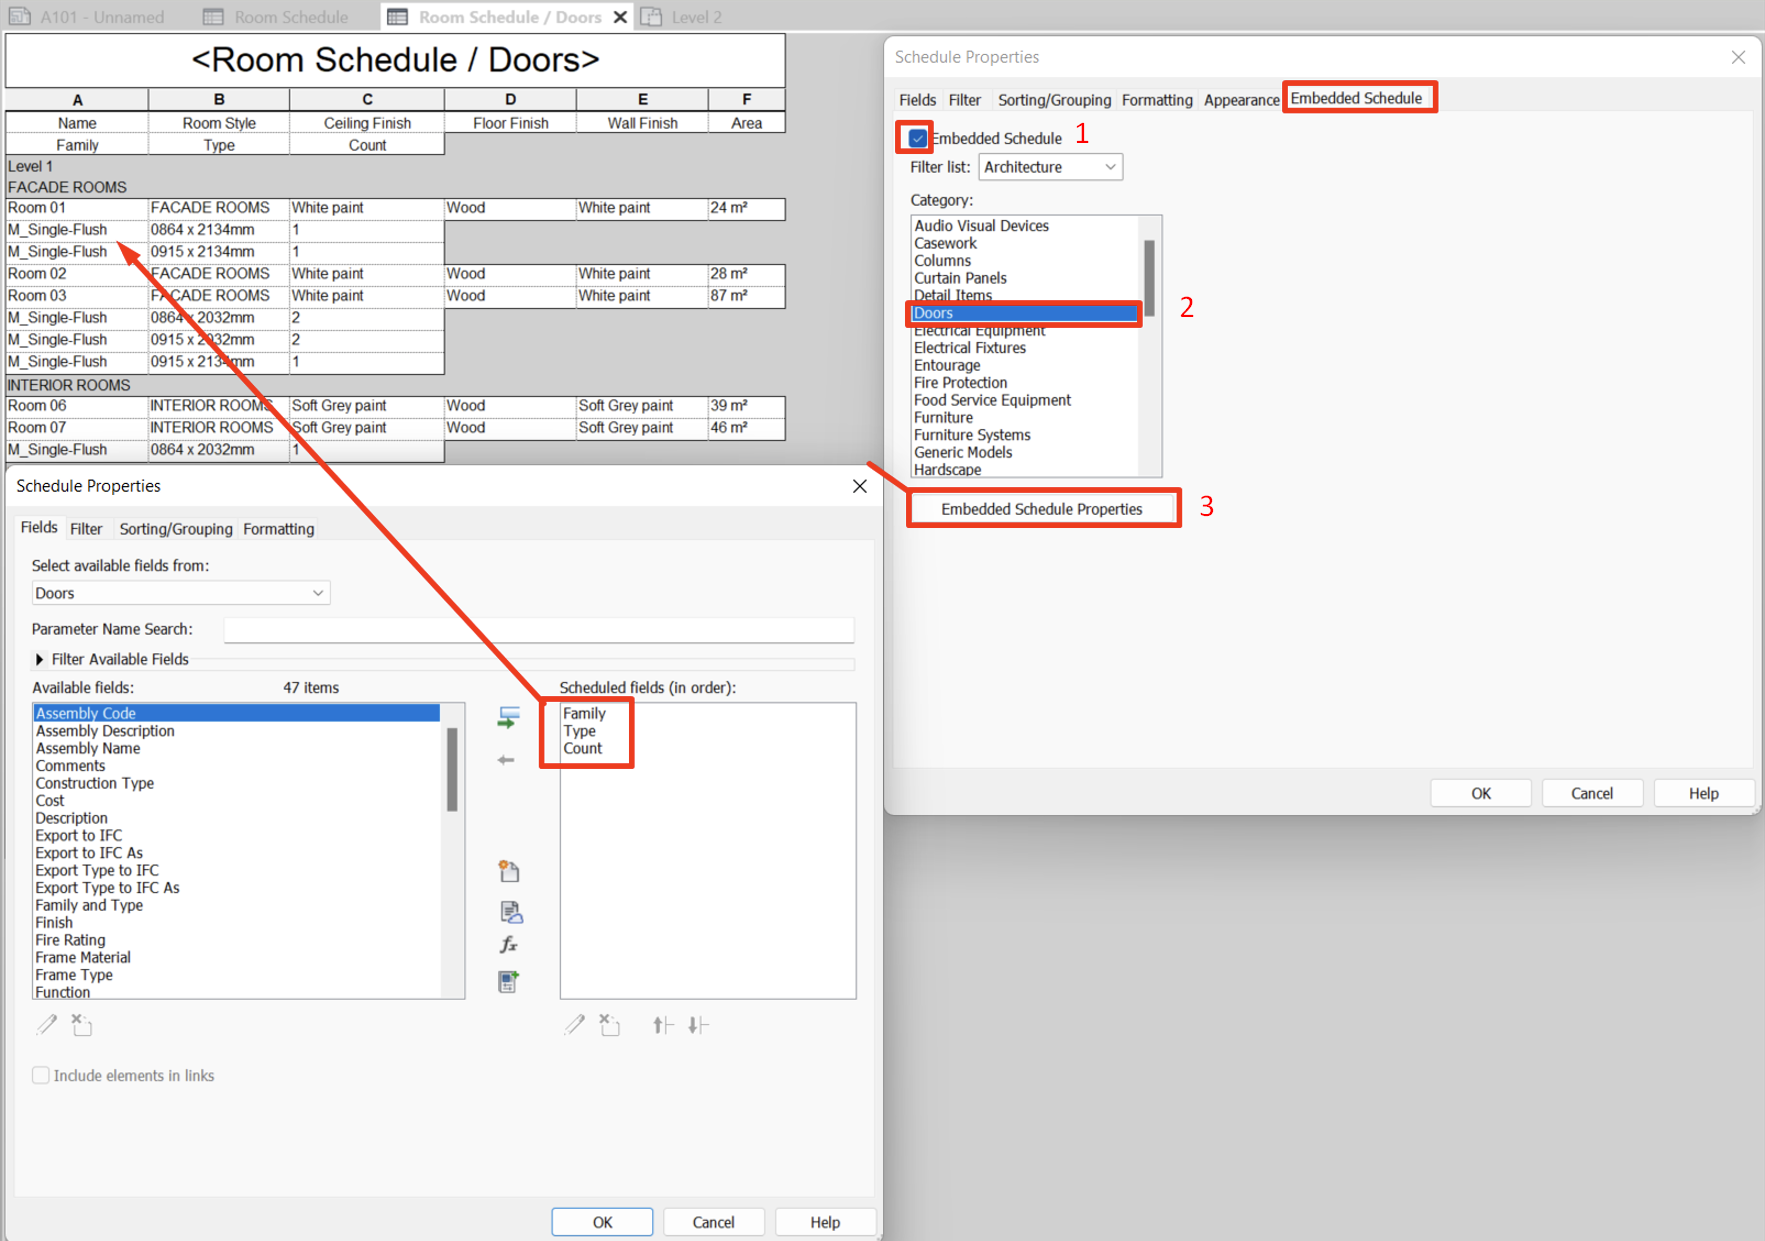
They allow for the display, within a schedule of one of these categories, of another schedule showing elements that are inside those rooms or spaces, or elements that make up those systems (duct systems, pipe systems, and circuits). The procedure is as follows:
- Check the “Embedded Schedule” option.
- Pick a category
- Configure the embedded schedule just like any other schedule.
A recurring example may be to show an embedded door schedule within a room schedule. As we can see in the image below, the schedule shows us not only the rooms in our model, but also each one of the doors that are associated with them.
1.7 Images in Schedules
There’s a series of parameters and options in the schedules which allow us to view images in the sheets.
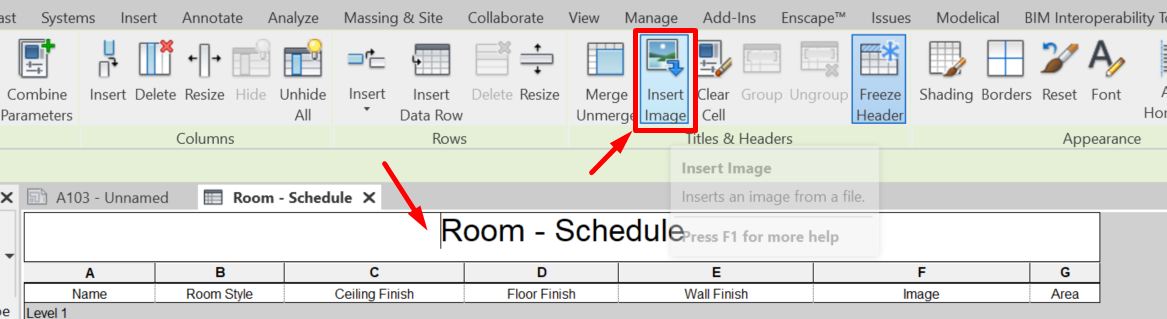
Through the Title cell
One way to insert images is found in a schedule’s title cell. If we click on it, we will see, in the upper menu, under “Titles & Headers”, the option to insert an image.
Through parameters
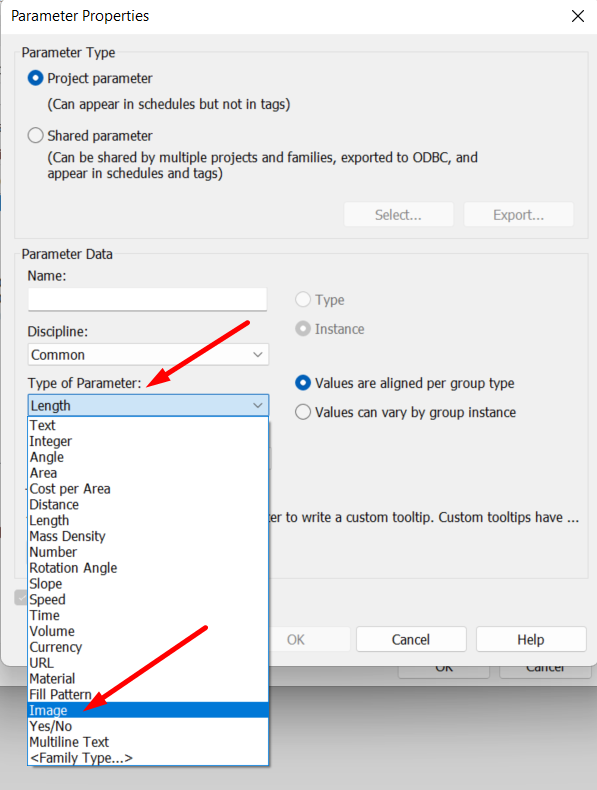
Another option is to do so via the fields that allow for the managing or insertion of images. It’s frequent to find the parameter Image within the list of available fields. Furthermore, we can create a new project or shared parameter and select “Image” in the “Type of parameter” drop-down.
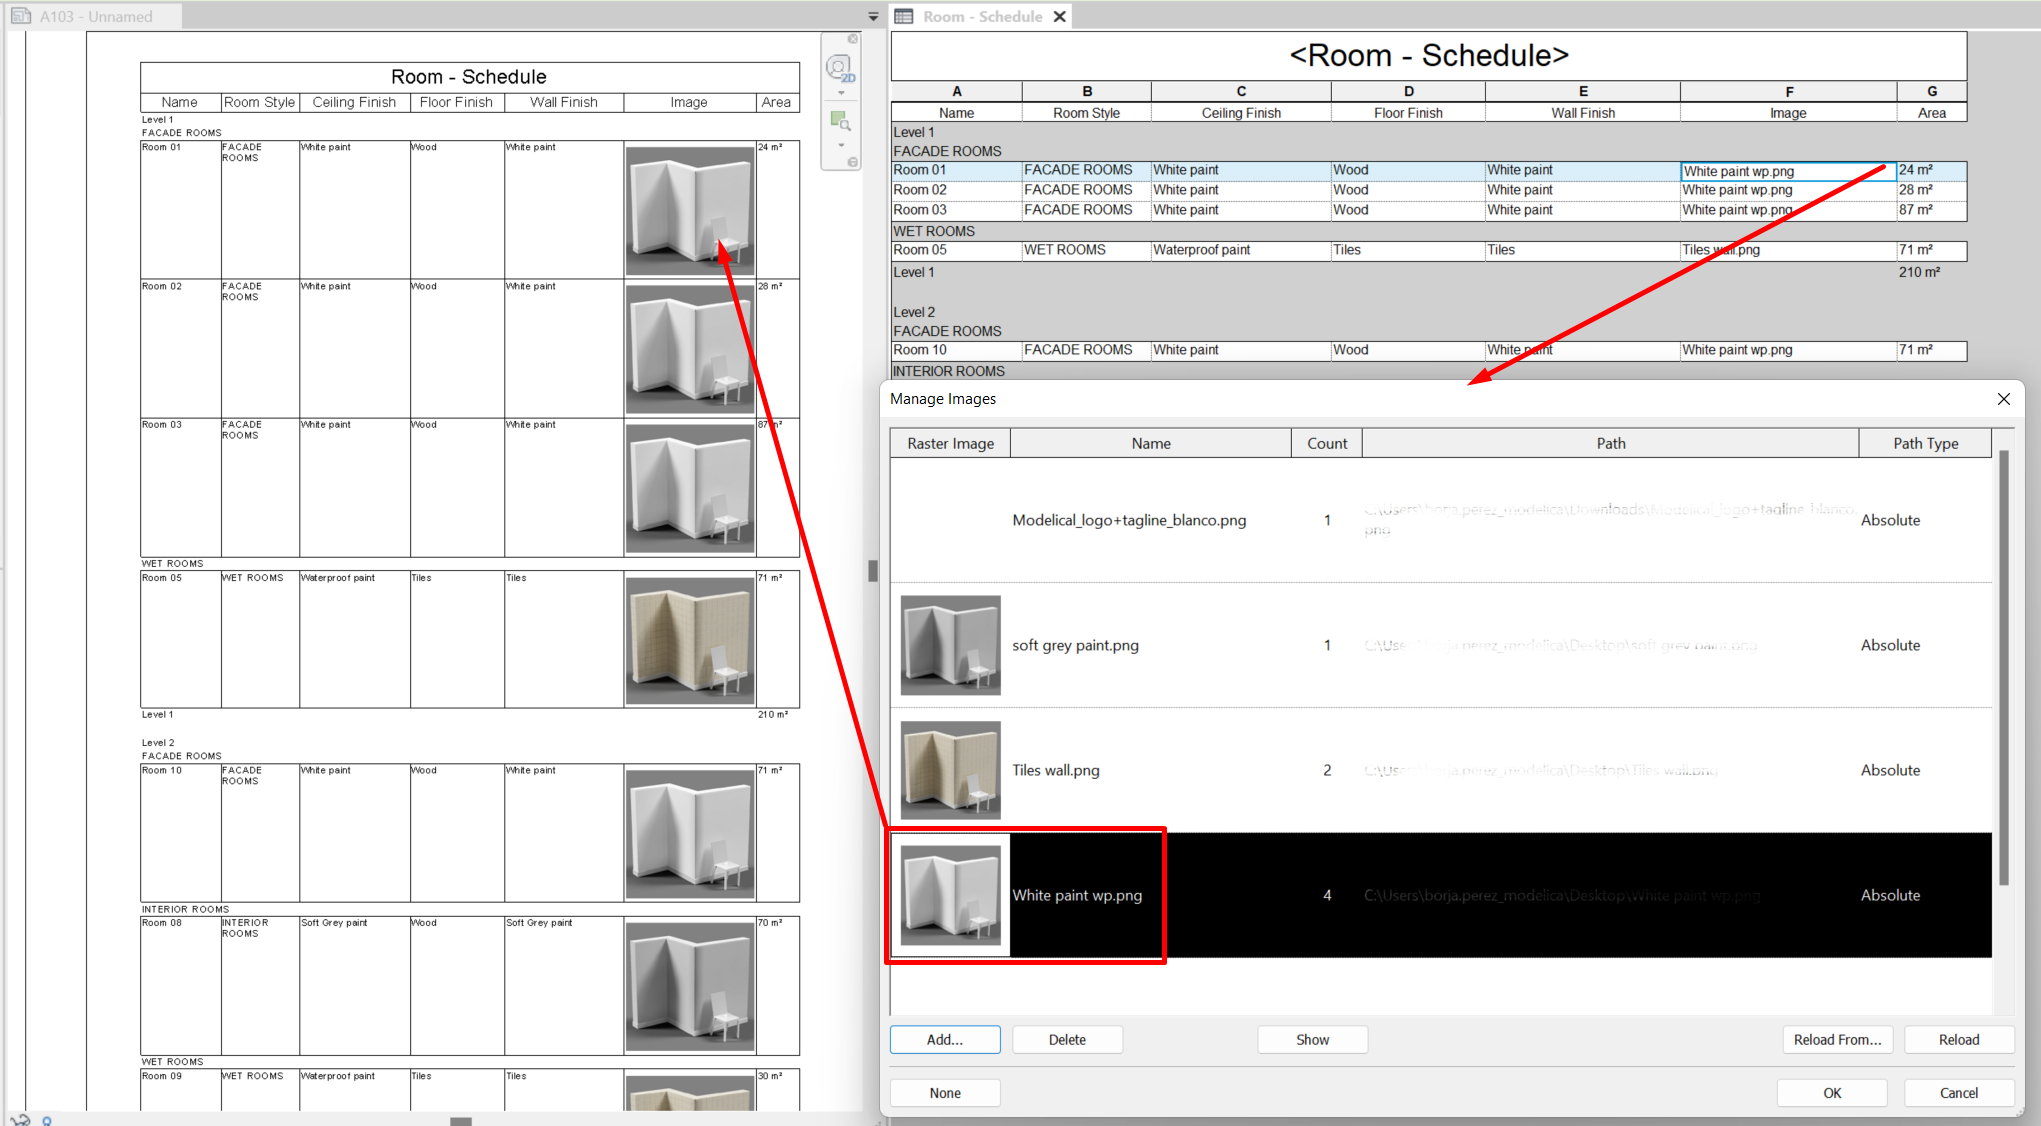
A useful example of the use of the “Image” field is when showing a textures or finishes catalogue in a room schedule.
As seen in the image below, once the parameter is added in the fields tab, clicking inside the corresponding cell will open the “Manage Images” window, where all the images imported to the model can be found. We can add or delete images, and select the desired image, which will appear as text in the schedule.
After we place the schedule on a sheet, we’ll be able to see the images in the schedule’s field.
It’s worth noting that making the column wider will change the dimension of the images in it, since they adapt to their column’s width. It is advisable to always have this dimension under control..
2. Editing a Schedule
All that’s needed to edit a schedule is to locate it in the project browser, under the Schedules/Quantities section, and open it by double-clicking on it.
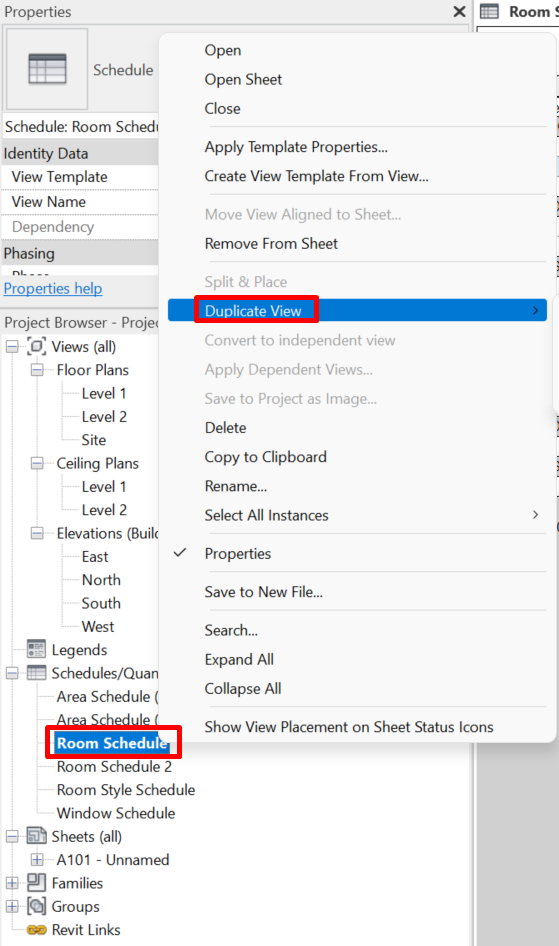
Schedules can be duplicated when needed, by right-clicking on them > Duplicate View.
2.1 Schedule’s Main Settings
Once the schedule is open, in the Properties panel, we can adjust the settings in any of the fields seen in point 1:
- Add or remove fields
- Change parameters’ filters
- Change sorting settings
- Change a field’s format
- Change the appearanceambiar la apariencia
- Add an embedded schedule
2.2 Schedule’s View Template
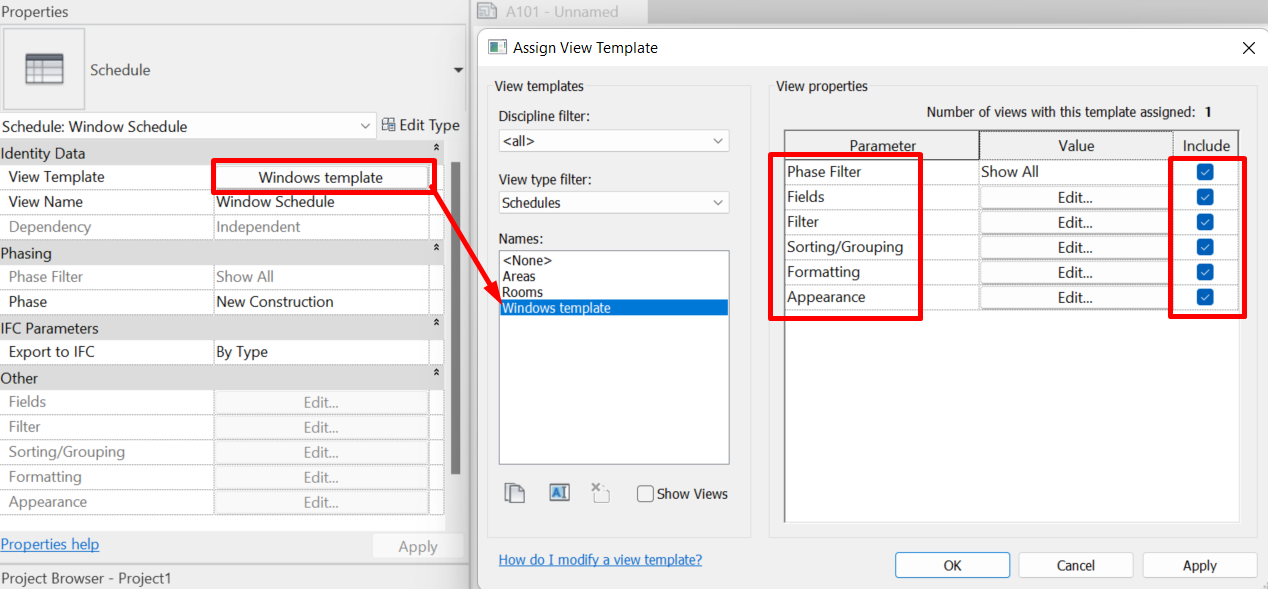
In Revit we can add a view template to our schedules. With the schedule open, under the Properties panel > View Template.
View templates by default save only the Phase filter and Appearance. But if we design a view template, say from a windows schedule, we can apply it to many windows schedules and use the same Phase filter, Fields, Filter, Sorting/Grouping, Formatting, and Appearance. We can personalise the template and include the parameters that we want.
Phase properties as well as embedded schedules are elements that cannot be saved in a template.
When a schedule has a template applied to it, the Properties section will be greyed out; they may be managed only through the template, in the same way as with any other view.
2.3 Schedule’s Phase and Phase Filter
Revit allows us to limit the information according to the phase and phase filter applied to the elements. With the schedule open, go to the Properties panel > “Phase” and “Phase Filter”.
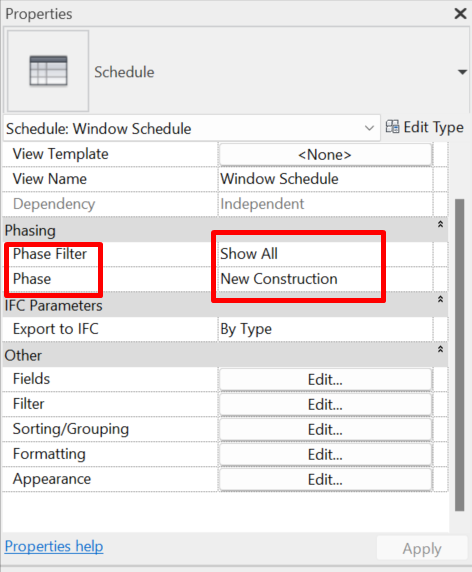
Some schedules, such as room or area schedules, do not allow for phases and phase filtering. However, we can embed other categories that allow both filtering. For instance, room schedules can only be filtered by phase; but if we embed to it another schedule (for example, a door schedule), then we’ll be able to filter by phase and phase filter.
Areas, however, do not allow for any filtering, since no other categories can be embedded into them.
We should take into account that filtering by phase or phase filter is independent from the Phase built and Phase demolished fields of the category’s selected elements—which can be added to the schedule as fields.
3. Placing a Schedule on a Sheet
A schedule may be placed on a sheet just as any other view.
- It may be dragged from the browser and released on the sheet at the desired position.
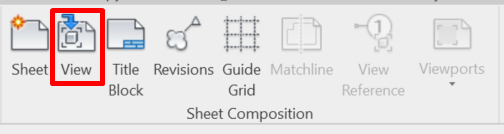
- Or it may be done from the “View” tab > “Sheet Composition” group > “View”:
Schedules can appear in more than one sheet and always with the same appearance in every sheet in which they are included. If the same schedule has to be added to different sheets with different graphics, it must be duplicated.
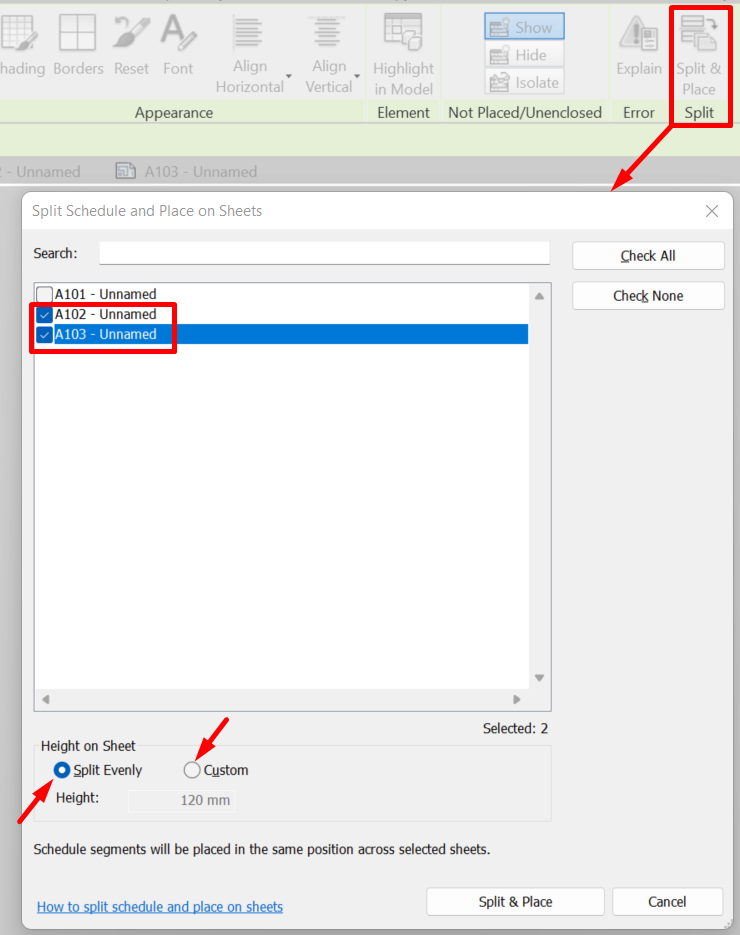
On the other hand, if we wish to split one schedule over multiple sheets, starting with a number of rows on one sheet and carrying it over to another one, we may use the “Split and Place” option, located on the “Modify Schedule/Quantities” ribbon, in the “Split” group.
With this option, we can select the sheets in which we wish to place the schedule, and we will choose either to split the table’s height evenly or in a custom way. The positioning of the schedule on the sheet is done by hand, and it will be placed on every sheet at the same spot.
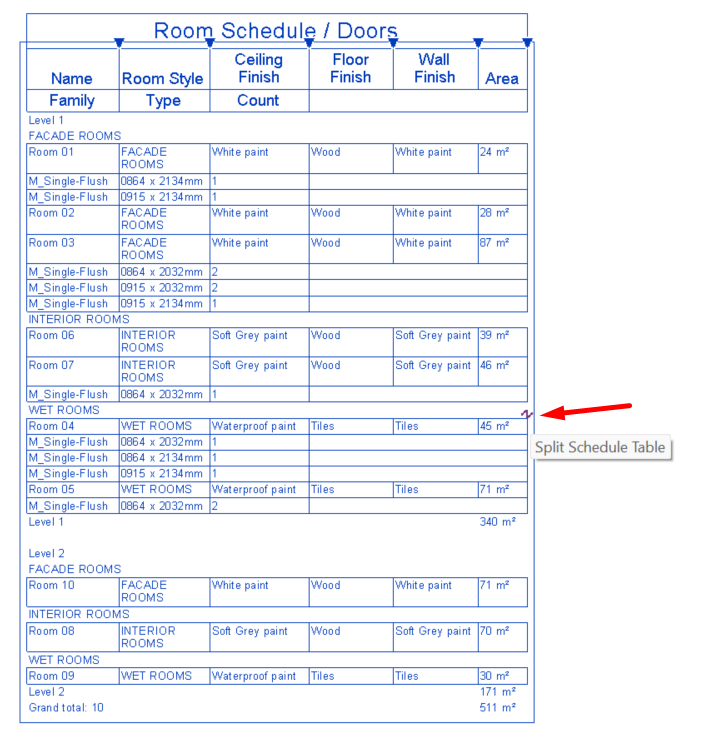
Schedules can be split within the same sheet if they are too long, by using the lightning-shaped symbol that we find midway down the table. We can split a schedule in as many parts as we need. By default, each part of the schedule that we create will show the original schedule’s title and headers.
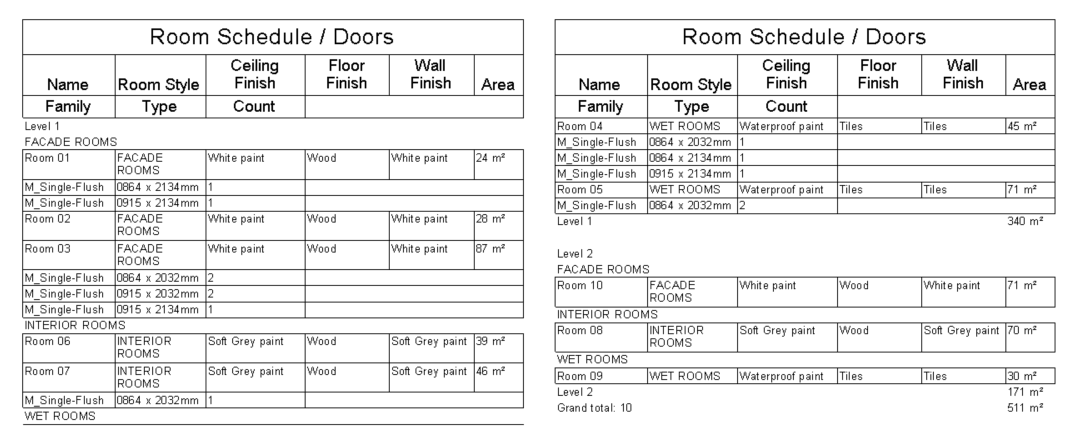
If we change the width or title in one of the columns, all the parts of the schedule will show that change.
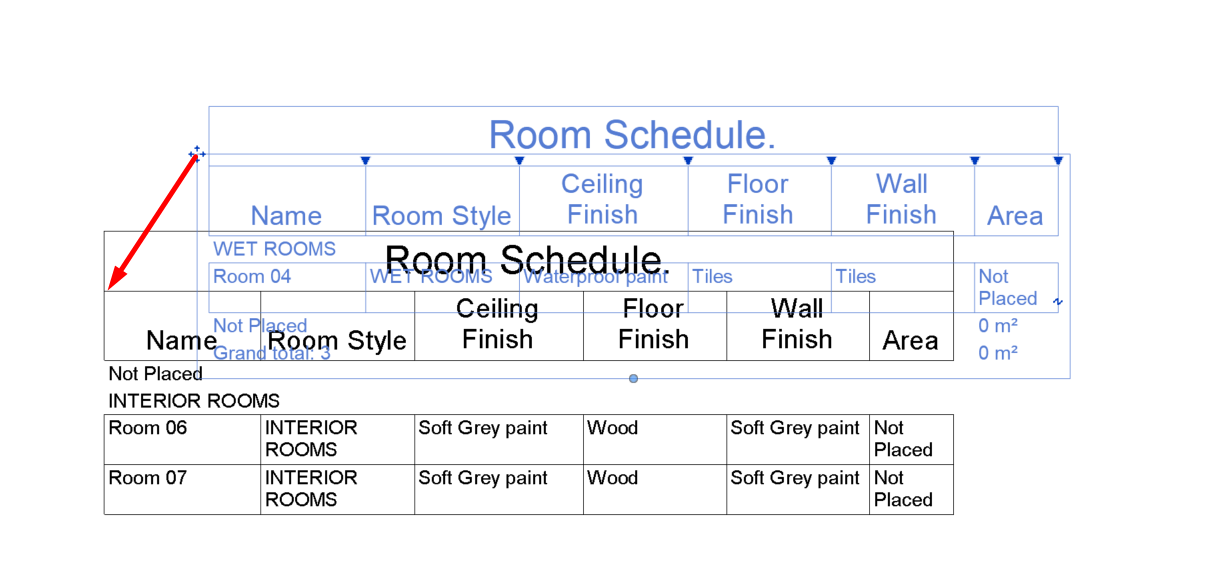
To join two parts of a schedule back together, all we have to do is drag one of them by the blue icon in the upper left corner and move it on top of the other part of the schedule. Releasing the mouse button will merge the two parts into one.
Lastly, to configure the schedule’s appearance on the sheets, it’s important to keep in mind that:
- Column width can be adjusted manually
- Row height cannot be adjusted. It depends only on the text’s size.
4. Exporting a Schedule
Schedules can be exported to .txt files, to be then opened with Excel.
To export a schedule, it should be the active view on our project. Them, from R > Export > Reports > Schedule
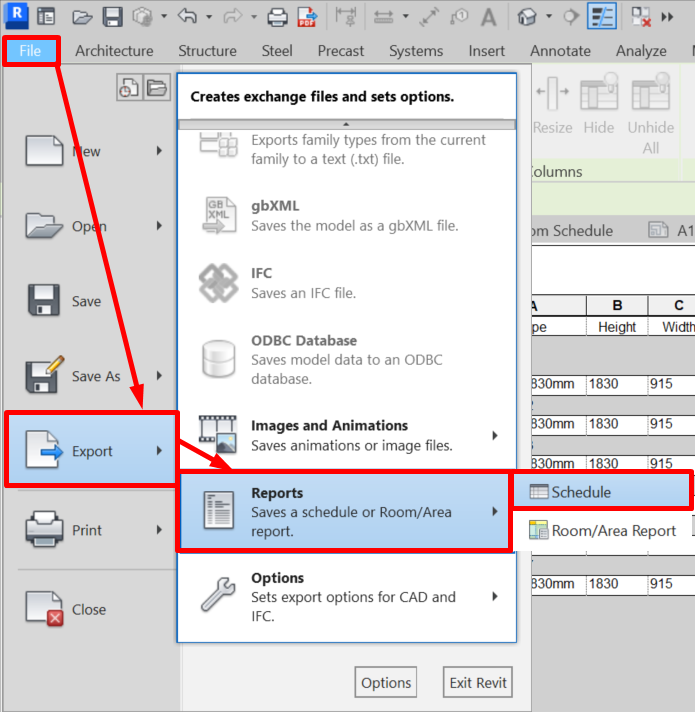
Schedules can only be exported one by one. To speed up the task, we may use Dynamo or special plugins like DiRoots.
Schedules can be added to a project template, and can also be copied from another file from the “Insert” tab > “Insert from file” > “Insert views from file”, or by using the ‘Ctrl+C’ and ‘Ctrl+V’ commands.
When exporting a schedule to .txt format, only the data is exported—not the functionalities (formulas).
Conclusion
BIM models are databases, and Revit schedules are one of the key tools that allow all this data to be managed in an orderly and clear way.
This tool’s bidirectionality (the correspondence between the ‘modelled element’ and its corresponding ‘table cell’) makes it one of the most powerful elements in Revit.
Any sound BIM practice will integrate the use of schedules in all the project stages, from basic modelling to mass data management. Thus, it is advisable to have clear notions about the schedule’s potentiality in each phase, be it in sheet management, measurements extraction, or project’s rooms control. This is why the role of BIM Manager is necessary: to keep a global vision of the project and supply the most efficient data management possible.
Schedules must keep improving their interface, appearance and development, so as to get closer to a true spreadsheet such as Excel or Google Sheets. An example of this is the inability of Revit schedules to use formulas directly in the tables, as we can do with any spreadsheet or even in the parameters settings of any Revit family.
To be able to create dynamic workflows with other softwares (Excel or Google Sheets) we need to use programming tools (Dynamo, Revit API, etc.) or external plug-ins (DiRoots), which makes it difficult for any person who isn’t specialised on the use of these tools.
Tips & Tricks
- Schedules help, not only in measuring and counting, but also in controlling the model. With schedules it’s easier to identify project or modelling errors.
A useful example is the door or window count in dwellings of the same typology; a schedule can help us clarify whether there are any duplicates of these elements.
- In order to export schedules and then be able to add functionalities in Excel, it is important to remember not to include the units’ symbols, so that Excel can recognise the values as numbers instead of text. Depending on the case, it may be advisable to duplicate the schedules: one with the units, to be shown on the sheets, and another one without them, to be exported into Excel.
- When clicking on a line or cell in a schedule, the element is automatically highlighted in the model. To visualise this, we may have the two views (element’s view and schedule) open side by side, or we may find the element in a view by clicking the “Highlight in Model” option, which is found on the “Modify Schedule/Quantities” ribbon, in the “Element” group.
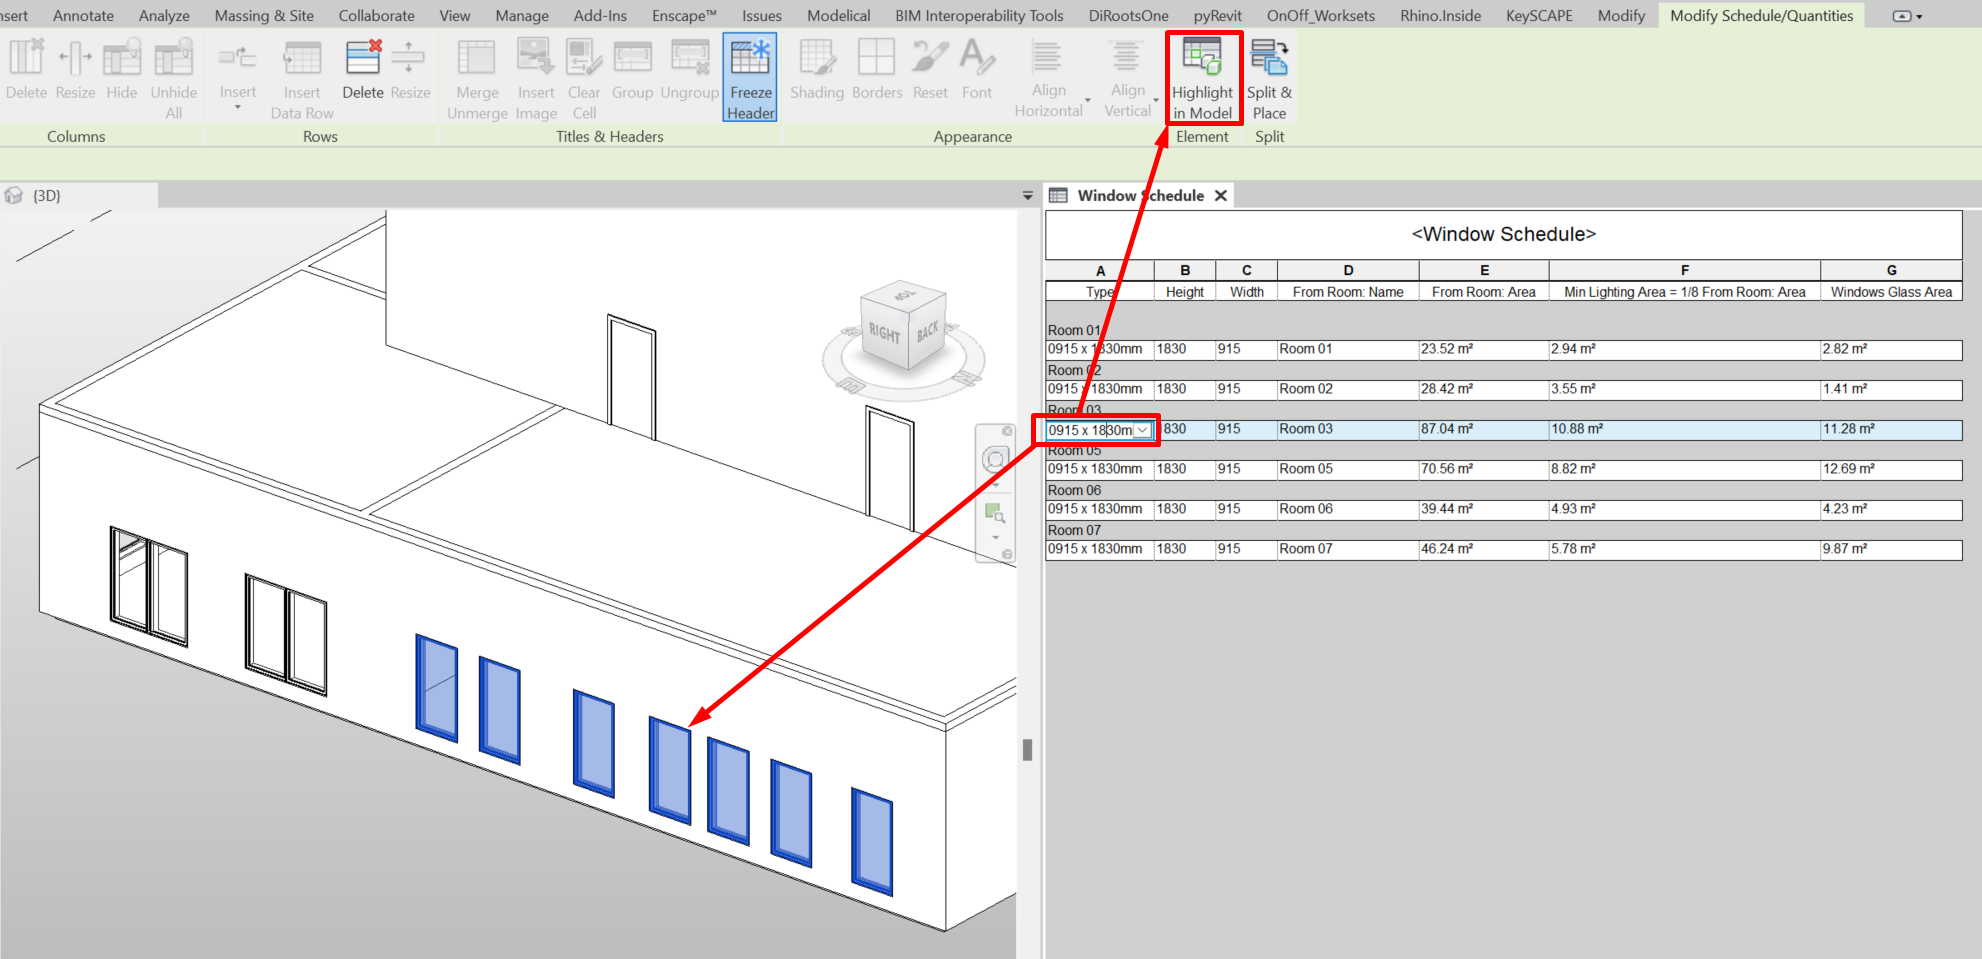
- We must keep in mind the difference between deleting a column and deleting a row. In the first case, on the “Modify Schedule/Quantities” tab, in the “Columns” group, we can stop displaying the field corresponding to the selected column. In the second case, however, in “Rows”, we would completely eliminate the row’s element or elements from the model.
- The rooms that are deleted in the model are kept in store without being completely deleted. Only through a schedule can they be definitely eliminated. A trick to visualise only the rooms that are not placed is to use the option “Isolate”, found on the “Modify Schedule/Quantities” ribbon, in the “Not Placed/Unenclosed” group.
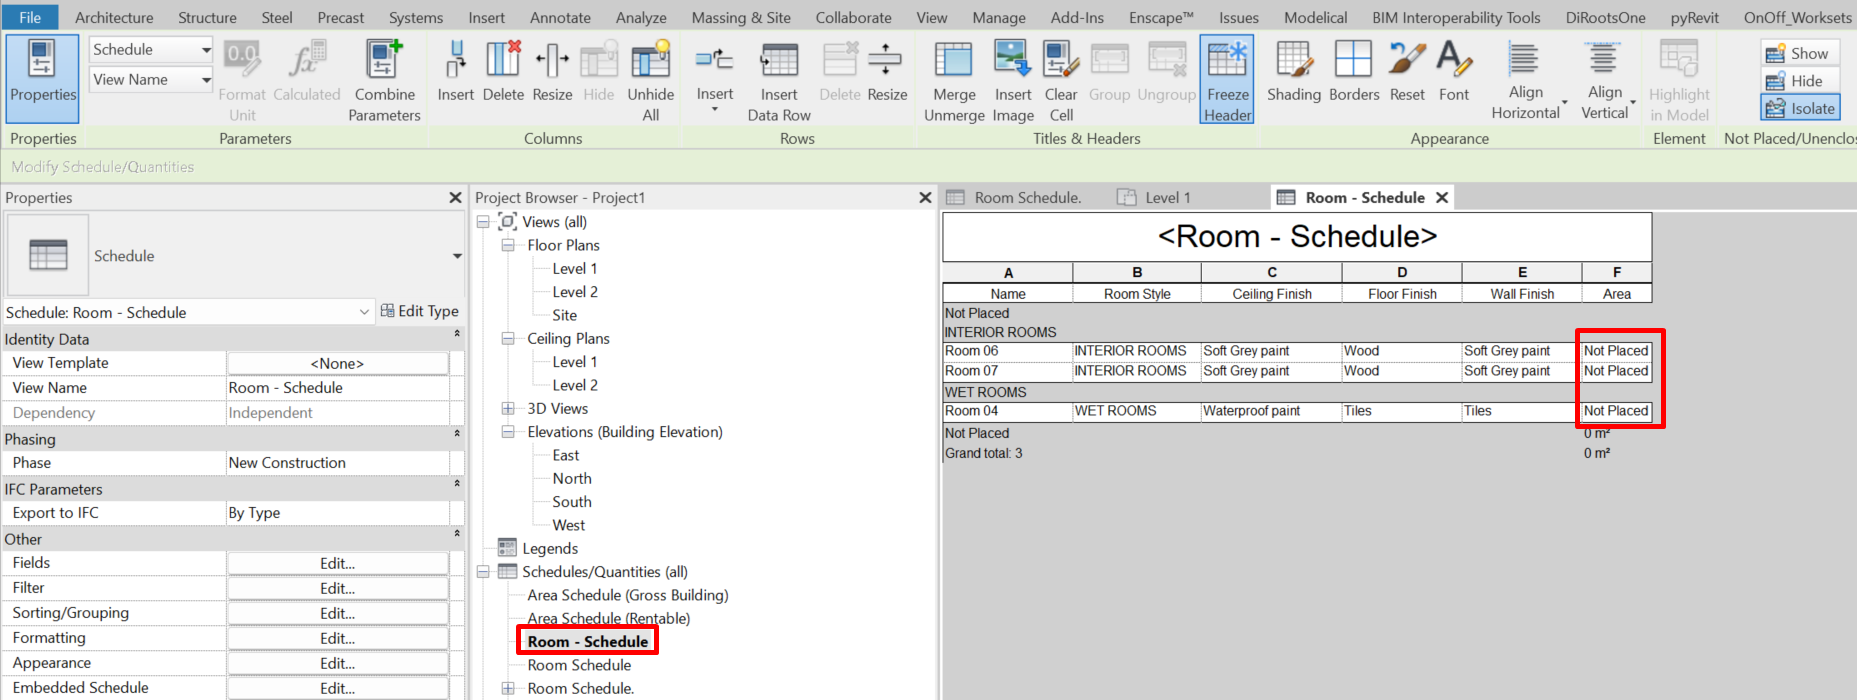
- Detail or model lines schedules cannot be created, but we can create a “Path of travel” with different line styles. We are able to list these elements on a schedule, and thus measure its complete length.
- Schedules do not allow for controlling Yes/No visualisation parameters of families such as titleblocks. But they do allow for management of other parameters, such as text.
- If we are not able to comfortably see a schedule on the screen because the text size is too small, we can zoom in or out by pressing Ctrl and using the mouse wheel.
References
- Parameters Guideline
- Electrical Modelling Guideline
- Key Schedule Guideline