

Model Parameters
Configuration in Revit
Model Parameters
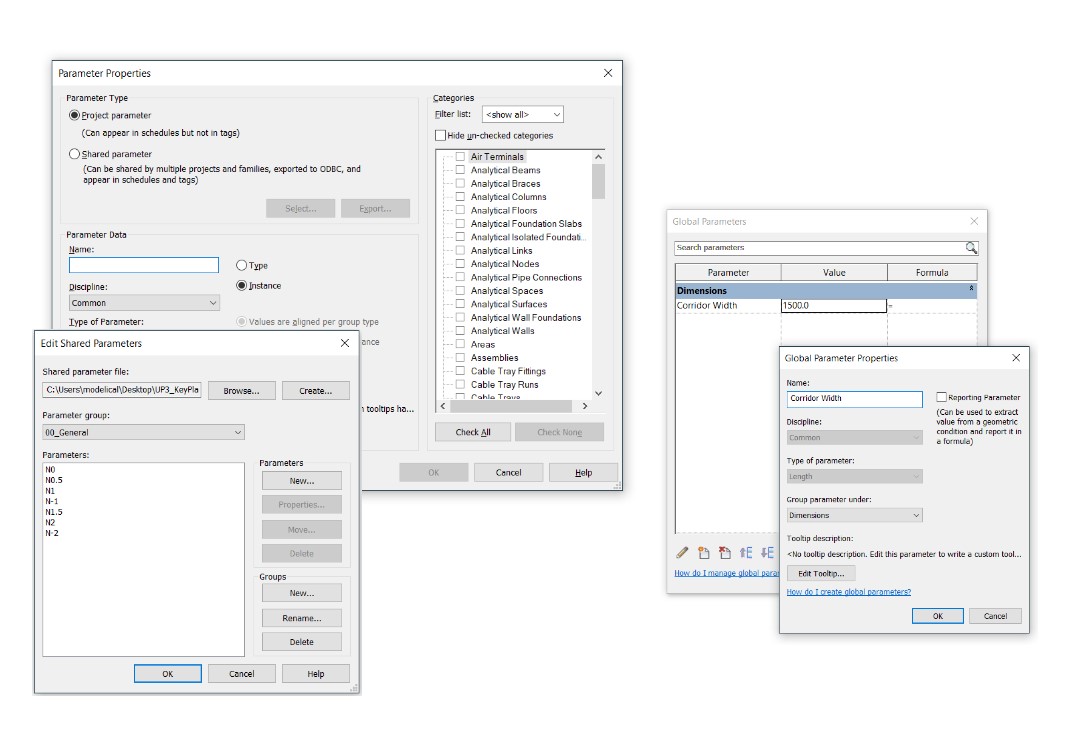
Objectives
- Understand what parameters are inside Revit models and families.
- Understand the difference between types of parameters in Revit models and families, and what are they used for.
- Be able to create a parameter with confidence, both in a model and in a family, and be sure that works for the intended future use.
- Be able to edit existing parameters and understand the possible consequences.
Prerequisites
- User has basic skills in BIM modelling with Revit Software, and understand the language used.
- User understands the data structure in models (category > family > type > instance).
- User has basic notions of parameterization.
Description
Parameters are properties of the elements that form the model, including not only model and annotation objects, but also views and sheets.
Every element in Revit has parameters, the name for its properties or attributes.
Parameters can be classified depending on who creates it and in which file they are saved. It is important to understand the difference between the types of parameters that exists or can be created because it is the key to use them properly and manage the information contained in the model in the best way.
Types of Parameters
Built-in parameters
The Built-in parameters, or OOTB (Out of the box) parameters are those that already exist in a file for elements when you start modeling, both in a project file or in a family file.
They are always available because they are the basic properties that objects have so that Revit can work with them. They cannot be changed nor deleted.
We will find these OOTB parameters both in project or family files, and as native parameters they can be tagged and scheduled.
In families some of them will appear directly in the family template. As said, they cannot be changed, nor deleted. But can be scheduled and tagged.
Some other family built-in parameters will be only available when the family is placed in the project.
WHO CREATES IT? | WHERE IS IT SAVED? | CAN BE TAGGED? | CAN BE SCHEDULED? | |
Built-in Parameters | Built-In | Project file Family file | Yes | Yes |
Project parameters
They are custom parameters that are added or created in a project file and they are saved in it. When creating a project parameter it will be added to every object of the selected categories.
Project parameters are specific to a single project file, and can be added to objects of the following categories:
- Model categories
- Analytical categories
- Views
- Sheets
- Project Information
(Please notice that project parameters cannot be created for annotation categories).
This kind of parameters will be used in project to include missing information both in schedules and for filtering, but they cannot be tagged. They add information but notice that actually cannot drive any properties of model elements.
WHO CREATES IT? | WHERE IS IT SAVED? | CAN BE TAGGED? | CAN BE SCHEDULED? | |
Project Parameters | Custom | Project file | No | Yes |
Family parameters
They are custom parameters that are created in a family file and they are added to control variable geometry relationships or other attributes in family.
Unlike project parameters, they are available only for the family in which they are created, and not in similar families of the same category.
This kind of parameters cannot be scheduled nor tagged, and can only accessed via project file to change family types/instances properties.
WHO CREATES IT? | WHERE IS IT SAVED? | CAN BE TAGGED? | CAN BE SCHEDULED? | |
Family Parameters | Custom | Family file | No | No |
Shared parameters
They are custom parameters that are a bit special because they are not saved in the project nor in the family. This type of parameters are stored in an external file that is called the Shared Parameter file (.txt)
When adding a project parameter or a family parameter you can choose to create it as a shared parameter, and this helps to avoid the limitation that those types of parameters have. This means that:
- They can be tagged
- They can be scheduled
- Same parameter can be used in multiple families.
- Their definition is protected from change (definition, not values)
WHO CREATES IT? | WHERE IS IT SAVED? | CAN BE TAGGED? | CAN BE SCHEDULED? | |
Shared Parameters | Custom | Shared Parameters File | Yes | Yes |
*Global parameters (since Revit 2017)
This new type of parameters were introduced in the Revit 2016 Release 2, but they have full functionality only from Revit 2017.
They are custom parameters that are created in the project environment. They are different from the project parameters because:
- When created they are not added to all elements in a category, but to specific properties (instance/type parameters) of specific elements.
- While project parameters only add information to objects, Global parameters are added to control variable geometry relationships or other attributes between model elements, to drive the value of a dimension or constraint, be associated to an element property to drive its value, or to report the value of a dimension, so the value can be used in the equations of other global parameters.
Summarizing it is the functionality of family parameters but in the project model environment.
When adding a project parameter or a family parameter you can choose to create it as a global parameter, and this helps to avoid the limitation that those types of parameters have. This means that:
- They cannot be tagged
- They cannot be scheduled
- Same parameter can be used in multiple elements.
- They can be used in formulas for other Global parameters
- They can be associated to some system and custom components instance/type parameters.
WHO CREATES IT? | WHERE IS IT SAVED? | CAN BE TAGGED? | CAN BE SCHEDULED? | |
* Global Parameters | Custom | Project file | No | No |
Notice that since the global parameters can be linked to project/family parameters, and project/family parameters can be created as shared parameters, we can end being able to tag global parameters through their link to shared project/family parameters.
See the following summary schedule:
WHO CREATES IT? | WHERE IS IT SAVED? | CAN BE TAGGED? | CAN BE SCHEDULED? | |
Built-in Parameters | Built-in | Project file Family file | Yes | Yes |
Project Parameters | Custom | Project file | No | Yes |
Family Parameters | Custom | Family file | No | No |
Shared Parameters | Custom | Shared Parameters file | Yes | Yes |
*Global Parameters | Custom | Project file | No | No |
Parameter definition
Parameters themselves have a set of properties to be defined:
Name
Name to be given to the parameter, it has to be descriptive enough to understand what the parameter is used for. It will have to meet the naming standards of the company or de BIM Execution Plan of the project.
- Is editable in Project/Family parameters
- Is not editable in Shared Parameters
Discipline
It is a drop-down menu with a set of disciplines. Depending on the discipline we can find different types of parameters.
Type
It is a drop-down menu, with a set of types pre-defined. Type of parameter is a very important property that has to be carefully selected according to the attribute of the object that will be controlling.
- Once selected cannot be changed.
- Units depend on the type of parameter
Type/Instance/Reporting
- TYPE: If we define a parameter as a type parameter, changing its value will affect all the elements that are defined by the same family type. When selecting an object, they can be found in the Type Properties Menu.
- INSTANCE: Changing an instance parameter value will affect only the selected object. Instance parameters can vary for every family instance. When selecting an object they can be found in the Properties Palette.
- REPORTING: A reporting parameter is a parameter type that has its value driven by a particular dimension in the family model. This means that the value is not user-decided but a reporting parameters extract a value from a geometric condition and use it to report the data to a formula or as a schedulable parameter.
Group parameter under
This is just a way to classify parameters in the Properties Palette or Type Properties Menu. Parameters will appear under the selected section.
Procedure
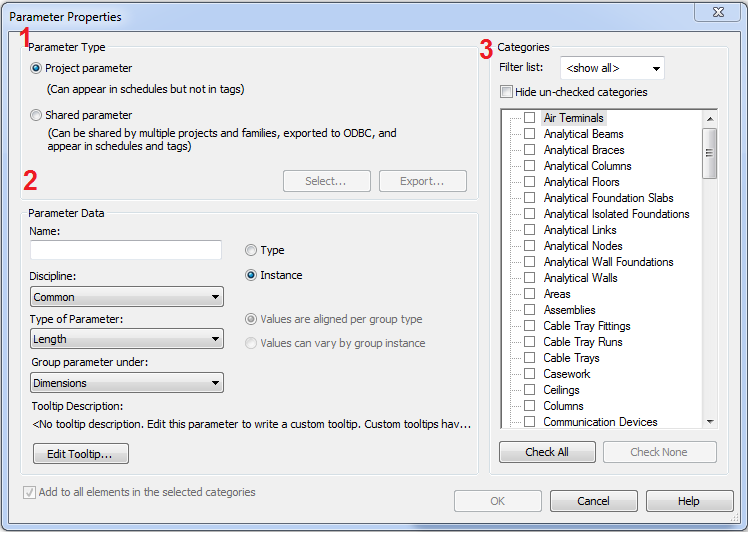
Create a Project Parameter
Project File > Manage Tab > Project parameters > Add

- Select Project parameter option
- Define parameter data
- Select categories
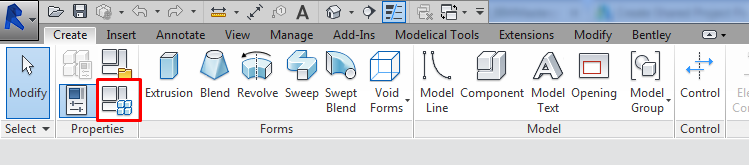
Create a Family Parameter
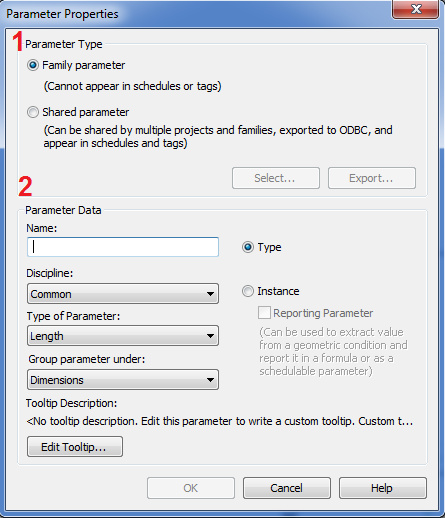
Family file > Create tab > Family Types menu > Add
- Select Family parameter option
- Define parameter data
Create the Shared Parameters File
Create
Project/Family File > Manage tab > Shared Parameters
In the menu that will appear we will find two sections.
- Shared parameter file:
- You can create a new file by clicking “Create” and saving it with a name in a selected location
- You can map the path to an existing shared parameters file
- The lower section is like accessing the text file from our revit file.
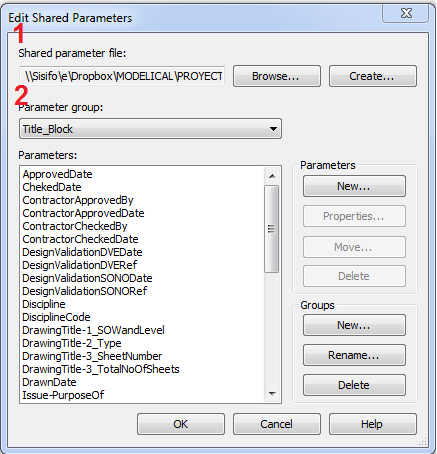
Once you create a Shared Parameter file and map the path from the revit file, it will be used in every session the user opens with the software in his machine, no matter what file you are editing.
Manage the Shared parameter file
Notice that to have the Shared Parameter File is important in order to create the parameters, but it is not necessary for the families or the models to work properly.
An optimal procedure would be to have:
- A common Shared Parameters File that contains general parameters included in the office BIM standards.
- A Shared Parameters File per project. It will be a copy of the common file and then will contain specific project shared parameters.
If we open a Shared Parameter file we will see a warning: “Do not edit manually”
So, if possible, we will follow the recommendation.
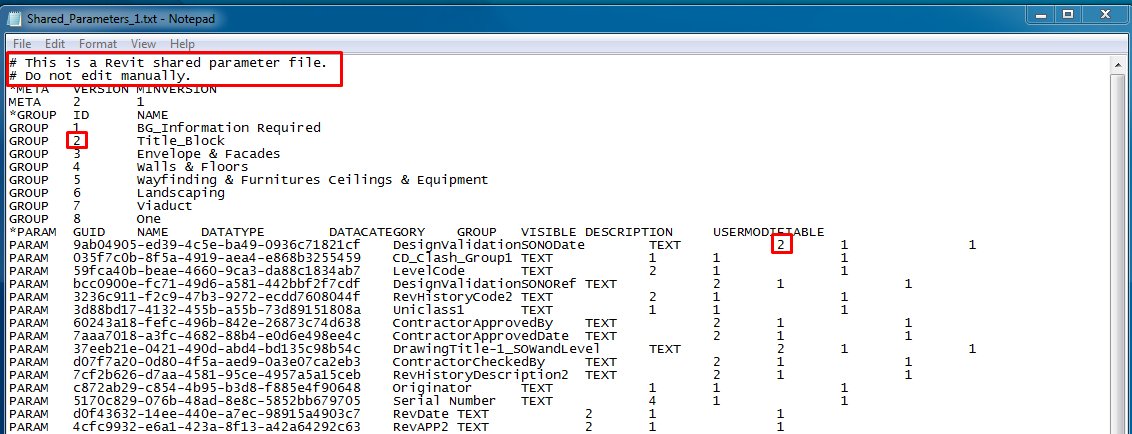
In some cases we will want to transfer parameters from one file to another, and this is possible by exporting the parameters to the new file:
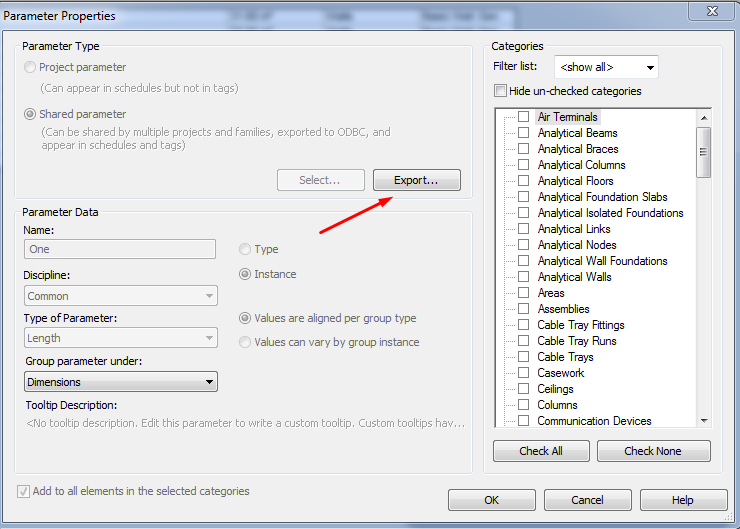
This being a useful procedure if the parameters to transfer are only a few.
If we have to condense various Shared Parameters files into one, then we will have to ignore the warning about not editing them manually. But then we will have to pay attention to codification used in those text files.
Create a Shared Parameter
Project/Family File > Manage tab > Shared Parameters
It is assumed that the shared parameters file has already been created and its path its mapped to access it from the active Revit file.
- In the lower section of the menu, first create a Group if there is not any, and give it a name. Or choose a group in the drop-down menu. Groups are just a way to organize parameters and put some order in the Shared Parameter file.
- Click Parameters > New and define the parameters data as usual.
To this point would be the procedure just to create the shared parameter in the shared parameter file.
After having created the shared parameter in the external file it will be available to be added as Project or Family parameter, following the same procedure as described before, but choosing the “Shared Parameter” option.
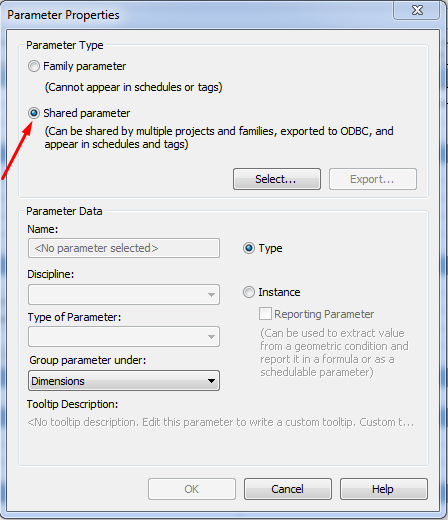
Since the parameter exists in the Shared Parameter file, you only have to choose it, and the parameter data will be populated automatically, except for:
- Group parameter under
- Type/Instance/Reporting
*Create a Global Parameter
(Remember, only for Revit 2016 R2 and following)
In project file >Manage Tab > Global Parameters
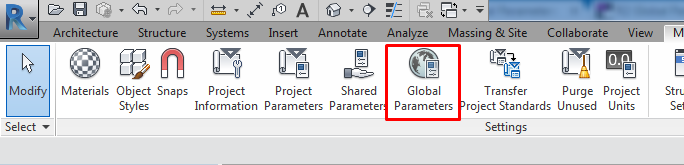
- Select Family parameter option
- Define parameter data. This is all similar to any parameter creation.
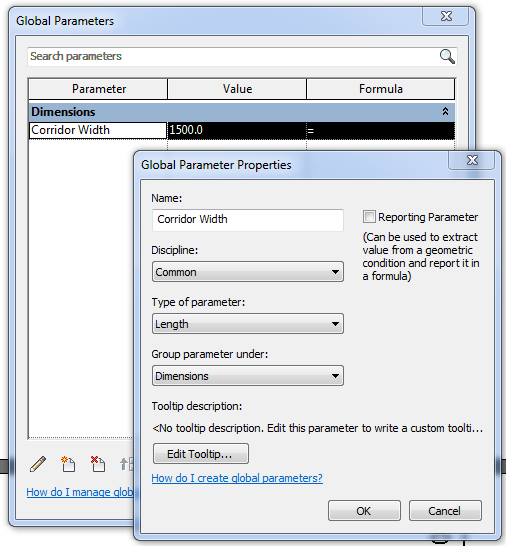
- Assign it to a dimension in model to restrict for example some distances. In the sample we will control the width of all corridors in project with the same global parameter.
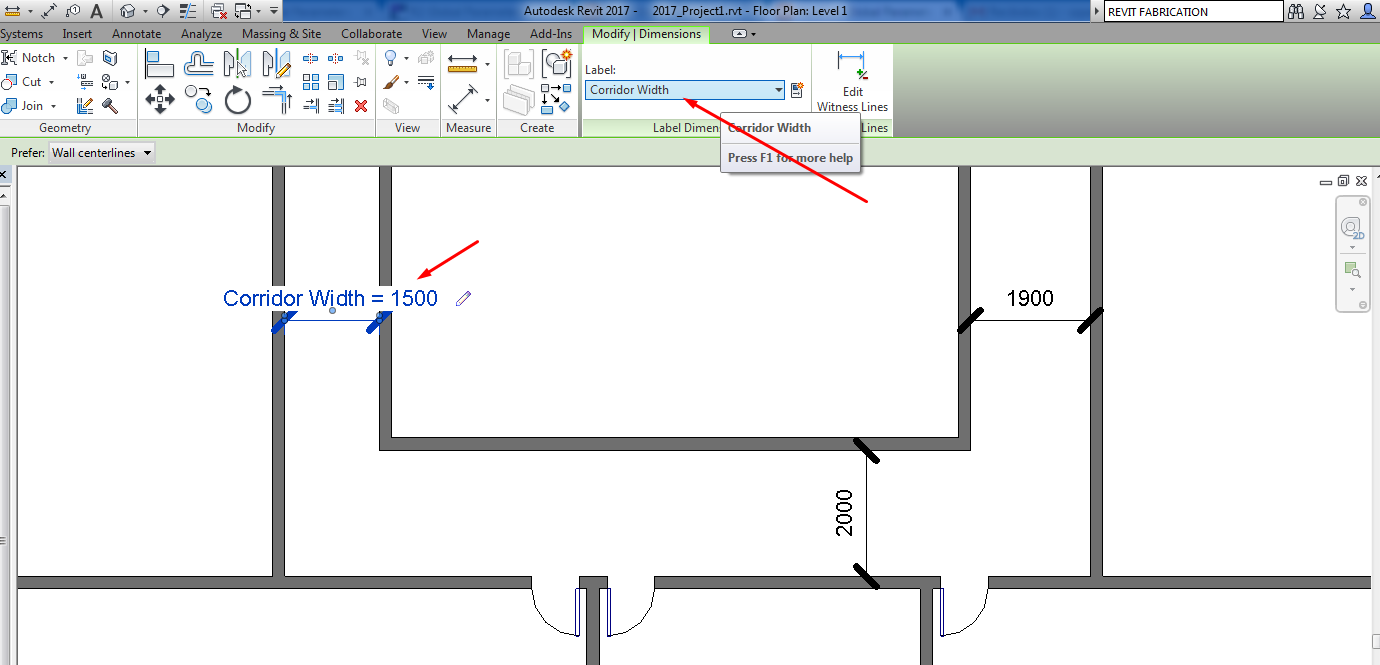
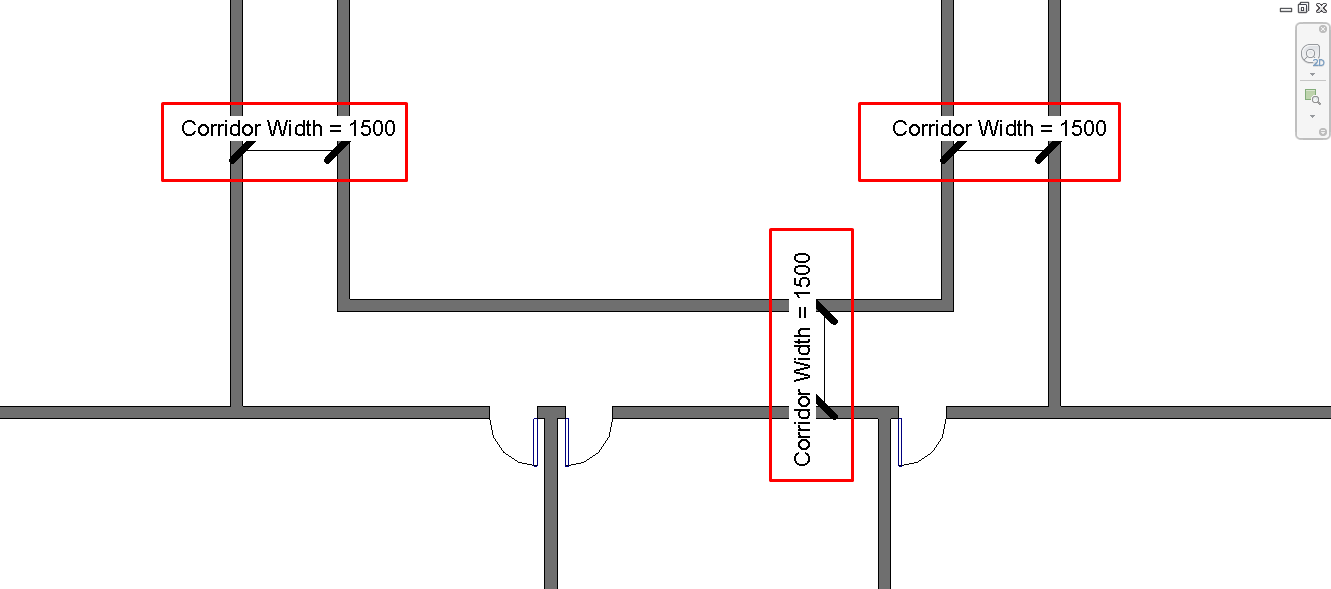
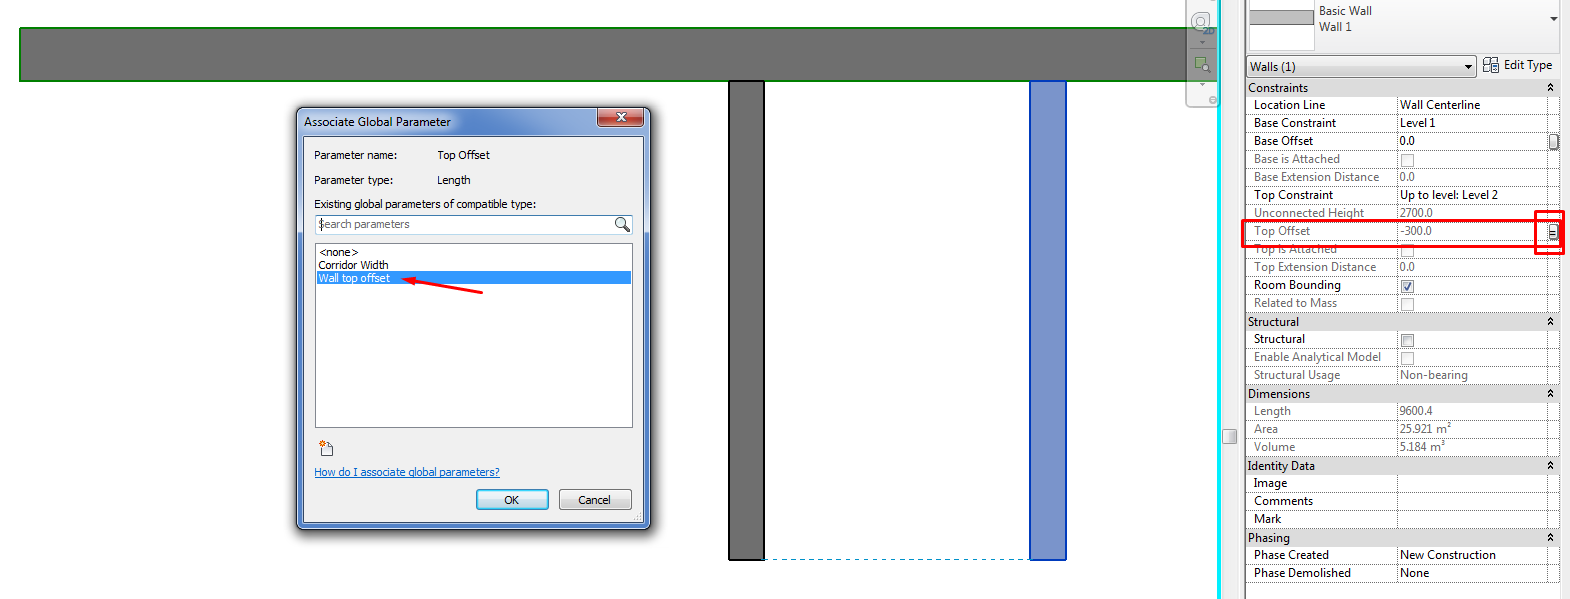
- Or associate it with an object instance parameter: here an example of how we can control the top offset of all the walls in a level with the same global parameter.
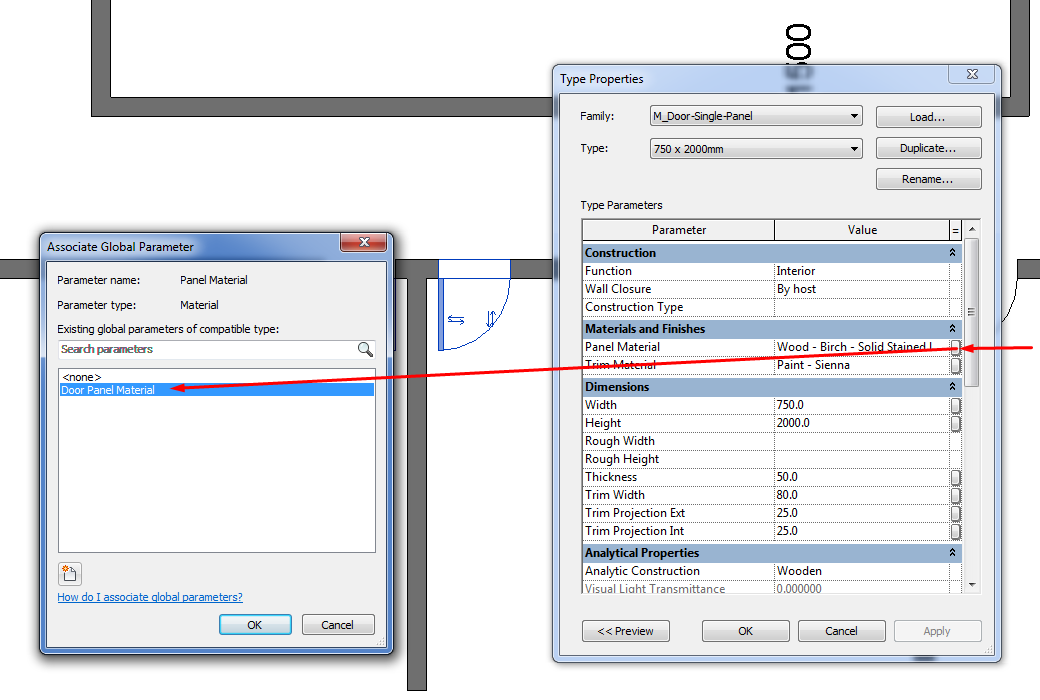
- Or associate a global parameter to a family type parameter. We could for example control the material for all the doors in a project with the same global parameter:
Tips&Tricks
- It is important to distinguish between a parameter and the given value of a parameter.
- If there is any chance that a custom parameter will have to be tagged or scheduled, create it as a shared parameter (no matter if project or family parameter).
- If the same parameter will be used across multiple families, create it as a shared parameter.
- When having made changes to a family, it has to be loaded again into the project to update the changes. At that point, a window will prompt asking a question:
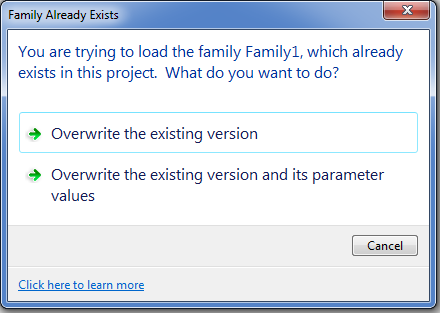
- Overwrite the existing version will mean to update the family, its new parameters, new configuration only. No changes in parameters values inside the project.
- Overwrite the existing version and its parameter values will mean to update the family and to override the values of the parameters that were already stored in the project with that coming from the family, thus causing sometimes unexpected changes in the model.
- If in a family widely used in a project a parameter was created as a family parameter and later we want to be able to schedule or tag it, we will have to transform it to a shared parameter.
- If we delete it and recreate it as a shared parameter, we will have to assume that when we re-load the family into the project, the existing information about that parameter in the model will be lost.
- If we replace the family parameter with a shared parameter by editing it, no matter if the name is exactly the same, but values in parameters will be reset as well.
- So, we can create a shared parameter and link it to the value of the existing family parameter so that we don´t lose the information in the model. Linking the value will consist in using the formula option in the family, and make the shared parameter equal to the existing family parameter.
- If we created a project parameter and later we want to be able to schedule or tag it, we will have to transform it to a shared parameter.
- If we delete it and recreate it as a shared parameter, we will have to assume that the existing values of that parameter in the model will be lost.
- The only way to not lose that information is to:
- extract it (maybe via dynamo?)
- Only then delete the parameter and recreate it as a shared parameter
- Reintroduce the values we had previously stored.
- * With Global parameter we can filter a schedule by parameters that have GP associations, which could be invaluable for tracking down all those associations that are making changes (sometimes unexpected) to the model
- * Try to have a set of views for placing restrictions through global parameters. Thus it will be easier to keep track of the constraints that placed and are affecting the model.
Bottom-line
- Parameters and the customization of information in BIM Models is one of the most powerful features.
- Because of that is very important to understand the processes to add correctly new properties to objects, in order to be able to work later with that information.
- Properties or attributes are called Parameters in Revit BIM Models.
Suggested Exercise
Exercise 1
- Use rac_basic_sample_project.rvt
- Add one or several parameters to the rooms:
- Illuminance level (lux)
- Is rentable? (yes/no)
- Level of access (int)
- List the rooms with their parameters
- Add any of above as shared parameters.
- Tag the rooms including the shared parameters.
- Prepare a door or lighting fixture schedule that includes room information.
- Use color schemes to adjust different views following any of the parameters above. Explore by range and by value options.
- Export the schedule to Excel.
Exercise 2 (Global Parameters 2017)
- Create a very simple L shaped layout with a central corridor and rooms on both sides.
- Create a parameter for the Room Width. Set it to 3m.
- Create a parameter for the Room Length
- Create a parameter for the corridor Length. Set it to 1m.
- Make the Room Length 2.3 times the Room Width
- Apply this rules to the layout
- Change the Room width to 2 meters
- Create the floor above, make it 200mm thick
- Adjust the top offset of walls to meet the floor (without attaching it).
- Create a parameter to make it parametric the top offset of walls
- Change the floor thickness to 250mm
- Place rooms
- Tag it with the area and total occupancy, if ratio is 1 pax/3m²
Brilliant article. Hope more such guides are published regularly.