

Worksharing
Configuration in Revit
Worksharing. Collaborative Work
Objectives
- Understand that collaborative work implies that every user works against the same file, that is, a common repository, and not with independent and fragmented files.
- Understand the need for better team coordination, to distribute work in a proper way so that work from different users does not overlap or contradict.
- Understand in depth how worksharing works in Revit, and make sure every user is able to work firmly and without doubts that changes will be correctly saved and they won’t interfere with other users.
Prerequisites
- User can navigate through Revit files.
- User has basic skills in BIM modelling with Revit Software, and understands the language used.
- IT Infrastructure (servers, local PCs, access to servers) works properly.
Description
When working with Revit BIM Models, users involved on a project are meant to work in a collaborative way, all of them with the most updated information or model at every moment.
In Revit we can work in stand-alone files, when nobody else is going to edit a model. But when working in teams, the worksharing option can be enabled so that several users can edit the model simultaneously, although they will be saving different portions of the project.
The main principle is that there will be a Central Model saved in the server in a location that is accessible to all the project team members. The central model has to be created saving the file in a specific mode.
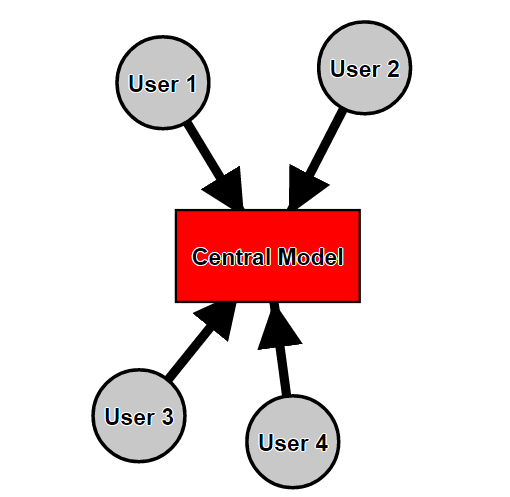
After creating the central model every user that has to edit the project model will create a mirror copy of the central model that will be saved as a local file in the user PC.
Central and local files are going to be connected constantly, receiving and sending information so that there are no incompatibilities in information that every user is editing.
- Central Model: This will be the central repository of information, this means that it is the PROJECT FILE. This should be the file that contains the most updated version of the model. Users will exchange their work saving their changes to this special file, that will serve as central node of interconnection. It will be the distribution point for receiving and publishing information from and to the users of the team.
- Local files: they are only local mirror copies of the central model. They contain the same information as the central model, except for when it is not fully updated because users are editing and have not synchronized their file yet. Users can work in their local file and save only locally, or they can choose to publish their changes and receive information from the central file by synchronizing.
Procedure
1 User settings
Before starting to work in a collaborative model users should set correctly some of the general options in Revit.
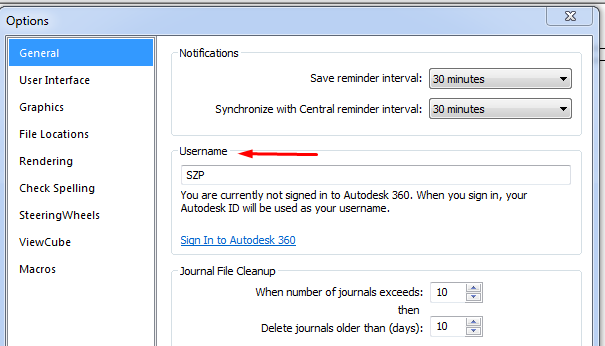
Revit main menu > Options > General > User name
User name: this will allow the users to identify each other when working in the same project, to ask and grant permits to edit elements in model.
If the user has logged in to his Autodesk Account, the username will be set automatically as it is in that account.
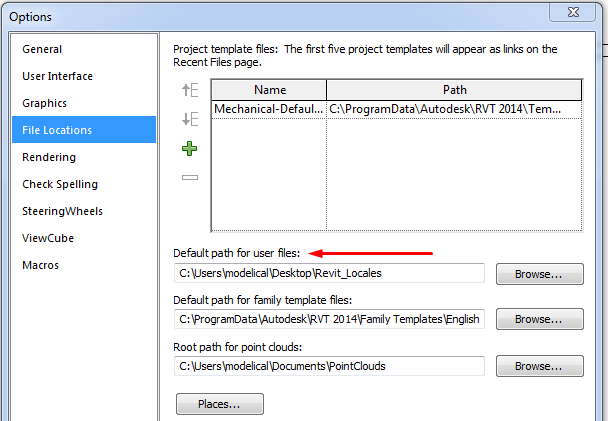
Revit main menu > Options > File Locations > Default path for user files
Default path for user files: map this path to have the local files saved in the selected location in your local PC.
2 Enable Worksharing
To start working collaboratively the worksharing option has to be enabled in the file.
This option will be enabled the first time we open the Workset menu (See Worksets Guideline).
Since Revit 2017 version we have to carry out a previous step, choosing between “Collaborate within your network” or “Collaborate using the cloud”.
Collaborate tab > Manage Collaboration Panel > Collaborate
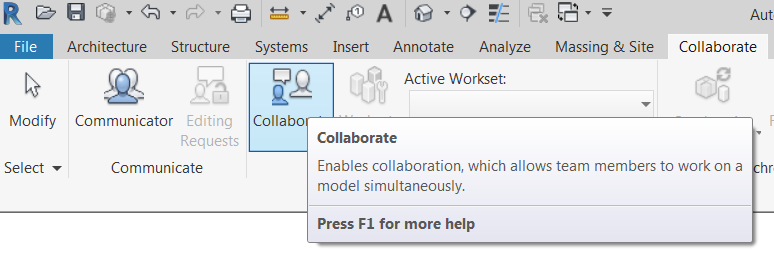
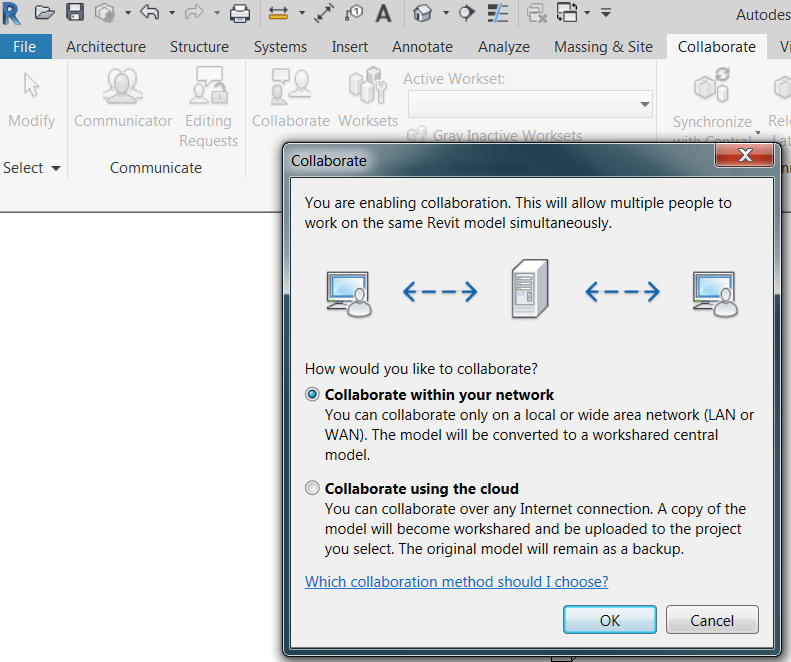
Once we have selected one of the two options we can start configuring the worksets.
Collaborate tab > Manage Collaboration Panel > Worksets
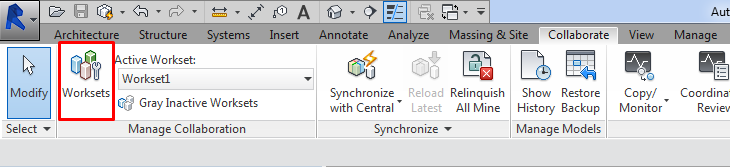
The first time this option is chosen a dialog will pop-up to set up the initial sharing of the project. The file that is being changed will become the Central Model.
First thing that will happen is that worksets will be created automatically (See Worksets Guideline):
- Two model worksets (User-created worksets):
- Shared Levels and Grids
- Workset1
- System worksets:
- One workset per view in model
- One workset per family in model
- One workset per project settings item
Click Ok, and exit the Worksets menu.
3 Create the Central File
The Central file is created the first time you save the project after sharing it. This file stores the current ownership information for all the Worksets in the project.
- Enable worksharing
- From the File menu, choose Save As or Save.
- In the Save As dialog box, give the file a name and directory location. Choose the ‘Options’ button and ensure that the “Make this the Central Model after save” option is automatically selected. This option is always automatically selected for the first save after Worksets have been enabled.
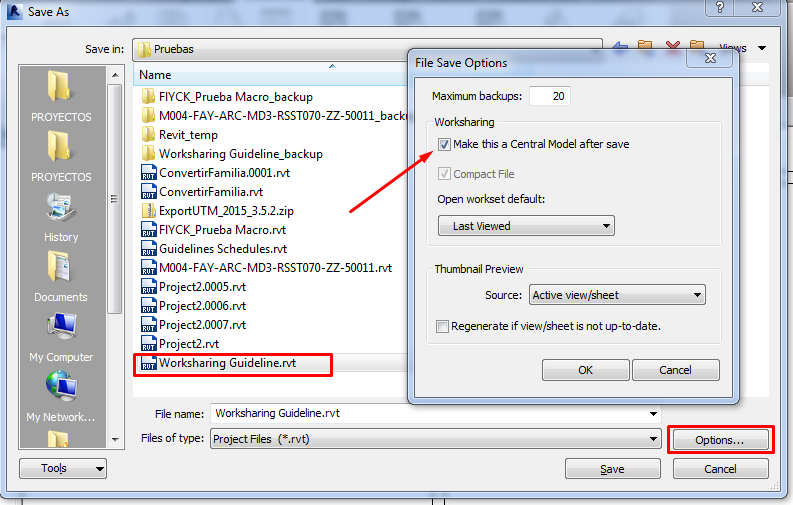
- Click Save. The project now has a Central file.
- Open again Worksets menu to manage ownership of worksets.
- Synchronize again.
- Relinquish the file (Collaborate tab > Synchronize panel > Relinquish all mine)
- Close the project file.
4 Create a local file
All users should save their own local copies of the Central file. You can create a local copy by doing the following:
- Open Revit.
- Choose open project
- Look for the central file and select it.
- Make sure that the “Create New Local” option is checked.
- Open the file.
This will create a local file in the selected location, and it creates a directory with your project name followed by “_backup”. This directory contains the backups for your local file.
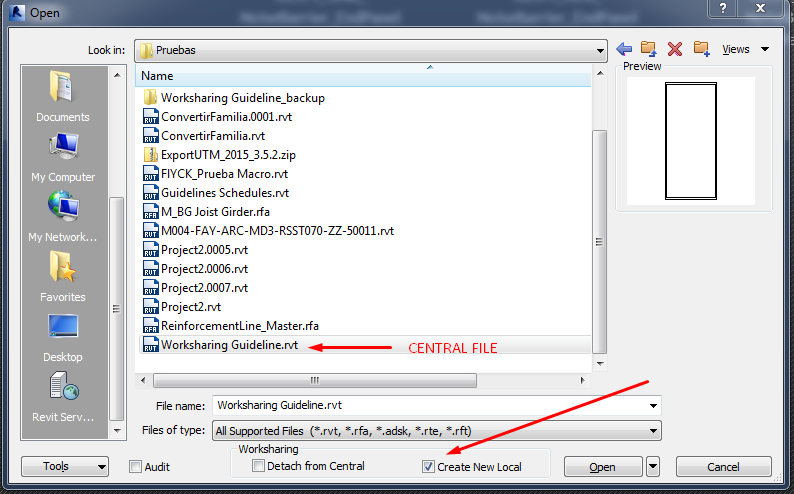
When you create or open a local file of a shared project, you will be able to save the changes in the model in two different ways:
- Save: this saves changes to your local file for safekeeping before you publish it back to the rest of the team. Use the save reminders available in the general settings of the file to make sure your work is saved regularly.
- Synchronize with Central: this publishes work by saving your changes back to the Central file.
- The Synchronize with Central now will Save to Central without further dialog.
- The Synchronize and modify settings will give you a dialog box where you can select what you want to relinquish when synchronizing.
- Reload Latest to see the changes of other users without sending any of your editions.
5 Edit a workshared file
After a project is shared, a user can only make changes to Worksets or Elements that are editable by that user, or to elements in Worksets that are not editable. (See also Worksets Guideline).
Worksets can be Editable: They will have an owner, and only that owner can edit the elements contained in that particular workset. Each Workset can only be owned by one user at a time.
Worksets can be Non-Editable: They do not have an owner, they will have successive borrowers that can edit any element contained in this non-editable worksets just by selecting and editing them. Element borrowing is currently transparent and automatically assigns ownership of an edited element to a user until his next “Synch with Central” makes the edited elements available to all other users of the model.
While the capability to check out a workset remains valuable under certain circumstances, in general the best practice is to use element borrowing rather than checking out entire worksets.
- Users will then synchronize regularly to be sure that all their changes are saved in the central model, and that every other user receives the most updated information about other changes in the model.
- Users should synchronize and relinquish all their elements before closing the local files.
- Revit prevents two users to be editing one element at the same time
6 Move or rename a Central File.
Central files are very sensitive. If they are moved from their original location (where they were first saved) or even renamed, they will stop being a Central file. This means that any local files that were working against it will lose the connection and will not be able to synchronize with the central file.
Central file can be moved or renamed, but taking some precautions:
- Make sure all team members publish their work to the current central file location by choosing Synchronize with Central from the File menu. This ensures that no work is lost as a result of changing the central file.
When saving, have each team member relinquish their Worksets by checking all options to relinquish Worksets after saving - Move the file to the new location. Or rename the file.
- Open the file you just moved or renamed. You will get a dialog telling you that the central location has changed. Dismiss this dialog and continue.
- From the File menu, choose Save As to re-save the file over itself (using the same name and path), ensuring that you select the Make this the Central location after save option under the Options button.
- What you have now is a new central file with most Worksets not editable (some Worksets may still be editable by the current user).
- Since all the work has been published, each team member should create a new local file.
Same procedure should be followed if out of necessity we have to make a central file from one user local file.
7 Detach a file from the central
There may be times when you want to open the central file without worrying about permissions or being connected to the live database.
Or times when it is needed to start a new project taking an existing one as a base.
In this cases what we have to do is to follow a different procedure:
- Open the workset file with the “Detach from Central” option selected.
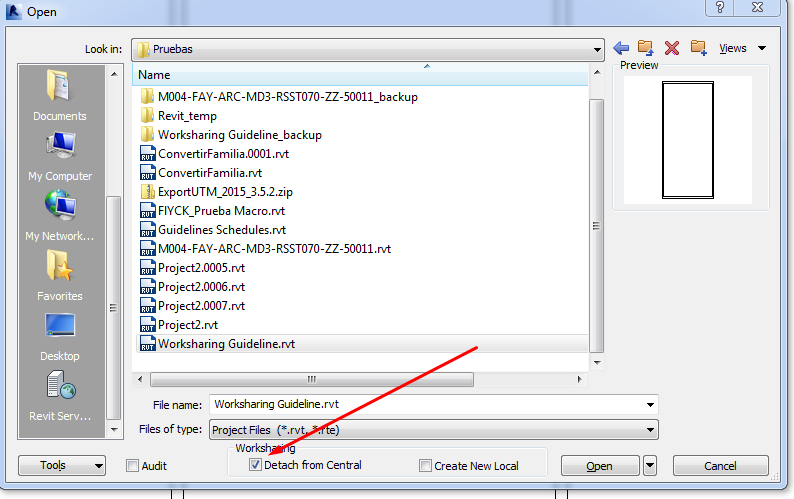
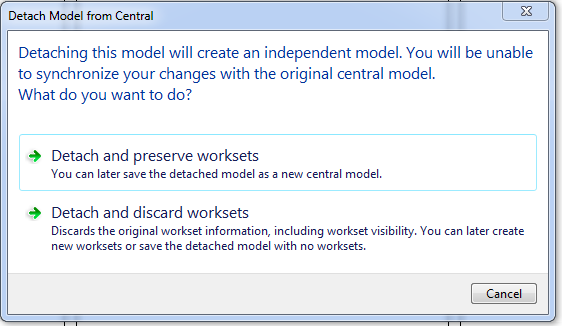
- The file is opened in a state where it no longer remembers its own path, its central path, nor any permissions. It acts as though it is a newly created file. Shared or not shared (stand-alone) depending on which option we take:
- Detach and preserve worksets: file keep existing worksets, and can be saved as a new central model.
- Detach and discard worksets: worksets will be deleted, and worksharing disabled. File will be saved as an stand-alone file.
Tips&Tricks
- It is recommended to use the element borrowing workflow rather than checking out entire worksets, but when working in some collaborative platforms such as Project Wise (Bentley) it is advisable that each user checks out a workset to work on it, even though objects are later moved to other worksets in the project.
- When linking, always link central files (not local ones).
Central File
- It is not a good practice to work in the Central File, users should have their local files and work in them. If strictly necessary, open the central file only when no other user is editing it through a local file.
- Don’t move or rename a central file while it is being accessed by users through their local files. When doing it, do it carefully.
- Audit and compact central file frequently.
Local File
- Users should have their local files and work in them.
- Users should synchronize and relinquish elements before closing their local files. Otherwise they can be leaving elements locked for editing.
- “Sync with Central” operations can be accelerated by a preceding “Reload Latest” command.
- Close all windows except one, and “Sync with Central” from the remaining view.
- Users should create new local files every day. It is easier and faster to do so than to try to reload changes from the central file.
- Unlike central files, local files can be moved to other locations and renamed without any further concern.
Bottom-line
BIM Models force the need to work collaboratively.
This need affects the access to models that become central and common repositories where every user saves their changes or additions to the project.
In Revit this results in the use of shared files:
- Central file: repository
- Local files: files for user edition.
No encuentro el botón “colaborar”
Buenas Claudia, si no te aparece el botón en el lugar que debería estar (tab “Colaborar”, al lado de “Subproyectos”) asegúrate de que es un modelo creado de cero en local, si es así, siempre debes tener la última actualización de la versión de Revit que estás usando (puedes acceder a ella a través de Autodesk Accounts > Product and Services > Updates), parece que ha dado problemas en algunas versiones, si ya lo has hecho y aún así no te aparece te recomiendo una nueva instalación de cero. Si el modelo está compartido en la nube no te va a aparecer nunca y si te aparece el botón “colaborar en la nube” es porque el proyecto ya tiene activado el worksharing. Coméntanos si lo has solucionado.
Un saludo
Buenos días, me parece una información muy útil, soy de Bolivia donde aún la metodología BIM es prácticamente nula en su aplicación, quería saber si podrían subir un video o compartir uno ya existente. Muchas gracias y buen trabajo.
Hola Héctor, gracias por tus comentarios. ¿A qué vídeo haces referencia?
Un saludo.
Si he eliminado niveles de mi archivo local y quiero volver a agregarlos, cómo se haría esto porque cuando creo niveles o los copio no los reconoce como vistas.
Una vez creados los niveles debes volver a crear las vistas de planta asociadas desde el menú View > Plan View > Floor Plan